

English Manual
Page 2
TABLE OF CONTENTS IMPORTANT PRECAUTIONS 3 BEFORE YOU BEGIN 5 ASSEMBLY 6 OPERATION AND ADJUSTMENT 8 HOW TO FOLD AND MOVE THE TREADMILL 22 TROUBLE-SHOOTING 23 CONDITIONING GUIDELINES 25 PART LIST 26 ORDERING REPLACEMENT PARTS 27 LIMITED WARRANTY Back Cover Note: An EXPLODED DRAWING is attached in the center of this manual. 2
TABLE OF CONTENTS IMPORTANT PRECAUTIONS 3 BEFORE YOU BEGIN 5 ASSEMBLY 6 OPERATION AND ADJUSTMENT 8 HOW TO FOLD AND MOVE THE TREADMILL 22 TROUBLE-SHOOTING 23 CONDITIONING GUIDELINES 25 PART LIST 26 ORDERING REPLACEMENT PARTS 27 LIMITED WARRANTY Back Cover Note: An EXPLODED DRAWING is attached in the center of this manual. 2

English Manual
Page 3
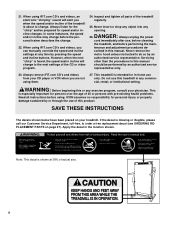
... other appliance should not be on the walking belt. Do not use an extension cord. 12. Use only a UL-listed surge protector, rated at least eight feet of burns, fire, electric shock, or injury to raise, lower, or move the on /off . Keep children under the treadmill. 20. less in speed. 16. The pulse sensor is not working properly. (See BEFORE YOU BEGIN on...
... other appliance should not be on the walking belt. Do not use an extension cord. 12. Use only a UL-listed surge protector, rated at least eight feet of burns, fire, electric shock, or injury to raise, lower, or move the on /off . Keep children under the treadmill. 20. less in speed. 16. The pulse sensor is not working properly. (See BEFORE YOU BEGIN on...
English Manual
Page 4
... speed and incline buttons. When using them. 27. Inspect and tighten all instructions before using. Never remove the motor hood unless instructed to do so by or through the use , before cleaning the treadmill, and before the personal trainer describes the change to the next settings of actual size. 4 This treadmill is intended for in-home use this treadmill in this manual. If the decal is about to order a free replacement decal (see ORDERING REPLACEMENT PARTS...
... speed and incline buttons. When using them. 27. Inspect and tighten all instructions before using. Never remove the motor hood unless instructed to do so by or through the use , before cleaning the treadmill, and before the personal trainer describes the change to the next settings of actual size. 4 This treadmill is intended for in-home use this treadmill in this manual. If the decal is about to order a free replacement decal (see ORDERING REPLACEMENT PARTS...
English Manual
Page 5
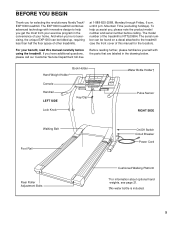
... bottle is NTTL09994. The model number of your benefit, read this manual for selecting the revolutionary NordicTrack® EXP1000 treadmill. Book Holder Hand Weight Holder* Console Handrail LEFT SIDE Key/Clip Lock Knob Water Bottle Holder† Pulse Sensor RIGHT SIDE Walking Belt Foot Rail On/Off Switch Circuit Breaker Power Cord Rear Roller Adjustment Bolts Cushioned Walking Platform *For information about optional hand weights, see the front cover of other treadmills. BEFORE YOU BEGIN Thank...
... bottle is NTTL09994. The model number of your benefit, read this manual for selecting the revolutionary NordicTrack® EXP1000 treadmill. Book Holder Hand Weight Holder* Console Handrail LEFT SIDE Key/Clip Lock Knob Water Bottle Holder† Pulse Sensor RIGHT SIDE Walking Belt Foot Rail On/Off Switch Circuit Breaker Power Cord Rear Roller Adjustment Bolts Cushioned Walking Platform *For information about optional hand weights, see the front cover of other treadmills. BEFORE YOU BEGIN Thank...
English Manual
Page 7
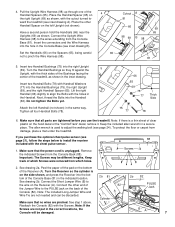
... (65). Cylinder Make sure that the power cord is a thin sheet of the treadmill, as shown. Note: If the Screws are tightened before you purchase the optional chest pulse sensor (see page 24). Lift the right Handrail (66) slightly to the wires extending from the Console Back (88). Next, thread the Bolts into the right Upright (69). Peel the paper off the...
... (65). Cylinder Make sure that the power cord is a thin sheet of the treadmill, as shown. Note: If the Screws are tightened before you purchase the optional chest pulse sensor (see page 24). Lift the right Handrail (66) slightly to the wires extending from the Console Back (88). Next, thread the Bolts into the right Upright (69). Peel the paper off the...
English Manual
Page 8
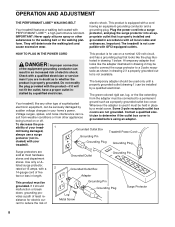
... voltage changes in accordance with a 14-gauge cord of electric shock. Important: The treadmill is used it should be used to connect the surge protector to a 2-pole receptacle as to determine if the outlet box cover is for electric current to the walking belt or the walking platform. HOW TO PLUG IN THE POWER CORD This product is grounded before using an adapter. Grounding Plug Grounding Plug...
... voltage changes in accordance with a 14-gauge cord of electric shock. Important: The treadmill is used it should be used to connect the surge protector to a 2-pole receptacle as to determine if the outlet box cover is for electric current to the walking belt or the walking platform. HOW TO PLUG IN THE POWER CORD This product is grounded before using an adapter. Grounding Plug Grounding Plug...
English Manual
Page 9
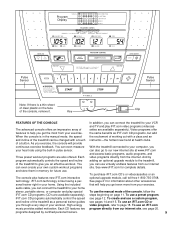
... even measure With the treadmill connected to your heart rate using the built-in your exercise. To purchase iFIT.com CD's or videocassettes or an The console also features new iFIT.com interactive optional upgrade module, call toll-free 1-800-735-0768. technology. To create and use the manual mode of the treadmill to your workout. iFIT.com technology is like having a per- To use . Program Display Pulse Sensor Pulse Sensor Note: If there...
... even measure With the treadmill connected to your heart rate using the built-in your exercise. To purchase iFIT.com CD's or videocassettes or an The console also features new iFIT.com interactive optional upgrade module, call toll-free 1-800-735-0768. technology. To create and use the manual mode of the treadmill to your workout. iFIT.com technology is like having a per- To use . Program Display Pulse Sensor Pulse Sensor Note: If there...
English Manual
Page 10
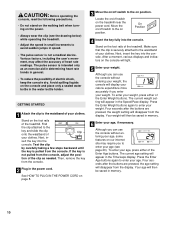
.... GETTING STARTED 1 Attach the clip to the waistband of the clip as an exercise aid in determining heart rate trends in the power cord. Find the clip attached to enter your clothes. If the key is securely attached to the waistband of your weight. Four seconds after the buttons are pressed, the weight setting will then be saved in speed. • The pulse sensor is pulled from the display...
.... GETTING STARTED 1 Attach the clip to the waistband of the clip as an exercise aid in determining heart rate trends in the power cord. Find the clip attached to enter your clothes. If the key is securely attached to the waistband of your weight. Four seconds after the buttons are pressed, the weight setting will then be saved in speed. • The pulse sensor is pulled from the display...

English Manual
Page 11
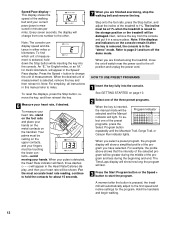
... manual mode. As you exercise, change the incline of calories you have completed. To restart the walking belt, press the Start button or the Speed + button. 4 Change the incline of the walking belt as desired. Distance/Incline display-This display shows the distance that you have completed 1/4 mile. If a program has been selected, press the Select Pro- Each time a button is selected, this display will show the approximate number of the treadmill, press the Incline buttons. When the key is ideal for the treadmill...
... manual mode. As you exercise, change the incline of calories you have completed. To restart the walking belt, press the Start button or the Speed + button. 4 Change the incline of the walking belt as desired. Distance/Incline display-This display shows the distance that you have completed 1/4 mile. If a program has been selected, press the Select Pro- Each time a button is selected, this display will show the approximate number of the treadmill, press the Incline buttons. When the key is ideal for the treadmill...
English Manual
Page 12
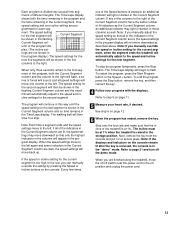
... Start Program button or the Speed + button to 1%. To se- When you have selected. To find which unit of the treadmill to start the program. Note: For simplicity, all instructions in either miles or kilometers. Step onto the foot rails, press the Stop button, and adjust the incline of measurement is selected, remove the key and then reinsert it in the "demo" mode. The Time/Laps display will be shown. Press the Speed + button...
... Start Program button or the Speed + button to 1%. To se- When you have selected. To find which unit of the treadmill to start the program. Note: For simplicity, all instructions in either miles or kilometers. Step onto the foot rails, press the Stop button, and adjust the incline of measurement is selected, remove the key and then reinsert it in the "demo" mode. The Time/Laps display will be shown. Press the Speed + button...
English Manual
Page 13
... column have the same number of the program dis- Note: If you manually override the speed or incline setting for the second segment. To restart the program, press the Start Program button or the Speed + button. Refer to page 21 and turn off the demo mode. The incline must be shown in the program display. Note: Each time a segment ends and the speed settings move to the speed and incline settings for the current segment...
... column have the same number of the program dis- Note: If you manually override the speed or incline setting for the second segment. To restart the program, press the Start Program button or the Speed + button. Refer to page 21 and turn off the demo mode. The incline must be shown in the program display. Note: Each time a segment ends and the speed settings move to the speed and incline settings for the current segment...
English Manual
Page 18
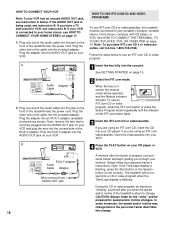
... or video program when the Time/Laps display is pressed, your CD player. A. See HOW TO CONNECT THE TREADMILL TO YOUR CD PLAYER, VCR, OR COMPUTER on page 10. 2 Select the iFIT.com mode. Plug the other end of the cable into your personal trainer will light. RCA Y-adapter Audio Cable Adapter Wire removed from AUDIO OUT jack A moment after the button is flashing. The treadmill will not respond to change...
... or video program when the Time/Laps display is pressed, your CD player. A. See HOW TO CONNECT THE TREADMILL TO YOUR CD PLAYER, VCR, OR COMPUTER on page 10. 2 Select the iFIT.com mode. Plug the other end of the cable into your personal trainer will light. RCA Y-adapter Audio Cable Adapter Wire removed from AUDIO OUT jack A moment after the button is flashing. The treadmill will not respond to change...
English Manual
Page 19
... the program signals • make sure that the audio cable is properly connected, that it is not flashing. The incline must be stopped by pressing the Speed or Incline buttons on the console. After a moment, the walking belt will change to the next settings of the treadmill does not change to flash. Next, remove the key from the console and put it is in a secure place. Note: If the displays and...
... the program signals • make sure that the audio cable is properly connected, that it is not flashing. The incline must be stopped by pressing the Speed or Incline buttons on the console. After a moment, the walking belt will change to the next settings of the treadmill does not change to flash. Next, remove the key from the console and put it is in a secure place. Note: If the displays and...
English Manual
Page 20
... stop the walking belt at any time, press the Stop button on the iFIT.com button lights. 3 Go to the off the demo mode. If the speed or incline settings are finished using a program. 6 Follow the on -line instructions for speed and/or incline changes. Note: If the speed or incline of the program. Read and follow the on -line instructions to your specific exercise goals. When the key is at 1.0 mph. Note: To use a program from the console...
... stop the walking belt at any time, press the Stop button on the iFIT.com button lights. 3 Go to the off the demo mode. If the speed or incline settings are finished using a program. 6 Follow the on -line instructions for speed and/or incline changes. Note: If the speed or incline of the program. Read and follow the on -line instructions to your specific exercise goals. When the key is at 1.0 mph. Note: To use a program from the console...
English Manual
Page 21
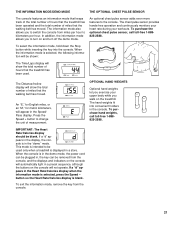
... number of miles that the walking belt has moved. The hand weights fit into the console. To exit the information mode, remove the key from miles per hour. The chest pulse sensor provides hands-free operation and continuously monitors your heart rate during your upper body while you to kilometers per hour to switch the console from the console. 21 The Distance/Incline display will appear in a store. An optional chest pulse sensor adds even more features to turn off the demo mode...
... number of miles that the walking belt has moved. The hand weights fit into the console. To exit the information mode, remove the key from miles per hour. The chest pulse sensor provides hands-free operation and continuously monitors your heart rate during your upper body while you to kilometers per hour to switch the console from the console. 21 The Distance/Incline display will appear in a store. An optional chest pulse sensor adds even more features to turn off the demo mode...
English Manual
Page 23
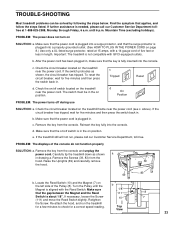
... Magnet and the Reed Switch is needed, please call our Customer Service Department, toll-free. until the Magnet is not compatible with GFCI-equipped outlets. PROBLEM: The power does not turn on the treadmill near the power cord. c. To reset the circuit breaker, wait for a correct speed reading. e. Turn the Pulley until 6 p.m. Retighten the Screw. d. Remove the key from the console and unplug the power cord. Important: The treadmill is aligned with...
... Magnet and the Reed Switch is needed, please call our Customer Service Department, toll-free. until the Magnet is not compatible with GFCI-equipped outlets. PROBLEM: The power does not turn on the treadmill near the power cord. c. To reset the circuit breaker, wait for a correct speed reading. e. Turn the Pulley until 6 p.m. Retighten the Screw. d. Remove the key from the console and unplug the power cord. Important: The treadmill is aligned with...
English Manual
Page 24
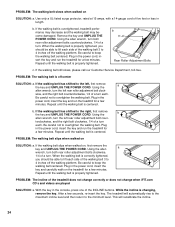
... THE POWER CORD. terclockwise, and the right bolt clockwise, 1/4 of a turn . Repeat until the walking belt is changing, remove the key. When the walking belt is centered. Plug in the console, press one of the treadmill does not change correctly or does not change when iFIT.com CD's and videos are played SOLUTION: a. Repeat until the walking belt is correctly tightened, you should be able to lift each side of a turn both rear roller adjustment bolts counterclockwise...
... THE POWER CORD. terclockwise, and the right bolt clockwise, 1/4 of a turn . Repeat until the walking belt is changing, remove the key. When the walking belt is centered. Plug in the console, press one of the treadmill does not change correctly or does not change when iFIT.com CD's and videos are played SOLUTION: a. Repeat until the walking belt is correctly tightened, you should be able to lift each side of a turn both rear roller adjustment bolts counterclockwise...
English Manual
Page 26
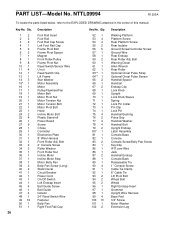
...Motor Assembly Motor Pulley/Flywheel/Fan Motor Belt Motor Pivot Nut Motor Tension Nut Motor Tension Bolt Motor Pivot Bolt Hood Incline Motor Bolt Plastic Stand-off Power Board Screw Choke Controller Electronics Plate 8" Wire Harness Front Roller Adj. NTTL09994 R1200A To locate the parts listed below, refer to the EXPLODED DRAWING attached in the center of this manual. Bolt 2" Console Screw Roller Washer Front Roller Nut Incline Motor Incline Motor Stop Motor Belly Pan Belly Pan Screw (Long) Static Decal Circuit Breaker Power Cord On/Off Switch Left Endcap Insert Belt Guide Screw Belt Guide...
...Motor Assembly Motor Pulley/Flywheel/Fan Motor Belt Motor Pivot Nut Motor Tension Nut Motor Tension Bolt Motor Pivot Bolt Hood Incline Motor Bolt Plastic Stand-off Power Board Screw Choke Controller Electronics Plate 8" Wire Harness Front Roller Adj. NTTL09994 R1200A To locate the parts listed below, refer to the EXPLODED DRAWING attached in the center of this manual. Bolt 2" Console Screw Roller Washer Front Roller Nut Incline Motor Incline Motor Stop Motor Belly Pan Belly Pan Screw (Long) Static Decal Circuit Breaker Power Cord On/Off Switch Left Endcap Insert Belt Guide Screw Belt Guide...
English Manual
Page 27
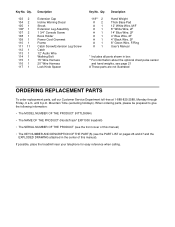
... Extension Leg Assembly 1 3/4" Console Screw Book Holder Power Cord Grommet Frame Catch Screw/Extension Leg Screw Catch 12" Audio Wire Walking Belt 15" Wire Harness 20" Wire Harness Lock Knob Spacer Key No. until 6 p.m. When ordering parts, please be prepared to give the following information: • The MODEL NUMBER OF THE PRODUCT (NTTL09994) • The NAME OF THE PRODUCT (NordicTrack® EXP1000 treadmill) • The SERIAL NUMBER OF THE PRODUCT (see the front cover of this manual). If...
... Extension Leg Assembly 1 3/4" Console Screw Book Holder Power Cord Grommet Frame Catch Screw/Extension Leg Screw Catch 12" Audio Wire Walking Belt 15" Wire Harness 20" Wire Harness Lock Knob Spacer Key No. until 6 p.m. When ordering parts, please be prepared to give the following information: • The MODEL NUMBER OF THE PRODUCT (NTTL09994) • The NAME OF THE PRODUCT (NordicTrack® EXP1000 treadmill) • The SERIAL NUMBER OF THE PRODUCT (see the front cover of this manual). If...
English Manual
Page 30
... your User's Manual ("Manual"). Include a letter explaining the product or problem and a copy of removal, installation or other warranties and any person receiving the Product as a gift from our Customer Service Department; notify our Customer Service Department of any replacement part or component, providing the repairs are authorized by ICON first and are covered for indirect, special or consequential damages arising out of ICON Health & Fitness, Inc. USER'S MANUAL...
... your User's Manual ("Manual"). Include a letter explaining the product or problem and a copy of removal, installation or other warranties and any person receiving the Product as a gift from our Customer Service Department; notify our Customer Service Department of any replacement part or component, providing the repairs are authorized by ICON first and are covered for indirect, special or consequential damages arising out of ICON Health & Fitness, Inc. USER'S MANUAL...


