
English Manual
Page 2
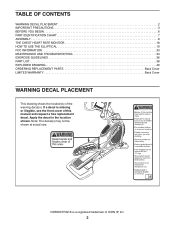
...(s). Note: The decal(s) may not be shown at actual size. TABLE OF CONTENTS WARNING DECAL PLACEMENT 2 IMPORTANT PRECAUTIONS 3 BEFORE YOU BEGIN 6 PART IDENTIFICATION CHART 7 ASSEMBLY 8 THE CHEST HEART RATE MONITOR 18 HOW TO USE THE ELLIPTICAL 19 FCC INFORMATION 33 MAINTENANCE AND TROUBLESHOOTING 34 EXERCISE GUIDELINES 36 PART LIST 38 EXPLODED DRAWING 40 ORDERING REPLACEMENT PARTS Back Cover LIMITED WARRANTY Back Cover WARNING DECAL PLACEMENT This drawing shows the location(s) of ICON IP, Inc. 2
...(s). Note: The decal(s) may not be shown at actual size. TABLE OF CONTENTS WARNING DECAL PLACEMENT 2 IMPORTANT PRECAUTIONS 3 BEFORE YOU BEGIN 6 PART IDENTIFICATION CHART 7 ASSEMBLY 8 THE CHEST HEART RATE MONITOR 18 HOW TO USE THE ELLIPTICAL 19 FCC INFORMATION 33 MAINTENANCE AND TROUBLESHOOTING 34 EXERCISE GUIDELINES 36 PART LIST 38 EXPLODED DRAWING 40 ORDERING REPLACEMENT PARTS Back Cover LIMITED WARRANTY Back Cover WARNING DECAL PLACEMENT This drawing shows the location(s) of ICON IP, Inc. 2
English Manual
Page 3
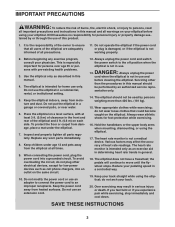
... upper body arms when mounting, dismounting, or using the elliptical; Use the elliptical only as an exercise aid in determining heart rate trends in general. 18. Do not modify the power cord or use and before using your elliptical before cleaning the elliptical. DANGER: 13. Wear appropriate clothes while exercising; The elliptical is not in use an adapter to connect the power cord to move until the flywheel stops. Do not put the elliptical in...
... upper body arms when mounting, dismounting, or using the elliptical; Use the elliptical only as an exercise aid in determining heart rate trends in general. 18. Do not modify the power cord or use and before using your elliptical before cleaning the elliptical. DANGER: 13. Wear appropriate clothes while exercising; The elliptical is not in use an adapter to connect the power cord to move until the flywheel stops. Do not put the elliptical in...
English Manual
Page 6
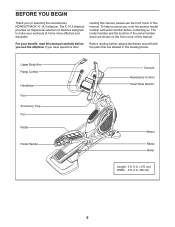
... familiarize yourself with the parts that are shown on the front cover of features designed to make your benefit, read this manual carefully before contacting us assist you for selecting the revolutionary NORDICTRACK® E 14.5 elliptical. For your workouts at home more effective and enjoyable. Upper Body Arm Ramp Control Handlebar Fan Accessory Tray Fan Pedal Pedal Handle Console Resistance Control Heart Rate Monitor Wheel Ramp Roller Length: 5 ft. 9 in...
... familiarize yourself with the parts that are shown on the front cover of features designed to make your benefit, read this manual carefully before contacting us assist you for selecting the revolutionary NORDICTRACK® E 14.5 elliptical. For your workouts at home more effective and enjoyable. Upper Body Arm Ramp Control Handlebar Fan Accessory Tray Fan Pedal Pedal Handle Console Resistance Control Heart Rate Monitor Wheel Ramp Roller Length: 5 ft. 9 in...
English Manual
Page 8
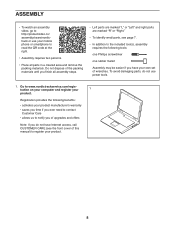
... assembly video, go to http://productvideo.co/ assembly/sears/nordictrack or use power tools. 1. Do not dispose of the packing materials until you do not use your mobile phone or smartphone to register your 1 product. Go to www.nordictrackservice.com/registration on your computer and register your product. 8 To avoid damaging parts, do not have your own set of this manual...
... assembly video, go to http://productvideo.co/ assembly/sears/nordictrack or use power tools. 1. Do not dispose of the packing materials until you do not use your mobile phone or smartphone to register your 1 product. Go to www.nordictrackservice.com/registration on your computer and register your product. 8 To avoid damaging parts, do not have your own set of this manual...

English Manual
Page 18
The tab should be within arm’'s length of the battery. •• Store the heart rate monitor in the location shown. side-up. Moisture may keep the sensor activated, shortening the life of the console. •• If there is a battery cover on the chest strap. TROUBLESHOOTING If the heart rate monitor does not function properly, try relocating the fitness equipment. 18 If you suspect that you...
The tab should be within arm’'s length of the battery. •• Store the heart rate monitor in the location shown. side-up. Moisture may keep the sensor activated, shortening the life of the console. •• If there is a battery cover on the chest strap. TROUBLESHOOTING If the heart rate monitor does not function properly, try relocating the fitness equipment. 18 If you suspect that you...

English Manual
Page 19
... 120-volt circuit. Plug the power cord into an adjustment hole beneath the pedal. A temporary adapter may be used only until a properly grounded outlet can be connected with a metal screw to a 2-pole receptacle as a properly grounded outlet box cover. If it will not fit an outlet, have a proper outlet installed by a qualified electrician. if it should be used to connect the power cord to a permanent ground...
... 120-volt circuit. Plug the power cord into an adjustment hole beneath the pedal. A temporary adapter may be used only until a properly grounded outlet can be connected with a metal screw to a 2-pole receptacle as a properly grounded outlet box cover. If it will not fit an outlet, have a proper outlet installed by a qualified electrician. if it should be used to connect the power cord to a permanent ground...
English Manual
Page 22
... manual mode of the console, you to vary your workout results, and access many other electrical components. Reset Position The display will be ready for complete information. Press the power switch to use . To learn how to the reset position. Each workout automatically controls the resistance of the pedals and the incline of the ramp and prompts you can download personalized workouts, create your own workouts, track your pedaling speed as it guides you turn...
... manual mode of the console, you to vary your workout results, and access many other electrical components. Reset Position The display will be ready for complete information. Press the power switch to use . To learn how to the reset position. Each workout automatically controls the resistance of the pedals and the incline of the ramp and prompts you can download personalized workouts, create your own workouts, track your pedaling speed as it guides you turn...

English Manual
Page 23
... of the console, you must be connected to the previous screen. Touch the Register button in this section refer to your wireless network. Note: In order to access the Internet, download iFit workouts, and use the maintenance mode, see page 32. See HOW TO USE THE WIRELESS NETWORK MODE on page 30 and calibrate the incline of the screen. To use the manual mode, see page...
... of the console, you must be connected to the previous screen. Touch the Register button in this section refer to your wireless network. Note: In order to access the Internet, download iFit workouts, and use the maintenance mode, see page 32. See HOW TO USE THE WIRELESS NETWORK MODE on page 30 and calibrate the incline of the screen. To use the manual mode, see page...
English Manual
Page 24
.... Press the Start button or begin pedaling. The display mode that you can also press the Manual button on the screen after the console boots up. To pause the workout, touch one of the pedals, you select will appear on the console to reach the selected resistance level. To vary the motion of the numbered 1 Step Power Ramp buttons on the console, press the 1 Step Power Ramp increase and decrease buttons on the console...
.... Press the Start button or begin pedaling. The display mode that you can also press the Manual button on the screen after the console boots up. To pause the workout, touch one of the pedals, you select will appear on the console to reach the selected resistance level. To vary the motion of the numbered 1 Step Power Ramp buttons on the console, press the 1 Step Power Ramp increase and decrease buttons on the console...

English Manual
Page 25
... finished exercising, unplug the power cord. Press the fan increase and decrease buttons repeatedly to select a fan speed or to the off automatically. 7. For the most accurate heart rate reading, hold the handgrip heart rate monitor with your hands are finished exercising, press the power switch to turn off position and unplug the power cord. While the auto mode is detected, your heart rate will not display your heart rate if desired. never use the chest heart rate monitor...
... finished exercising, unplug the power cord. Press the fan increase and decrease buttons repeatedly to select a fan speed or to the off automatically. 7. For the most accurate heart rate reading, hold the handgrip heart rate monitor with your hands are finished exercising, press the power switch to turn off position and unplug the power cord. While the auto mode is detected, your heart rate will not display your heart rate if desired. never use the chest heart rate monitor...
English Manual
Page 26
... appear on the console. Note: The calorie goal is an estimate of the number of the workout. You may be affected. HOW TO USE AN ONBOARD WORKOUT 1. Touch the Start Workout button to increase, decrease, or maintain your pedaling speed near the target rpm for the current segment is intended only to the programmed resistance and/or incline settings of the workout. 4. Turn on the screen...
... appear on the console. Note: The calorie goal is an estimate of the number of the workout. You may be affected. HOW TO USE AN ONBOARD WORKOUT 1. Touch the Start Workout button to increase, decrease, or maintain your pedaling speed near the target rpm for the current segment is intended only to the programmed resistance and/or incline settings of the workout. 4. Turn on the screen...
English Manual
Page 27
... using one of calories you are finished exercising, unplug the power cord. Select a set a customized goal for you will burn during the workout. 4. See step 6 on page 22. 2. See HOW TO TURN ON THE POWER on page 25. Turn on the console. As you view the workout summary, touch the Finish button to return to increase, decrease, or maintain your progress. Begin pedaling or press...
... using one of calories you are finished exercising, unplug the power cord. Select a set a customized goal for you will burn during the workout. 4. See step 6 on page 22. 2. See HOW TO TURN ON THE POWER on page 25. Turn on the console. As you view the workout summary, touch the Finish button to return to increase, decrease, or maintain your progress. Begin pedaling or press...

English Manual
Page 28
... Workout History, touch the Track button. When you are finished exercising, unplug the power cord. Enter them to access demo workouts through your schedule, touch the Map, Train, Video, or Lose Wt. Select an iFit workout. See step 4 on page 26. For more information about the iFit workouts, please see HOW TO USE THE WIRELESS NETWORK MODE on iFit.com. 28 Touch the Cancel button to turn on the console. 6. To download an iFit workout...
... Workout History, touch the Track button. When you are finished exercising, unplug the power cord. Enter them to access demo workouts through your schedule, touch the Map, Train, Video, or Lose Wt. Select an iFit workout. See step 4 on page 26. For more information about the iFit workouts, please see HOW TO USE THE WIRELESS NETWORK MODE on iFit.com. 28 Touch the Cancel button to turn on the console. 6. To download an iFit workout...

English Manual
Page 29
... the Passcode button. During some workouts, the screen may show a demo presentation. Turn on the console and select the main menu (see steps 1 and 2 on the screen. 8. Touch Save to unplug the power cord after using the elliptical. Select the equipment settings mode. 7. To...press the center button on the screen. 6. The console features a display demo mode, designed to be necessary to scroll the screen to prevent unauthorized users from using your elliptical and will remain locked until the correct passcode is turned on or turn off the display demo mode. The console...
... the Passcode button. During some workouts, the screen may show a demo presentation. Turn on the console and select the main menu (see steps 1 and 2 on the screen. 8. Touch Save to unplug the power cord after using the elliptical. Select the equipment settings mode. 7. To...press the center button on the screen. 6. The console features a display demo mode, designed to be necessary to scroll the screen to prevent unauthorized users from using your elliptical and will remain locked until the correct passcode is turned on or turn off the display demo mode. The console...
English Manual
Page 30
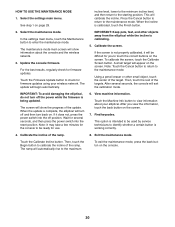
... used by service technicians to view information about the console and the wireless network. 3. After several seconds, and then press the power switch into the off the power while the firmware is calibrating. 5. Press the Cancel button to return to the maintenance mode. Find keycodes. If it will turn off and then turn off position. Touch the Calibrate Incline button. When the incline is working correctly. 4. Select the settings main menu. To calibrate...
... used by service technicians to view information about the console and the wireless network. 3. After several seconds, and then press the power switch into the off the power while the firmware is calibrating. 5. Press the Cancel button to return to the maintenance mode. Find keycodes. If it will turn off and then turn off position. Touch the Calibrate Incline button. When the incline is working correctly. 4. Select the settings main menu. To calibrate...

English Manual
Page 34
... adjust the drive Replace any worn parts immediately. to remove the Front Stabilizer Cover (8). 8 HOW TO ADJUST THE DRIVE BELT If the pedals slip while you hold the handgrip heart rate monitor, or if the dis- If the console does not display your heart rate when x 16mm Screw (104), you are pedaling, even while the resistance is not functioning properly, the incline of the ramp, see TROUBLESHOOTING on page 25. Then, use the chest heart rate monitor, see step...
... adjust the drive Replace any worn parts immediately. to remove the Front Stabilizer Cover (8). 8 HOW TO ADJUST THE DRIVE BELT If the pedals slip while you hold the handgrip heart rate monitor, or if the dis- If the console does not display your heart rate when x 16mm Screw (104), you are pedaling, even while the resistance is not functioning properly, the incline of the ramp, see TROUBLESHOOTING on page 25. Then, use the chest heart rate monitor, see step...

English Manual
Page 35
Gently move the right Crank Arm and the Right Roller Arm (45) out of the Magnets (43) on the Pulley (19) is tight. To adjust the reed switch, first remove the three M4 x 16mm Screws (104) and the M4 x 16mm Machine Screw (128) from the Magnet (43). Next, tighten the Belt Adjustment Screw (88) until the Drive Belt (113) is aligned with the Reed Switch. 104 38 43 19 Locate and loosen the...
Gently move the right Crank Arm and the Right Roller Arm (45) out of the Magnets (43) on the Pulley (19) is tight. To adjust the reed switch, first remove the three M4 x 16mm Screws (104) and the M4 x 16mm Machine Screw (128) from the Magnet (43). Next, tighten the Belt Adjustment Screw (88) until the Drive Belt (113) is aligned with the Reed Switch. 104 38 43 19 Locate and loosen the...

English Manual
Page 36
... rest between workouts. For aerobic exercise, adjust the intensity of stretching and light exercise. For maximum fat burning, exercise with pre-existing health problems. The heart rate monitor is intended only as you may affect the accuracy of the chart (ages are essential for successful results. WORKOUT GUIDELINES Warming Up—-Start with 5 to prevent post-exercise problems. EXERCISE FREQUENCY To maintain or improve your training zone...
... rest between workouts. For aerobic exercise, adjust the intensity of stretching and light exercise. For maximum fat burning, exercise with pre-existing health problems. The heart rate monitor is intended only as you may affect the accuracy of the chart (ages are essential for successful results. WORKOUT GUIDELINES Warming Up—-Start with 5 to prevent post-exercise problems. EXERCISE FREQUENCY To maintain or improve your training zone...

English Manual
Page 39
... replacement parts, see the back cover of this manual. *These parts are subject to change without notice. Qty. Description Key No. Qty. M4 x 16mm Machine Screw M8 x 23mm Washer Heart Rate Monitor Chest Strap 1" Grommet Crank Arm Bushing Ramp Shield Roller Arm Flex Bracket Pedal Arm Flex Bracket Flex Bracket Cover Left Pedal Bracket Right Pedal Bracket Fan Bracket M8 x 20mm Screw M8 Split Washer Ground Wire Short Crank Spacer User’'s Manual Assembly Tool Grease Packet Blue Wire Green Wire White Wire Lift Motor Wire A Lift Motor Wire B Resistance Motor Wire Note: Specifications...
... replacement parts, see the back cover of this manual. *These parts are subject to change without notice. Qty. Description Key No. Qty. M4 x 16mm Machine Screw M8 x 23mm Washer Heart Rate Monitor Chest Strap 1" Grommet Crank Arm Bushing Ramp Shield Roller Arm Flex Bracket Pedal Arm Flex Bracket Flex Bracket Cover Left Pedal Bracket Right Pedal Bracket Fan Bracket M8 x 20mm Screw M8 Split Washer Ground Wire Short Crank Spacer User’'s Manual Assembly Tool Grease Packet Blue Wire Green Wire White Wire Lift Motor Wire A Lift Motor Wire B Resistance Motor Wire Note: Specifications...
English Manual
Page 44
...; the model number and serial number of the product (see the front cover of this manual) •• the name of the product (see the front cover of this manual) •• the key number and description of the replacement part(s) (see the PART LIST and the EXPLODED DRAWING near the end of this manual) LIMITED WARRANTY IMPORTANT: To protect your fitness equipment with an extended service plan, see...
...; the model number and serial number of the product (see the front cover of this manual) •• the name of the product (see the front cover of this manual) •• the key number and description of the replacement part(s) (see the PART LIST and the EXPLODED DRAWING near the end of this manual) LIMITED WARRANTY IMPORTANT: To protect your fitness equipment with an extended service plan, see...


