
English Manual
Page 3
... circuit. Place the treadmill on the walking belt. Use only a single-outlet surge suppressor that the storage latch is not a medical device. Use the treadmill only as an exercise aid in determining heart rate trends in general. 18. Athletic support clothes are standing on a level surface, with bare feet, wearing only stockings, or in sandals. 10. Keep the power cord and the surge suppressor...
... circuit. Place the treadmill on the walking belt. Use only a single-outlet surge suppressor that the storage latch is not a medical device. Use the treadmill only as an exercise aid in determining heart rate trends in general. 18. Athletic support clothes are standing on a level surface, with bare feet, wearing only stockings, or in sandals. 10. Keep the power cord and the surge suppressor...
English Manual
Page 4
... service representative. Do not use only. SAVE THESE INSTRUCTIONS The decals shown here have been placed on the front cover of this or any exercise program, consult your treadmill. When using . DANGER: 27. tenance and adjustment procedures de- ICON assumes no responsibility for speed and/or incline changes. Always unplug the power cord immediately after use of this manual. WARNING: Before beginning this product. Never remove the motor hood unless instructed...
... service representative. Do not use only. SAVE THESE INSTRUCTIONS The decals shown here have been placed on the front cover of this or any exercise program, consult your treadmill. When using . DANGER: 27. tenance and adjustment procedures de- ICON assumes no responsibility for speed and/or incline changes. Always unplug the power cord immediately after use of this manual. WARNING: Before beginning this product. Never remove the motor hood unless instructed...
English Manual
Page 5
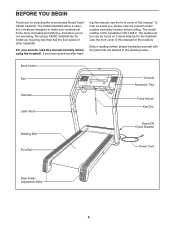
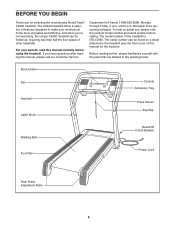
... familiarize yourself with the parts that are labeled in the drawing below. If you for the location). Book Holder Fan Handrail Latch Knob Console Accessory Tray Pulse Sensor Key/Clip Walking Belt Reset/Off Circuit Breaker Foot Rail Power Cord Rear Roller Adjustment Bolts 5 For your workouts at home more enjoyable and effective. ing this manual, see the front cover of this manual. The serial number can be found on a decal attached to make your...
... familiarize yourself with the parts that are labeled in the drawing below. If you for the location). Book Holder Fan Handrail Latch Knob Console Accessory Tray Pulse Sensor Key/Clip Walking Belt Reset/Off Circuit Breaker Foot Rail Power Cord Rear Roller Adjustment Bolts 5 For your workouts at home more enjoyable and effective. ing this manual, see the front cover of this manual. The serial number can be found on a decal attached to make your...

English Manual
Page 6
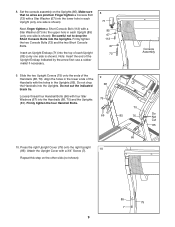
... and remove all packing materials. Note: The underside of the treadmill walking belt is completed. Assembly requires the included allen wrench and your own phillips screwdriver and wire cutters . With the help identifying the assembly hardware, see the hardware drawings below. 3/4" Tek Screw (44)-4 Star Washer (67)-12 1" Tek Screw (82)-2 Short Console Bolt (112)-2 Extension Screw (87)-4 3/4" Screw (7)-2 Handrail Bolt (66)-4 Console Bolt (72)-2 Pulse Bar Bolt (127)-4 1. Open parts...
... and remove all packing materials. Note: The underside of the treadmill walking belt is completed. Assembly requires the included allen wrench and your own phillips screwdriver and wire cutters . With the help identifying the assembly hardware, see the hardware drawings below. 3/4" Tek Screw (44)-4 Star Washer (67)-12 1" Tek Screw (82)-2 Short Console Bolt (112)-2 Extension Screw (87)-4 3/4" Screw (7)-2 Handrail Bolt (66)-4 Console Bolt (72)-2 Pulse Bar Bolt (127)-4 1. Open parts...
English Manual
Page 8
.... Attach the Pulse Bar Assembly (69) to install the receiver included with the two included small screws. Place the console assembly face-down. Hold the receiver so the small cylinder is oriented as - Assembly sembly. Remove the indicated 3/4" Screw (7) and the Access Door (95) from the Console Back (96). Make sure that no wires are pinched. If you have purchased an optional chest pulse sensor, follow step...
.... Attach the Pulse Bar Assembly (69) to install the receiver included with the two included small screws. Place the console assembly face-down. Hold the receiver so the small cylinder is oriented as - Assembly sembly. Remove the indicated 3/4" Screw (7) and the Access Door (95) from the Console Back (96). Make sure that no wires are pinched. If you have purchased an optional chest pulse sensor, follow step...
English Manual
Page 9
... each Upright (85) (only one side is shown). Next, finger tighten a Short Console Bolt (112) with a Star Washer (67) into the Handrails (68, 70) and the Uprights 75 (85). Make sure that no wires are pinched. 8. use a rubber mallet if necessary. 8 71 85 67 112 67 72 Console Assembly 9. Attach the Upright Cover with a 3/4" Screw (7). Firmly tighten the two Console Bolts (72) and the two Short Console Bolts.
... each Upright (85) (only one side is shown). Next, finger tighten a Short Console Bolt (112) with a Star Washer (67) into the Handrails (68, 70) and the Uprights 75 (85). Make sure that no wires are pinched. 8. use a rubber mallet if necessary. 8 71 85 67 112 67 72 Console Assembly 9. Attach the Upright Cover with a 3/4" Screw (7). Firmly tighten the two Console Bolts (72) and the two Short Console Bolts.
English Manual
Page 11
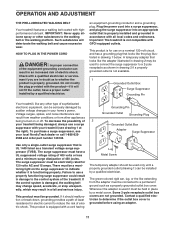
... shock. HOW TO PLUG IN THE POWER CORD DANGER: Improper connection of sophisticated electronic equipment, can be held in an increased risk of 450 joules. If the control system is grounded before using an adapter. 11 This product is UL 1449 listed as a transient voltage surge suppressor (TVSS). OPERATION AND ADJUSTMENT THE PRE-LUBRICATED WALKING BELT Your treadmill features a walking belt coated with the product...
... shock. HOW TO PLUG IN THE POWER CORD DANGER: Improper connection of sophisticated electronic equipment, can be held in an increased risk of 450 joules. If the control system is grounded before using an adapter. 11 This product is UL 1449 listed as a transient voltage surge suppressor (TVSS). OPERATION AND ADJUSTMENT THE PRE-LUBRICATED WALKING BELT Your treadmill features a walking belt coated with the product...
English Manual
Page 12
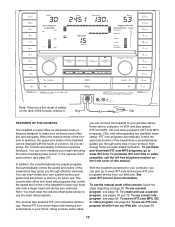
.... The console also offers four heart rate programs that automatically control the speed and incline of the treadmill as they guide you through every step of the treadmill as a personal trainer guides you can even measure your workout; To purchase and download iFIT.com MP3 programs, go to www.iFIT.com. With the treadmill connected to use a custom program, see page 27). To use the manual mode of this manual. highenergy music provides added motivation. To use a heart rate program...
.... The console also offers four heart rate programs that automatically control the speed and incline of the treadmill as they guide you through every step of the treadmill as a personal trainer guides you can even measure your workout; To purchase and download iFIT.com MP3 programs, go to www.iFIT.com. With the treadmill connected to use a custom program, see page 27). To use the manual mode of this manual. highenergy music provides added motivation. To use a heart rate program...
English Manual
Page 13
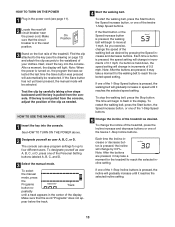
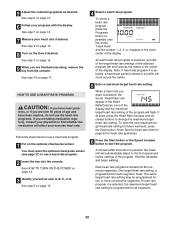
... USE THE MANUAL MODE 1 Insert the key into the console. The console can save program settings for the treadmill to reach the selected incline setting. To designate yourself as user A, B, C, or D, press one of the 1-Step Speed buttons is pressed, the walking belt will gradually increase until the key is turned on, the program that was selected the last time the Save button was pressed will begin to reach the selected speed setting. To stop the walking belt, press the Stop button...
... USE THE MANUAL MODE 1 Insert the key into the console. The console can save program settings for the treadmill to reach the selected incline setting. To designate yourself as user A, B, C, or D, press one of the 1-Step Speed buttons is pressed, the walking belt will gradually increase until the key is turned on, the program that was selected the last time the Save button was pressed will begin to reach the selected speed setting. To stop the walking belt, press the Stop button...
English Manual
Page 14
... program instead of calories you use the handgrip pulse sensor or the optional chest pulse sensor. When the desired unit of miles will show the time remaining in the display. To see the total number of miles that you walk or run, the indicators around the track will appear in the Pace/Speed zone of the walking platform, turn the knob clockwise. When the manual mode or the iFIT.com mode...
... program instead of calories you use the handgrip pulse sensor or the optional chest pulse sensor. When the desired unit of miles will show the time remaining in the display. To see the total number of miles that you walk or run, the indicators around the track will appear in the Pace/Speed zone of the walking platform, turn the knob clockwise. When the manual mode or the iFIT.com mode...
English Manual
Page 20
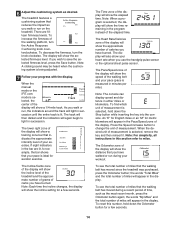
... years of the program will automatically adjust to start the program. See HOW TO TURN ON THE POWER on page 13. 4 Select a heart rate program. To select a heart rate program, press the Programs button repeatedly until the words "Heart Rate" and the number 1, 2, 3, or 4 appear in the Heart Rate/Calories zone of the display and the maximum target heart rate setting of age and have heart prob- You must wear the optional chest pulse sensor (see page 27...
... years of the program will automatically adjust to start the program. See HOW TO TURN ON THE POWER on page 13. 4 Select a heart rate program. To select a heart rate program, press the Programs button repeatedly until the words "Heart Rate" and the number 1, 2, 3, or 4 appear in the Heart Rate/Calories zone of the display and the maximum target heart rate setting of age and have heart prob- You must wear the optional chest pulse sensor (see page 27...
English Manual
Page 26
... "iFIT" appear in the display and that the audio cable is properly connected. 5 Start your heart rate if desired. Read and follow the on page 14. 11 Measure your web browser, if necessary, and go to use programs from the console. See step 7 on -line instructions for speed and/or incline changes. See HOW TO CONNECT YOUR COMPUTER on page 13. 3 Select the iFIT.com mode. See HOW TO TURN...
... "iFIT" appear in the display and that the audio cable is properly connected. 5 Start your heart rate if desired. Read and follow the on page 14. 11 Measure your web browser, if necessary, and go to use programs from the console. See step 7 on -line instructions for speed and/or incline changes. See HOW TO CONNECT YOUR COMPUTER on page 13. 3 Select the iFIT.com mode. See HOW TO TURN...

English Manual
Page 32
... affect the accuracy of your physician. Fat Burning To burn fat effectively, you exercise-never hold your exercise program. The three numbers define your heart rate as you must be found by using your "training zone." Training Zone Exercise-After warming up -Start each workout with preexisting health problems. The pulse sensor is activity that requires large amounts of oxygen for en- The proper intensity level...
... affect the accuracy of your physician. Fat Burning To burn fat effectively, you exercise-never hold your exercise program. The three numbers define your heart rate as you must be found by using your "training zone." Training Zone Exercise-After warming up -Start each workout with preexisting health problems. The pulse sensor is activity that requires large amounts of oxygen for en- The proper intensity level...
English Manual
Page 34
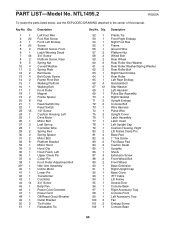
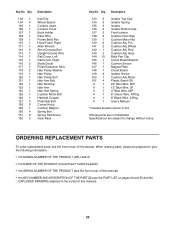
...Platform Screw, Front Latch Warning Decal 3/4" Screw Platform Screw, Rear Spring Nut Curved Washer Spring Plate Belt Guide Belt Guide Screw Frame Pivot Bolt Walking Platform Walking Belt Front Roller Magnet Frame Spacer Nut Reed Switch Clip Reed Switch 1/2" Screw Cushion Housing, Left Drive Motor Motor Belt Leaf Spring Controller Wire Spring Pad Spring Spacer Motor Bolt Platform Bracket Motor Hood Hood Clip Hood Foam, Left Upper Clevis Pin Cotter Pin Front Roller Adjustment Bolt Idler Arm Assembly Incline Motor Lower Pin Transformer Controller 3/4" Screw Belly Pan Power Cord Grommet Power Cord...
...Platform Screw, Front Latch Warning Decal 3/4" Screw Platform Screw, Rear Spring Nut Curved Washer Spring Plate Belt Guide Belt Guide Screw Frame Pivot Bolt Walking Platform Walking Belt Front Roller Magnet Frame Spacer Nut Reed Switch Clip Reed Switch 1/2" Screw Cushion Housing, Left Drive Motor Motor Belt Leaf Spring Controller Wire Spring Pad Spring Spacer Motor Bolt Platform Bracket Motor Hood Hood Clip Hood Foam, Left Upper Clevis Pin Cotter Pin Front Roller Adjustment Bolt Idler Arm Assembly Incline Motor Lower Pin Transformer Controller 3/4" Screw Belly Pan Power Cord Grommet Power Cord...
English Manual
Page 35
... Spacer Console Insert Console Cover Book Holder Filter Wire Frame Belly Pan Hood Foam, Right Allen Wrench Short Console Bolt Upright Ground Wire Rail Cover, Left Rail Cover, Right Static Decal Pulse Extension Wire Idler Pulley Washer Idler Pulley Idler Pulley Bolt Idler Arm Bolt Idler Bushing Idler Arm Idler Arm Spring Cushion Motor Bolt Handrail Coupler Pulse Bar Bolt Control Knob Cushion Magnet Spring Bolt Spring Pad Screw Gear Rack Key No. When ordering parts, please be prepared to change without notice. Motor...
... Spacer Console Insert Console Cover Book Holder Filter Wire Frame Belly Pan Hood Foam, Right Allen Wrench Short Console Bolt Upright Ground Wire Rail Cover, Left Rail Cover, Right Static Decal Pulse Extension Wire Idler Pulley Washer Idler Pulley Idler Pulley Bolt Idler Arm Bolt Idler Bushing Idler Arm Idler Arm Spring Cushion Motor Bolt Handrail Coupler Pulse Bar Bolt Control Knob Cushion Magnet Spring Bolt Spring Pad Screw Gear Rack Key No. When ordering parts, please be prepared to change without notice. Motor...
English Manual
Page 38
... part to use, operate, and maintain as your proof of purchase if you . Accordingly, the above limitation may not apply to any implied warranties of whatsoever nature. WHO IS COVERED-The original purchaser or any defect within 10 days after discovery of purchase, such as set forth herein. HOW LONG IS IT COVERED-ICON Health & Fitness, Inc. ("ICON"), warrants the drive motor for service...
... part to use, operate, and maintain as your proof of purchase if you . Accordingly, the above limitation may not apply to any implied warranties of whatsoever nature. WHO IS COVERED-The original purchaser or any defect within 10 days after discovery of purchase, such as set forth herein. HOW LONG IS IT COVERED-ICON Health & Fitness, Inc. ("ICON"), warrants the drive motor for service...

English Manual
Page 3
... the control system is damaged, the walking belt may change the incline of the treadmill by persons weighing more amps. Do not operate the treadmill if the power cord or plug is damaged, or if the treadmill is not working properly.) 5. Do not operate the treadmill where aerosol products are recommended for the location of the reset/off . Wear appropriate exercise clothes when using the treadmill. 6. The pulse sensor is...
... the control system is damaged, the walking belt may change the incline of the treadmill by persons weighing more amps. Do not operate the treadmill if the power cord or plug is damaged, or if the treadmill is not working properly.) 5. Do not operate the treadmill where aerosol products are recommended for the location of the reset/off . Wear appropriate exercise clothes when using the treadmill. 6. The pulse sensor is...
English Manual
Page 5
... Customer Service Department toll-free at home more enjoyable and effective. For your workouts at 1-888-825-2588, Monday through Friday, 6 a.m. Mountain Time (excluding holidays). The model number of this manual for selecting the revolutionary NordicTrack® C2420 treadmill. Book Holder Fan Handrail Latch Knob Console Accessory Tray Pulse Sensor Key/Clip Walking Belt Reset/Off Circuit Breaker Foot Rail Power Cord Rear Roller Adjustment Bolts 5 If you , please note the product model number and serial number before using the treadmill...
... Customer Service Department toll-free at home more enjoyable and effective. For your workouts at 1-888-825-2588, Monday through Friday, 6 a.m. Mountain Time (excluding holidays). The model number of this manual for selecting the revolutionary NordicTrack® C2420 treadmill. Book Holder Fan Handrail Latch Knob Console Accessory Tray Pulse Sensor Key/Clip Walking Belt Reset/Off Circuit Breaker Foot Rail Power Cord Rear Roller Adjustment Bolts 5 If you , please note the product model number and serial number before using the treadmill...

English Manual
Page 13
... the walking belt, press the Start button, the Speed increase button, or one of the 1-Step Incline buttons is pressed, the walking belt will begin to move at 1 mph. HOW TO TURN ON THE POWER 1 Plug in the power cord (see the drawing on page 12) and attach the clip securely to the waistband of the treadmill. Next, insert the key into the console. If the Save button has not yet been pressed, the manual mode will...
... the walking belt, press the Start button, the Speed increase button, or one of the 1-Step Incline buttons is pressed, the walking belt will begin to move at 1 mph. HOW TO TURN ON THE POWER 1 Plug in the power cord (see the drawing on page 12) and attach the clip securely to the waistband of the treadmill. Next, insert the key into the console. If the Save button has not yet been pressed, the manual mode will...
English Manual
Page 35
... 1 130 4 131 2 132 2 Key/Clip Wheel Spacer Console Insert Console Cover Book Holder Filter Wire Frame Belly Pan Hood Foam, Right Allen Wrench Short Console Bolt Upright Ground Wire Rail Cover, Left Rail Cover, Right Static Decal Pulse Extension Wire Idler Pulley Washer Idler Pulley Idler Pulley Bolt Idler Arm Bolt Idler Bushing Idler Arm Idler Arm Spring Cushion Motor Bolt Handrail Coupler Pulse Bar Bolt Control Knob Cushion Magnet Spring Bolt Spring Pad Screw Gear Rack Key No. Gear Belly Pan...
... 1 130 4 131 2 132 2 Key/Clip Wheel Spacer Console Insert Console Cover Book Holder Filter Wire Frame Belly Pan Hood Foam, Right Allen Wrench Short Console Bolt Upright Ground Wire Rail Cover, Left Rail Cover, Right Static Decal Pulse Extension Wire Idler Pulley Washer Idler Pulley Idler Pulley Bolt Idler Arm Bolt Idler Bushing Idler Arm Idler Arm Spring Cushion Motor Bolt Handrail Coupler Pulse Bar Bolt Control Knob Cushion Magnet Spring Bolt Spring Pad Screw Gear Rack Key No. Gear Belly Pan...


