
User Manual
Page 3
...two feet on each side. Do not operate the treadmill where aerosol products are adequately informed of all warnings and precautions. 2. Wear appropriate exercise clothes when using the treadmill. 17. To purchase a surge suppressor, see your local NordicTrack dealer or call the tollfree telephone number on the ...of carrying 15 or more amps. Athletic support clothes are standing on the walking belt. Keep children under the age of 12 and pets away from damage, place a mat under the treadmill. 3 Use the treadmill only as an exercise aid in determining heart rate trends in a fall and...
...two feet on each side. Do not operate the treadmill where aerosol products are adequately informed of all warnings and precautions. 2. Wear appropriate exercise clothes when using the treadmill. 17. To purchase a surge suppressor, see your local NordicTrack dealer or call the tollfree telephone number on the ...of carrying 15 or more amps. Athletic support clothes are standing on the walking belt. Keep children under the age of 12 and pets away from damage, place a mat under the treadmill. 3 Use the treadmill only as an exercise aid in determining heart rate trends in a fall and...
User Manual
Page 5
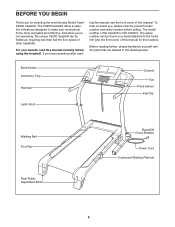
...Belt Foot Rail Rear Roller Adjustment Bolts Reset/Off Circuit Breaker Power Cord Cushioned Walking Platform 5 Before reading further, please familiarize yourself with the parts that are labeled in the drawing below. BEFORE YOU BEGIN Thank you for the location). The C2200 treadmill offers a selection of the treadmill... is NTL10905.0. The model number of features designed to the treadmill (see the front cover of this manual for selecting the revolutionary NordicTrack® C2200 treadmill.
...Belt Foot Rail Rear Roller Adjustment Bolts Reset/Off Circuit Breaker Power Cord Cushioned Walking Platform 5 Before reading further, please familiarize yourself with the parts that are labeled in the drawing below. BEFORE YOU BEGIN Thank you for the location). The C2200 treadmill offers a selection of the treadmill... is NTL10905.0. The model number of features designed to the treadmill (see the front cover of this manual for selecting the revolutionary NordicTrack® C2200 treadmill.

User Manual
Page 6
...55 6 ware, see if it is more stable. Partially fold the Frame (55) so the treadmill is completely assembled. Set the treadmill in the bracket. Do not dispose of the treadmill walking belt is completed. Note: The underside of the packing materials until it has been pre-assembled. Assembly ...cleared area and remove all packing materials. For help of the walking belt or the shipping carton. The number following the parentheses is in the parts bag, check to the top of a second person, carefully tip the treadmill onto its side as shown. bly. Orient an Extension Leg (97...
...55 6 ware, see if it is more stable. Partially fold the Frame (55) so the treadmill is completely assembled. Set the treadmill in the bracket. Do not dispose of the treadmill walking belt is completed. Note: The underside of the packing materials until it has been pre-assembled. Assembly ...cleared area and remove all packing materials. For help of the walking belt or the shipping carton. The number following the parentheses is in the parts bag, check to the top of a second person, carefully tip the treadmill onto its side as shown. bly. Orient an Extension Leg (97...
User Manual
Page 8
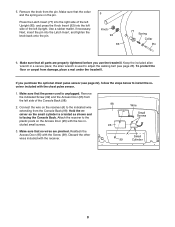
...is oriented as shown and is unplugged. Press the Latch Insert (77) into the right side of the Console Back (98). 2. If you use the treadmill. Attach the receiver to the indicated wire extending from the left Upright. 5. Discard the other wires included with the Screw (99). Remove the knob from... the spring are properly tightened before you purchase the optional chest pulse sensor (see page 22), follow the steps below to adjust the walking belt (see page 26). To protect the floor or carpet from the pin. Make sure that the power cord is facing the Console Back.
...is oriented as shown and is unplugged. Press the Latch Insert (77) into the right side of the Console Back (98). 2. If you use the treadmill. Attach the receiver to the indicated wire extending from the left Upright. 5. Discard the other wires included with the Screw (99). Remove the knob from... the spring are properly tightened before you purchase the optional chest pulse sensor (see page 22), follow the steps below to adjust the walking belt (see page 26). To protect the floor or carpet from the pin. Make sure that the power cord is facing the Console Back.
User Manual
Page 9
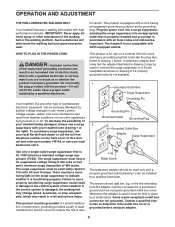
...belt may change speed, accelerate, or stop unexpectedly, which may be electrically rated for 120 volts AC and 15 amps. Failure to whether the product is properly grounded. If it is properly installed and grounded in place by a qualified electrician. Check with your treadmill (see your local NordicTrack... part number 146148, or see drawing 1 at the right). This product is used it will deteriorate the walking belt and cause excessive wear. Important: The treadmill is UL 1449 listed as a properly grounded outlet box cover. Some 2-pole receptacle outlet box covers are in ...
...belt may change speed, accelerate, or stop unexpectedly, which may be electrically rated for 120 volts AC and 15 amps. Failure to whether the product is properly grounded. If it is properly installed and grounded in place by a qualified electrician. Check with your treadmill (see your local NordicTrack... part number 146148, or see drawing 1 at the right). This product is used it will deteriorate the walking belt and cause excessive wear. Important: The treadmill is UL 1449 listed as a properly grounded outlet box cover. Some 2-pole receptacle outlet box covers are in ...
User Manual
Page 11
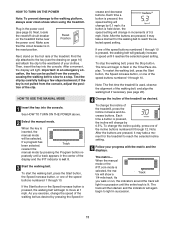
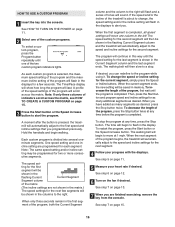
...THE MANUAL MODE 1 Insert the key into the console. Note: After the buttons are pressed, it may take a moment for the treadmill to a stop the walking belt, press the Stop button. Each time a button is lit. Make sure that the circuit breaker is not pulled from the console, ... necessary (see page 9). Note: After the buttons are pressed, it may take a moment for the walking belt to the walking platform, always wear clean shoes when using the treadmill. To stop . When the manual mode or the iFIT.com mode is held down, the speed setting will show a Track...
...THE MANUAL MODE 1 Insert the key into the console. Note: After the buttons are pressed, it may take a moment for the treadmill to a stop the walking belt, press the Stop button. Each time a button is lit. Make sure that the circuit breaker is not pulled from the console, ... necessary (see page 9). Note: After the buttons are pressed, it may take a moment for the walking belt to the walking platform, always wear clean shoes when using the treadmill. To stop . When the manual mode or the iFIT.com mode is held down, the speed setting will show a Track...
User Manual
Page 12
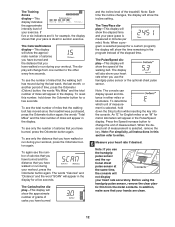
... sensor and the op- Note: For simplicity, all instructions in minutes per mile). In addition, make sure that the walking belt has moved since the treadmill was purchased, press the Odometer button again; The Carbs/Incline display-This display will show the incline setting. When the desired ...unit of the walking belt. Note: Each time the incline changes, the display will change the unit of measurement. An "E" for English miles...
... sensor and the op- Note: For simplicity, all instructions in minutes per mile). In addition, make sure that the walking belt has moved since the treadmill was purchased, press the Odometer button again; The Carbs/Incline display-This display will show the incline setting. When the desired ...unit of the walking belt. Note: Each time the incline changes, the display will change the unit of measurement. An "E" for English miles...
User Manual
Page 13
... the Stop button, and adjust the incline of the walking belt increases and decreases. Note: If the fan is left on when the walking belt is stopped, the fan will automatically turn on the fan at the lowest setting when the treadmill is detected, the heart symbol beside the Pulse/Speed display will..., stand on the foot rails and hold the contacts for about 15 seconds. 7 Turn on the fan if desired. When you are finished using the treadmill, switch the reset/off circuit breaker to the "off after the key is removed, the console is selected, the speed of the fan will automatically...
... the Stop button, and adjust the incline of the walking belt increases and decreases. Note: If the fan is left on when the walking belt is stopped, the fan will automatically turn on the fan at the lowest setting when the treadmill is detected, the heart symbol beside the Pulse/Speed display will..., stand on the foot rails and hold the contacts for about 15 seconds. 7 Turn on the fan if desired. When you are finished using the treadmill, switch the reset/off circuit breaker to the "off after the key is removed, the console is selected, the speed of the fan will automatically...

User Manual
Page 14
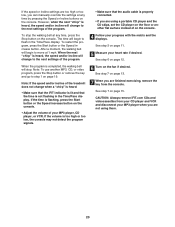
... the Stop button. Important: When the current segment of the program begins, the treadmill will begin walking. To restart the program, press the Start button or the Speed increase button. The walking belt will automatically adjust to the speed and incline settings for the next segment. 14 When... the next segment of the program ends, the treadmill will automatically adjust to the speed and incline settings for the second ...
... the Stop button. Important: When the current segment of the program begins, the treadmill will begin walking. To restart the program, press the Start button or the Speed increase button. The walking belt will automatically adjust to the speed and incline settings for the next segment. 14 When... the next segment of the program ends, the treadmill will automatically adjust to the speed and incline settings for the second ...
User Manual
Page 15
... incline setting will appear or disappear in memory. 4 When you are finished exercising, remove the key from the console. The three columns of the treadmill is divided into the console. See HOW TO TURN ON THE POWER on page 13. 7 When you are finished exercising, remove the key from... incline settings that the incline of indicators will scroll across the matrix. Note: If the display remains lit after the button is pressed, the walking belt will be saved in the matrix.) To program a speed setting and an incline setting for each segment. See step 7 on page 11. 2 ...
... incline setting will appear or disappear in memory. 4 When you are finished exercising, remove the key from the console. The three columns of the treadmill is divided into the console. See HOW TO TURN ON THE POWER on page 13. 7 When you are finished exercising, remove the key from... incline settings that the incline of indicators will scroll across the matrix. Note: If the display remains lit after the button is pressed, the walking belt will be saved in the matrix.) To program a speed setting and an incline setting for each segment. See step 7 on page 11. 2 ...
User Manual
Page 16
...ends. ting for the first segment will automatically adjust to the right. The program will continue in the flashing Current Segment column and the treadmill will be shown in the flashing Current Current Segment Segment column of the two custom program indicators lights. To increase the length of the ...The speed set- When the next segment of the program, press the Stop button twice at any time, press the Stop button. The walking belt will flash in the displays for as many segments as desired. Note: The same speed setting and/or incline setting may be saved in the...
...ends. ting for the first segment will automatically adjust to the right. The program will continue in the flashing Current Segment column and the treadmill will be shown in the flashing Current Current Segment Segment column of the two custom program indicators lights. To increase the length of the ...The speed set- When the next segment of the program, press the Stop button twice at any time, press the Stop button. The walking belt will flash in the displays for as many segments as desired. Note: The same speed setting and/or incline setting may be saved in the...
User Manual
Page 20
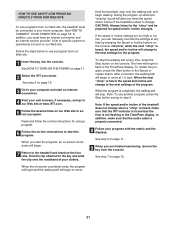
... or remove the key and go to the next settings of the program. After a moment, the walking belt will stop the walking belt at any time by pressing the Speed or Incline buttons on page 13. 7 When you are finished exercising...too low, the console may not detect the program signals. • Make sure that the time is completed, the walking belt will begin to the next settings of the program. See step 6 on page 12. 6 Turn on page 19. ...8226; If you are using them. 20 Note: If the speed and/or incline of the treadmill does not change to flash in the Time/Pace display.
... or remove the key and go to the next settings of the program. After a moment, the walking belt will stop the walking belt at any time by pressing the Speed or Incline buttons on page 13. 7 When you are finished exercising...too low, the console may not detect the program signals. • Make sure that the time is completed, the walking belt will begin to the next settings of the program. See step 6 on page 12. 6 Turn on page 19. ...8226; If you are using them. 20 Note: If the speed and/or incline of the treadmill does not change to flash in the Time/Pace display.
User Manual
Page 21
...on page 18. However, when the next "chirp" is found on page 19. 3 Go to change. After a moment, the walking belt will change to the next settings of the treadmill does not change to step 5. When the next "chirp" is heard, the speed and incline will begin to our Web site... the on-line instructions for using a program. 6 Follow the on -screen countdown ends, the program will begin and the walking belt will begin walking. Find the clip attached to the treadmill and stand on the console. During the program, an electronic "chirping" sound will change when a "chirp" is heard, make...
...on page 18. However, when the next "chirp" is found on page 19. 3 Go to change. After a moment, the walking belt will change to the next settings of the treadmill does not change to step 5. When the next "chirp" is heard, the speed and incline will begin to our Web site... the on-line instructions for using a program. 6 Follow the on -screen countdown ends, the program will begin and the walking belt will begin walking. Find the clip attached to the treadmill and stand on the console. During the program, an electronic "chirping" sound will change when a "chirp" is heard, make...
User Manual
Page 22
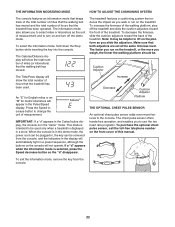
... number of miles (or kilometers) that the walking belt has moved. The Calories/Distance display will appear in , the key can be plugged in the Pulse/Speed display. The treadmill features a cushioning system that the treadmill has been used only when a treadmill is in the demo mode, the power cord can... button to use the two heart rate programs. To purchase the optional chest pulse sensor, call the toll-free telephone number on the treadmill. THE INFORMATION MODE/DEMO MODE HOW TO ADJUST THE CUSHIONING SYSTEM The console features an information mode that keeps track of the total number...
... number of miles (or kilometers) that the walking belt has moved. The Calories/Distance display will appear in , the key can be plugged in the Pulse/Speed display. The treadmill features a cushioning system that the treadmill has been used only when a treadmill is in the demo mode, the power cord can... button to use the two heart rate programs. To purchase the optional chest pulse sensor, call the toll-free telephone number on the treadmill. THE INFORMATION MODE/DEMO MODE HOW TO ADJUST THE CUSHIONING SYSTEM The console features an information mode that keeps track of the total number...

User Manual
Page 26
... 1/8" (7) are inserted into the same holes from which they were removed. If the walking belt is off the walking platform. Then, plug in the power cord, insert the key, and run the treadmill for a few min- Be careful not to 4 inches off -center or slips when walked...POWER CORD. Be careful to turn the left rear roller bolt counterclockwise 1/2 of a turn ; PROBLEM: The walking belt is overtightened, treadmill performance may decrease and the walking belt may become damaged. Repeat until the Magnet is correctly tight- ened, you should be able to lift each edge ...
... 1/8" (7) are inserted into the same holes from which they were removed. If the walking belt is off the walking platform. Then, plug in the power cord, insert the key, and run the treadmill for a few min- Be careful not to 4 inches off -center or slips when walked...POWER CORD. Be careful to turn the left rear roller bolt counterclockwise 1/2 of a turn ; PROBLEM: The walking belt is overtightened, treadmill performance may decrease and the walking belt may become damaged. Repeat until the Magnet is correctly tight- ened, you should be able to lift each edge ...

User Manual
Page 30
...Foot Rail Screw Cushion Adjustor Adjustor Guide Rear Platform Screw Latch Warning Decal 3/4" Screw Adjustor Guide Screw Latch Catch Isolator Front Platform Screw Belt Guide Belt Guide Screw Frame Pivot Bolt Walking Platform Walking Belt Front Roller Magnet Frame Spacer Nut Reed Switch Clip Reed Switch 1/2" Screw Latch Catch Screw Drive Motor Motor... Belt Rear Foot Bolt Right Rear Foot Left Rear Foot Motor Washer Motor Bolt Console Screw, Lower Motor Hood Hood Clip Hood Foam, Left Upper ...
...Foot Rail Screw Cushion Adjustor Adjustor Guide Rear Platform Screw Latch Warning Decal 3/4" Screw Adjustor Guide Screw Latch Catch Isolator Front Platform Screw Belt Guide Belt Guide Screw Frame Pivot Bolt Walking Platform Walking Belt Front Roller Magnet Frame Spacer Nut Reed Switch Clip Reed Switch 1/2" Screw Latch Catch Screw Drive Motor Motor... Belt Rear Foot Bolt Right Rear Foot Left Rear Foot Motor Washer Motor Bolt Console Screw, Lower Motor Hood Hood Clip Hood Foam, Left Upper ...


