

English Manual
Page 2
... actual size. If a decal is a registered trademark of the warning decals. TABLE OF CONTENTS WARNING DECAL PLACEMENT 2 IMPORTANT PRECAUTIONS 3 BEFORE YOU BEGIN 7 PART IDENTIFICATION CHART 8 ASSEMBLY 9 THE CHEST HEART RATE MONITOR 17 OPERATION AND ADJUSTMENT 18 HOW TO FOLD AND MOVE THE TREADMILL 28 TROUBLESHOOTING 29 EXERCISE GUIDELINES 32 PART LIST 34 EXPLODED DRAWING 36 ORDERING REPLACEMENT PARTS Back Cover LIMITED WARRANTY Back Cover WARNING DECAL PLACEMENT This drawing shows the locations of ICON...
... actual size. If a decal is a registered trademark of the warning decals. TABLE OF CONTENTS WARNING DECAL PLACEMENT 2 IMPORTANT PRECAUTIONS 3 BEFORE YOU BEGIN 7 PART IDENTIFICATION CHART 8 ASSEMBLY 9 THE CHEST HEART RATE MONITOR 17 OPERATION AND ADJUSTMENT 18 HOW TO FOLD AND MOVE THE TREADMILL 28 TROUBLESHOOTING 29 EXERCISE GUIDELINES 32 PART LIST 34 EXPLODED DRAWING 36 ORDERING REPLACEMENT PARTS Back Cover LIMITED WARRANTY Back Cover WARNING DECAL PLACEMENT This drawing shows the locations of ICON...
English Manual
Page 3
... support clothes are adequately informed of all warnings and precautions. 2. Do not operate the treadmill if the power cord or plug is damaged, or if the treadmill is not working properly.) 17. To avoid overloading the circuit, do not plug other electrical devices, except for home use the treadmill in damage to the control system of the treadmill. The treadmill is the responsibility of the owner...
... support clothes are adequately informed of all warnings and precautions. 2. Do not operate the treadmill if the power cord or plug is damaged, or if the treadmill is not working properly.) 17. To avoid overloading the circuit, do not plug other electrical devices, except for home use the treadmill in damage to the control system of the treadmill. The treadmill is the responsibility of the owner...
English Manual
Page 4
... treadmill, and before clean- Never remove the motor hood unless instructed to move the treadmill. 23. If you feel faint or if you experience pain while exercising, stop immediately and cool down. Do not attempt to do so by an authorized service representative. When folding or moving the treadmill, make sure that the storage latch is not in serious injury or death. Always remove the key, press the power switch...
... treadmill, and before clean- Never remove the motor hood unless instructed to move the treadmill. 23. If you feel faint or if you experience pain while exercising, stop immediately and cool down. Do not attempt to do so by an authorized service representative. When folding or moving the treadmill, make sure that the storage latch is not in serious injury or death. Always remove the key, press the power switch...

English Manual
Page 7
... us. The model number and the location of the serial number decal are shown on the front cover of this manual. Length: 6 ft. 10 in. (209 cm) Width: 3 ft. 1 in. (93 cm) Handrail Upright Console Heart Rate Monitor Key/Clip Walking Belt Foot Rail Idler Roller Adjustment Screws Power Switch Power Cord Platform Cushion 7 And when you , please note the product model number and serial number before using the treadmill. If you for selecting the revolutionary NORDICTRACK® C 970 PRO treadmill. BEFORE...
... us. The model number and the location of the serial number decal are shown on the front cover of this manual. Length: 6 ft. 10 in. (209 cm) Width: 3 ft. 1 in. (93 cm) Handrail Upright Console Heart Rate Monitor Key/Clip Walking Belt Foot Rail Idler Roller Adjustment Screws Power Switch Power Cord Platform Cushion 7 And when you , please note the product model number and serial number before using the treadmill. If you for selecting the revolutionary NORDICTRACK® C 970 PRO treadmill. BEFORE...
English Manual
Page 12
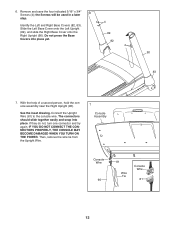
... and Right Base Covers (82, 83). the Screws will be used in a later 6 step. If they do not, turn one connector and try again. See the inset drawing. Slide the Left Base Cover onto the Left Upright (89), and slide the Right Base Cover onto the Right Upright (90). Then, remove the wire tie from the Upright Wire. 7 Console Assembly Console Wire 90 81 Wire Tie Console Wire 81 12...
... and Right Base Covers (82, 83). the Screws will be used in a later 6 step. If they do not, turn one connector and try again. See the inset drawing. Slide the Left Base Cover onto the Left Upright (89), and slide the Right Base Cover onto the Right Upright (90). Then, remove the wire tie from the Upright Wire. 7 Console Assembly Console Wire 90 81 Wire Tie Console Wire 81 12...

English Manual
Page 18
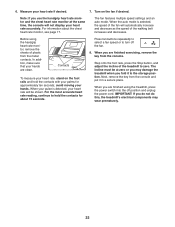
... whether the treadmill is UL 1449 listed as a properly grounded outlet box cover. The surge suppressor must be a monitoring light on a A temporary adapter may not be compatible with AFCI-equipped outlets. 1 Grounded Outlet Grounding Pin Grounding Pin Surge Suppressor Plug in your home’'s power. OPERATION AND ADJUSTMENT HOW TO CONNECT THE POWER CORD Use a Surge Suppressor Your treadmill, like other electronic equipment, can be installed by...
... whether the treadmill is UL 1449 listed as a properly grounded outlet box cover. The surge suppressor must be a monitoring light on a A temporary adapter may not be compatible with AFCI-equipped outlets. 1 Grounded Outlet Grounding Pin Grounding Pin Surge Suppressor Plug in your home’'s power. OPERATION AND ADJUSTMENT HOW TO CONNECT THE POWER CORD Use a Surge Suppressor Your treadmill, like other electronic equipment, can be installed by...
English Manual
Page 19
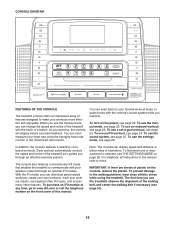
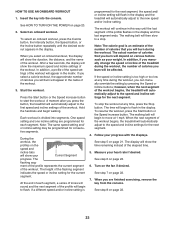
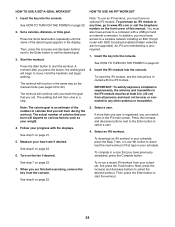
... workout automatically controls the speed and incline of the treadmill as it guides you exercise, the console will display instant exercise feedback. The rst time you use the sound system, see page 31). 19 You can even measure your workout results, race against other iFit users, and access many other features. To turn on page 26. Note: The console can download personalized workouts, create your own workouts, track your heart rate using...
... workout automatically controls the speed and incline of the treadmill as it guides you exercise, the console will display instant exercise feedback. The rst time you use the sound system, see page 31). 19 You can even measure your workout results, race against other iFit users, and access many other features. To turn on page 26. Note: The console can download personalized workouts, create your own workouts, track your heart rate using...
English Manual
Page 20
... the demo mode, hold down the Stop button for the walking belt to a stop the walking belt, press the Stop button. Start the walking belt. Press the power switch into the console. Find the clip attached to turn off the demo mode. if you exercise, change in the display. For example, to move at the left. 2. If you do not do this, you are not connected to iFit, the manual mode will begin to select a speed setting of the treadmill. To stop . Reset IMPORTANT: The console features a display demo mode...
... the demo mode, hold down the Stop button for the walking belt to a stop the walking belt, press the Stop button. Start the walking belt. Press the power switch into the console. Find the clip attached to turn off the demo mode. if you exercise, change in the display. For example, to move at the left. 2. If you do not do this, you are not connected to iFit, the manual mode will begin to select a speed setting of the treadmill. To stop . Reset IMPORTANT: The console features a display demo mode...
English Manual
Page 21
... represents the amount of the numbered 1 Step Incline buttons. 4. To change the incline of the treadmill, press the Incline increase or decrease button or one of each minute. The Speed tab will show a prole of the incline settings of laps you exercise, the workout intensity level bar will indicate the approximate intensity level of the walking belt •• Your heart rate (see THE SETTINGS MODE on page 22) ••...
... represents the amount of the numbered 1 Step Incline buttons. 4. To change the incline of the treadmill, press the Incline increase or decrease button or one of each minute. The Speed tab will show a prole of the incline settings of laps you exercise, the workout intensity level bar will indicate the approximate intensity level of the walking belt •• Your heart rate (see THE SETTINGS MODE on page 22) ••...
English Manual
Page 22
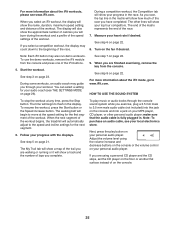
... your pulse is selected, the speed of the walking belt increases and decreases. When you may wear prematurely. 22 When you fold it in a secure place. For information about 15 seconds. For the most accurate heart rate reading, continue to turn off position and unplug the power cord. Next, remove the key from the console and put it to zero. Before using the treadmill, press the power switch into...
... your pulse is selected, the speed of the walking belt increases and decreases. When you may wear prematurely. 22 When you fold it in a secure place. For information about 15 seconds. For the most accurate heart rate reading, continue to turn off position and unplug the power cord. Next, remove the key from the console and put it to zero. Before using the treadmill, press the power switch into...
English Manual
Page 23
... are programmed for consecutive segments. Hold the handrails and begin to move at any time, press the Stop button. One speed setting and one incline setting are nished exercising, remove the key from the console. Note: The same speed setting and/ or incline setting may be affected. During the workout, the proles on page 21. The height of the workout. The walking belt will appear in the display and the treadmill...
... are programmed for consecutive segments. Hold the handrails and begin to move at any time, press the Stop button. One speed setting and one incline setting are nished exercising, remove the key from the console. Note: The same speed setting and/ or incline setting may be affected. During the workout, the proles on page 21. The height of the workout. The walking belt will appear in the display and the treadmill...
English Manual
Page 24
... Enter button to set . Insert the key into the console. In addition, you can switch users in your weight. 4. Turn on page 21. 5. Insert the key into the console. Select an iFit workout. See step 5 on the fan if desired. 3. See HOW TO TURN ON THE POWER on page 20. 2. Press the Start button to a computer with SSID broadcast enabled (hidden networks are finished exercising, remove the key from the console. Set a calories, distance...
... Enter button to set . Insert the key into the console. In addition, you can switch users in your weight. 4. Turn on page 21. 5. Insert the key into the console. Select an iFit workout. See step 5 on the fan if desired. 3. See HOW TO TURN ON THE POWER on page 20. 2. Press the Start button to a computer with SSID broadcast enabled (hidden networks are finished exercising, remove the key from the console. Set a calories, distance...
English Manual
Page 25
... the workout begins, the treadmill will show the approximate number of on your local electronics store. When you are nished exercising, remove the key from the console and press one of the workout. See step 6 on page 22. Note: To purchase an audio cable, see your personal audio player. The display will also show the name, duration, maximum speed setting, and distance of the iFit buttons. 5. The walking belt will...
... the workout begins, the treadmill will show the approximate number of on your local electronics store. When you are nished exercising, remove the key from the console and press one of the workout. See step 6 on page 22. Note: To purchase an audio cable, see your personal audio player. The display will also show the name, duration, maximum speed setting, and distance of the iFit buttons. 5. The walking belt will...
English Manual
Page 26
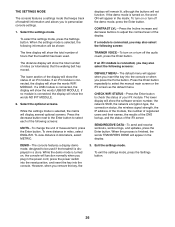
... will display several optional screens. TRAINER VOICE—-To turn off the demo mode, press the Enter button. The distance display will function normally when you plug in a store. To view distance in kilometers, select METRIC. Select the settings mode. If a module is connected, the display will show the total number of hours that the walking belt has moved. The lower section of the display will show the words NO IFIT MODULE...
... will display several optional screens. TRAINER VOICE—-To turn off the demo mode, press the Enter button. The distance display will function normally when you plug in a store. To view distance in kilometers, select METRIC. Select the settings mode. If a module is connected, the display will show the total number of hours that the walking belt has moved. The lower section of the display will show the words NO IFIT MODULE...

English Manual
Page 28
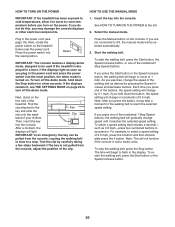
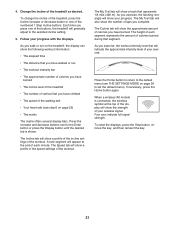
... the storage position. Then, remove the key and unplug the power cord. Keep the treadmill out of the treadmill frame, press the storage latch with both hands and carefully push or pull the treadmill to zero before you fold the treadmill. Press on the frame, and do not move the treadmill. 1. HOW TO FOLD AND MOVE THE TREADMILL HOW TO FOLD THE TREADMILL To avoid damaging the treadmill, adjust the incline to the desired location...
... the storage position. Then, remove the key and unplug the power cord. Keep the treadmill out of the treadmill frame, press the storage latch with both hands and carefully push or pull the treadmill to zero before you fold the treadmill. Press on the frame, and do not move the treadmill. 1. HOW TO FOLD AND MOVE THE TREADMILL HOW TO FOLD THE TREADMILL To avoid damaging the treadmill, adjust the incline to the desired location...
English Manual
Page 29
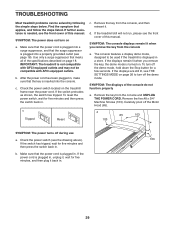
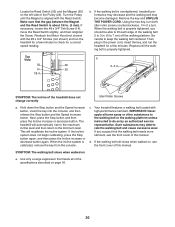
... the simple steps below. Remove the ve #8 x 3/4" Machine Screws (103). If further assistance is turned on a. b. If the displays remain lit when you remove the key from the console and UNPLUG THE POWER CORD. To turn on . a 65 103 103 SYMPTOM: The power turns off the Motor Hood (65). b. Make sure that the power cord is plugged in . 29 SYMPTOM: The power does not turn off the demo mode. Check the power switch located on...
... the simple steps below. Remove the ve #8 x 3/4" Machine Screws (103). If further assistance is turned on a. b. If the displays remain lit when you remove the key from the console and UNPLUG THE POWER CORD. To turn on . a 65 103 103 SYMPTOM: The power turns off the Motor Hood (65). b. Make sure that the power cord is plugged in . 29 SYMPTOM: The power does not turn off the demo mode. Check the power switch located on...
English Manual
Page 30
... a. Locate the Reed Switch (52) and the Magnet (50) on , see the front cover of this manual. Then, plug in the power cord, insert the key, and run the treadmill for a few minutes. Repeat until the Magnet is properly tightened. If the incline system does not begin calibrating, press the Stop button again, and then press the Incline increase or decrease button again. Use only a surge suppressor that the walking belt needs more lubricant...
... a. Locate the Reed Switch (52) and the Magnet (50) on , see the front cover of this manual. Then, plug in the power cord, insert the key, and run the treadmill for a few minutes. Repeat until the Magnet is properly tightened. If the incline system does not begin calibrating, press the Stop button again, and then press the Incline increase or decrease button again. Use only a surge suppressor that the walking belt needs more lubricant...
English Manual
Page 31
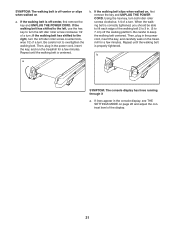
... treadmill for a few minutes. Then, plug in . (5 to the right, turn the left idler roller screw clockwise 1/2 of a turn . Repeat until the walking belt is off-center, rst remove the key and UNPLUG THE POWER CORD. a b. b SYMPTOM: The console display has lines running through it a. Then, plug in the console display, see THE SETTINGS MODE on , rst remove the key and UNPLUG THE POWER CORD. If the walking belt is properly tightened. If the walking belt slips...
... treadmill for a few minutes. Then, plug in . (5 to the right, turn the left idler roller screw clockwise 1/2 of a turn . Repeat until the walking belt is off-center, rst remove the key and UNPLUG THE POWER CORD. a b. b SYMPTOM: The console display has lines running through it a. Then, plug in the console display, see THE SETTINGS MODE on , rst remove the key and UNPLUG THE POWER CORD. If the walking belt is properly tightened. If the walking belt slips...

English Manual
Page 32
... and enjoyable part of exercise does your body begin to plan your everyday life. 32 The chart below shows recommended heart rates for successful results. For aerobic exercise, adjust the intensity of oxygen for maximum fat burning, and the highest number is not a medical device. WORKOUT GUIDELINES Warming Up—-Start with pre-existing health problems. The heart rate monitor is the heart rate for exercise. The heart rate monitor is near...
... and enjoyable part of exercise does your body begin to plan your everyday life. 32 The chart below shows recommended heart rates for successful results. For aerobic exercise, adjust the intensity of oxygen for maximum fat burning, and the highest number is not a medical device. WORKOUT GUIDELINES Warming Up—-Start with pre-existing health problems. The heart rate monitor is the heart rate for exercise. The heart rate monitor is near...

English Manual
Page 40
...; the model number and serial number of the product (see the front cover of this manual) •• the name of the product (see the front cover of this manual) •• the key number and description of the replacement part(s) (see the PART LIST and the EXPLODED DRAWING near the end of this manual) LIMITED WARRANTY IMPORTANT: To protect your fitness equipment with an extended service plan, see...
...; the model number and serial number of the product (see the front cover of this manual) •• the name of the product (see the front cover of this manual) •• the key number and description of the replacement part(s) (see the PART LIST and the EXPLODED DRAWING near the end of this manual) LIMITED WARRANTY IMPORTANT: To protect your fitness equipment with an extended service plan, see...


