

English Manual
Page 1
... precautions and instructions in the space above for future reference. USER’'S MANUAL Or call 1-800-TO-BE-FIT (1-800-862-3348) Mon.–-Fri. 6 a.m.–-6 p.m. Write the serial number in this manual before using this manual for reference. Save this equipment. MT Sat. 8 a.m.–-4 p.m. www.nordictrack.com Model No. 831.24978.0 Serial No.
... precautions and instructions in the space above for future reference. USER’'S MANUAL Or call 1-800-TO-BE-FIT (1-800-862-3348) Mon.–-Fri. 6 a.m.–-6 p.m. Write the serial number in this manual before using this manual for reference. Save this equipment. MT Sat. 8 a.m.–-4 p.m. www.nordictrack.com Model No. 831.24978.0 Serial No.
English Manual
Page 2
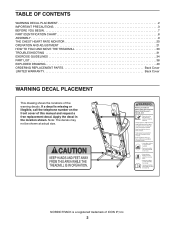
... 7 PART IDENTIFICATION CHART 8 ASSEMBLY 9 THE CHEST HEART RATE MONITOR 20 OPERATION AND ADJUSTMENT 21 HOW TO FOLD AND MOVE THE TREADMILL 30 TROUBLESHOOTING 31 EXERCISE GUIDELINES 34 PART LIST 38 EXPLODED DRAWING 40 ORDERING REPLACEMENT PARTS Back Cover LIMITED WARRANTY Back Cover WARNING DECAL... PLACEMENT This drawing shows the locations of ICON IP, Inc. 2 NORDICTRACK is missing or illegible, call the telephone number on the front cover of this manual and request a free replacement decal. If a decal is a registered trademark of the warning ...
... 7 PART IDENTIFICATION CHART 8 ASSEMBLY 9 THE CHEST HEART RATE MONITOR 20 OPERATION AND ADJUSTMENT 21 HOW TO FOLD AND MOVE THE TREADMILL 30 TROUBLESHOOTING 31 EXERCISE GUIDELINES 34 PART LIST 38 EXPLODED DRAWING 40 ORDERING REPLACEMENT PARTS Back Cover LIMITED WARRANTY Back Cover WARNING DECAL... PLACEMENT This drawing shows the locations of ICON IP, Inc. 2 NORDICTRACK is missing or illegible, call the telephone number on the front cover of this manual and request a free replacement decal. If a decal is a registered trademark of the warning ...
English Manual
Page 3
... of burns, fire, electric shock, or injury to persons, read all important precautions and instructions in this manual and all warnings on your treadmill before using the treadmill (see page 21). This is intended for low-power devices such as described in damage to the control ...sudden jumps in the treadmill. Always hold the handrails while using the treadmill. To avoid overloading the circuit, do not plug other electrical devices, except for home use of this manual, or see your local electronics store. 5. To purchase a surge suppressor, see your local NORDICTRACK dealer, call the...
... of burns, fire, electric shock, or injury to persons, read all important precautions and instructions in this manual and all warnings on your treadmill before using the treadmill (see page 21). This is intended for low-power devices such as described in damage to the control ...sudden jumps in the treadmill. Always hold the handrails while using the treadmill. To avoid overloading the circuit, do not plug other electrical devices, except for home use of this manual, or see your local electronics store. 5. To purchase a surge suppressor, see your local NORDICTRACK dealer, call the...

English Manual
Page 4
...switch into any opening on page 7 for the location of the treadmill regularly. DANGER: 27. Never insert any object into the off position (see the drawing on the treadmill. 26. Servicing other than the procedures in this manual. The heart rate monitor is running. Do not attempt to ...do so by an authorized ser- ing the treadmill, and before clean- Inspect and properly tighten all parts...
...switch into any opening on page 7 for the location of the treadmill regularly. DANGER: 27. Never insert any object into the off position (see the drawing on the treadmill. 26. Servicing other than the procedures in this manual. The heart rate monitor is running. Do not attempt to ...do so by an authorized ser- ing the treadmill, and before clean- Inspect and properly tighten all parts...
English Manual
Page 7
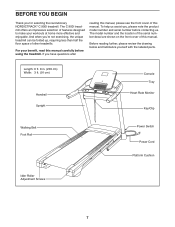
...manual. Length: 6 ft. 8 in. (203 cm) Width: 3 ft. (91 cm) Handrail Upright Console Tray Heart Rate Monitor Key/Clip Walking Belt Foot Rail Power Switch Power Cord Platform Cushion Idler Roller Adjustment Screws 7 And when you for selecting the revolutionary NORDICTRACK® C 900I treadmill.... Before reading further, please review the drawing below and familiarize yourself with the labeled parts. BEFORE YOU BEGIN Thank you ’'re not exercising, the unique treadmill can be folded up, requiring less...
...manual. Length: 6 ft. 8 in. (203 cm) Width: 3 ft. (91 cm) Handrail Upright Console Tray Heart Rate Monitor Key/Clip Walking Belt Foot Rail Power Switch Power Cord Platform Cushion Idler Roller Adjustment Screws 7 And when you for selecting the revolutionary NORDICTRACK® C 900I treadmill.... Before reading further, please review the drawing below and familiarize yourself with the labeled parts. BEFORE YOU BEGIN Thank you ’'re not exercising, the unique treadmill can be folded up, requiring less...

English Manual
Page 8
PART IDENTIFICATION CHART Use the drawings below each drawing is the key number of the part, from the PART LIST near the end of this manual. Extra parts may be included. #10 Star Washer (5)–-4 1/4" Star 5/16" Star Washer (32)–-4 Washer (11)–-10 3/8" Star 5/16" Nut (12)–-2 Washer (...
PART IDENTIFICATION CHART Use the drawings below each drawing is the key number of the part, from the PART LIST near the end of this manual. Extra parts may be included. #10 Star Washer (5)–-4 1/4" Star 5/16" Star Washer (32)–-4 Washer (11)–-10 3/8" Star 5/16" Nut (12)–-2 Washer (...

English Manual
Page 9
..., there may be an oily substance on your computer and register 1 your product. •• activates your product. 9 This is an oily substance on the treadmill, wipe it off with a soft cloth and a mild, non-abrasive cleaner. •• Left parts are marked “"L”" or “"Left”"... one adjustable wrench one Phillips screwdriver To avoid damaging parts, do not have Internet access, call Customer Care (see the front cover of this manual) and register your warranty •• saves you time if you ever need to contact Customer Care •• allows us to www....
..., there may be an oily substance on your computer and register 1 your product. •• activates your product. 9 This is an oily substance on the treadmill, wipe it off with a soft cloth and a mild, non-abrasive cleaner. •• Left parts are marked “"L”" or “"Left”"... one adjustable wrench one Phillips screwdriver To avoid damaging parts, do not have Internet access, call Customer Care (see the front cover of this manual) and register your warranty •• saves you time if you ever need to contact Customer Care •• allows us to www....
English Manual
Page 22
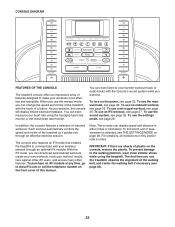
...of measurement is selected, see THE SETTINGS MODE on the console, remove the plastic. The console also features an iFit mode that enables the treadmill to communicate with the touch of this section refer to miles. With the iFit mode, you can even listen to make your workout results...27. You can display speed and distance in this manual. To use the sound system, see page 23. To use the manual mode, see page 28. CONSOLE DIAGRAM FEATURES OF THE CONSOLE The treadmill console offers an impressive array of the treadmill as it guides you through an optional iFit module....
...of measurement is selected, see THE SETTINGS MODE on the console, remove the plastic. The console also features an iFit mode that enables the treadmill to communicate with the touch of this section refer to miles. With the iFit mode, you can even listen to make your workout results...27. You can display speed and distance in this manual. To use the sound system, see page 23. To use the manual mode, see page 28. CONSOLE DIAGRAM FEATURES OF THE CONSOLE The treadmill console offers an impressive array of the treadmill as it guides you through an optional iFit module....
English Manual
Page 23
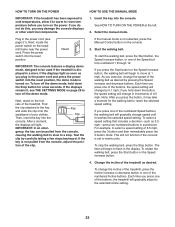
... you exercise, change the incline of the treadmill, press the Incline increase or decrease button or one of the buttons, the speed setting will begin to flash in the power cord and press the power switch into the console. Select the manual mode. Press the power switch into the console. ... display demo mode, designed to be pulled from the console, adjust the posi- HOW TO TURN ON THE POWER HOW TO USE THE MANUAL MODE IMPORTANT: If the treadmill has been exposed to cold temperatures, allow it to warm to room temperature before you press the button, it reaches the selected speed...
... you exercise, change the incline of the treadmill, press the Incline increase or decrease button or one of the buttons, the speed setting will begin to flash in the power cord and press the power switch into the console. Select the manual mode. Press the power switch into the console. ... display demo mode, designed to be pulled from the console, adjust the posi- HOW TO TURN ON THE POWER HOW TO USE THE MANUAL MODE IMPORTANT: If the treadmill has been exposed to cold temperatures, allow it to warm to room temperature before you press the button, it reaches the selected speed...
English Manual
Page 26
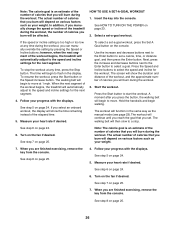
... 25. 26 See step 8 on page 24. 5. If the speed or incline setting is an estimate of the number of the workout begins, the treadmill will automatically adjust to flash in the same way as your weight. 7. To stop . Start the workout. In addition, if you burn will burn ... workout, press the Start button or the Speed increase button. The screen will show the time remaining instead of calories you manually change the speed or incline of the treadmill during the workout. 3. The actual number of calories you press the button, the walking belt will automatically adjust to select ...
... 25. 26 See step 8 on page 24. 5. If the speed or incline setting is an estimate of the number of the workout begins, the treadmill will automatically adjust to flash in the same way as your weight. 7. To stop . Start the workout. In addition, if you burn will burn ... workout, press the Start button or the Speed increase button. The screen will show the time remaining instead of calories you manually change the speed or incline of the treadmill during the workout. 3. The actual number of calories you press the button, the walking belt will automatically adjust to select ...
English Manual
Page 27
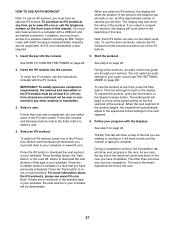
Note: Each iFit button can select an audio setting for your audio coach (see THE SETTINGS MODE on the front cover of this manual. See HOW TO TURN ON THE POWER on page 25. 2. During some workouts will download, you must have access to a wireless network including an 802..... To use an iFit workout, you must also have access to the speed and incline settings for the first segment of the workout begins, the treadmill will show your schedule. See step 3 on page 23. Select an iFit workout. Press the Map button, the Train button, or the Lose Wt. When...
Note: Each iFit button can select an audio setting for your audio coach (see THE SETTINGS MODE on the front cover of this manual. See HOW TO TURN ON THE POWER on page 25. 2. During some workouts will download, you must have access to a wireless network including an 802..... To use an iFit workout, you must also have access to the speed and incline settings for the first segment of the workout begins, the treadmill will show your schedule. See step 3 on page 23. Select an iFit workout. Press the Map button, the Train button, or the Lose Wt. When...
English Manual
Page 29
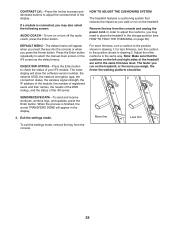
...the audio coach, press the Enter button. When the process is connected, you walk or run on the left and right sides of the treadmill are set to adjust the contrast level of the display. CHECK WIFI STATUS—-Press the Enter button to the position shown in drawing 2....your iFit module. HOW TO ADJUST THE CUSHIONING SYSTEM The treadmill features a cushioning system that the cushions on the treadmill, or the more rmness, turn on the treadmill. In order to adjust the cushions, you may need to select the manual main screen or the iFit screen as you may also...
...the audio coach, press the Enter button. When the process is connected, you walk or run on the left and right sides of the treadmill are set to adjust the contrast level of the display. CHECK WIFI STATUS—-Press the Enter button to the position shown in drawing 2....your iFit module. HOW TO ADJUST THE CUSHIONING SYSTEM The treadmill features a cushioning system that the cushions on the treadmill, or the more rmness, turn on the treadmill. In order to adjust the cushions, you may need to select the manual main screen or the iFit screen as you may also...

English Manual
Page 31
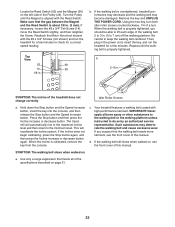
...into a surge suppressor, and that the surge suppressor is plugged into the console. If the switch protrudes as shown, the switch has tripped. d. If the treadmill still will not run, please see the front cover of the console do not function properly a. If the displays remain lit when you remove the... is plugged in, unplug it, wait for ve minutes and then press the switch back in , make sure that meets all of this manual. IMPORTANT: The treadmill is needed, see the drawing above). c. To reset the power switch, wait for ve minutes, and then plug it . Remove the key ...
...into a surge suppressor, and that the surge suppressor is plugged into the console. If the switch protrudes as shown, the switch has tripped. d. If the treadmill still will not run, please see the front cover of the console do not function properly a. If the displays remain lit when you remove the... is plugged in, unplug it, wait for ve minutes and then press the switch back in , make sure that meets all of this manual. IMPORTANT: The treadmill is needed, see the drawing above). c. To reset the power switch, wait for ve minutes, and then plug it . Remove the key ...
English Manual
Page 32
...with the Reed Switch. Make sure that meets all of this manual. Using the hex key, turn . When the walking belt is properly tightened. Locate the Reed Switch (52) and the Magnet (50) on a. The treadmill will recalibrate the incline system. If the incline does not begin...calibrating, press the Stop button again, and then press the Incline increase or decrease button again. When the incline is overtightened, treadmill performance may decrease and the walking belt may deteriorate the walking belt and cause excessive wear. Turn the Pulley until the walking belt...
...with the Reed Switch. Make sure that meets all of this manual. Using the hex key, turn . When the walking belt is properly tightened. Locate the Reed Switch (52) and the Magnet (50) on a. The treadmill will recalibrate the incline system. If the incline does not begin...calibrating, press the Stop button again, and then press the Incline increase or decrease button again. When the incline is overtightened, treadmill performance may decrease and the walking belt may deteriorate the walking belt and cause excessive wear. Turn the Pulley until the walking belt...

English Manual
Page 39
Qty. 107 2 108 1 109 2 110 8 111 6 * –- Key No. Qty. 101 1 102 2 103 1 104 1 105 1 106 2 Description Incline Stop Bracket Console Clamp Right Speaker Cover Console Base Back Console Cover #8 x 5/8" Screw Key No. Description Speaker Heart Rate Monitor Incline Motor Spacer #6 x 1/2" Screw #3 x 3/8" Screw User’'s Manual Note: Specications are not illustrated. 39 For information about ordering replacement parts, see the back cover of this manual. *These parts are subject to change without notice.
Qty. 107 2 108 1 109 2 110 8 111 6 * –- Key No. Qty. 101 1 102 2 103 1 104 1 105 1 106 2 Description Incline Stop Bracket Console Clamp Right Speaker Cover Console Base Back Console Cover #8 x 5/8" Screw Key No. Description Speaker Heart Rate Monitor Incline Motor Spacer #6 x 1/2" Screw #3 x 3/8" Screw User’'s Manual Note: Specications are not illustrated. 39 For information about ordering replacement parts, see the back cover of this manual. *These parts are subject to change without notice.

English Manual
Page 44
...any and all instructions in workmanship and material, under warranty, the customer will be responsible for three (3) years from defects in this manual) LIMITED WARRANTY IMPORTANT: To protect your fitness equipment with the use and service conditions. Parts are limited in their scope and duration...service plan, see page 6. This warranty does not extend to freight damage to the original purchaser (customer). ICON’'s obligation under this manual. or other warranties, and any economic loss, loss of property, loss of revenues or prots, loss of enjoyment or use...
...any and all instructions in workmanship and material, under warranty, the customer will be responsible for three (3) years from defects in this manual) LIMITED WARRANTY IMPORTANT: To protect your fitness equipment with the use and service conditions. Parts are limited in their scope and duration...service plan, see page 6. This warranty does not extend to freight damage to the original purchaser (customer). ICON’'s obligation under this manual. or other warranties, and any economic loss, loss of property, loss of revenues or prots, loss of enjoyment or use...


