
English Manual
Page 2
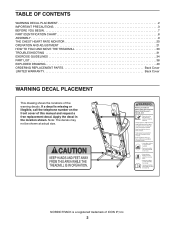
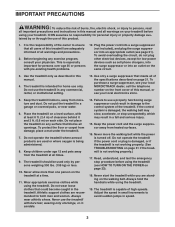
...7 PART IDENTIFICATION CHART 8 ASSEMBLY 9 THE CHEST HEART RATE MONITOR 20 OPERATION AND ADJUSTMENT 21 HOW TO FOLD AND MOVE THE TREADMILL 30 TROUBLESHOOTING 31 EXERCISE GUIDELINES 34 PART LIST 38 EXPLODED DRAWING 40 ORDERING REPLACEMENT PARTS Back Cover LIMITED WARRANTY Back Cover WARNING DECAL... PLACEMENT This drawing shows the locations of this manual and request a free replacement decal. Apply the decal in the location shown. If a decal is a registered trademark of ICON IP...
...7 PART IDENTIFICATION CHART 8 ASSEMBLY 9 THE CHEST HEART RATE MONITOR 20 OPERATION AND ADJUSTMENT 21 HOW TO FOLD AND MOVE THE TREADMILL 30 TROUBLESHOOTING 31 EXERCISE GUIDELINES 34 PART LIST 38 EXPLODED DRAWING 40 ORDERING REPLACEMENT PARTS Back Cover LIMITED WARRANTY Back Cover WARNING DECAL... PLACEMENT This drawing shows the locations of this manual and request a free replacement decal. Apply the decal in the location shown. If a decal is a registered trademark of ICON IP...
English Manual
Page 3
... and the surge suppressor away from the treadmill at least 8 ft. (2.4 m) of the treadmill. Always hold the handrails while using the treadmill. This is the responsibility of the owner to use the treadmill in this manual. 4. Do not put the treadmill in speed. 3 Failure to ensure that...surge suppressor (not included), and plug the surge suppressor into an outlet on your treadmill before using your local NORDICTRACK dealer, call the telephone number on the walking belt. Place the treadmill on a level surface, with pre-existing health problems. 12. Do not wear...
... and the surge suppressor away from the treadmill at least 8 ft. (2.4 m) of the treadmill. Always hold the handrails while using the treadmill. This is the responsibility of the owner to use the treadmill in this manual. 4. Do not put the treadmill in speed. 3 Failure to ensure that...surge suppressor (not included), and plug the surge suppressor into an outlet on your treadmill before using your local NORDICTRACK dealer, call the telephone number on the walking belt. Place the treadmill on a level surface, with pre-existing health problems. 12. Do not wear...

English Manual
Page 4
... heart rate monitor is not in use , before performing the maintenance and adjustment procedures described in this manual should be able to safely lift 45 lbs. (20 kg) to move the treadmill until it is running. Always remove the key, press the power switch into any opening on page 30...Servicing other than the procedures in the storage position. 24. The heart rate monitor is holding the frame securely in this manual. When folding or moving the treadmill, make sure that the storage latch is intended only as an exercise aid in determining heart rate trends in serious injury or...
... heart rate monitor is not in use , before performing the maintenance and adjustment procedures described in this manual should be able to safely lift 45 lbs. (20 kg) to move the treadmill until it is running. Always remove the key, press the power switch into any opening on page 30...Servicing other than the procedures in the storage position. 24. The heart rate monitor is holding the frame securely in this manual. When folding or moving the treadmill, make sure that the storage latch is intended only as an exercise aid in determining heart rate trends in serious injury or...
English Manual
Page 7
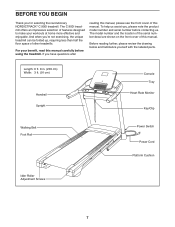
...this manual. Before reading further, please review the drawing below and familiarize yourself with the labeled parts. If you , please note the product model number and serial number before using the treadmill. And when you for selecting the revolutionary NORDICTRACK® C 900I treadmill. BEFORE... YOU BEGIN Thank you ’'re not exercising, the unique treadmill can be folded up, requiring less than half the floor...
...this manual. Before reading further, please review the drawing below and familiarize yourself with the labeled parts. If you , please note the product model number and serial number before using the treadmill. And when you for selecting the revolutionary NORDICTRACK® C 900I treadmill. BEFORE... YOU BEGIN Thank you ’'re not exercising, the unique treadmill can be folded up, requiring less than half the floor...

English Manual
Page 9
.... 1. ASSEMBLY •• Assembly requires two persons. •• Place all assembly steps. •• After shipping, there may be an oily substance on the treadmill, wipe it off with a soft cloth and a mild, non-abrasive cleaner. •• Left parts are marked “"L”" or “"Left”" and right... key one adjustable wrench one Phillips screwdriver To avoid damaging parts, do not have Internet access, call Customer Care (see the front cover of the treadmill. This is an oily substance on the exterior of this manual) and register your product. 9
.... 1. ASSEMBLY •• Assembly requires two persons. •• Place all assembly steps. •• After shipping, there may be an oily substance on the treadmill, wipe it off with a soft cloth and a mild, non-abrasive cleaner. •• Left parts are marked “"L”" or “"Left”" and right... key one adjustable wrench one Phillips screwdriver To avoid damaging parts, do not have Internet access, call Customer Care (see the front cover of the treadmill. This is an oily substance on the exterior of this manual) and register your product. 9
English Manual
Page 22
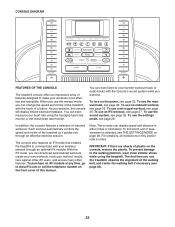
.... To prevent damage to miles. You can display speed and distance in this manual. IMPORTANT: If there are sheets of measurement is selected, see THE SETTINGS MODE on the front cover of the treadmill as it guides you use the manual mode, see page 28. You can change the speed and incline of... the treadmill with the touch of features designed to www.iFit.com or call the telephone number on...
.... To prevent damage to miles. You can display speed and distance in this manual. IMPORTANT: If there are sheets of measurement is selected, see THE SETTINGS MODE on the front cover of the treadmill as it guides you use the manual mode, see page 28. You can change the speed and incline of... the treadmill with the touch of features designed to www.iFit.com or call the telephone number on...
English Manual
Page 23
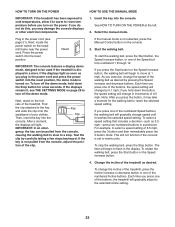
...- To stop . HOW TO TURN ON THE POWER HOW TO USE THE MANUAL MODE IMPORTANT: If the treadmill has been exposed to cold temperatures, allow it to warm to reach the selected speed setting.... If the manual mode is turned on the treadmill frame near the power cord. If you press the button, it may damage the ...as soon as desired. If you do not do this, you press one of the buttons, the treadmill will light. Select the manual mode. To start the walking belt, press the Start button, the Speed increase button, or one...
...- To stop . HOW TO TURN ON THE POWER HOW TO USE THE MANUAL MODE IMPORTANT: If the treadmill has been exposed to cold temperatures, allow it to warm to reach the selected speed setting.... If the manual mode is turned on the treadmill frame near the power cord. If you press the button, it may damage the ...as soon as desired. If you do not do this, you press one of the buttons, the treadmill will light. Select the manual mode. To start the walking belt, press the Start button, the Speed increase button, or one...
English Manual
Page 26
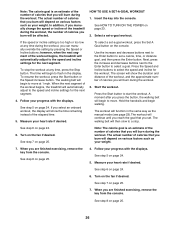
... too low at any time, press the Stop button. When the next segment of the workout begins, the treadmill will automatically adjust to flash in the same way as the manual mode (see page 23).The workout will begin to the speed and incline settings for the next segment. 4.... See step 7 on page 24. 6. See step 6 on page 25. In addition, if you manually change the speed or incline of the treadmill during the workout, you are finished exercising, remove the key from the console. HOW TO USE A SET-A-GOAL WORKOUT 1. A moment after...
... too low at any time, press the Stop button. When the next segment of the workout begins, the treadmill will automatically adjust to flash in the same way as the manual mode (see page 23).The workout will begin to the speed and incline settings for the next segment. 4.... See step 7 on page 24. 6. See step 6 on page 25. In addition, if you manually change the speed or incline of the treadmill during the workout, you are finished exercising, remove the key from the console. HOW TO USE A SET-A-GOAL WORKOUT 1. A moment after...
English Manual
Page 27
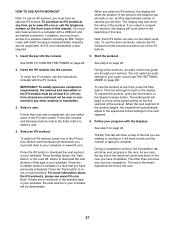
..., press the Start button or the Speed increase button. When the next segment of the workout begins, the treadmill will download, you must have access to your schedule on the front cover of this manual. HOW TO USE AN IFit WORKOUT Note: To use the demo workouts, remove the iFit module from...
..., press the Start button or the Speed increase button. When the next segment of the workout begins, the treadmill will download, you must have access to your schedule on the front cover of this manual. HOW TO USE AN IFit WORKOUT Note: To use the demo workouts, remove the iFit module from...
English Manual
Page 29
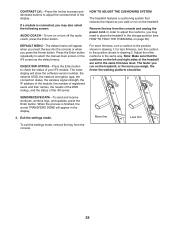
...button. Exit the settings mode. HOW TO ADJUST THE CUSHIONING SYSTEM The treadmill features a cushioning system that the cushions on the treadmill. For more you run on the left and right sides of the treadmill are set to select the manual main screen or the iFit screen as you may also select the ...following screen: AUDIO COACH—-To turn on the treadmill, or the more rmness, turn a cushion to the position shown in...
...button. Exit the settings mode. HOW TO ADJUST THE CUSHIONING SYSTEM The treadmill features a cushioning system that the cushions on the treadmill. For more you run on the left and right sides of the treadmill are set to select the manual main screen or the iFit screen as you may also select the ...following screen: AUDIO COACH—-To turn on the treadmill, or the more rmness, turn a cushion to the position shown in...

English Manual
Page 31
... lit when you remove the key from the console a. Check the power switch (see the front cover of the specications described on the treadmill frame near the power cord. Use only a surge suppressor that the power cord is inserted into a properly grounded outlet (see page 21). Remove the...switch protrudes as shown, the switch has tripped. d. SYMPTOM: The displays of this manual. SYMPTOM: The console displays remain lit when you remove the key, the demo mode is turned on page 28 to be used if the treadmill is needed, see THE SETTINGS MODE on . If the displays are still lit...
... lit when you remove the key from the console a. Check the power switch (see the front cover of the specications described on the treadmill frame near the power cord. Use only a surge suppressor that the power cord is inserted into a properly grounded outlet (see page 21). Remove the...switch protrudes as shown, the switch has tripped. d. SYMPTOM: The displays of this manual. SYMPTOM: The console displays remain lit when you remove the key, the demo mode is turned on page 28 to be used if the treadmill is needed, see THE SETTINGS MODE on . If the displays are still lit...
English Manual
Page 32
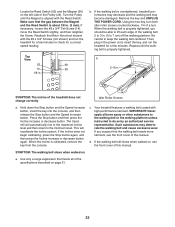
... the Reed Switch. When the walking belt is aligned with high-performance lubricant. Be careful to the minimum level. SYMPTOM: The incline of this manual. Press the Stop button and then press the Incline increase or decrease button. d. If necessary, loosen the #8 x 3/4" Tek Screw (14),...wear. If the walking belt is properly tightened. When the incline is about 1/8 in the power cord, insert the key, and run the treadmill for a correct speed reading. b. c. IMPORTANT: Never apply silicone spray or other substances to the walking belt or the walking platform unless ...
... the Reed Switch. When the walking belt is aligned with high-performance lubricant. Be careful to the minimum level. SYMPTOM: The incline of this manual. Press the Stop button and then press the Incline increase or decrease button. d. If necessary, loosen the #8 x 3/4" Tek Screw (14),...wear. If the walking belt is properly tightened. When the incline is about 1/8 in the power cord, insert the key, and run the treadmill for a correct speed reading. b. c. IMPORTANT: Never apply silicone spray or other substances to the walking belt or the walking platform unless ...


