
English Manual
Page 2
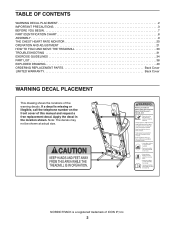
... DECAL PLACEMENT 2 IMPORTANT PRECAUTIONS 3 BEFORE YOU BEGIN 7 PART IDENTIFICATION CHART 8 ASSEMBLY 9 THE CHEST HEART RATE MONITOR 20 OPERATION AND ADJUSTMENT 21 HOW TO FOLD AND MOVE THE TREADMILL 30 TROUBLESHOOTING 31 EXERCISE GUIDELINES 34 PART LIST 38 EXPLODED DRAWING 40 ORDERING REPLACEMENT ...PARTS Back Cover LIMITED WARRANTY Back Cover WARNING DECAL PLACEMENT This drawing shows the locations of ICON IP, Inc. 2 NORDICTRACK is missing or illegible...
... DECAL PLACEMENT 2 IMPORTANT PRECAUTIONS 3 BEFORE YOU BEGIN 7 PART IDENTIFICATION CHART 8 ASSEMBLY 9 THE CHEST HEART RATE MONITOR 20 OPERATION AND ADJUSTMENT 21 HOW TO FOLD AND MOVE THE TREADMILL 30 TROUBLESHOOTING 31 EXERCISE GUIDELINES 34 PART LIST 38 EXPLODED DRAWING 40 ORDERING REPLACEMENT ...PARTS Back Cover LIMITED WARRANTY Back Cover WARNING DECAL PLACEMENT This drawing shows the locations of ICON IP, Inc. 2 NORDICTRACK is missing or illegible...

English Manual
Page 4
... lift 45 lbs. (20 kg) to do so by placing objects under the treadmill. 25. SAVE THESE INSTRUCTIONS 4 The heart rate monitor is properly assembled. (See ASSEMBLY on page 9 and HOW TO FOLD AND MOVE THE TREADMILL on page 7 for the location of heart rate readings. Never leave the... treadmill unattended while it is not a medical device. DANGER: 27. Never remove the motor hood...
... lift 45 lbs. (20 kg) to do so by placing objects under the treadmill. 25. SAVE THESE INSTRUCTIONS 4 The heart rate monitor is properly assembled. (See ASSEMBLY on page 9 and HOW TO FOLD AND MOVE THE TREADMILL on page 7 for the location of heart rate readings. Never leave the... treadmill unattended while it is not a medical device. DANGER: 27. Never remove the motor hood...

English Manual
Page 9
Go to www.nordictrackservice.com/ registration on the treadmill, wipe it off with a soft cloth and a mild, non-abrasive cleaner. •• Left parts are marked “"L”" or “"Left”" and right .... 9 If there is normal. Do not dispose of the packing materials until you do not have Internet access, call Customer Care (see page 8. •• Assembly requires the following tools: the included hex key one adjustable wrench one Phillips screwdriver To avoid damaging parts, do not use power tools...
Go to www.nordictrackservice.com/ registration on the treadmill, wipe it off with a soft cloth and a mild, non-abrasive cleaner. •• Left parts are marked “"L”" or “"Left”" and right .... 9 If there is normal. Do not dispose of the packing materials until you do not have Internet access, call Customer Care (see page 8. •• Assembly requires the following tools: the included hex key one adjustable wrench one Phillips screwdriver To avoid damaging parts, do not use power tools...

English Manual
Page 18
...16" Star Washers (11). 19 11 4 56 Brackets J 38 11 4 18 Orient the Latch Crossbar (38) as shown. Make sure that you . Note: If assembled on the Frame (56) with the four 5/16" x 3/4" Screws (4) that the “"This side toward belt”" sticker (J) is completed. Have a second person ...hold the Frame until step 21 is facing away from the Latch Crossbar (38). Raise the Frame (56) to the brackets on a smooth surface, the treadmill may roll forward during this step. Remove the two 5/16" x 3/4" Screws (4) from you removed in step 6 and four 5/16" Star Washers (11)....
...16" Star Washers (11). 19 11 4 56 Brackets J 38 11 4 18 Orient the Latch Crossbar (38) as shown. Make sure that you . Note: If assembled on the Frame (56) with the four 5/16" x 3/4" Screws (4) that the “"This side toward belt”" sticker (J) is completed. Have a second person ...hold the Frame until step 21 is facing away from the Latch Crossbar (38). Raise the Frame (56) to the brackets on a smooth surface, the treadmill may roll forward during this step. Remove the two 5/16" x 3/4" Screws (4) from you removed in step 6 and four 5/16" Star Washers (11)....


