
English Manual
Page 3
...17. Do not put the treadmill in general. 18. Always hold the handrails while using the treadmill. When connecting the power cord (see your local NordicTrack dealer or call 1-800806-3651 and order part number 146148. 16. To purchase a surge suppressor, see page 8), plug the power cord into a ...use a properly functioning surge suppressor could become caught in order to raise, lower, or move the treadmill. 20. The pulse sensor is running. Keep the power cord and the surge suppressor away from the treadmill at least eight feet of the treadmill by persons weighing more than ...
...17. Do not put the treadmill in general. 18. Always hold the handrails while using the treadmill. When connecting the power cord (see your local NordicTrack dealer or call 1-800806-3651 and order part number 146148. 16. To purchase a surge suppressor, see page 8), plug the power cord into a ...use a properly functioning surge suppressor could become caught in order to raise, lower, or move the treadmill. 20. The pulse sensor is running. Keep the power cord and the surge suppressor away from the treadmill at least eight feet of the treadmill by persons weighing more than ...
English Manual
Page 11
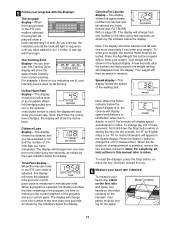
...To change the unit of the walking belt. Note: For simplicity, all instructions in miles. The Training Zone display-As you have walked or run and the number of measurement is used, the display will display speed and distance in this display will show the elapsed time and your weight... desired. When the desired unit of 1/4mile laps you have completed. Distance/Laps display-This display shows the distance that you have walked or run 1/4 mile. Press the Age/Weight Set buttons repeatedly to miles. When the handgrip pulse sensor or the optional chest pulse sensor is selected,...
...To change the unit of the walking belt. Note: For simplicity, all instructions in miles. The Training Zone display-As you have walked or run and the number of measurement is used, the display will display speed and distance in this display will show the elapsed time and your weight... desired. When the desired unit of 1/4mile laps you have completed. Distance/Laps display-This display shows the distance that you have walked or run 1/4 mile. Press the Age/Weight Set buttons repeatedly to miles. When the handgrip pulse sensor or the optional chest pulse sensor is selected,...
English Manual
Page 12
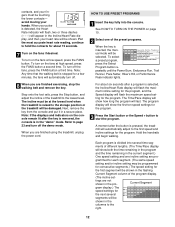
... pressed, the treadmill will automatically turn off the demo mode. To select a preset program, press the Select Program button repeatedly until the Power Burn, Endurance Run, Trail Runner, Pace Setter, Hiker's Hill, or Performance Peak indicator lights. The Time/Pace display will show how long the program will show both the...
... pressed, the treadmill will automatically turn off the demo mode. To select a preset program, press the Select Program button repeatedly until the Power Burn, Endurance Run, Trail Runner, Pace Setter, Hiker's Hill, or Performance Peak indicator lights. The Time/Pace display will show how long the program will show both the...

English Manual
Page 23
... of miles or kilometers that the walking belt has moved. Press the Speed + button to be . An optional chest pulse sensor adds even more you run on the treadmill. To select the information mode, hold down the Stop button while inserting the key into the console. The chest pulse sensor provides... total number of miles that the walking belt has moved and the total number of measurement. In addition, the information mode allows you walk or run on the console will appear in a preset sequence; When the information mode is in the demo mode, the power cord can be plugged in, ...
... of miles or kilometers that the walking belt has moved. Press the Speed + button to be . An optional chest pulse sensor adds even more you run on the treadmill. To select the information mode, hold down the Stop button while inserting the key into the console. The chest pulse sensor provides... total number of miles that the walking belt has moved and the total number of measurement. In addition, the information mode allows you walk or run on the console will appear in a preset sequence; When the information mode is in the demo mode, the power cord can be plugged in, ...
English Manual
Page 26
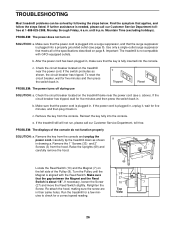
... GFCI-equipped outlets. Reinsert the key fully into a properly grounded outlet (see c. Remove the 1" Screws (33) and 2" Screws (3) from the console. Run the treadmill for a correct speed reading. 26 Mountain Time (excluding holidays). b. If the switch protrudes as shown a in . If the circuit breaker has tripped...function properly SOLUTION: a. Remove the key from the console and unplug the power cord. If the treadmill still will not run, please call our Customer Service Department tollfree at 1-888-825-2588, Monday through Friday, 6 a.m. e. c.
... GFCI-equipped outlets. Reinsert the key fully into a properly grounded outlet (see c. Remove the 1" Screws (33) and 2" Screws (3) from the console. Run the treadmill for a correct speed reading. 26 Mountain Time (excluding holidays). b. If the switch protrudes as shown a in . If the circuit breaker has tripped...function properly SOLUTION: a. Remove the key from the console and unplug the power cord. If the treadmill still will not run, please call our Customer Service Department tollfree at 1-888-825-2588, Monday through Friday, 6 a.m. e. c.

English Manual
Page 27
...and then return to keep the walking belt centered. b. terclockwise 1/2 of the Incline buttons. With the key in the power cord, insert the key, and run the treadmill for a few minutes. Use only a single-outlet surge suppressor that meets all of a turn. b 3"-4" Rear Roller Adjustment Bolts c. If ...walking belt has shifted to the left, use the allen wrench to the right, turn . b. Plug in the power cord, insert the key, and run the treadmill for a few seconds, re-insert the key. After a few minutes. Repeat until the walking belt is centered. PROBLEM: The incline of...
...and then return to keep the walking belt centered. b. terclockwise 1/2 of the Incline buttons. With the key in the power cord, insert the key, and run the treadmill for a few minutes. Use only a single-outlet surge suppressor that meets all of a turn. b 3"-4" Rear Roller Adjustment Bolts c. If ...walking belt has shifted to the left, use the allen wrench to the right, turn . b. Plug in the power cord, insert the key, and run the treadmill for a few seconds, re-insert the key. After a few minutes. Repeat until the walking belt is centered. PROBLEM: The incline of...


