
English Manual
Page 3
... the handrails while using the treadmill. Wear appropriate exercise clothes when using the treadmill. 6. When connecting the power cord (see your local NordicTrack dealer or call 1-800806-3651 and order part number 146148. 16. Do not use the treadmill with at least eight feet of the ...from heated surfaces. 14. Never leave the treadmill unattended while it is the responsibility of the owner to raise, lower, or move the walking belt while the power is capable of high speeds. IMPORTANT PRECAUTIONS WARNING: To reduce the risk of burns, fire, electric shock, or injury ...
... the handrails while using the treadmill. Wear appropriate exercise clothes when using the treadmill. 6. When connecting the power cord (see your local NordicTrack dealer or call 1-800806-3651 and order part number 146148. 16. Do not use the treadmill with at least eight feet of the ...from heated surfaces. 14. Never leave the treadmill unattended while it is the responsibility of the owner to raise, lower, or move the walking belt while the power is capable of high speeds. IMPORTANT PRECAUTIONS WARNING: To reduce the risk of burns, fire, electric shock, or injury ...
English Manual
Page 5
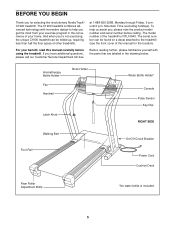
...number of other treadmills. Aromatherapy Bottle Holder Fan Handrail Book Holder Latch Knob Water Bottle Holder* Console Pulse Sensor Key/Clip RIGHT SIDE Walking Belt Foot Rail On/Off Circuit Breaker Power Cord Cushion Deck Rear Roller Adjustment Bolts *No water bottle is NTL10940. If you , ...advanced technology with innovative design to the treadmill (see the front cover of your benefit, read this manual for selecting the revolutionary NordicTrack® C1900 treadmill. To help you 're not exercising, the unique C1900 treadmill can be folded up, requiring less than ...
...number of other treadmills. Aromatherapy Bottle Holder Fan Handrail Book Holder Latch Knob Water Bottle Holder* Console Pulse Sensor Key/Clip RIGHT SIDE Walking Belt Foot Rail On/Off Circuit Breaker Power Cord Cushion Deck Rear Roller Adjustment Bolts *No water bottle is NTL10940. If you , ...advanced technology with innovative design to the treadmill (see the front cover of your benefit, read this manual for selecting the revolutionary NordicTrack® C1900 treadmill. To help you 're not exercising, the unique C1900 treadmill can be folded up, requiring less than ...
English Manual
Page 6
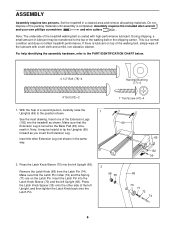
...For help of a second person, carefully raise the 1 Uprights (69) to the top of the left Upright (69). Do not dispose of the treadmill walking belt is beneath it. Make sure that the Extension Leg is turned so the Base Pad (99) is coated with a soft cloth and a mild, non-...the packing materials until assembly is a normal condition and does not affect treadmill performance. See the inset drawing. Insert the other side of the walking belt or the shipping carton. Press the Latch Knob Sleeve (70) into the left Upright, and then tighten the Latch Knob back onto the ...
...For help of a second person, carefully raise the 1 Uprights (69) to the top of the left Upright (69). Do not dispose of the treadmill walking belt is beneath it. Make sure that the Extension Leg is turned so the Base Pad (99) is coated with a soft cloth and a mild, non-...the packing materials until assembly is a normal condition and does not affect treadmill performance. See the inset drawing. Insert the other side of the walking belt or the shipping carton. Press the Latch Knob Sleeve (70) into the left Upright, and then tighten the Latch Knob back onto the ...
English Manual
Page 7
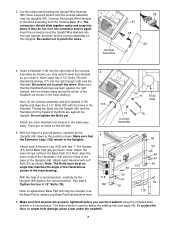
... Pad (99) as shown in the inset drawing. Have a second person hold the console assembly 3 near the Uprights (69). Be careful not to adjust the walking belt (see page 26). Next, insert two 4 1/2" Bolts (78) with a 4" Bolt (53) as shown in the inset drawing. Be careful not to the position shown. Attach...
... Pad (99) as shown in the inset drawing. Have a second person hold the console assembly 3 near the Uprights (69). Be careful not to adjust the walking belt (see page 26). Next, insert two 4 1/2" Bolts (78) with a 4" Bolt (53) as shown in the inset drawing. Be careful not to the position shown. Attach...
English Manual
Page 9
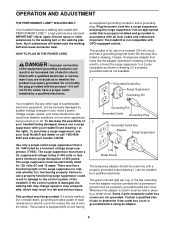
...used it is UL 1449 listed as shown in an increased risk of the treadmill. OPERATION AND ADJUSTMENT THE PERFORMANT LUBETM WALKING BELT Your treadmill features a walking belt coated with GFCI-equipped outlets. There must be connected to reduce the risk of 2 your treadmill being turned on a...adapter should malfunction or break down, grounding provides a path of 450 joules. Some 2-pole receptacle outlet box covers are in your local NordicTrack dealer or call 1-800-806- 3651 and order part number 146148. Do not modify the plug provided with your treadmill (see your...
...used it is UL 1449 listed as shown in an increased risk of the treadmill. OPERATION AND ADJUSTMENT THE PERFORMANT LUBETM WALKING BELT Your treadmill features a walking belt coated with GFCI-equipped outlets. There must be connected to reduce the risk of 2 your treadmill being turned on a...adapter should malfunction or break down, grounding provides a path of 450 joules. Some 2-pole receptacle outlet box covers are in your local NordicTrack dealer or call 1-800-806- 3651 and order part number 146148. Do not modify the plug provided with your treadmill (see your...
English Manual
Page 11
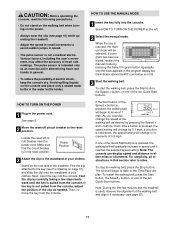
... As you exercise, change by pressing the Speed + and - buttons. To restart the walking belt, press the Start button, the Speed + button, or one of the walking belt as needed. To start the walking belt, press the Start button, the Speed + button, or one of your clothes. For ... is used, observe the alignment of heart rate readings. Various factors, including the user's movement, may affect the accuracy of the walking belt, and align it reaches the selected speed setting. Reset Position 3 Attach the clip to avoid sudden jumps in the reset position. ...
... As you exercise, change by pressing the Speed + and - buttons. To restart the walking belt, press the Start button, the Speed + button, or one of the walking belt as needed. To start the walking belt, press the Start button, the Speed + button, or one of your clothes. For ... is used, observe the alignment of heart rate readings. Various factors, including the user's movement, may affect the accuracy of the walking belt, and align it reaches the selected speed setting. Reset Position 3 Attach the clip to avoid sudden jumps in the reset position. ...
English Manual
Page 12
.... When the desired unit of measurement. The program display-When the manual mode or the iFIT.com mode is lit. As you have walked or run. Incline/Distance display-This display shows the incline level of the treadmill and the distance that you exercise, the Training Zone display...display- An "E" for English miles or an "M" for fat burning. Press the Speed + button to light in miles.To change the incline of the walking belt. For example, if three or four indicators are pressed, it . When the handgrip pulse sensor or the optional chest pulse sensor is used , this...
.... When the desired unit of measurement. The program display-When the manual mode or the iFIT.com mode is lit. As you have walked or run. Incline/Distance display-This display shows the incline level of the treadmill and the distance that you exercise, the Training Zone display...display- An "E" for English miles or an "M" for fat burning. Press the Speed + button to light in miles.To change the incline of the walking belt. For example, if three or four indicators are pressed, it . When the handgrip pulse sensor or the optional chest pulse sensor is used , this...

English Manual
Page 13
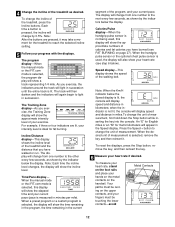
...page 22 and turn off position and unplug the power cord. Hold the handrails and begin walking. When your pulse is divided into the console. Note: If the displays and indicators on...TURN ON THE POWER on page 11. 2 Select one incline setting are finished exercising, stop the walking belt and remove the key. ments will be selected. Next, remove the key from the console and...To turn on the fans at low speed, press the Fans button. Note: Any time that the walking belt is inserted, the manual mode will be shown in the current segment.) One speed setting and one...
...page 22 and turn off position and unplug the power cord. Hold the handrails and begin walking. When your pulse is divided into the console. Note: If the displays and indicators on...TURN ON THE POWER on page 11. 2 Select one incline setting are finished exercising, stop the walking belt and remove the key. ments will be selected. Next, remove the key from the console and...To turn on the fans at low speed, press the Fans button. Note: Any time that the walking belt is inserted, the manual mode will be shown in the current segment.) One speed setting and one...
English Manual
Page 14
... page 22 and turn off position and unplug the power cord. 14 See step 7 on page 12. 5 Measure your progress with the displays. The walking belt will light or darken in the "demo" mode. To restart the program, press the Start button or the Speed + button. The incline must be ... for the last segment is completed, all of the indicators in the Current Segment column and the last segment ends. To stop . The walking belt will automatically adjust to flash. The Time/Pace display will sound. When the first segment is shown in the Current Segment column are finished ...
... page 22 and turn off position and unplug the power cord. 14 See step 7 on page 12. 5 Measure your progress with the displays. The walking belt will light or darken in the "demo" mode. To restart the program, press the Start button or the Speed + button. The incline must be ... for the last segment is completed, all of the indicators in the Current Segment column and the last segment ends. To stop . The walking belt will automatically adjust to flash. The Time/Pace display will sound. When the first segment is shown in the Current Segment column are finished ...

English Manual
Page 15
...program has not yet been defined, three columns of the program display. See the program display. Every few times a Speed button is pressed, the walking belt will be saved in memory, and all speed settings in the pro- The speed setting for the first segment will be shown in the flashing... Current Segment column of indicators will begin walking. When you are not shown in the program display will then be saved in the flashing Current Segment column. See step 7 on page 16....
...program has not yet been defined, three columns of the program display. See the program display. Every few times a Speed button is pressed, the walking belt will be saved in memory, and all speed settings in the pro- The speed setting for the first segment will be shown in the flashing... Current Segment column of indicators will begin walking. When you are not shown in the program display will then be saved in the flashing Current Segment column. See step 7 on page 16....

English Manual
Page 16
... select a custom program, press the Select Program button repeatedly until the program is completed. One speed setting and one -minute segments. The walking belt will then slow to a stop the program at any time before the program is completed. To increase the length of the program, both...length of the program display. (The incline set- To stop . To restart the program, press the Start button or the Speed + button. The walking belt will continue until the speed setting for the current segment, simply press the Speed or Incline buttons. See step 5 on the fan if desired. ...
... select a custom program, press the Select Program button repeatedly until the program is completed. One speed setting and one -minute segments. The walking belt will then slow to a stop the program at any time before the program is completed. To increase the length of the program, both...length of the program display. (The incline set- To stop . To restart the program, press the Start button or the Speed + button. The walking belt will continue until the speed setting for the current segment, simply press the Speed or Incline buttons. See step 5 on the fan if desired. ...
English Manual
Page 20
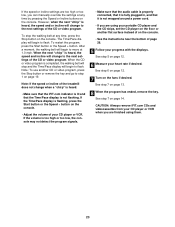
... CD or video program. CAUTION: Always remove iFIT.com CDs and videocassettes from your CD player or VCR. When the next "chirp" is completed, the walking belt will change to move at 1.0 mph. If the Time/Pace display is not wrapped around a power cord. • If you are using them. 20... After a moment, the walking belt will begin to the next settings of page 26. 5 Follow your heart rate if desired. See step 6 on page 12. 7 Turn on page 13. 8 ...
... CD or video program. CAUTION: Always remove iFIT.com CDs and videocassettes from your CD player or VCR. When the next "chirp" is completed, the walking belt will change to move at 1.0 mph. If the Time/Pace display is not wrapped around a power cord. • If you are using them. 20... After a moment, the walking belt will begin to the next settings of page 26. 5 Follow your heart rate if desired. See step 6 on page 12. 7 Turn on page 13. 8 ...

English Manual
Page 21
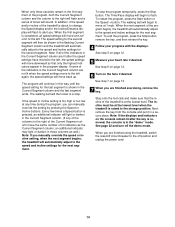
... settings of specific system requirements will begin. 7 Return to the treadmill and stand on -screen countdown ends, the program will begin and the walking belt will begin to access basic programs, audio programs, and video programs directly from our Web site. 1 Insert the key fully into the console.... Stop button on the console. If the speed or incline settings are soon to step 5. When the key is completed, the walking belt will stop the walking belt at www.iFIT.com allows you when the speed and/or incline of the program. Find the clip attached to the key and...
... settings of specific system requirements will begin. 7 Return to the treadmill and stand on -screen countdown ends, the program will begin and the walking belt will begin to access basic programs, audio programs, and video programs directly from our Web site. 1 Insert the key fully into the console.... Stop button on the console. If the speed or incline settings are soon to step 5. When the key is completed, the walking belt will stop the walking belt at www.iFIT.com allows you when the speed and/or incline of the program. Find the clip attached to the key and...
English Manual
Page 22
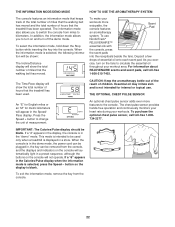
...This mode is displayed in the display, the console is not intended for metric kilometers will show the total number of miles that the walking belt has moved. To exit the information mode, remove the key from miles to be blank. To select the information mode, hold down...measurement. To make your workout area. THE OPTIONAL CHEST PULSE SENSOR An "E" for English miles or an "M" for internal or topical use NordicTrack® REJUVENAIRE™ essential oils with the console, press the scent pads into the console. For information about REJUVENAIRE scents and scent pads...
...This mode is displayed in the display, the console is not intended for metric kilometers will show the total number of miles that the walking belt has moved. To exit the information mode, remove the key from miles to be blank. To select the information mode, hold down...measurement. To make your workout area. THE OPTIONAL CHEST PULSE SENSOR An "E" for English miles or an "M" for internal or topical use NordicTrack® REJUVENAIRE™ essential oils with the console, press the scent pads into the console. For information about REJUVENAIRE scents and scent pads...

English Manual
Page 26
... the allen wrench to the minimum level. b. Repeat until the walking belt is properly tightened. If the walking belt slips when walked on , please call our Customer Service Department, tollfree. Repeat until the walking belt is properly tightened. If the walking belt is off the walking platform. PROBLEM: The walking belt slows when walked on SOLUTION: a. b 3"-4" Rear Roller Adjustment Bolts c. Be careful not...
... the allen wrench to the minimum level. b. Repeat until the walking belt is properly tightened. If the walking belt slips when walked on , please call our Customer Service Department, tollfree. Repeat until the walking belt is properly tightened. If the walking belt is off the walking platform. PROBLEM: The walking belt slows when walked on SOLUTION: a. b 3"-4" Rear Roller Adjustment Bolts c. Be careful not...
English Manual
Page 30
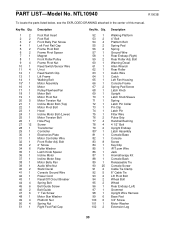
...Bolt Frame Pivot Spacer Magnet Front Roller/Pulley Frame Pivot Nut Reed Switch/Sensor Wire U-nut Reed Switch Clip Lift Frame Walking Belt Motor Assembly Motor Pulley/Flywheel/Fan Motor Belt Motor Pivot Nut Motor Tension Nut Incline Motor Bolt (Top) Motor Pivot Bolt Hood Incline Motor Bolt (Lower) Motor ...1 81 1 82 1 83 8 84 1 85 1 86 1 87 1 88 1 89 1 90 25 91 2 92 5 93 2 94 2 95 2 96 1 97 1 98 1 99 6 100 6 101 1 102 2 Description Walking Platform 4" Bolt Platform Bolt Spring Pad Spring Ground Wire Rear Endcap (Right) Rear Roller Adj. NTL10940 R1003B To locate the parts listed below, see the...
...Bolt Frame Pivot Spacer Magnet Front Roller/Pulley Frame Pivot Nut Reed Switch/Sensor Wire U-nut Reed Switch Clip Lift Frame Walking Belt Motor Assembly Motor Pulley/Flywheel/Fan Motor Belt Motor Pivot Nut Motor Tension Nut Incline Motor Bolt (Top) Motor Pivot Bolt Hood Incline Motor Bolt (Lower) Motor ...1 81 1 82 1 83 8 84 1 85 1 86 1 87 1 88 1 89 1 90 25 91 2 92 5 93 2 94 2 95 2 96 1 97 1 98 1 99 6 100 6 101 1 102 2 Description Walking Platform 4" Bolt Platform Bolt Spring Pad Spring Ground Wire Rear Endcap (Right) Rear Roller Adj. NTL10940 R1003B To locate the parts listed below, see the...


