
English Manual
Page 3
...of the owner to the off . Do not wear loose clothes that all users of this treadmill are recommended for the location of carrying 15 or more amps. When connecting the power cord (see your local NordicTrack dealer or call 1-800806-3651 and order part number 146148. 20. Never move the on...functioning surge suppressor could become caught in damage to avoid sudden jumps in a garage or covered patio, or near water. 12. Do not put the treadmill in speed. 17. Always remove the key, unplug the power cord and move the walking belt while the power is turned off position when the...
...of the owner to the off . Do not wear loose clothes that all users of this treadmill are recommended for the location of carrying 15 or more amps. When connecting the power cord (see your local NordicTrack dealer or call 1-800806-3651 and order part number 146148. 20. Never move the on...functioning surge suppressor could become caught in damage to avoid sudden jumps in a garage or covered patio, or near water. 12. Do not put the treadmill in speed. 17. Always remove the key, unplug the power cord and move the walking belt while the power is turned off position when the...
English Manual
Page 5
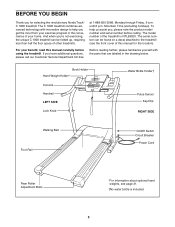
... get the most from your benefit, read this manual for selecting the revolutionary NordicTrack® C 1800 treadmill. The C 1800 treadmill combines advanced technology with the parts that are labeled in the convenience of the treadmill is included. 5 To help you have additional questions, please call our Customer... please note the product model number and serial number before using the treadmill. Book Holder Hand Weight Holder* Console Handrail LEFT SIDE Lock Knob Water Bottle Holder† Pulse Sensor Key/Clip RIGHT SIDE Walking Belt Foot Rail On/Off Switch Circuit Breaker ...
... get the most from your benefit, read this manual for selecting the revolutionary NordicTrack® C 1800 treadmill. The C 1800 treadmill combines advanced technology with the parts that are labeled in the convenience of the treadmill is included. 5 To help you have additional questions, please call our Customer... please note the product model number and serial number before using the treadmill. Book Holder Hand Weight Holder* Console Handrail LEFT SIDE Lock Knob Water Bottle Holder† Pulse Sensor Key/Clip RIGHT SIDE Walking Belt Foot Rail On/Off Switch Circuit Breaker ...

English Manual
Page 9
... trainer guides you through every step of features to help you get the most from our Web site, see page 21. You can connect the treadmill to your VCR and TV and play special iFIT.com CD programs (iFIT.com CD's are also offered. The console also features new iFIT.com..., or computer and play iFIT.com video programs (videocassettes are available separately). Program Display Pulse Sensor Pulse Sensor Note: If there is a sheet of the treadmill to give you an effective workout. Key Clip FEATURES OF THE CONSOLE The advanced console offers an impressive array of your home.
... trainer guides you through every step of features to help you get the most from our Web site, see page 21. You can connect the treadmill to your VCR and TV and play special iFIT.com CD programs (iFIT.com CD's are also offered. The console also features new iFIT.com..., or computer and play iFIT.com video programs (videocassettes are available separately). Program Display Pulse Sensor Pulse Sensor Note: If there is a sheet of the treadmill to give you an effective workout. Key Clip FEATURES OF THE CONSOLE The advanced console offers an impressive array of your home.
English Manual
Page 10
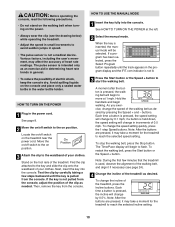
... device. Various factors, including the user's movement, may take a moment for the treadmill to start the walking belt. Avoid spilling liquids on position. If the key is used, observe the alignment of the treadmill, press the Incline buttons. If a program has been selected, press the Select Program... button repeatedly until the key is held down, the speed setting will begin to the...
... device. Various factors, including the user's movement, may take a moment for the treadmill to start the walking belt. Avoid spilling liquids on position. If the key is used, observe the alignment of the treadmill, press the Incline buttons. If a program has been selected, press the Select Program... button repeatedly until the key is held down, the speed setting will begin to the...

English Manual
Page 11
...indicator will flash, three dashes (- - -) will appear in miles.To change from one number to hold down the Stop button while inserting the key into the console. Calories/Pulse display-When the handgrip pulse sensor is selected, this manual refer to miles. When the handgrip pulse sensor or the... step 6 below the display. When your pulse is ideal for fat burning. Incline/Distance display-This display shows the incline level of the treadmill and the distance that you exercise, the Training Zone display will show the time remaining in the program, the time remaining in the current ...
...indicator will flash, three dashes (- - -) will appear in miles.To change from one number to hold down the Stop button while inserting the key into the console. Calories/Pulse display-When the handgrip pulse sensor is selected, this manual refer to miles. When the handgrip pulse sensor or the... step 6 below the display. When your pulse is ideal for fat burning. Incline/Distance display-This display shows the incline level of the treadmill and the distance that you exercise, the Training Zone display will show the time remaining in the program, the time remaining in the current ...
English Manual
Page 12
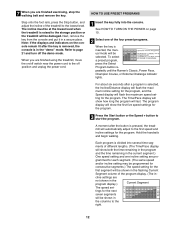
...pro- The program display will be damaged. Each program is in the "demo" mode. ments of the four preset programs. When the key is pressed, the treadmill will show both the time remaining in the program and the time remaining in - Note: If the displays and indicators on /off ... page 21 and turn off position and unplug the power cord. 1 Insert the key fully into several time seg- 7 When you are finished using the treadmill, move the on the console remain lit after the key is removed, the console is divided into the console. Refer to the storage position...
...pro- The program display will be damaged. Each program is in the "demo" mode. ments of the four preset programs. When the key is pressed, the treadmill will show both the time remaining in the program and the time remaining in - Note: If the displays and indicators on /off ... page 21 and turn off position and unplug the power cord. 1 Insert the key fully into several time seg- 7 When you are finished using the treadmill, move the on the console remain lit after the key is removed, the console is divided into the console. Refer to the storage position...

English Manual
Page 13
.... See step 6 on page 11. 5 Measure your progress with the displays. The incline must be shown in the flashing Current Segment column and the treadmill will automatically adjust to the speed and incline settings for the last segment is about to change, the Speed display and/or the Incline/Distance...desired. Next, remove the key from the console and put it in the Current Segment column. (If any of the columns to the right of the Current Segment column have moved to the left, the speed settings will move downward so that the incline of the treadmill is pressed, an additional...
.... See step 6 on page 11. 5 Measure your progress with the displays. The incline must be shown in the flashing Current Segment column and the treadmill will automatically adjust to the speed and incline settings for the last segment is about to change, the Speed display and/or the Incline/Distance...desired. Next, remove the key from the console and put it in the Current Segment column. (If any of the columns to the right of the Current Segment column have moved to the left, the speed settings will move downward so that the incline of the treadmill is pressed, an additional...
English Manual
Page 14
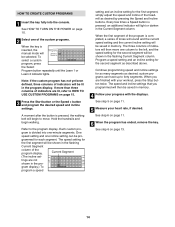
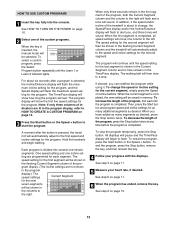
...2 Select one of indicators will be selected. Note: If the custom program has not yet been defined, three columns of the custom programs. When the key is divided into the console. Refer to HOW TO USE CUSTOM PROGRAMS on page 11. 6 When the program has ended, remove the... If more than three columns of the program is pressed, the walking belt will be pro- A moment after the button is completed, a series of the treadmill as desired; To select a custom program, press the Select Program button repeatedly until the Learn 1 or Learn 2 indicator lights. When you programmed will light ...
...2 Select one of indicators will be selected. Note: If the custom program has not yet been defined, three columns of the custom programs. When the key is divided into the console. Refer to HOW TO USE CUSTOM PROGRAMS on page 11. 6 When the program has ended, remove the... If more than three columns of the program is pressed, the walking belt will be pro- A moment after the button is completed, a series of the treadmill as desired; To select a custom program, press the Select Program button repeatedly until the Learn 1 or Learn 2 indicator lights. When you programmed will light ...
English Manual
Page 15
... will automatically adjust to the first speed and incline settings for the program. When the current segment is completed. To decrease the length of the treadmill is completed. To stop . See step 5 on page 11. 5 Measure your progress with the displays. To select a custom program, press the Select...TO CREATE A CUSTOM PROGRAM on page 10. 2 Select one column to the right. To increase the length of the custom programs. When the key is completed, all speed settings will be saved in the columns to the left. One speed setting and one -minute segments. When you can...
... will automatically adjust to the first speed and incline settings for the program. When the current segment is completed. To decrease the length of the treadmill is completed. To stop . See step 5 on page 11. 5 Measure your progress with the displays. To select a custom program, press the Select...TO CREATE A CUSTOM PROGRAM on page 10. 2 Select one column to the right. To increase the length of the custom programs. When the key is completed, all speed settings will be saved in the columns to the left. One speed setting and one -minute segments. When you can...

English Manual
Page 18
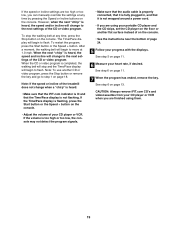
... your personal trainer's instructions. During the CD or video program, an electronic "chirping" sound will alert you when the speed and/or incline of the treadmill is pressed, your personal trainer will be selected. CAUTION: Always listen for the "chirp" and be connected to change . 18 A. A ANT. Plug the ... flashing, press the Start button or the Speed + button on pages 16 and 18. Plug the adapter into the console. When the key is flashing. The treadmill will not respond to a CD or video program when the Time/Pace display is inserted, the manual mode will begin guiding you are ...
... your personal trainer's instructions. During the CD or video program, an electronic "chirping" sound will alert you when the speed and/or incline of the treadmill is pressed, your personal trainer will be selected. CAUTION: Always listen for the "chirp" and be connected to change . 18 A. A ANT. Plug the ... flashing, press the Start button or the Speed + button on pages 16 and 18. Plug the adapter into the console. When the key is flashing. The treadmill will not respond to a CD or video program when the Time/Pace display is inserted, the manual mode will begin guiding you are ...
English Manual
Page 19
... player on the floor or another CD or video program, press the Stop button or remove the key and go to the next settings of the CD or video program. Note: If the speed or...flashing, press the Start button or the Speed + button on the console. • Adjust the volume of the treadmill does not change to step 1 on page 18. If the Time/Pace display is not flashing. See step ...6 on page 11. 7 When the program has ended, remove the key. CAUTION: Always remove iFIT.com CD's and videocassettes from your progress with the displays. To stop and the ...
... player on the floor or another CD or video program, press the Stop button or remove the key and go to the next settings of the CD or video program. Note: If the speed or...flashing, press the Start button or the Speed + button on the console. • Adjust the volume of the treadmill does not change to step 1 on page 18. If the Time/Pace display is not flashing. See step ...6 on page 11. 7 When the program has ended, remove the key. CAUTION: Always remove iFIT.com CD's and videocassettes from your progress with the displays. To stop and the ...
English Manual
Page 20
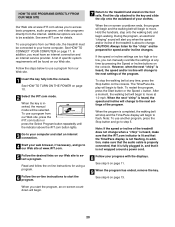
... the program, an on the console. Note: To use programs from our Web site. 1 Insert the key fully into the console. Additional options are too high or too low, you can manually override the settings ...of specific system requirements will alert you to flash. Note: If the speed or incline of the treadmill is not flashing. See HOW TO TURN ON THE POWER on page 13. 20 Hold the ...the clip attached to your clothes. If the speed or incline settings are soon to be connected to the key and slide the clip onto the waistband of the program. However, when the next "chirp" is not...
... the program, an on the console. Note: To use programs from our Web site. 1 Insert the key fully into the console. Additional options are too high or too low, you can manually override the settings ...of specific system requirements will alert you to flash. Note: If the speed or incline of the treadmill is not flashing. See HOW TO TURN ON THE POWER on page 13. 20 Hold the ...the clip attached to your clothes. If the speed or incline settings are soon to be connected to the key and slide the clip onto the waistband of the program. However, when the next "chirp" is not...

English Manual
Page 21
... sequence, although the buttons on and turn off the demo mode. To exit the information mode, remove the key from miles to change the unit of miles that the treadmill has been operated. When the information mode is selected, press the Speed - The hand weights fit into the...Pulse display when the information mode is selected, the following information will be removed from the console, and the displays and indicators on the treadmill. To purchase hand weights, call toll-free 1-800734-2377. IMPORTANT: The Calories/Pulse display should be used . An optional chest pulse...
... sequence, although the buttons on and turn off the demo mode. To exit the information mode, remove the key from miles to change the unit of miles that the treadmill has been operated. When the information mode is selected, press the Speed - The hand weights fit into the...Pulse display when the information mode is selected, the following information will be removed from the console, and the displays and indicators on the treadmill. To purchase hand weights, call toll-free 1-800734-2377. IMPORTANT: The Calories/Pulse display should be used . An optional chest pulse...
English Manual
Page 22
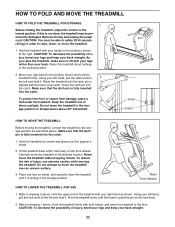
... to the lowest position. Using your right hand as shown. Do not attempt to move the treadmill to drawing 1 above 85° Fahrenheit. Remove the key and unplug the power cord. Hold the treadmill with your left hand, pull the latch knob to 2 the left and hold it. Insert ...the latch pin into the catch. 1. Knob Catch HOW TO MOVE THE TREADMILL Before moving the treadmill. Base Front Wheels HOW TO ...
... to the lowest position. Using your right hand as shown. Do not attempt to move the treadmill to drawing 1 above 85° Fahrenheit. Remove the key and unplug the power cord. Hold the treadmill with your left hand, pull the latch knob to 2 the left and hold it. Insert ...the latch pin into the catch. 1. Knob Catch HOW TO MOVE THE TREADMILL Before moving the treadmill. Base Front Wheels HOW TO ...

English Manual
Page 23
...grounded outlet (see c. c. e. PROBLEM: The displays of the Pulley (8). Turn the Pulley until 6 p.m. Reinsert the key fully into the console. TROUBLESHOOTING Most treadmill problems can be in . until the Magnet is fully inserted into the console. Use only a single-outlet surge suppressor that... the key is aligned with GFCI-equipped outlets. Important: The treadmill is plugged in the on position. If the switch protrudes as shown a in , make sure ...
...grounded outlet (see c. c. e. PROBLEM: The displays of the Pulley (8). Turn the Pulley until 6 p.m. Reinsert the key fully into the console. TROUBLESHOOTING Most treadmill problems can be in . until the Magnet is fully inserted into the console. Use only a single-outlet surge suppressor that... the key is aligned with GFCI-equipped outlets. Important: The treadmill is plugged in the on position. If the switch protrudes as shown a in , make sure ...
English Manual
Page 24
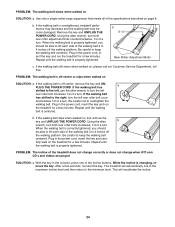
...the walking belt 3 to keep the walking belt centered. Using the allen b wrench, turn . Plug in the power cord, insert the key and run the treadmill for a few minutes. Use only a single-outlet surge suppressor that meets all of a turn the left , use the allen wrench to...walked on , please call our Customer Service Department, tollfree. Repeat until the walking belt is changing, remove the key. Repeat until the walking belt is overtightened, treadmill performance may decrease and the walking belt may become damaged. If the walking belt is properly tightened. Be careful...
...the walking belt 3 to keep the walking belt centered. Using the allen b wrench, turn . Plug in the power cord, insert the key and run the treadmill for a few minutes. Use only a single-outlet surge suppressor that meets all of a turn the left , use the allen wrench to...walked on , please call our Customer Service Department, tollfree. Repeat until the walking belt is changing, remove the key. Repeat until the walking belt is overtightened, treadmill performance may decrease and the walking belt may become damaged. If the walking belt is properly tightened. Be careful...

English Manual
Page 25
... muscles, and on the console. Next, find your age near the lowest number in your exercise must exercise at least one day of the treadmill. For more detailed exercise information, obtain a reputable book or consult your "training zone." Aerobic exercise is not a medical device. WORKOUT GUIDELINES ..., do not keep your pulse in general. To measure your breath. During the first few minutes does your everyday life. 25 The key to success is especially important for fat burning and aerobic exercise. Only after the first few minutes of exercise, your body Training Zone ...
... muscles, and on the console. Next, find your age near the lowest number in your exercise must exercise at least one day of the treadmill. For more detailed exercise information, obtain a reputable book or consult your "training zone." Aerobic exercise is not a medical device. WORKOUT GUIDELINES ..., do not keep your pulse in general. To measure your breath. During the first few minutes does your everyday life. 25 The key to success is especially important for fat burning and aerobic exercise. Only after the first few minutes of exercise, your body Training Zone ...
English Manual
Page 26
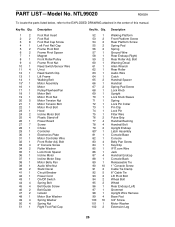
... Breaker Power Cord On/Off Switch Spring Bolt Belt Guide Screw Belt Guide Isolator Motor Star Washer Spring Washer Spring Nut Right Foot Rail Cap Key No. Qty. 1 2 2 2 3 8 4 1 5 2 6 2 7 1 8 1 9 4 10 1 11 4 12 1 13 1 14 1 15* 1 16 1 17 1 18 1 19 1 20 5 21 1 22 1 23 1 24 2 25 4 26 1 27 7 ... Bolt Hood Incline Motor Bolt Plastic Stand-off Power Board Screw Choke Controller Electronics Plate Motor Controller Wire Front Roller Adj. Key No. NTL99020 R0902A To locate the parts listed below, refer to the EXPLODED DRAWING attached in the center of this manual...
... Breaker Power Cord On/Off Switch Spring Bolt Belt Guide Screw Belt Guide Isolator Motor Star Washer Spring Washer Spring Nut Right Foot Rail Cap Key No. Qty. 1 2 2 2 3 8 4 1 5 2 6 2 7 1 8 1 9 4 10 1 11 4 12 1 13 1 14 1 15* 1 16 1 17 1 18 1 19 1 20 5 21 1 22 1 23 1 24 2 25 4 26 1 27 7 ... Bolt Hood Incline Motor Bolt Plastic Stand-off Power Board Screw Choke Controller Electronics Plate Motor Controller Wire Front Roller Adj. Key No. NTL99020 R0902A To locate the parts listed below, refer to the EXPLODED DRAWING attached in the center of this manual...
English Manual
Page 27
Qty. until 6 p.m. Key No. Qty. Description # 2 Thick Base Pad # 1 12" White Wire, M/F # 1 8" White Wire, 2F # 1 4" Blue Wire, 2F # 1 4" Black Wire, 2F # 1 12" Green Wire, 2 Ring # ...MODEL NUMBER OF THE PRODUCT (NTL99020) • the NAME OF THE PRODUCT (NordicTrack® C 1800 treadmill) • the SERIAL NUMBER OF THE PRODUCT (see the front cover of this manual) • the KEY NUMBER AND DESCRIPTION OF THE PART(S) (see the PART LIST on pages 26 and...Grounding Bracket Book Holder Power Cord Grommet Frame Catch Screw Roller Star Washer Spring Plate Foam Trim Key No.
Qty. until 6 p.m. Key No. Qty. Description # 2 Thick Base Pad # 1 12" White Wire, M/F # 1 8" White Wire, 2F # 1 4" Blue Wire, 2F # 1 4" Black Wire, 2F # 1 12" Green Wire, 2 Ring # ...MODEL NUMBER OF THE PRODUCT (NTL99020) • the NAME OF THE PRODUCT (NordicTrack® C 1800 treadmill) • the SERIAL NUMBER OF THE PRODUCT (see the front cover of this manual) • the KEY NUMBER AND DESCRIPTION OF THE PART(S) (see the PART LIST on pages 26 and...Grounding Bracket Book Holder Power Cord Grommet Frame Catch Screw Roller Star Washer Spring Plate Foam Trim Key No.

