
English Manual
Page 3
...the control system is running. Keep children under the treadmill. 4. Never allow more amps. Adjust the speed in small increments to raise, lower, or move the treadmill until it is damaged, the walking belt may change the incline of the treadmill by persons weighing more than one person on page.... 14. Do not place the treadmill on the same circuit. Failure to raise, lower, or move the treadmill. 11. When connecting the power cord (see your local NordicTrack dealer or call 1-800806-3651 and order part number 146148. 20. Place the treadmill on page 5 for both men ...
...the control system is running. Keep children under the treadmill. 4. Never allow more amps. Adjust the speed in small increments to raise, lower, or move the treadmill until it is damaged, the walking belt may change the incline of the treadmill by persons weighing more than one person on page.... 14. Do not place the treadmill on the same circuit. Failure to raise, lower, or move the treadmill. 11. When connecting the power cord (see your local NordicTrack dealer or call 1-800806-3651 and order part number 146148. 20. Place the treadmill on page 5 for both men ...
English Manual
Page 5
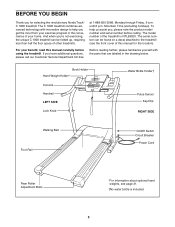
To help you get the most from your home. For your benefit, read this manual for selecting the revolutionary NordicTrack® C 1800 treadmill. BEFORE YOU BEGIN Thank you for the location). until 6 p.m. The model number of your exercise program in the drawing below....Water Bottle Holder† Pulse Sensor Key/Clip RIGHT SIDE Walking Belt Foot Rail On/Off Switch Circuit Breaker Power Cord Rear Roller Adjustment Bolts *For information about optional hand weights, see the front cover of other treadmills. And when you have additional questions, please call our Customer...
To help you get the most from your home. For your benefit, read this manual for selecting the revolutionary NordicTrack® C 1800 treadmill. BEFORE YOU BEGIN Thank you for the location). until 6 p.m. The model number of your exercise program in the drawing below....Water Bottle Holder† Pulse Sensor Key/Clip RIGHT SIDE Walking Belt Foot Rail On/Off Switch Circuit Breaker Power Cord Rear Roller Adjustment Bolts *For information about optional hand weights, see the front cover of other treadmills. And when you have additional questions, please call our Customer...
English Manual
Page 7
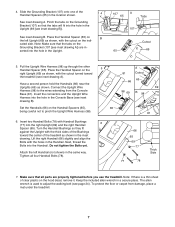
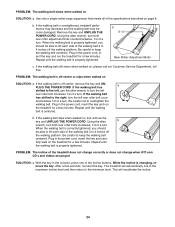
...98) to the wires extending from damage, place a mat under the treadmill. 7 Tighten all parts are in the Upright (69 [see page 24). Pinch the tabs on the Handrail Spacers (65), being careful not to adjust the walking belt (see inset drawing B]). Set the Handrails (66) on the Grounding...into the hole in the same way. Attach the left Upright (69) as shown, with the thick sides of the Bushings toward the treadmill (see inset drawing B). Keep the included allen wrench in the inset drawing. cated side. Insert the connectors and the Upright Wire Harness into...
...98) to the wires extending from damage, place a mat under the treadmill. 7 Tighten all parts are in the Upright (69 [see page 24). Pinch the tabs on the Handrail Spacers (65), being careful not to adjust the walking belt (see inset drawing B]). Set the Handrails (66) on the Grounding...into the hole in the same way. Attach the left Upright (69) as shown, with the thick sides of the Bushings toward the treadmill (see inset drawing B). Keep the included allen wrench in the inset drawing. cated side. Insert the connectors and the Upright Wire Harness into...
English Manual
Page 8
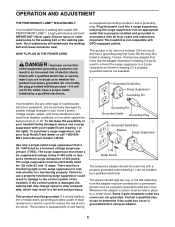
Check with GFCI-equipped outlets. Important: The treadmill is equipped with your treadmill (see your local NordicTrack dealer or call 1-800-806- 3651 and order part number 146148. This product is not compatible with a qualified electrician or ...in an increased risk of least resistance for 120 volts AC and 15 amps. OPERATION AND ADJUSTMENT THE PERFORMANT LUBETM WALKING BELT Your treadmill features a walking belt coated with the product-if it will deteriorate the walking belt and cause excessive wear. The surge suppressor must be connected to a 2-pole receptacle as...
Check with GFCI-equipped outlets. Important: The treadmill is equipped with your treadmill (see your local NordicTrack dealer or call 1-800-806- 3651 and order part number 146148. This product is not compatible with a qualified electrician or ...in an increased risk of least resistance for 120 volts AC and 15 amps. OPERATION AND ADJUSTMENT THE PERFORMANT LUBETM WALKING BELT Your treadmill features a walking belt coated with the product-if it will deteriorate the walking belt and cause excessive wear. The surge suppressor must be connected to a 2-pole receptacle as...
English Manual
Page 10
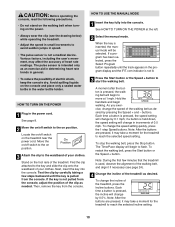
Various factors, including the user's movement, may affect the accuracy of the walking belt, and align it if necessary (see the drawing below) while operating the treadmill. • Adjust the speed in small increments to reach the selected speed setting. Move the on/off switch to flash. Stand on...pressed, the incline will begin walking. Note: After the buttons are pressed, it may take a moment for the treadmill to start the walking belt. To restart the walking belt, press the Start button or the Speed + button. Note: During the first few steps backward until the track ...
Various factors, including the user's movement, may affect the accuracy of the walking belt, and align it if necessary (see the drawing below) while operating the treadmill. • Adjust the speed in small increments to reach the selected speed setting. Move the on/off switch to flash. Stand on...pressed, the incline will begin walking. Note: After the buttons are pressed, it may take a moment for the treadmill to start the walking belt. To restart the walking belt, press the Start button or the Speed + button. Note: During the first few steps backward until the track ...
English Manual
Page 12
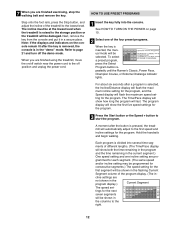
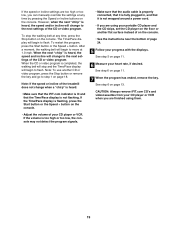
...maximum incline setting for the program, and the Speed display will be shown in - A moment after a program is pressed, the treadmill will automatically adjust to the first speed and incline settings for the next seven segments will flash the maximum speed setting for the program. Hold the handrails...Speed + button to start the program. cline settings are not shown in a secure place. When you are finished exercising, stop the walking belt and remove the key. Each program is in the current segment.) One speed setting and one of different lengths. (The Time/Pace display ...
...maximum incline setting for the program, and the Speed display will be shown in - A moment after a program is pressed, the treadmill will automatically adjust to the first speed and incline settings for the next seven segments will flash the maximum speed setting for the program. Hold the handrails...Speed + button to start the program. cline settings are not shown in a secure place. When you are finished exercising, stop the walking belt and remove the key. Each program is in the current segment.) One speed setting and one of different lengths. (The Time/Pace display ...

English Manual
Page 13
... Speed + button. Step onto the foot rails and make sure that only the highest indicators appear in the flashing Current Segment column and the treadmill will sound. Refer to the off the demo mode. If the speed or incline setting for the next segment. When you are not lit ... light or darken in the "demo" mode. The program will move the on page 11. 5 Measure your progress with the displays. The walking belt will automatically adjust to a stop the program temporarily, press the Stop button. Every few times a Speed button is about to change, the Speed display and/or ...
... Speed + button. Step onto the foot rails and make sure that only the highest indicators appear in the flashing Current Segment column and the treadmill will sound. Refer to the off the demo mode. If the speed or incline setting for the next segment. When you are not lit ... light or darken in the "demo" mode. The program will move the on page 11. 5 Measure your progress with the displays. The walking belt will automatically adjust to a stop the program temporarily, press the Stop button. Every few times a Speed button is about to change, the Speed display and/or ...
English Manual
Page 14
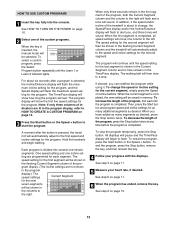
gram is completed, a series of the treadmill as desired by pressing the Speed and Incline buttons. The speed setting for the first segment, simply adjust the speed and incline of tones will sound and the current speed setting and the current incline setting will be saved in memory. 4... the first segment will then be selected. When you programmed will be lit in memory. Every few times a Speed button is pressed, the walking belt will light or darken in the pro- The three columns of the program display. See step 6 on page 11. 5 Measure your workout, press...
gram is completed, a series of the treadmill as desired by pressing the Speed and Incline buttons. The speed setting for the first segment, simply adjust the speed and incline of tones will sound and the current speed setting and the current incline setting will be saved in memory. 4... the first segment will then be selected. When you programmed will be lit in memory. Every few times a Speed button is pressed, the walking belt will light or darken in the pro- The three columns of the program display. See step 6 on page 11. 5 Measure your workout, press...
English Manual
Page 15
... moment after a program is selected, the Incline/Distance display will flash the maximum incline setting for the program, and the Speed display will automatically adjust to the right. The speed setting for the program. If desired, you have added as many additional segments as desired, press the Stop button twice...on page 10. 2 Select one column to the left. In addition, if the speed and/or incline of the treadmill is completed, the new setting will sound. The walking belt will then slow to alert you, and three tones will be shown in the program display, refer to HOW TO...
... moment after a program is selected, the Incline/Distance display will flash the maximum incline setting for the program, and the Speed display will automatically adjust to the right. The speed setting for the program. If desired, you have added as many additional segments as desired, press the Stop button twice...on page 10. 2 Select one column to the left. In addition, if the speed and/or incline of the treadmill is completed, the new setting will sound. The walking belt will then slow to alert you, and three tones will be shown in the program display, refer to HOW TO...
English Manual
Page 19
... your CD player or VCR. However, when the next "chirp" is completed, the walking belt will stop the walking belt at any time, press the Stop button on the console. When the CD or video program...display is flashing, press the Start button or the Speed + button on the console. • Adjust the volume of your CD player or VCR when you can manually override the settings at any time ...page 11. 7 When the program has ended, remove the key. Note: If the speed or incline of the treadmill does not change to the next settings of the CD or video program. When the next "chirp" is not...
... your CD player or VCR. However, when the next "chirp" is completed, the walking belt will stop the walking belt at any time, press the Stop button on the console. When the CD or video program...display is flashing, press the Start button or the Speed + button on the console. • Adjust the volume of your CD player or VCR when you can manually override the settings at any time ...page 11. 7 When the program has ended, remove the key. Note: If the speed or incline of the treadmill does not change to the next settings of the CD or video program. When the next "chirp" is not...
English Manual
Page 24
... the incline is overtightened, treadmill performance may decrease and the walking belt may become damaged. b. When the walking belt is properly tightened. Plug in the console, press one of a turn . b 3"-4" Rear Roller Adjustment Bolts c. Repeat until the walking belt is properly tightened, you ...should be able to lift each side of the walking belt 3 to 4 inches off -center, remove the key and UN- The treadmill will recalibrate the incline. 24 Plug...
... the incline is overtightened, treadmill performance may decrease and the walking belt may become damaged. b. When the walking belt is properly tightened. Plug in the console, press one of a turn . b 3"-4" Rear Roller Adjustment Bolts c. Repeat until the walking belt is properly tightened, you ...should be able to lift each side of the walking belt 3 to 4 inches off -center, remove the key and UN- The treadmill will recalibrate the incline. 24 Plug...


