

English Manual
Page 1
... TOLL-FREE: 1-800-TO-BE-FIT (1-800-862-3348) Mon.-Fri. 6 a.m.-6 p.m. USERʼS MANUAL If you have questions, or if parts are damaged or missing, DO NOT CONTACT THE STORE; www.nordictrack.com Model No. 831.24992.4 Serial No. Write the serial number in this manual before using this manual) before contacting...
... TOLL-FREE: 1-800-TO-BE-FIT (1-800-862-3348) Mon.-Fri. 6 a.m.-6 p.m. USERʼS MANUAL If you have questions, or if parts are damaged or missing, DO NOT CONTACT THE STORE; www.nordictrack.com Model No. 831.24992.4 Serial No. Write the serial number in this manual before using this manual) before contacting...

English Manual
Page 2
... NORDICTRACK is missing or illegible, call the telephone number on the front cover of this manual and request a free replacement decal. If a decal is a registered trademark of the warning decals. TABLE OF CONTENTS WARNING DECAL PLACEMENT 2 IMPORTANT PRECAUTIONS 3 BEFORE YOU BEGIN 5 PART ...CHEST HEART RATE MONITOR 13 OPERATION AND ADJUSTMENT 14 HOW TO FOLD AND MOVE THE TREADMILL 24 TROUBLESHOOTING 25 EXERCISE GUIDELINES 28 PART LIST 30 EXPLODED DRAWING 32 ORDERING REPLACEMENT PARTS Back Cover LIMITED WARRANTY Back Cover WARNING DECAL PLACEMENT This drawing shows the locations ...
... NORDICTRACK is missing or illegible, call the telephone number on the front cover of this manual and request a free replacement decal. If a decal is a registered trademark of the warning decals. TABLE OF CONTENTS WARNING DECAL PLACEMENT 2 IMPORTANT PRECAUTIONS 3 BEFORE YOU BEGIN 5 PART ...CHEST HEART RATE MONITOR 13 OPERATION AND ADJUSTMENT 14 HOW TO FOLD AND MOVE THE TREADMILL 24 TROUBLESHOOTING 25 EXERCISE GUIDELINES 28 PART LIST 30 EXPLODED DRAWING 32 ORDERING REPLACEMENT PARTS Back Cover LIMITED WARRANTY Back Cover WARNING DECAL PLACEMENT This drawing shows the locations ...
English Manual
Page 3
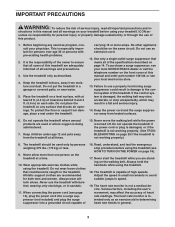
... When connecting the power cord (see your local NORDICTRACK dealer or call the telephone number on a level surface, with pre-existing health problems. 2. Always hold the handrails while using the treadmill. The heart rate monitor is turned off. Keep the treadmill indoors, away from heated surfaces. 6. Do not...trends in speed. 19. Before beginning any surface that meets all of this manual and order part number 146148, or see HOW TO TURN ON THE POWER on page 25 if the treadmill is intended only as described. 4. Use only a single-outlet surge suppressor that blocks air ...
... When connecting the power cord (see your local NORDICTRACK dealer or call the telephone number on a level surface, with pre-existing health problems. 2. Always hold the handrails while using the treadmill. The heart rate monitor is turned off. Keep the treadmill indoors, away from heated surfaces. 6. Do not...trends in speed. 19. Before beginning any surface that meets all of this manual and order part number 146148, or see HOW TO TURN ON THE POWER on page 25 if the treadmill is intended only as described. 4. Use only a single-outlet surge suppressor that blocks air ...
English Manual
Page 4
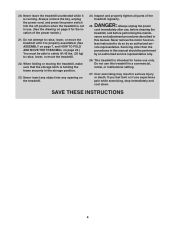
... only. 26. Over exercising may result in the storage position. 23. SAVE THESE INSTRUCTIONS 4 Inspect and properly tighten all parts of the power switch.) 21. nance and adjustment procedures described in this treadmill in a commercial, rental, or institutional setting. 27. Never remove the motor hood un- vice representative. This...while it is not in this manual should be able to safely lift 45 lbs. (20 kg) to raise, lower, or move the treadmill. 22. Always remove the key, unplug the power cord, and press the power switch into any opening on page 24.) You must be...
... only. 26. Over exercising may result in the storage position. 23. SAVE THESE INSTRUCTIONS 4 Inspect and properly tighten all parts of the power switch.) 21. nance and adjustment procedures described in this treadmill in a commercial, rental, or institutional setting. 27. Never remove the motor hood un- vice representative. This...while it is not in this manual should be able to safely lift 45 lbs. (20 kg) to raise, lower, or move the treadmill. 22. Always remove the key, unplug the power cord, and press the power switch into any opening on page 24.) You must be...
English Manual
Page 5
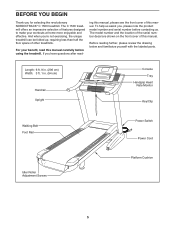
... with the labeled parts. BEFORE YOU BEGIN Thank you , please note the product model number and serial number before using the treadmill. ing this manual, please see the front cover of this manual. The C 1500 treadmill offers an impressive selection of other treadmills. To help us... you have questions after read this manual carefully before contacting us assist you for selecting the revolutionary NORDICTRACK® C 1500 treadmill. If you ʼre not exercising, the unique treadmill can be folded up, requiring less than half the floor space of features designed to make your...
... with the labeled parts. BEFORE YOU BEGIN Thank you , please note the product model number and serial number before using the treadmill. ing this manual, please see the front cover of this manual. The C 1500 treadmill offers an impressive selection of other treadmills. To help us... you have questions after read this manual carefully before contacting us assist you for selecting the revolutionary NORDICTRACK® C 1500 treadmill. If you ʼre not exercising, the unique treadmill can be folded up, requiring less than half the floor space of features designed to make your...

English Manual
Page 6
... the key number is the key number of the part, from the PART LIST near the end of this manual. The number in the hardware kit, check to identify small parts used for assembly. Extra hardware may be included....x 3/4" Screw (1)-4 3/8" x 1 1/4" Screw (8)-4 5/16" x 1 1/2" Screw (5)-4 3/8" x 2" Bolt (3)-1 5/16" x 2" Screw (4)-4 3/8" x 2 3/4" Screw (7)-4 3/8" x 1 3/4" Bolt (6)-1 5/16" x 3 3/4" Screw (2)-2 6 PART IDENTIFICATION CHART Use the drawings below each drawing is the quantity used for assembly. Note: If a part is not in parentheses below to see if it is preattached.
... the key number is the key number of the part, from the PART LIST near the end of this manual. The number in the hardware kit, check to identify small parts used for assembly. Extra hardware may be included....x 3/4" Screw (1)-4 3/8" x 1 1/4" Screw (8)-4 5/16" x 1 1/2" Screw (5)-4 3/8" x 2" Bolt (3)-1 5/16" x 2" Screw (4)-4 3/8" x 2 3/4" Screw (7)-4 3/8" x 1 3/4" Bolt (6)-1 5/16" x 3 3/4" Screw (2)-2 6 PART IDENTIFICATION CHART Use the drawings below each drawing is the quantity used for assembly. Note: If a part is not in parentheses below to see if it is preattached.

English Manual
Page 7
... (97) in the Base (97). 2 81 Hole 84 9 94 97 7 This is coated with a soft cloth and a mild, non-abrasive cleaner. • To identify small parts, see page 6. • Assembly requires the following tools: the included hex key one adjustable wrench one Phillips screwdriver To avoid damaging.... Attach the Base Ground Wire (94) to the right side of the walking belt is normal. ASSEMBLY • Assembly requires two persons. • Place all parts in the Base (97). Attach the Left Wheel Cap (96) to protect the floor or carpet. After shipping, there may be some lubricant on top...
... (97) in the Base (97). 2 81 Hole 84 9 94 97 7 This is coated with a soft cloth and a mild, non-abrasive cleaner. • To identify small parts, see page 6. • Assembly requires the following tools: the included hex key one adjustable wrench one Phillips screwdriver To avoid damaging.... Attach the Base Ground Wire (94) to the right side of the walking belt is normal. ASSEMBLY • Assembly requires two persons. • Place all parts in the Base (97). Attach the Left Wheel Cap (96) to protect the floor or carpet. After shipping, there may be some lubricant on top...

English Manual
Page 12
... (6) 11 and a 3/8" Nut (11). Note: Extra hardware may be included. If one of plastic on the treadmill decals, remove the plastic. Make sure that the 1/2" Rear Leveling Foot Nuts (111) are threaded all parts are sheets of the Rear Leveling Feet (60) doesnʼt sit flat on page 24). 11. If... there are properly tightened before you use the treadmill. Remove the packaging material from the bottom of the Storage Latch...
... (6) 11 and a 3/8" Nut (11). Note: Extra hardware may be included. If one of plastic on the treadmill decals, remove the plastic. Make sure that the 1/2" Rear Leveling Foot Nuts (111) are threaded all parts are sheets of the Rear Leveling Feet (60) doesnʼt sit flat on page 24). 11. If... there are properly tightened before you use the treadmill. Remove the packaging material from the bottom of the Storage Latch...

English Manual
Page 28
... after the first few months of time. For aerobic exercise, adjust the intensity of exercise does your body begin to make exercise a regular and enjoyable part of your exercise program, do not keep your heart rate in your heart rate is activity that requires large amounts of oxygen for prolonged periods...
... after the first few months of time. For aerobic exercise, adjust the intensity of exercise does your body begin to make exercise a regular and enjoyable part of your exercise program, do not keep your heart rate in your heart rate is activity that requires large amounts of oxygen for prolonged periods...

English Manual
Page 30
... Bracket Latch Warning Decal Walking Platform Walking Belt Belt Guide Front Cushion Wire Tie Drive Roller/Pulley Magnet Model No. 831.24992.4 R0611A Key No. PART LIST Key No. Qty. 51 1 52 1 53 1 54 1 55 1 56 1 57 1 58 6 59 2 60 2 61 1 62 1 63 1 64 1 65 1 66 2 67 1 68 1 69 1 70 2 71...
... Bracket Latch Warning Decal Walking Platform Walking Belt Belt Guide Front Cushion Wire Tie Drive Roller/Pulley Magnet Model No. 831.24992.4 R0611A Key No. PART LIST Key No. Qty. 51 1 52 1 53 1 54 1 55 1 56 1 57 1 58 6 59 2 60 2 61 1 62 1 63 1 64 1 65 1 66 2 67 1 68 1 69 1 70 2 71...

English Manual
Page 31
Key No. Qty. 109 1 110 1 111 2 112 2 113 1 114 1 * - Description Pulse Ground Wire Pulse Bar Bottom 1/2" Rear Leveling Foot Nut 3/8" Flat Washer Short Hex Key #8 x 3/8" Screw Userʼs Manual Note: Specifications are not illustrated. 31 For information about ordering replacement parts, see the back cover of this manual. *These parts are subject to change without notice. Qty. 101 2 102 1 103 1 104 1 105 1 106 2 107 1 108 1 Description Wheel Console Base Console Console Back Fan Assembly Handrail Spacer Console Frame Pulse Bar Top Key No.
Key No. Qty. 109 1 110 1 111 2 112 2 113 1 114 1 * - Description Pulse Ground Wire Pulse Bar Bottom 1/2" Rear Leveling Foot Nut 3/8" Flat Washer Short Hex Key #8 x 3/8" Screw Userʼs Manual Note: Specifications are not illustrated. 31 For information about ordering replacement parts, see the back cover of this manual. *These parts are subject to change without notice. Qty. 101 2 102 1 103 1 104 1 105 1 106 2 107 1 108 1 Description Wheel Console Base Console Console Back Fan Assembly Handrail Spacer Console Frame Pulse Bar Top Key No.
English Manual
Page 36
...of this manual) • the key number and description of the replacement part(s) (see the front cover of its authorized service centers. ICON Health & Fitness, Inc., 1500 S. 1000 W., Logan, UT 84321-9813 Part No. 312450 R0611A Printed in lieu of merchantability or fitness for commercial ...vary from the service center will be free from defects in workmanship and material, under warranty. ORDERING REPLACEMENT PARTS To order replacement parts, please see the PART LIST and the EXPLODED DRAWING near the end of this manual) LIMITED WARRANTY IMPORTANT: You must be preauthorized...
...of this manual) • the key number and description of the replacement part(s) (see the front cover of its authorized service centers. ICON Health & Fitness, Inc., 1500 S. 1000 W., Logan, UT 84321-9813 Part No. 312450 R0611A Printed in lieu of merchantability or fitness for commercial ...vary from the service center will be free from defects in workmanship and material, under warranty. ORDERING REPLACEMENT PARTS To order replacement parts, please see the PART LIST and the EXPLODED DRAWING near the end of this manual) LIMITED WARRANTY IMPORTANT: You must be preauthorized...


