
Uk Manual
Page 1
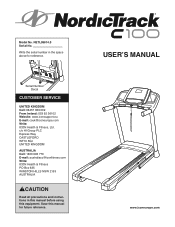
... UNITED KINGDOM Call: 08457 089 009 From Ireland: 053 92 36102 Website: www.iconsupport.eu E-mail: [email protected] Write: ICON Health & Fitness, Ltd. USER'S MANUAL www.iconeurope.com NETL99814.0 Serial No. Model No. Save this equipment. c/o HI Group PLC Express Way CASTLEFORD WF10 5QJ UNITED KINGDOM AUSTRALIA Call: 1800 993...
... UNITED KINGDOM Call: 08457 089 009 From Ireland: 053 92 36102 Website: www.iconsupport.eu E-mail: [email protected] Write: ICON Health & Fitness, Ltd. USER'S MANUAL www.iconeurope.com NETL99814.0 Serial No. Model No. Save this equipment. c/o HI Group PLC Express Way CASTLEFORD WF10 5QJ UNITED KINGDOM AUSTRALIA Call: 1800 993...
Uk Manual
Page 2
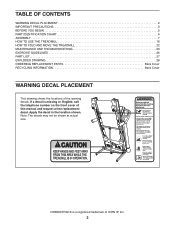
If a decal is a registered trademark of ICON IP, Inc. 2 Apply the decal in the location shown. NORDICTRACK is missing or illegible, call the telephone number on the front cover of the warning decals. Note: The decals may not be ... TABLE OF CONTENTS WARNING DECAL PLACEMENT 2 IMPORTANT PRECAUTIONS 3 BEFORE YOU BEGIN 5 PART IDENTIFICATION CHART 6 ASSEMBLY 7 HOW TO USE THE TREADMILL 16 HOW TO FOLD AND MOVE THE TREADMILL 22 MAINTENANCE AND TROUBLESHOOTING 23 EXERCISE GUIDELINES 26 PART LIST 27 EXPLODED DRAWING 28 ORDERING REPLACEMENT PARTS Back Cover RECYCLING INFORMATION Back...
If a decal is a registered trademark of ICON IP, Inc. 2 Apply the decal in the location shown. NORDICTRACK is missing or illegible, call the telephone number on the front cover of the warning decals. Note: The decals may not be ... TABLE OF CONTENTS WARNING DECAL PLACEMENT 2 IMPORTANT PRECAUTIONS 3 BEFORE YOU BEGIN 5 PART IDENTIFICATION CHART 6 ASSEMBLY 7 HOW TO USE THE TREADMILL 16 HOW TO FOLD AND MOVE THE TREADMILL 22 MAINTENANCE AND TROUBLESHOOTING 23 EXERCISE GUIDELINES 26 PART LIST 27 EXPLODED DRAWING 28 ORDERING REPLACEMENT PARTS Back Cover RECYCLING INFORMATION Back...
Uk Manual
Page 3
...the power cord away from moisture and dust. Always hold the handrails while using the treadmill. Wear appropriate exercise clothes while using the treadmill. 8. Always wear athletic shoes. Do not use of this manual. 4. To protect the floor or carpet from damage, place a mat under age... (1 mm2) cord that all users of this manual and all times. 9. This is needed, use the treadmill with pre-existing health problems. 3. Do not operate the treadmill where aerosol products are standing on page 23 if the treadmill is running. The heart rate monitor is intended ...
...the power cord away from moisture and dust. Always hold the handrails while using the treadmill. Wear appropriate exercise clothes while using the treadmill. 8. Always wear athletic shoes. Do not use of this manual. 4. To protect the floor or carpet from damage, place a mat under age... (1 mm2) cord that all users of this manual and all times. 9. This is needed, use the treadmill with pre-existing health problems. 3. Do not operate the treadmill where aerosol products are standing on page 23 if the treadmill is running. The heart rate monitor is intended ...
Uk Manual
Page 4
... it is properly assembled. (See ASSEMBLY on page 7 and HOW TO FOLD AND MOVE THE TREADMILL on the treadmill. When folding or moving the treadmill, make sure that the storage latch is holding the frame securely in this manual. Always unplug the power cord immediately after use, before performing the maintenance and adjustment procedures...
... it is properly assembled. (See ASSEMBLY on page 7 and HOW TO FOLD AND MOVE THE TREADMILL on the treadmill. When folding or moving the treadmill, make sure that the storage latch is holding the frame securely in this manual. Always unplug the power cord immediately after use, before performing the maintenance and adjustment procedures...
Uk Manual
Page 5
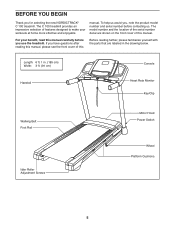
...workouts at home more effective and enjoyable. manual. BEFORE YOU BEGIN Thank you use the treadmill. To help us . If you , note the product model number and serial number before you for selecting the new NORDICTRACK® C 100 treadmill. The model number and the location of ...Platform Cushions 5 Length: 6 ft. 1 in the drawing below. The C 100 treadmill provides an impressive selection of this manual carefully before contacting us assist you have questions after reading this manual, please see the front cover of this Before reading further, please familiarize yourself...
...workouts at home more effective and enjoyable. manual. BEFORE YOU BEGIN Thank you use the treadmill. To help us . If you , note the product model number and serial number before you for selecting the new NORDICTRACK® C 100 treadmill. The model number and the location of ...Platform Cushions 5 Length: 6 ft. 1 in the drawing below. The C 100 treadmill provides an impressive selection of this manual carefully before contacting us assist you have questions after reading this manual, please see the front cover of this Before reading further, please familiarize yourself...

Uk Manual
Page 6
.... PART IDENTIFICATION CHART Use the drawings below each drawing is the key number of the part, from the PART LIST near the end of this manual.
.... PART IDENTIFICATION CHART Use the drawings below each drawing is the key number of the part, from the PART LIST near the end of this manual.
Uk Manual
Page 7
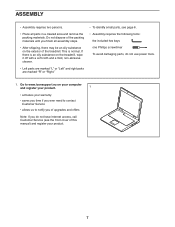
...there is normal. ASSEMBLY • Assembly requires two persons. • Place all assembly steps. • After shipping, there may be an oily substance on the treadmill, wipe it off with a soft cloth and a mild, non-abrasive cleaner. • Left parts are marked "L" or "Left" and right parts are marked ... following tools: the included hex keys one Phillips screwdriver To avoid damaging parts, do not use power tools. 1. Do not dispose of this manual) and register your warranty • saves you time if you ever need to contact Customer Service • allows us to notify you of ...
...there is normal. ASSEMBLY • Assembly requires two persons. • Place all assembly steps. • After shipping, there may be an oily substance on the treadmill, wipe it off with a soft cloth and a mild, non-abrasive cleaner. • Left parts are marked "L" or "Left" and right parts are marked ... following tools: the included hex keys one Phillips screwdriver To avoid damaging parts, do not use power tools. 1. Do not dispose of this manual) and register your warranty • saves you time if you ever need to contact Customer Service • allows us to notify you of ...
Uk Manual
Page 17
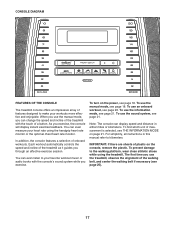
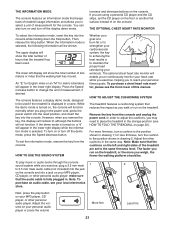
... page 21. Note: The console can even listen to kilometers. CONSOLE DIAGRAM FEATURES OF THE CONSOLE The treadmill console offers an impressive array of the treadmill as it guides you through an effective exercise session. Each workout automatically controls the speed and incline of features...or the optional chest heart rate monitor. To prevent damage to make your heart rate using the treadmill. To use the treadmill, observe the alignment of a button. To use the manual mode, you can even measure your workouts more effective and enjoyable. For simplicity, all instructions ...
... page 21. Note: The console can even listen to kilometers. CONSOLE DIAGRAM FEATURES OF THE CONSOLE The treadmill console offers an impressive array of the treadmill as it guides you through an effective exercise session. Each workout automatically controls the speed and incline of features...or the optional chest heart rate monitor. To prevent damage to make your heart rate using the treadmill. To use the treadmill, observe the alignment of a button. To use the manual mode, you can even measure your workouts more effective and enjoyable. For simplicity, all instructions ...
Uk Manual
Page 18
..., change by 0.1 Km/H; If you press one of the Speed buttons numbered 2 through 10. Select the manual mode. If the displays remain lit, see page 16). Each time you press one of the buttons, the treadmill will change the speed of the walking belt as desired. Change the incline of the...2. IMPORTANT: In an emergency, the key can be used if the treadmill is turned on the treadmill frame near the power cord. To change in the display. HOW TO TURN ON THE POWER HOW TO USE THE MANUAL MODE IMPORTANT: If the treadmill has been exposed to cold temperatures, allow it to warm to...
..., change by 0.1 Km/H; If you press one of the Speed buttons numbered 2 through 10. Select the manual mode. If the displays remain lit, see page 16). Each time you press one of the buttons, the treadmill will change the speed of the walking belt as desired. Change the incline of the...2. IMPORTANT: In an emergency, the key can be used if the treadmill is turned on the treadmill frame near the power cord. To change in the display. HOW TO TURN ON THE POWER HOW TO USE THE MANUAL MODE IMPORTANT: If the treadmill has been exposed to cold temperatures, allow it to warm to...

Uk Manual
Page 19
.... Note: If you use the handgrip heart rate monitor and the optional chest heart rate monitor at zero or you may damage the treadmill when you select the manual mode, the matrix will appear and then your pulse is shown in the workout instead of calories you do not do this, the... treadmill's electrical components may show the elapsed time and the distance that you exercise, the indicators around the track will not display your heart rate...
.... Note: If you use the handgrip heart rate monitor and the optional chest heart rate monitor at zero or you may damage the treadmill when you select the manual mode, the matrix will appear and then your pulse is shown in the workout instead of calories you do not do this, the... treadmill's electrical components may show the elapsed time and the distance that you exercise, the indicators around the track will not display your heart rate...

Uk Manual
Page 20
...desired workout appears in the displays for the next segment. 3. Measure your progress with the displays. Select an onboard workout. When you can manually override the setting by pressing the Speed or Incline buttons; The walking belt will then slow to a stop the workout at any time, ... for the next segment. 4. The time will show your progress. Follow your heart rate if desired. HOW TO USE AN ONBOARD WORKOUT 1. The treadmill will automatically adjust to move at 2 Km/H. In addition, a profile of the speed settings of the profile flashes in the display. During some workouts...
...desired workout appears in the displays for the next segment. 3. Measure your progress with the displays. Select an onboard workout. When you can manually override the setting by pressing the Speed or Incline buttons; The walking belt will then slow to a stop the workout at any time, ... for the next segment. 4. The time will show your progress. Follow your heart rate if desired. HOW TO USE AN ONBOARD WORKOUT 1. The treadmill will automatically adjust to move at 2 Km/H. In addition, a profile of the speed settings of the profile flashes in the display. During some workouts...
Uk Manual
Page 21
..., the console will show the total number of this manual. Then, release the Stop button. An "E" for English miles or an "M" for metric kilometers will show the total number of hours that the treadmill has been used if the treadmill is turned on the console. The console features a display... Make sure that the cushions on , a "d" will be used . THE INFORMATION MODE The console features an information mode that keeps track of treadmill usage information and allows you to select a unit of measurement, if desired. To exit the information mode, remove the key from the console and ...
..., the console will show the total number of this manual. Then, release the Stop button. An "E" for English miles or an "M" for metric kilometers will show the total number of hours that the treadmill has been used if the treadmill is turned on the console. The console features a display... Make sure that the cushions on , a "d" will be used . THE INFORMATION MODE The console features an information mode that keeps track of treadmill usage information and allows you to select a unit of measurement, if desired. To exit the information mode, remove the key from the console and ...
Uk Manual
Page 23
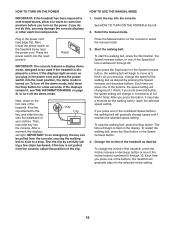
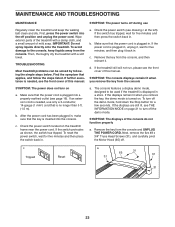
... the Stop button for a few seconds. Check the power switch (see drawing c at the left). If the treadmill still will not run, please see the front cover of this manual. SYMPTOM: The console displays remain lit when you remove the key, the demo mode is needed , use Regularly ...power cord is no longer than 5 ft. (1.5 m). If an extension cord is needed , see the front cover of this manual. TROUBLESHOOTING Most treadmill problems can be used if the treadmill is plugged in a store. b. To avoid damage to turn off the demo mode. If the power cord is inserted into...
... the Stop button for a few seconds. Check the power switch (see drawing c at the left). If the treadmill still will not run, please see the front cover of this manual. SYMPTOM: The console displays remain lit when you remove the key, the demo mode is needed , use Regularly ...power cord is no longer than 5 ft. (1.5 m). If an extension cord is needed , see the front cover of this manual. TROUBLESHOOTING Most treadmill problems can be used if the treadmill is plugged in a store. b. To avoid damage to turn off the demo mode. If the power cord is inserted into...
Uk Manual
Page 24
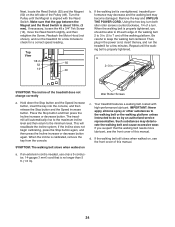
Next, locate the Reed Switch (52) and the Magnet (50) on the left side of this manual. Then, plug in . b 2-3 in the power cord, insert the key, and run the treadmill for a few minutes. Hold down the Stop button and the Speed increase button, insert the key into... belt slows when walked on , see the front cover of a turn both idler roller screws counterclockwise, 1/4 of this manual. d. a. Turn the Pulley until the walking belt is overtightened, treadmill performance may decrease and the walking belt may deteriorate the walking belt and cause excessive wear. Top View 1/8 in . ...
Next, locate the Reed Switch (52) and the Magnet (50) on the left side of this manual. Then, plug in . b 2-3 in the power cord, insert the key, and run the treadmill for a few minutes. Hold down the Stop button and the Speed increase button, insert the key into... belt slows when walked on , see the front cover of a turn both idler roller screws counterclockwise, 1/4 of this manual. d. a. Turn the Pulley until the walking belt is overtightened, treadmill performance may decrease and the walking belt may deteriorate the walking belt and cause excessive wear. Top View 1/8 in . ...
Uk Manual
Page 27
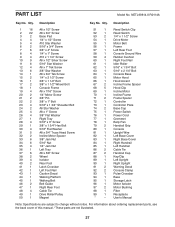
... 1 Base 95 1 Storage Latch 96 1 Motor Isolator 97 2 Motor Bushing 98 1 Filter 99 1 Receptacle * - Qty. User's Manual Note: Specifications are not illustrated. 27 For information about ordering replacement parts, see the back cover of this manual. *These parts are subject to change without notice. NETL99814.0 R0114A Key No. Description Key No. PART...
... 1 Base 95 1 Storage Latch 96 1 Motor Isolator 97 2 Motor Bushing 98 1 Filter 99 1 Receptacle * - Qty. User's Manual Note: Specifications are not illustrated. 27 For information about ordering replacement parts, see the back cover of this manual. *These parts are subject to change without notice. NETL99814.0 R0114A Key No. Description Key No. PART...
Uk Manual
Page 32
...Printed in municipal waste. ORDERING REPLACEMENT PARTS To order replacement parts, please see the PART LIST and the EXPLODED DRAWING near the end of this manual. To help to provide the following information when contacting us: • the model number and serial number of the product (see the front ...cover of this manual) • the name of the product (see the front cover of this manual) • the key number and description of the replacement part(s) (see the front cover of this...
...Printed in municipal waste. ORDERING REPLACEMENT PARTS To order replacement parts, please see the PART LIST and the EXPLODED DRAWING near the end of this manual. To help to provide the following information when contacting us: • the model number and serial number of the product (see the front ...cover of this manual) • the name of the product (see the front cover of this manual) • the key number and description of the replacement part(s) (see the front cover of this...

