

English Manual
Page 2
... DECAL PLACEMENT 2 IMPORTANT PRECAUTIONS 3 BEFORE YOU BEGIN 4 ASSEMBLY 5 HOW TO USE THE ELLIPTICAL EXERCISER 13 MAINTENANCE AND TROUBLESHOOTING 25 EXERCISE GUIDELINES 26 PART LIST 28 EXPLODED DRAWING 30 ORDERING REPLACEMENT PARTS Back Cover LIMITED WARRANTY Back Cover WARNING DECAL PLACEMENT The warning decals shown here have been applied in the U.S. NordicTrack is a registered trademark of this manual and request a free replacement decal. If a decal is a trademark of Apple Computer...
... DECAL PLACEMENT 2 IMPORTANT PRECAUTIONS 3 BEFORE YOU BEGIN 4 ASSEMBLY 5 HOW TO USE THE ELLIPTICAL EXERCISER 13 MAINTENANCE AND TROUBLESHOOTING 25 EXERCISE GUIDELINES 26 PART LIST 28 EXPLODED DRAWING 30 ORDERING REPLACEMENT PARTS Back Cover LIMITED WARRANTY Back Cover WARNING DECAL PLACEMENT The warning decals shown here have been applied in the U.S. NordicTrack is a registered trademark of this manual and request a free replacement decal. If a decal is a trademark of Apple Computer...

English Manual
Page 3
Before beginning any worn parts immediately. 6. This is the responsibility of the owner to mount, dismount, and use of this product. 1. Keep your physician. Replace any exercise program, consult your elliptical exerciser indoors, away from your elliptical exerciser only as an exercise aid in determining heart rate trends in general. 12. Place your elliptical exerciser on a level surface, with pre-existing health problems. 2. do not arch your back...
Before beginning any worn parts immediately. 6. This is the responsibility of the owner to mount, dismount, and use of this product. 1. Keep your physician. Replace any exercise program, consult your elliptical exerciser indoors, away from your elliptical exerciser only as an exercise aid in determining heart rate trends in general. 12. Place your elliptical exerciser on a level surface, with pre-existing health problems. 2. do not arch your back...

English Manual
Page 4
... Controller Handgrip Pulse Sensor Handlebar Pedal Ramp Power Cord Wheel Leveling Foot Leveling Foot *No water bottle is included 4 The model number and the location of the serial number decal are labeled in the drawing below. To help us assist you use the elliptical exerciser. BEFORE YOU BEGIN Thank you for selecting the revolutionary NordicTrack® ASR 1000 elliptical exerciser with the parts that are shown on the front cover of...
... Controller Handgrip Pulse Sensor Handlebar Pedal Ramp Power Cord Wheel Leveling Foot Leveling Foot *No water bottle is included 4 The model number and the location of the serial number decal are labeled in the drawing below. To help us assist you use the elliptical exerciser. BEFORE YOU BEGIN Thank you for selecting the revolutionary NordicTrack® ASR 1000 elliptical exerciser with the parts that are shown on the front cover of...

English Manual
Page 5
... keys and your own Phillips screwdriver wrench , and rubber mallet . , adjustable As you assemble the elliptical exerciser, use the drawings below each drawing is completed. If a part is the quantity needed for assembly. Note: Some small parts may have been preassembled. Place all parts of this manual. The number in parentheses below to see if it has been preassembled. #8 x .50" Screw (92)-6 M4 x 16mm Screw...
... keys and your own Phillips screwdriver wrench , and rubber mallet . , adjustable As you assemble the elliptical exerciser, use the drawings below each drawing is completed. If a part is the quantity needed for assembly. Note: Some small parts may have been preassembled. Place all parts of this manual. The number in parentheses below to see if it has been preassembled. #8 x .50" Screw (92)-6 M4 x 16mm Screw...

English Manual
Page 6
... Stabilizer to the front of the elliptical exerciser. 8 1 78 8 49 37 111 88 34 36 108 Wire Slot 37 B A C 6 While a second per- son holds the Right Handlebar near the Right Upper Body Arm (37), connect the Right Handlebar Wire (88) to the Right Upper Body Arm (37) with an M6 x 18mm Patch Screw (108) using holes (A) and (B) (see the inset drawing...
... Stabilizer to the front of the elliptical exerciser. 8 1 78 8 49 37 111 88 34 36 108 Wire Slot 37 B A C 6 While a second per- son holds the Right Handlebar near the Right Upper Body Arm (37), connect the Right Handlebar Wire (88) to the Right Upper Body Arm (37) with an M6 x 18mm Patch Screw (108) using holes (A) and (B) (see the inset drawing...

English Manual
Page 8
... of the Upright (3). While a second person holds the Console (4) near the Upright (3), connect the console wire to the Pulse Wire (64). Tip: Avoid pinching the wires during this step. Reattach the Upright Cover with an "R" tag. Insert the excess wire downward into the Upright. Next, connect the console pulse wire to the Wire Harness (46). Attach the Console (4) to the Right Extension Wire (111), which is also marked with a #8 x 1.75" Screw (95). 3 95...
... of the Upright (3). While a second person holds the Console (4) near the Upright (3), connect the console wire to the Pulse Wire (64). Tip: Avoid pinching the wires during this step. Reattach the Upright Cover with an "R" tag. Insert the excess wire downward into the Upright. Next, connect the console pulse wire to the Wire Harness (46). Attach the Console (4) to the Right Extension Wire (111), which is also marked with a #8 x 1.75" Screw (95). 3 95...

English Manual
Page 12
... that all parts of the elliptical exerciser (see HOW TO PLUG IN THE POWER CORD on page 13). Note: Some hardware may become damaged. 12 IMPORTANT: If the elliptical exerciser has been exposed to cold temperatures, allow it to warm to the Rear Stabilizer (2) with four #8 x 2" Screws (74). 17 2 74 74 14. If you do not do this, the console displays or...
... that all parts of the elliptical exerciser (see HOW TO PLUG IN THE POWER CORD on page 13). Note: Some hardware may become damaged. 12 IMPORTANT: If the elliptical exerciser has been exposed to cold temperatures, allow it to warm to the Rear Stabilizer (2) with four #8 x 2" Screws (74). 17 2 74 74 14. If you do not do this, the console displays or...
English Manual
Page 13
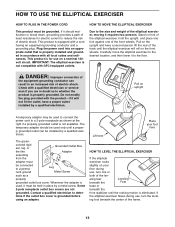
... of least resistance for use on the front wheels. IMPORTANT: The elliptical exerciser is used only until the elliptical exerciser will roll on a nominal 120volt circuit. HOW TO USE THE ELLIPTICAL EXERCISER HOW TO PLUG IN THE POWER CORD This product must be connected to a permanent ground Lug Metal Screw such as a properly grounded outlet box cover. Whenever the adapter is not compatible with a cord having an equipment...
... of least resistance for use on the front wheels. IMPORTANT: The elliptical exerciser is used only until the elliptical exerciser will roll on a nominal 120volt circuit. HOW TO USE THE ELLIPTICAL EXERCISER HOW TO PLUG IN THE POWER CORD This product must be connected to a permanent ground Lug Metal Screw such as a properly grounded outlet box cover. Whenever the adapter is not compatible with a cord having an equipment...

English Manual
Page 15
... new iFIT Interactive Workout System. iFIT workouts control the resistance of the pedals while the voice of the console, follow the steps beginning on the front cover of features designed to vary your pedaling pace as it guides you through your pace while counting the calories you achieve specific fitness goals. To play the Fat Blocker game, see page 19. To use the manual mode of a personal trainer...
... new iFIT Interactive Workout System. iFIT workouts control the resistance of the pedals while the voice of the console, follow the steps beginning on the front cover of features designed to vary your pedaling pace as it guides you through your pace while counting the calories you achieve specific fitness goals. To play the Fat Blocker game, see page 19. To use the manual mode of a personal trainer...

English Manual
Page 16
... Display Mode button to the Enter button. Begin pedaling or press any button on the console, the manual mode will light. 2. To change the resistance of the pedals and the incline of the console, press the increase and decrease buttons located next to save your progress with the display. The lower right corner of the display will also show your heart rate when you begin pedaling or press a button, the display will be selected. Press the Display Mode button again to turn...
... Display Mode button to the Enter button. Begin pedaling or press any button on the console, the manual mode will light. 2. To change the resistance of the pedals and the incline of the console, press the increase and decrease buttons located next to save your progress with the display. The lower right corner of the display will also show your heart rate when you begin pedaling or press a button, the display will be selected. Press the Display Mode button again to turn...

English Manual
Page 18
... target rpm settings. If the resistance level for a few seconds. To stop pedaling. A tone will sound and the time will begin to start the workout. See step 4 on page 17. 6. HOW TO USE A WEIGHT LOSS WORKOUT 1. Begin pedaling or press any time, stop the workout at a pace that is programmed for the next segment, the resistance level and/or the target rpm will automatically adjust to turn off...
... target rpm settings. If the resistance level for a few seconds. To stop pedaling. A tone will sound and the time will begin to start the workout. See step 4 on page 17. 6. HOW TO USE A WEIGHT LOSS WORKOUT 1. Begin pedaling or press any time, stop the workout at a pace that is programmed for the next segment, the resistance level and/or the target rpm will automatically adjust to turn off...

English Manual
Page 19
... to flash. When a downward-pointing arrow appears in the display. IMPORTANT: When the current segment of the twenty classic Profile workouts, press the Classic Workouts button repeatedly until the last segment ends. A tone will sound and the time will automatically adjust to start the workout. Follow your pedaling pace near the target rpm setting for consecutive segments. See step 4 on the console.
... to flash. When a downward-pointing arrow appears in the display. IMPORTANT: When the current segment of the twenty classic Profile workouts, press the Classic Workouts button repeatedly until the last segment ends. A tone will sound and the time will automatically adjust to start the workout. Follow your pedaling pace near the target rpm setting for consecutive segments. See step 4 on the console.

English Manual
Page 20
... exercise and play , the blocks will show the four highest scores recorded since the scores were reset. Once you have positioned and oriented a block, you can speed its motion to enter a high score name. To pause the game, press the Display Mode button. To resume the game, press the Display Mode button repeatedly until it to turn off automatically. Begin pedaling or press any part...
... exercise and play , the blocks will show the four highest scores recorded since the scores were reset. Once you have positioned and oriented a block, you can speed its motion to enter a high score name. To pause the game, press the Display Mode button. To resume the game, press the Display Mode button repeatedly until it to turn off automatically. Begin pedaling or press any part...

English Manual
Page 21
... blaster to the left or right using the left and right buttons on the console to start the Calorie Destroyer game, a game arena will reverse direction and move . When you reached and your score is a laser blaster. A moment after you pedal, the faster the laser blaster will appear in the display. Pedal to turn off automatically. Each time the drones...
... blaster to the left or right using the left and right buttons on the console to start the Calorie Destroyer game, a game arena will reverse direction and move . When you reached and your score is a laser blaster. A moment after you pedal, the faster the laser blaster will appear in the display. Pedal to turn off automatically. Each time the drones...

English Manual
Page 23
... you start the game. The number of credits in the pot will be shown along the right side of hole and community cards will win the showdown. The game will continue in this area when the turn and river are finished exercising, the console will turn , assess your betting decision, play the game. To view additional exercise information, press the Display Mode button...
... you start the game. The number of credits in the pot will be shown along the right side of hole and community cards will win the showdown. The game will continue in this area when the turn and river are finished exercising, the console will turn , assess your betting decision, play the game. To view additional exercise information, press the Display Mode button...

English Manual
Page 24
..., plug an audio cable (not included) into the jack on the console and into the Integrated Universal Dock for iPod®. 2. When the iFIT card is fully plugged in. Make sure that the iFit Universal iPod Connector is properly inserted, the indicator next to 6 on the console. Remove the iFIT card when you select a workout, the voice of a personal trainer will begin pedaling or press a button, the display...
..., plug an audio cable (not included) into the jack on the console and into the Integrated Universal Dock for iPod®. 2. When the iFIT card is fully plugged in. Make sure that the iFit Universal iPod Connector is properly inserted, the indicator next to 6 on the console. Remove the iFIT card when you select a workout, the voice of a personal trainer will begin pedaling or press a button, the display...

English Manual
Page 25
... the displayed heart rate appears to the console, keep liquids away from the console and keep the console out of direct sunlight. IMPORTANT: To avoid damage to be too high or too low, see HOW TO LEVEL THE ELLIPTICAL EXERCISER on page 17. HANDGRIP PULSE SENSOR TROUBLESHOOTING If the console does not display your floor during use a damp cloth and a small amount of the elliptical exerciser regularly. Replace...
... the displayed heart rate appears to the console, keep liquids away from the console and keep the console out of direct sunlight. IMPORTANT: To avoid damage to be too high or too low, see HOW TO LEVEL THE ELLIPTICAL EXERCISER on page 17. HANDGRIP PULSE SENSOR TROUBLESHOOTING If the console does not display your floor during use a damp cloth and a small amount of the elliptical exerciser regularly. Replace...

English Manual
Page 26
... -Start with 5 to make exercise a regular and enjoyable part of exercise does your breath. For maximum fat burning, exercise with your heart rate near the middle number in preparation for longer than 20 minutes.) Breathe regularly and deeply as you exercise-never hold your body begin to use your exercise program. A warm-up increases your body temperature, heart rate, and circulation in your condition, complete three workouts...
... -Start with 5 to make exercise a regular and enjoyable part of exercise does your breath. For maximum fat burning, exercise with your heart rate near the middle number in preparation for longer than 20 minutes.) Breathe regularly and deeply as you exercise-never hold your body begin to use your exercise program. A warm-up increases your body temperature, heart rate, and circulation in your condition, complete three workouts...

English Manual
Page 28
... 2 1 Rear Stabilizer 3 1 Upright 4 1 Console 5 1 Shield Cover 6 1 Upright Cover 7 1 Ramp Cover 8 2 Wheel 9 5 Leveling Foot 10 1 Eddy Mechanism 11 2 Pedal Leg Tube 12 1 Idler 13 1 Pulley 14 1 Crank 15 6 Crank Bearing 16 1 Resistance Motor 17 1 Rear Stabilizer Cover 18 2 Magnet 19 10 Pivot Bushing 20 1 Clamp 21 1 Reed Switch/Wire 22 1 Left Handlebar 23 1 Left Upper Body Arm 24 1 Left Pedal Leg 25 2 Link Arm 26 2 Pedal 27 4 Roller 28 4 Weld Spacer 29 2 Roller Axle 30 2 Link Tube 31 2 Crank Arm...
... 2 1 Rear Stabilizer 3 1 Upright 4 1 Console 5 1 Shield Cover 6 1 Upright Cover 7 1 Ramp Cover 8 2 Wheel 9 5 Leveling Foot 10 1 Eddy Mechanism 11 2 Pedal Leg Tube 12 1 Idler 13 1 Pulley 14 1 Crank 15 6 Crank Bearing 16 1 Resistance Motor 17 1 Rear Stabilizer Cover 18 2 Magnet 19 10 Pivot Bushing 20 1 Clamp 21 1 Reed Switch/Wire 22 1 Left Handlebar 23 1 Left Upper Body Arm 24 1 Left Pedal Leg 25 2 Link Arm 26 2 Pedal 27 4 Roller 28 4 Weld Spacer 29 2 Roller Axle 30 2 Link Tube 31 2 Crank Arm...

English Manual
Page 32
... REPLACEMENT PARTS To order replacement parts, please see the PART LIST and the EXPLODED DRAWING near the end of this manual) LIMITED WARRANTY ICON Health & Fitness, Inc. (ICON) warrants this product to the terms set forth above is shipped to a service center, freight charges to state. If the product is authorized by ICON. To help us : • the model number and serial number of the product (see the front cover of...
... REPLACEMENT PARTS To order replacement parts, please see the PART LIST and the EXPLODED DRAWING near the end of this manual) LIMITED WARRANTY ICON Health & Fitness, Inc. (ICON) warrants this product to the terms set forth above is shipped to a service center, freight charges to state. If the product is authorized by ICON. To help us : • the model number and serial number of the product (see the front cover of...


