
English Manual
Page 3
... the treadmill. 1. Never leave the treadmill unattended while it and two feet on any surface that all of the specifications described on the walking belt. Do not attempt to raise, lower, or move the treadmill. 3 Do not put the treadmill in a fall and serious injury. 13.... circuit capable of heart rate readings. Adjust the speed in sandals. 10. Various factors, including the user's movement, may compromise your local NordicTrack dealer or call 1-800806-3651 and order part number 146148. 16. Using hand weights and not holding the handrails may affect the accuracy of...
... the treadmill. 1. Never leave the treadmill unattended while it and two feet on any surface that all of the specifications described on the walking belt. Do not attempt to raise, lower, or move the treadmill. 3 Do not put the treadmill in a fall and serious injury. 13.... circuit capable of heart rate readings. Adjust the speed in sandals. 10. Various factors, including the user's movement, may compromise your local NordicTrack dealer or call 1-800806-3651 and order part number 146148. 16. Using hand weights and not holding the handrails may affect the accuracy of...
English Manual
Page 5
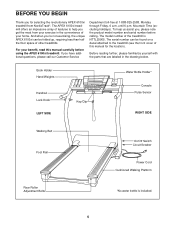
...treadmill is included. 5 The APEX 6100xi treadmill offers an impressive array of features to the treadmill (see the front cover of other treadmills. until 6 p.m. The serial number can be found on a decal attached to help us assist you get the most from NordicTrack®. If you for the... location). Book Holder Hand Weights Handrail Lock Knob LEFT SIDE Key/Clip Water Bottle Holder* Console Pulse Sensor RIGHT SIDE Walking Belt Foot Rail On/Off Switch Circuit Breaker Power Cord ...
...treadmill is included. 5 The APEX 6100xi treadmill offers an impressive array of features to the treadmill (see the front cover of other treadmills. until 6 p.m. The serial number can be found on a decal attached to help us assist you get the most from NordicTrack®. If you for the... location). Book Holder Hand Weights Handrail Lock Knob LEFT SIDE Key/Clip Water Bottle Holder* Console Pulse Sensor RIGHT SIDE Walking Belt Foot Rail On/Off Switch Circuit Breaker Power Cord ...

English Manual
Page 6
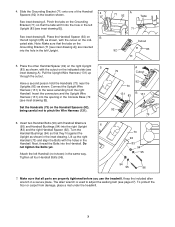
...the floor as you tighten the Screws. Tighten the Lock Knob (85) onto the Lock Pin (91). 3. Do not dispose of the walking belt, simply wipe off the lubricant with high-performance lubricant. Assembly requires the included allen wrench and your own flat-bladed screwdriver . This is completed....28 bladed screwdriver to press the other side of a second person, carefully raise both 2 Uprights (83) to the top of the treadmill walking belt is properly engaged as shown. Slide the treadmill out of the Spring.) Insert the Lock Pin into the hole. 2. Note: The underside of...
...the floor as you tighten the Screws. Tighten the Lock Knob (85) onto the Lock Pin (91). 3. Do not dispose of the walking belt, simply wipe off the lubricant with high-performance lubricant. Assembly requires the included allen wrench and your own flat-bladed screwdriver . This is completed....28 bladed screwdriver to press the other side of a second person, carefully raise both 2 Uprights (83) to the top of the treadmill walking belt is properly engaged as shown. Slide the treadmill out of the Spring.) Insert the Lock Pin into the hole. 2. Note: The underside of...
English Manual
Page 7
... (96). Attach the left Upright. Tighten all parts are inserted into the hole in a secure place. The allen wrench is used to adjust the walking belt (see inset drawing B]). Insert two Handrail Bolts (96) with the holes in the left Upright (83) as shown in the Console Base (79 [see page...
... (96). Attach the left Upright. Tighten all parts are inserted into the hole in a secure place. The allen wrench is used to adjust the walking belt (see inset drawing B]). Insert two Handrail Bolts (96) with the holes in the left Upright (83) as shown in the Console Base (79 [see page...

English Manual
Page 8
... adapter that looks like extending from other appliances being damaged, always use a surge suppressor with your treadmill (see your local NordicTrack dealer or call 1-800-806- 3651 and order part number 146148. Voltage surges, spikes, and noise interference can result in...plug illustrated in damage to a permanent ground such as a transient voltage surge suppressor (TVSS). Important: The treadmill is damaged, the walking belt may change speed or stop unexpectedly, which may result in drawing 2 may be electrically rated for use a properly functioning surge suppressor could ...
... adapter that looks like extending from other appliances being damaged, always use a surge suppressor with your treadmill (see your local NordicTrack dealer or call 1-800-806- 3651 and order part number 146148. Voltage surges, spikes, and noise interference can result in...plug illustrated in damage to a permanent ground such as a transient voltage surge suppressor (TVSS). Important: The treadmill is damaged, the walking belt may change speed or stop unexpectedly, which may result in drawing 2 may be electrically rated for use a properly functioning surge suppressor could ...

English Manual
Page 10
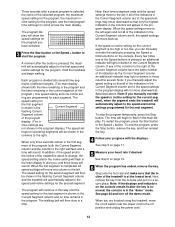
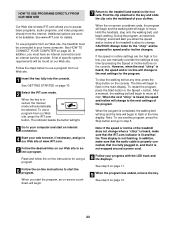
... power cord. To use a custom program, see page 21. CAUTION: Before operating the console, read the following precautions. • Do not stand on the walking belt when turning on the power. • Always wear the clip (see page 17. Stand on the foot rails of electric shock, keep the console dry...
... power cord. To use a custom program, see page 21. CAUTION: Before operating the console, read the following precautions. • Do not stand on the walking belt when turning on the power. • Always wear the clip (see page 17. Stand on the foot rails of electric shock, keep the console dry...
English Manual
Page 11
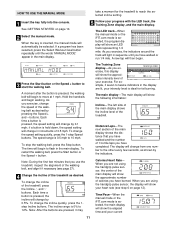
...have burned. See GETTING STARTED on page 12). A moment after the button is inserted, the manual mode will change the incline of the walking belt, and align it may 11 The Training Zone display-As you exercise, change the speed setting quickly, press the 1-step Speed buttons. buttons.... will show the following information: Incline-The left side of the main display shows the incline level of 0.5 mph. To stop the walking belt, press the Stop button. Time/Pace-When the manual mode or the iFIT.com mode is ideal for the treadmill to twelve indicators in increments...
...have burned. See GETTING STARTED on page 12). A moment after the button is inserted, the manual mode will change the incline of the walking belt, and align it may 11 The Training Zone display-As you exercise, change the speed setting quickly, press the 1-step Speed buttons. buttons.... will show the following information: Incline-The left side of the main display shows the incline level of 0.5 mph. To stop the walking belt, press the Stop button. Time/Pace-When the manual mode or the iFIT.com mode is ideal for the treadmill to twelve indicators in increments...

English Manual
Page 12
... for metric kilometers will be shown. Next, remove the key from one of the treadmill to miles. When you are finished exercising, stop the walking belt and remove the key. Speed-The right side of the main display shows the speed of the preset programs, first press the Select Workout Goal... the power cord. See GETTING STARTED on the right side of measurement. nine programs that focus on the handrail. To select one of the walking belt. pace (pace is in the "demo" mode. The display will be damaged. When the desired unit of the program. An "E" for English miles or an...
... for metric kilometers will be shown. Next, remove the key from one of the treadmill to miles. When you are finished exercising, stop the walking belt and remove the key. Speed-The right side of the main display shows the speed of the preset programs, first press the Select Workout Goal... the power cord. See GETTING STARTED on the right side of measurement. nine programs that focus on the handrail. To select one of the walking belt. pace (pace is in the "demo" mode. The display will be damaged. When the desired unit of the program. An "E" for English miles or an...
English Manual
Page 13
... will move the on/off switch near the power cord to the off the demo mode. Each program is at the lowest level. The walking belt will then slow to alert you manually override the speed or incline setting for the current segment, when the segment ends the treadmill will begin...
... will move the on/off switch near the power cord to the off the demo mode. Each program is at the lowest level. The walking belt will then slow to alert you manually override the speed or incline setting for the current segment, when the segment ends the treadmill will begin...
English Manual
Page 14
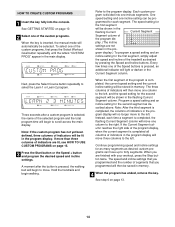
... indicator will move three columns to move one incline setting can have up to the right. Three seconds after the button is pressed, the walking belt will begin to the left. Continue programming speed and incline settings for the first segment, simply adjust the speed and incline of the program dis...
... indicator will move three columns to move one incline setting can have up to the right. Three seconds after the button is pressed, the walking belt will begin to the left. Continue programming speed and incline settings for the first segment, simply adjust the speed and incline of the program dis...
English Manual
Page 15
A moment after a custom program is divided into the console. gram display. (The incline settings are pro- The walking belt will then slow to flash in the program display will move to scroll across the main display. When the current segment is pressed, the treadmill ...
A moment after a custom program is divided into the console. gram display. (The incline settings are pro- The walking belt will then slow to flash in the program display will move to scroll across the main display. When the current segment is pressed, the treadmill ...

English Manual
Page 16
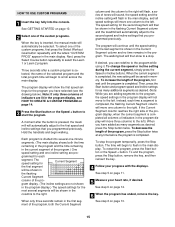
... Course button repeatedly until the words "HEART RATE" appear in the flashing Current Segment column of the treadmill will automatically adjust to 3% and the walking belt will appear in the thirteen columns to 2.5 mph. 16 Once you have entered your energy level is high; The fitness test program is divided into...
... Course button repeatedly until the words "HEART RATE" appear in the flashing Current Segment column of the treadmill will automatically adjust to 3% and the walking belt will appear in the thirteen columns to 2.5 mph. 16 Once you have entered your energy level is high; The fitness test program is divided into...

English Manual
Page 17
... on the chest pulse sensor. Note: The Speed and Incline buttons will be shown in the main display. When the key is completed, the walking belt will flash in this way until your workout. CAUTION: If you are taking medication regularly, consult your exercise heart rate. lems, or if you are...
... on the chest pulse sensor. Note: The Speed and Incline buttons will be shown in the main display. When the key is completed, the walking belt will flash in this way until your workout. CAUTION: If you are taking medication regularly, consult your exercise heart rate. lems, or if you are...

English Manual
Page 18
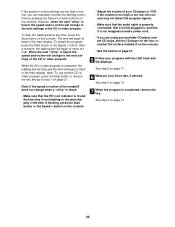
... will appear in the columns to the left. 4 Enter your progress with the displays. The buttons can be stopped temporarily and then restarted. The walking belt will always attempt to the heart rate setting for the program. Note: When the incline reaches the lowest setting, the speed cannot be stopped at...
... will appear in the columns to the left. 4 Enter your progress with the displays. The buttons can be stopped temporarily and then restarted. The walking belt will always attempt to the heart rate setting for the program. Note: When the incline reaches the lowest setting, the speed cannot be stopped at...
English Manual
Page 22
... main display. See step 6 on the console. When the CD or video program is completed, the walking belt will change when a "chirp" is heard: • Make sure that the iFIT.com indicator is lit ... However, when the next "chirp" is heard, the speed and/or incline will stop the walking belt at any time by pressing the Speed or Incline buttons on page 13. 22 If the volume is... cable is properly connected, that it is not flashing in the main display. After a moment, the walking belt will begin to move at 1 mph. If the speed or incline settings are using your portable CD player ...
... main display. See step 6 on the console. When the CD or video program is completed, the walking belt will change when a "chirp" is heard: • Make sure that the iFIT.com indicator is lit ... However, when the next "chirp" is heard, the speed and/or incline will stop the walking belt at any time by pressing the Speed or Incline buttons on page 13. 22 If the volume is... cable is properly connected, that it is not flashing in the main display. After a moment, the walking belt will begin to move at 1 mph. If the speed or incline settings are using your portable CD player ...
English Manual
Page 23
... "chirp" and be available. Find the clip attached to flash in the time display. However, when the next "chirp" is completed, the walking belt will stop the walking belt at www.iFIT.com allows you when the speed and/or incline of the program. See step 5 on page 13. 23 See step... Web site, press the iFIT.com button. When the on our Web site to be prepared for details. Hold the handrails, step onto the walking belt, and begin to flash in , and that the Time display is not wrapped around a power cord. 8 Follow your web browser, if necessary, and go to...
... "chirp" and be available. Find the clip attached to flash in the time display. However, when the next "chirp" is completed, the walking belt will stop the walking belt at www.iFIT.com allows you when the speed and/or incline of the program. See step 5 on page 13. 23 See step... Web site, press the iFIT.com button. When the on our Web site to be prepared for details. Hold the handrails, step onto the walking belt, and begin to flash in , and that the Time display is not wrapped around a power cord. 8 Follow your web browser, if necessary, and go to...

English Manual
Page 24
... monitors your heart rate during your workouts. The left side of the main display will appear on the right side of miles that the walking belt has moved. Press the Speed + button to kilometers per hour to change the unit of miles that the walking... belt has moved. IMPORTANT: Make sure that there is in the main display. To select the information mode, hold down the Stop button while inserting the ...
... monitors your heart rate during your workouts. The left side of the main display will appear on the right side of miles that the walking belt has moved. Press the Speed + button to kilometers per hour to change the unit of miles that the walking... belt has moved. IMPORTANT: Make sure that there is in the main display. To select the information mode, hold down the Stop button while inserting the ...
English Manual
Page 27
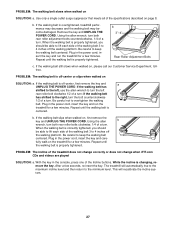
...correctly or does not change when iFIT.com CDs and videos are played SOLUTION: a. b. Be careful to keep the walking belt centered. PROBLEM: The incline of the walking belt 3 to the minimum level. Using the allen wrench, turn both rear roller bolts clockwise, 1/4 of a turn . Repeat... until the walking belt is properly tightened, you should be able to overtighten the walking belt. If the walking belt slips when walked on page 8. Plug in the console, press one of the specifications described on ,...
...correctly or does not change when iFIT.com CDs and videos are played SOLUTION: a. b. Be careful to keep the walking belt centered. PROBLEM: The incline of the walking belt 3 to the minimum level. Using the allen wrench, turn both rear roller bolts clockwise, 1/4 of a turn . Repeat... until the walking belt is properly tightened, you should be able to overtighten the walking belt. If the walking belt slips when walked on page 8. Plug in the console, press one of the specifications described on ,...

English Manual
Page 30
...Description Foot Rail Insert Left Foot Rail Audio Wire Nut Left Foot Rail Endcap Endcap Screw Rear Platform Screw Frame Walking Belt Walking Platform Front Roller/Pulley Motor Belt Motor/Pulley/Flywheel/Fan Roller Bushing (Bottom) Roller Bushing (Top) Bushing Plate Bushing Plate Screw/Isolator Screw Lift Frame... Reed Switch Clip Platform Screw Reed Switch/Sensor Wire Belt Tension Assembly Idler Tension Bolt Idler Pulley Bolt Tension Washer Idler Arm Bearing Idler Arm Idler Arm Washer Cage Nut Pulley Bushing Idler...
...Description Foot Rail Insert Left Foot Rail Audio Wire Nut Left Foot Rail Endcap Endcap Screw Rear Platform Screw Frame Walking Belt Walking Platform Front Roller/Pulley Motor Belt Motor/Pulley/Flywheel/Fan Roller Bushing (Bottom) Roller Bushing (Top) Bushing Plate Bushing Plate Screw/Isolator Screw Lift Frame... Reed Switch Clip Platform Screw Reed Switch/Sensor Wire Belt Tension Assembly Idler Tension Bolt Idler Pulley Bolt Tension Washer Idler Arm Bearing Idler Arm Idler Arm Washer Cage Nut Pulley Bushing Idler...
English Manual
Page 31
...parts, please be prepared to give the following information: • The MODEL NUMBER OF THE PRODUCT (NTTL25905) • The NAME OF THE PRODUCT (NordicTrack® APEX 6100xi treadmill) • The SERIAL NUMBER OF THE PRODUCT (see the front cover of this manual) • The KEY NUMBER AND DESCRIPTION OF THE ...PART(S) (see the PART LIST on page 30 and this manual) 31 until 6 p.m. Screw Pinch Decal Upright Endcap Belt Guide Wire Track Base ...
...parts, please be prepared to give the following information: • The MODEL NUMBER OF THE PRODUCT (NTTL25905) • The NAME OF THE PRODUCT (NordicTrack® APEX 6100xi treadmill) • The SERIAL NUMBER OF THE PRODUCT (see the front cover of this manual) • The KEY NUMBER AND DESCRIPTION OF THE ...PART(S) (see the PART LIST on page 30 and this manual) 31 until 6 p.m. Screw Pinch Decal Upright Endcap Belt Guide Wire Track Base ...


