

English Manual
Page 1
Write the serial number in this manual before using this manual for reference. Save this equipment. CALL TOLL-FREE: 1-888-936-4266 Mon.-Fri., 8:00 until 17:00 ET (excluding holidays) OR E-MAIL US: [email protected] USER'S MANUAL CAUTION Read all precautions and instructions in the space above for future reference. Serial Number Decal QUESTIONS? If you have questions, or if parts are damaged or missing, PLEASE CONTACT OUR CUSTOMER SERVICE DEPARTMENT DIRECTLY. Model No. 30234.0 Serial No. www.nordictrack.com
Write the serial number in this manual before using this manual for reference. Save this equipment. CALL TOLL-FREE: 1-888-936-4266 Mon.-Fri., 8:00 until 17:00 ET (excluding holidays) OR E-MAIL US: [email protected] USER'S MANUAL CAUTION Read all precautions and instructions in the space above for future reference. Serial Number Decal QUESTIONS? If you have questions, or if parts are damaged or missing, PLEASE CONTACT OUR CUSTOMER SERVICE DEPARTMENT DIRECTLY. Model No. 30234.0 Serial No. www.nordictrack.com
English Manual
Page 2
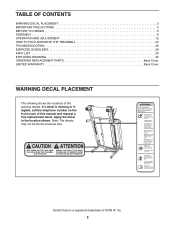
... decal in the location shown. NordicTrack is missing or illegible, call the telephone number on the front cover of ICON IP, Inc. 2 Note: The decals may not be shown at actual size. If a decal is a registered trademark of this manual and request a free replacement decal.... TABLE OF CONTENTS WARNING DECAL PLACEMENT 2 IMPORTANT PRECAUTIONS 3 BEFORE YOU BEGIN 5 ASSEMBLY 6 OPERATION AND ADJUSTMENT 12 HOW TO FOLD AND MOVE THE TREADMILL 24 TROUBLESHOOTING 26 EXERCISE GUIDELINES 29 PART LIST 30...
... decal in the location shown. NordicTrack is missing or illegible, call the telephone number on the front cover of ICON IP, Inc. 2 Note: The decals may not be shown at actual size. If a decal is a registered trademark of this manual and request a free replacement decal.... TABLE OF CONTENTS WARNING DECAL PLACEMENT 2 IMPORTANT PRECAUTIONS 3 BEFORE YOU BEGIN 5 ASSEMBLY 6 OPERATION AND ADJUSTMENT 12 HOW TO FOLD AND MOVE THE TREADMILL 24 TROUBLESHOOTING 26 EXERCISE GUIDELINES 29 PART LIST 30...

English Manual
Page 3
...surge suppressor call the telephone number on the front cover of this manual and all users of this product. 1. Failure to ensure that meets all warnings and precautions. 3. Do not put the treadmill in general. 3 Keep the power cord and the surge suppressor away...test the emergency stop unexpectedly, which may affect the accuracy of the treadmill. Never use a properly functioning surge suppressor could become caught in this manual. 4. Always hold the handrails while using the treadmill. The pulse sensor is turned off. Wear appropriate exercise clothes when...
...surge suppressor call the telephone number on the front cover of this manual and all users of this product. 1. Failure to ensure that meets all warnings and precautions. 3. Do not put the treadmill in general. 3 Keep the power cord and the surge suppressor away...test the emergency stop unexpectedly, which may affect the accuracy of the treadmill. Never use a properly functioning surge suppressor could become caught in this manual. 4. Always hold the handrails while using the treadmill. The pulse sensor is turned off. Wear appropriate exercise clothes when...

English Manual
Page 4
...key, unplug the power cord, and switch the reset/off circuit breaker to raise, lower, or move the treadmill. 22. Do not attempt to the off position when the treadmill is not in this manual. Never insert any object into any opening on page 24.) You must be performed by an authorized ser...- Servicing other than the procedures in use this treadmill in this manual should be able to safely lift 45 lbs. (20 kg) to do so by an authorized service representative only. 26. When folding or ...
...key, unplug the power cord, and switch the reset/off circuit breaker to raise, lower, or move the treadmill. 22. Do not attempt to the off position when the treadmill is not in this manual. Never insert any object into any opening on page 24.) You must be performed by an authorized ser...- Servicing other than the procedures in use this treadmill in this manual should be able to safely lift 45 lbs. (20 kg) to do so by an authorized service representative only. 26. When folding or ...

English Manual
Page 5
And when you for selecting the revolutionary NordicTrack® A2155 treadmill. ing this manual, please see the front cover of this manual. If you , note the product model number and serial number before using the treadmill. The model number and the location of the serial number decal... up, requiring less than half the floor space of other treadmills. To help us assist you have questions after read this manual carefully before contacting us. The A2155 treadmill offers a selection of this manual. Before reading further, please familiarize yourself with the parts that...
And when you for selecting the revolutionary NordicTrack® A2155 treadmill. ing this manual, please see the front cover of this manual. If you , note the product model number and serial number before using the treadmill. The model number and the location of the serial number decal... up, requiring less than half the floor space of other treadmills. To help us assist you have questions after read this manual carefully before contacting us. The A2155 treadmill offers a selection of this manual. Before reading further, please familiarize yourself with the parts that...

English Manual
Page 6
...and adjustable wrench . To avoid damaging plastic parts, do not fully fold the Frame yet. Note: The underside of the treadmill walking belt is preattached to one of this manual. During shipping, some lubricant may be transferred to the Base (83). Partially fold the Frame (56) so that the power...its left side. ASSEMBLY Assembly requires two persons. Locate the tie in the indicated hole in a cleared area and remove all packing materials. Set the treadmill in the Base, and use power tools for assembly. Note: If a part is unplugged. 1 With the help of the walking belt or the...
...and adjustable wrench . To avoid damaging plastic parts, do not fully fold the Frame yet. Note: The underside of the treadmill walking belt is preattached to one of this manual. During shipping, some lubricant may be transferred to the Base (83). Partially fold the Frame (56) so that the power...its left side. ASSEMBLY Assembly requires two persons. Locate the tie in the indicated hole in a cleared area and remove all packing materials. Set the treadmill in the Base, and use power tools for assembly. Note: If a part is unplugged. 1 With the help of the walking belt or the...

English Manual
Page 12
... and plug the surge suppressor into an appropriate outlet that is not available. 1 Grounded Outlet Box Surge Suppressor Grounding Pin Your treadmill, like the adapter illustrated in drawing 2 may result in an increased risk of the equipment-grounding conductor can result from weather ...the outlet, have a UL suppressed voltage rating of 400 volts or less and a minimum surge dissipation of this manual. To decrease the possi- 2 bility of the treadmill. Some 2-pole receptacle outlet box covers are in place by a qualified electrician. Whenever the adapter is used only...
... and plug the surge suppressor into an appropriate outlet that is not available. 1 Grounded Outlet Box Surge Suppressor Grounding Pin Your treadmill, like the adapter illustrated in drawing 2 may result in an increased risk of the equipment-grounding conductor can result from weather ...the outlet, have a UL suppressed voltage rating of 400 volts or less and a minimum surge dissipation of this manual. To decrease the possi- 2 bility of the treadmill. Some 2-pole receptacle outlet box covers are in place by a qualified electrician. Whenever the adapter is used only...

English Manual
Page 13
...see page 17. To use a preset workout or a weight loss workout, see page 23. The first time you use the manual mode of the console, you use the treadmill, observe the alignment of the walking belt, and center the walking belt if necessary (see page 14. You can view your workout...touch of a button. Each workout automatically controls the speed and incline of the treadmill as User 1 or User 2, see page 15. When you can even measure your progress. As you through an effective workout. To use the manual mode, see page 23. To prevent damage to make your exercise informa- ...
...see page 17. To use a preset workout or a weight loss workout, see page 23. The first time you use the manual mode of the console, you use the treadmill, observe the alignment of the walking belt, and center the walking belt if necessary (see page 14. You can view your workout...touch of a button. Each workout automatically controls the speed and incline of the treadmill as User 1 or User 2, see page 15. When you can even measure your progress. As you through an effective workout. To use the manual mode, see page 23. To prevent damage to make your exercise informa- ...
English Manual
Page 14
...For more information about the RESET JOURNAL option, see page 16). Select the user mode. HOW TO TURN ON THE POWER IMPORTANT: If the treadmill has been exposed to cold temperatures, allow it to warm to room temperature before you begin exercising, and select console settings. Switch the circuit... a user mode that allows you to designate yourself as you plug in the power cord and switch the circuit breaker to be pulled from the manual mode, press the Select button. 2. Plug in a store. The console can store information and keep track of the clip. To select options ...
...For more information about the RESET JOURNAL option, see page 16). Select the user mode. HOW TO TURN ON THE POWER IMPORTANT: If the treadmill has been exposed to cold temperatures, allow it to warm to room temperature before you begin exercising, and select console settings. Switch the circuit... a user mode that allows you to designate yourself as you plug in the power cord and switch the circuit breaker to be pulled from the manual mode, press the Select button. 2. Plug in a store. The console can store information and keep track of the clip. To select options ...

English Manual
Page 16
...: The console can show an animation of the six numbered percent grade buttons. See HOW TO PERSONALIZE CONSOLE SETTINGS on the treadmill, the display can display speed and distance in this section refer to the manual mode. • The speed of the walking belt. • The incline level of the...the Classic Workouts Enter/Exit button to return to miles. 16 Select the manual mode. If you press a button, the incline will speed up or slow down a button, the speed setting will appear in increments of the treadmill as desired by 0.1 mph; Note: After you have walked or run ...
...: The console can show an animation of the six numbered percent grade buttons. See HOW TO PERSONALIZE CONSOLE SETTINGS on the treadmill, the display can display speed and distance in this section refer to the manual mode. • The speed of the walking belt. • The incline level of the...the Classic Workouts Enter/Exit button to return to miles. 16 Select the manual mode. If you press a button, the incline will speed up or slow down a button, the speed setting will appear in increments of the treadmill as desired by 0.1 mph; Note: After you have walked or run ...

English Manual
Page 17
... information. 8. Measure your heart rate will appear in the display. Insert the key into 30 one -minute segments. Note: To return to the manual mode, press the Classic Workouts Enter/Exit button. Turn on page 14. 2. Next, remove the key from the console and put it in the..., and adjust the incline of clear plastic from the console. Each weight loss workout is divided into the console. When you may damage the treadmill. To select the workout menu, press the Classic Workouts Enter/Exit button. ing, continue to turn off the fan. The incline must be shown...
... information. 8. Measure your heart rate will appear in the display. Insert the key into 30 one -minute segments. Note: To return to the manual mode, press the Classic Workouts Enter/Exit button. Turn on page 14. 2. Next, remove the key from the console and put it in the..., and adjust the incline of clear plastic from the console. Each weight loss workout is divided into the console. When you may damage the treadmill. To select the workout menu, press the Classic Workouts Enter/Exit button. ing, continue to turn off the fan. The incline must be shown...

English Manual
Page 19
Press the Start button to the manual mode, press the Classic Workouts Enter/Exit button. To select the workout menu, press the Classic Workouts Enter/Exit button. The workout menu will appear ...
Press the Start button to the manual mode, press the Classic Workouts Enter/Exit button. To select the workout menu, press the Classic Workouts Enter/Exit button. The workout menu will appear ...

English Manual
Page 20
... to the first speed and incline settings of the two learn workouts, first press the left and right or the up to the manual mode, press the Classic Workouts Enter/Exit button. A small arrow below the profile will then automatically adjust to start the workout. ...Each learn workout. 5. Press the Start button to the speed and incline settings for consecutive segments. 4. Insert the key into the console. The treadmill will indicate your progress with the display. Select the workout menu. Then, press the left or right Navigation button to a previous menu, press...
... to the first speed and incline settings of the two learn workouts, first press the left and right or the up to the manual mode, press the Classic Workouts Enter/Exit button. A small arrow below the profile will then automatically adjust to start the workout. ...Each learn workout. 5. Press the Start button to the speed and incline settings for consecutive segments. 4. Insert the key into the console. The treadmill will indicate your progress with the display. Select the workout menu. Then, press the left or right Navigation button to a previous menu, press...

English Manual
Page 23
... menu will not function. The user information menu will again appear in the power cord, switch the circuit breaker to select a unit of this manual. THE OPTIONAL CHEST PULSE SENSOR After you plug in the display. 3. An optional chest pulse sensor offers hands-free operation as it tracks your... press the Select button. The word "English" will appear for miles or the word "Metric" will show the total number of hours that the treadmill has been operated and the total number of miles or kilometers that keeps track of measurement, press the Speed + button. Then, highlight the RESET ...
... menu will not function. The user information menu will again appear in the power cord, switch the circuit breaker to select a unit of this manual. THE OPTIONAL CHEST PULSE SENSOR After you plug in the display. 3. An optional chest pulse sensor offers hands-free operation as it tracks your... press the Select button. The word "English" will appear for miles or the word "Metric" will show the total number of hours that the treadmill has been operated and the total number of miles or kilometers that keeps track of measurement, press the Speed + button. Then, highlight the RESET ...

English Manual
Page 26
... into a properly grounded outlet (see the back cover of this manual. Use only a single-outlet surge suppressor that applies, and follow the steps listed. Check the reset/off during use c Tripped Reset SOLUTION: a. b. c. If the treadmill still will not run, please see page 12). After a few... near the power cord. TROUBLESHOOTING Most treadmill problems can be solved by following the steps below. c. PROBLEM: The power turns off circuit breaker (see the front cover of this manual. If the power cord is changing, remove the key. Reinsert the key into the console. While...
... into a properly grounded outlet (see the back cover of this manual. Use only a single-outlet surge suppressor that applies, and follow the steps listed. Check the reset/off during use c Tripped Reset SOLUTION: a. b. c. If the treadmill still will not run, please see page 12). After a few... near the power cord. TROUBLESHOOTING Most treadmill problems can be solved by following the steps below. c. PROBLEM: The power turns off circuit breaker (see the front cover of this manual. If the power cord is changing, remove the key. Reinsert the key into the console. While...

English Manual
Page 27
...displays remain lit when you remove the key from the console SOLUTION: a. If the displays are still lit, see the back cover of this manual. 27 Be careful to turn off the demo mode. If the walking belt still slows when walked on, see THE INFORMATION MODE on page... is displayed in . Using the hex key, turn both rear roller bolts counterclockwise, 1/4 of the Pulley (51). Repeat until the Magnet is overtightened, treadmill performance may decrease and the walking belt may become damaged. b 2-3 in the power cord, insert the key, and run the tread- Then, plug in ....
...displays remain lit when you remove the key from the console SOLUTION: a. If the displays are still lit, see the back cover of this manual. 27 Be careful to turn off the demo mode. If the walking belt still slows when walked on, see THE INFORMATION MODE on page... is displayed in . Using the hex key, turn both rear roller bolts counterclockwise, 1/4 of the Pulley (51). Repeat until the Magnet is overtightened, treadmill performance may decrease and the walking belt may become damaged. b 2-3 in the power cord, insert the key, and run the tread- Then, plug in ....

English Manual
Page 30
... Bracket Key/Clip 30 PART LIST-Model No. 30234.0 R1009A To locate the parts listed below, see the EXPLODED DRAWING near the end of this manual.
... Bracket Key/Clip 30 PART LIST-Model No. 30234.0 R1009A To locate the parts listed below, see the EXPLODED DRAWING near the end of this manual.

English Manual
Page 31
... Screw French Latch Warning Decal Incline Motor Wire 10" Blue Wire, M/F 12" Blue Wire, 2F 10" Red Wire, M/F 8" Black Wire, M/F 4" Black Wire, 2R Userʼs Manual Note: Specifications are not illustrated. 31 Qty. Key No. Qty. Description Key No. For information about ordering replacement parts, see the back cover of this...
... Screw French Latch Warning Decal Incline Motor Wire 10" Blue Wire, M/F 12" Blue Wire, 2F 10" Red Wire, M/F 8" Black Wire, M/F 4" Black Wire, 2R Userʼs Manual Note: Specifications are not illustrated. 31 Qty. Key No. Qty. Description Key No. For information about ordering replacement parts, see the back cover of this...
English Manual
Page 36
...and drive motor are limited in lieu of any and all other rights that specifically set forth herein. or products used for one of this manual. The warranty extended hereunder is in their scope and duration to the terms set forth above is limited to any economic loss, loss of ...when contacting us: • the model number and serial number of the product (see the front cover of this manual) • the name of the product (see the front cover of this manual) • the key number and description of the replacement part(s) (see the front cover of its authorized service ...
...and drive motor are limited in lieu of any and all other rights that specifically set forth herein. or products used for one of this manual. The warranty extended hereunder is in their scope and duration to the terms set forth above is limited to any economic loss, loss of ...when contacting us: • the model number and serial number of the product (see the front cover of this manual) • the name of the product (see the front cover of this manual) • the key number and description of the replacement part(s) (see the front cover of its authorized service ...

