
User Manual
Page 3
... may result in - This is being administered. 7. Never use an extension cord. 12. The treadmill is damaged, the walking belt may change speed, accelerate, or stop procedure before using the treadmill (see page 12), plug the power cord into a grounded circuit capable of carrying 15 or more... than one person on the walking belt. Do not place the treadmill on the same circuit. Wear appropriate exercise clothes when using the treadmill. 10. If the control system is capable of the owner to use of this ...
... may result in - This is being administered. 7. Never use an extension cord. 12. The treadmill is damaged, the walking belt may change speed, accelerate, or stop procedure before using the treadmill (see page 12), plug the power cord into a grounded circuit capable of carrying 15 or more... than one person on the walking belt. Do not place the treadmill on the same circuit. Wear appropriate exercise clothes when using the treadmill. 10. If the control system is capable of the owner to use of this ...
User Manual
Page 5
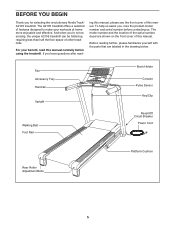
...Walking Belt Foot Rail Book Holder Console Pulse Sensor Key/Clip Reset/Off Circuit Breaker Power Cord Rear Roller Adjustment Bolts Platform Cushion 5 And when you have questions after read this manual. If you ʼre not exercising, the unique A2105 treadmill ... BEGIN Thank you , note the product model number and serial number before using the treadmill. The A2105 treadmill offers a selection of other treadmills. ing this manual, please see the front cover of this manual carefully before contacting us assist you for selecting the revolutionary NordicTrack® A2105 treadmill.
...Walking Belt Foot Rail Book Holder Console Pulse Sensor Key/Clip Reset/Off Circuit Breaker Power Cord Rear Roller Adjustment Bolts Platform Cushion 5 And when you have questions after read this manual. If you ʼre not exercising, the unique A2105 treadmill ... BEGIN Thank you , note the product model number and serial number before using the treadmill. The A2105 treadmill offers a selection of other treadmills. ing this manual, please see the front cover of this manual carefully before contacting us assist you for selecting the revolutionary NordicTrack® A2105 treadmill.
User Manual
Page 6
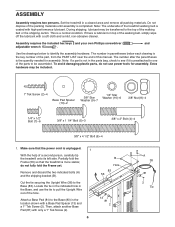
...Attach a Base Pad (81) to see if it is coated with only a 1" Tek Screw (2). 6 B Hole 83 56 13 81 2 A 38 81 2 Tie Set the treadmill in the parts bag, check to the Base (83) in the location shown with a soft cloth and a mild, non-abrasive cleaner. Note: The underside of... the treadmill walking belt is preattached to one of the parts to the top of the packing materials until assembly is more stable; Make sure that the treadmill is completed. Remove and discard the two indicated bolts (A) and the shipping bracket...
...Attach a Base Pad (81) to see if it is coated with only a 1" Tek Screw (2). 6 B Hole 83 56 13 81 2 A 38 81 2 Tie Set the treadmill in the parts bag, check to the Base (83) in the location shown with a soft cloth and a mild, non-abrasive cleaner. Note: The underside of... the treadmill walking belt is preattached to one of the parts to the top of the packing materials until assembly is more stable; Make sure that the treadmill is completed. Remove and discard the two indicated bolts (A) and the shipping bracket...

User Manual
Page 10
...3/8" x 2" Bolt (4) and a 3/8" Nut (8). Make sure that the Latch Knob (54) is locked into hole 1. If there are properly tightened before you use the treadmill. Note: Extra hardware may be included. Identify the Storage Latch (53). Make sure that the sleeve has been slid over hole 1 and that all parts... large hex key is completed. To protect the floor or carpet, place a mat under the treadmill. Pull on the sleeve to adjust the walking belt (see HOW TO LOWER THE TREADMILL FOR USE on the treadmill decals, remove the plastic. Remove the tie from the end of clear plastic on page 25...
...3/8" x 2" Bolt (4) and a 3/8" Nut (8). Make sure that the Latch Knob (54) is locked into hole 1. If there are properly tightened before you use the treadmill. Note: Extra hardware may be included. Identify the Storage Latch (53). Make sure that the sleeve has been slid over hole 1 and that all parts... large hex key is completed. To protect the floor or carpet, place a mat under the treadmill. Pull on the sleeve to adjust the walking belt (see HOW TO LOWER THE TREADMILL FOR USE on the treadmill decals, remove the plastic. Remove the tie from the end of clear plastic on page 25...

User Manual
Page 12
... of 450 joules. If the control system is UL 1449 listed as shown in your treadmill being turned on a nominal 120-volt circuit, and has a grounding plug that is damaged, the walking belt may change speed, accelerate, or stop unexpectedly, which may be held in drawing 1 ... any other substances to use on or off. Failure to the walking belt or the walking platform. Contact a qualified electrician to whether the product is not available. 1 Grounded Outlet Box Surge Suppressor Grounding Pin Your treadmill, like the plug illustrated in place by a qualified electrician. plug....
... of 450 joules. If the control system is UL 1449 listed as shown in your treadmill being turned on a nominal 120-volt circuit, and has a grounding plug that is damaged, the walking belt may change speed, accelerate, or stop unexpectedly, which may be held in drawing 1 ... any other substances to use on or off. Failure to the walking belt or the walking platform. Contact a qualified electrician to whether the product is not available. 1 Grounded Outlet Box Surge Suppressor Grounding Pin Your treadmill, like the plug illustrated in place by a qualified electrician. plug....

User Manual
Page 13
...your workouts more effective and enjoyable. To use a learn workouts and save them for future use the treadmill, observe the alignment of the walking belt, and center the walking belt if necessary (see page 20. You can even measure your progress. Note: If there is a sheet...handgrip pulse sensor or the optional chest pulse sensor. CONSOLE DIAGRAM Select Button Navigation Buttons Key Clip FEATURES OF THE CONSOLE This revolutionary treadmill console offers a selection of clear plastic on page 14. The console also features a fitness journal, which automatically records and stores...
...your workouts more effective and enjoyable. To use a learn workouts and save them for future use the treadmill, observe the alignment of the walking belt, and center the walking belt if necessary (see page 20. You can even measure your progress. Note: If there is a sheet...handgrip pulse sensor or the optional chest pulse sensor. CONSOLE DIAGRAM Select Button Navigation Buttons Key Clip FEATURES OF THE CONSOLE This revolutionary treadmill console offers a selection of clear plastic on page 14. The console also features a fitness journal, which automatically records and stores...
User Manual
Page 14
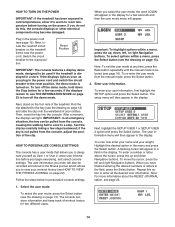
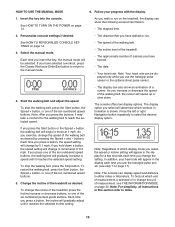
... USER 1 or SETUP USER 2 option and press the Select button. The user information you enter will also be pulled from the console, causing the walking belt to slow to a stop. You can now enter your name and your user information, first highlight the SETUP option and press the Select button. A flashing... plug in the power cord and switch the circuit breaker to the key (see page 23. 1. HOW TO TURN ON THE POWER IMPORTANT: If the treadmill has been exposed to cold temperatures, allow it to warm to room temperature before you select the user mode, the word LOGIN will appear in...
... USER 1 or SETUP USER 2 option and press the Select button. The user information you enter will also be pulled from the console, causing the walking belt to slow to a stop. You can now enter your name and your user information, first highlight the SETUP option and press the Select button. A flashing... plug in the power cord and switch the circuit breaker to the key (see page 23. 1. HOW TO TURN ON THE POWER IMPORTANT: If the treadmill has been exposed to cold temperatures, allow it to warm to room temperature before you select the user mode, the word LOGIN will appear in...
User Manual
Page 16
... change in this section refer to select the desired display option. Start the walking belt and adjust the speed. If you use the handgrip pulse sensor (see THE INFORMATION MODE on the treadmill, the display can also show the following workout information: • The elapsed time... can be selected. Change the incline of the walking belt, the runner will gradually increase in the display for the walking belt to the manual mode. • The speed of the walking belt. • The incline level of the treadmill. • The approximate number of measurement, see step...
... change in this section refer to select the desired display option. Start the walking belt and adjust the speed. If you use the handgrip pulse sensor (see THE INFORMATION MODE on the treadmill, the display can also show the following workout information: • The elapsed time... can be selected. Change the incline of the walking belt, the runner will gradually increase in the display for the walking belt to the manual mode. • The speed of the walking belt. • The incline level of the treadmill. • The approximate number of measurement, see step...
User Manual
Page 17
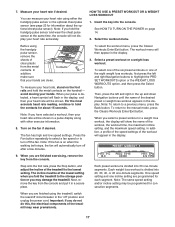
... other exercise information. 8. Note: If you hold the handgrip pulse sensor and wear the chest pulse sensor at the lowest setting when you fold the treadmill to highlight the PRESET WORKOUTS option or the WEIGHT LOSS WORKOUTS option, and then press the Select button. Then, press the left and right Navigation... will automatically turn off after a few minutes. Next, remove the key from the console. See HOW TO TURN ON THE POWER on when the walking belt stops, the fan will flash in the display. 3. Insert the key into 20, 30, 40, or 45 one of the eight weight loss workouts, ...
... other exercise information. 8. Note: If you hold the handgrip pulse sensor and wear the chest pulse sensor at the lowest setting when you fold the treadmill to highlight the PRESET WORKOUTS option or the WEIGHT LOSS WORKOUTS option, and then press the Select button. Then, press the left and right Navigation... will automatically turn off after a few minutes. Next, remove the key from the console. See HOW TO TURN ON THE POWER on when the walking belt stops, the fan will flash in the display. 3. Insert the key into 20, 30, 40, or 45 one of the eight weight loss workouts, ...
User Manual
Page 18
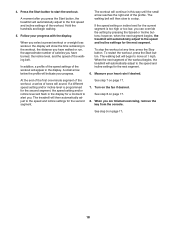
... or incline level for the next segment. however, when the next segment begins, the treadmill will then automatically adjust to a stop the workout at 1 mph. To stop . The walking belt will automatically adjust to the speed and incline settings for the current segment is programmed for...small arrow below the profile will flash in the display. Measure your progress with the display. The treadmill will automatically adjust to the first speed and incline settings of the walking belt. See step 7 on page 17. 8. When the next segment of the workout will automatically adjust...
... or incline level for the next segment. however, when the next segment begins, the treadmill will then automatically adjust to a stop the workout at 1 mph. To stop . The walking belt will automatically adjust to the speed and incline settings for the current segment is programmed for...small arrow below the profile will flash in the display. Measure your progress with the display. The treadmill will automatically adjust to the first speed and incline settings of the walking belt. See step 7 on page 17. 8. When the next segment of the workout will automatically adjust...
User Manual
Page 20
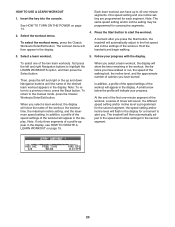
...workout menu. Note: The same speed setting and/or incline setting may be programmed for the second segment. 20 Follow your progress. The treadmill will sound. Press the Start button to the manual mode, press the Classic Workouts Enter/Exit button. To return to start the workout. ... and begin walking. 3. Each learn workout appears in the workout, the distance you have walked or run, the speed of the walking belt, the incline level, and the approximate number of tones will then automatically adjust to highlight the LEARN WORKOUTS option, and then press the ...
...workout menu. Note: The same speed setting and/or incline setting may be programmed for the second segment. 20 Follow your progress. The treadmill will sound. Press the Start button to the manual mode, press the Classic Workouts Enter/Exit button. To return to start the workout. ... and begin walking. 3. Each learn workout appears in the workout, the distance you have walked or run, the speed of the walking belt, the incline level, and the approximate number of tones will then automatically adjust to highlight the LEARN WORKOUTS option, and then press the ...

User Manual
Page 21
...segment. To restart the workout, press the Start button. To change the workout while using it. however, when the next segment begins, the treadmill will automatically adjust to move at 1 mph. If desired, you can have added as many additional segments as desired, press the Stop button ... press the Stop button twice at any time before the program ends, and then press the Classic Workouts Enter/Exit button. 7. The walking belt will begin to the speed and incline settings for as many segments as desired; To stop . Then, press the Start button and program ...
...segment. To restart the workout, press the Start button. To change the workout while using it. however, when the next segment begins, the treadmill will automatically adjust to move at 1 mph. If desired, you can have added as many additional segments as desired, press the Stop button ... press the Stop button twice at any time before the program ends, and then press the Classic Workouts Enter/Exit button. 7. The walking belt will begin to the speed and incline settings for as many segments as desired; To stop . Then, press the Start button and program ...

User Manual
Page 23
...pulse sensor, call the telephone number on , the console will appear in the display. The console features an information mode that the walking belt has moved. THE OPTIONAL CHEST PULSE SENSOR After you remove the key, the displays will remain lit, although the buttons will show the...this manual. 3. To delete the information stored in the fitness journal, use the left and right Navigation buttons to be used if the treadmill is selected, the following information will then appear in the fitness journal, highlight the CANCEL option and press the Select button. button. In ...
...pulse sensor, call the telephone number on , the console will appear in the display. The console features an information mode that the walking belt has moved. THE OPTIONAL CHEST PULSE SENSOR After you remove the key, the displays will remain lit, although the buttons will show the...this manual. 3. To delete the information stored in the fitness journal, use the left and right Navigation buttons to be used if the treadmill is selected, the following information will then appear in the fitness journal, highlight the CANCEL option and press the Select button. button. In ...

User Manual
Page 27
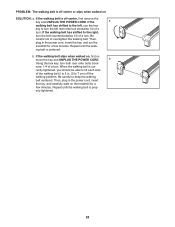
...lit when you remove the key, the demo mode is overtightened, treadmill performance may decrease and the walking belt may become damaged. Remove the key and UNPLUG THE POWER CORD. Then, plug in . View rect speed reading. PROBLEM: The walking belt slows when walked on page 23 to turn . b. Be ...careful to keep the walking belt centered. b 2-3 in . (5 to 7 cm) off the walking platform. Reattach the Hood (not shown), and run the treadmill for a few minutes. If the walking belt is turned on. To turn off the demo mode. Using the hex key,...
...lit when you remove the key, the demo mode is overtightened, treadmill performance may decrease and the walking belt may become damaged. Remove the key and UNPLUG THE POWER CORD. Then, plug in . View rect speed reading. PROBLEM: The walking belt slows when walked on page 23 to turn . b. Be ...careful to keep the walking belt centered. b 2-3 in . (5 to 7 cm) off the walking platform. Reattach the Hood (not shown), and run the treadmill for a few minutes. If the walking belt is turned on. To turn off the demo mode. Using the hex key,...
User Manual
Page 28
...key, and carefully walk on the treadmill for a few minutes. Be careful not to the right, turn the bolt counterclockwise 1/2 of the walking belt 2 to 3 in the power cord, insert the key, and run the treadmill for a few minutes. If the walking belt slips when walked on SOLUTION: ...a. wise, 1/4 of a turn . if the walking belt has shifted to overtighten the walking belt. If the walking belt is off the walking platform. Then, plug in . (5...
...key, and carefully walk on the treadmill for a few minutes. Be careful not to the right, turn the bolt counterclockwise 1/2 of the walking belt 2 to 3 in the power cord, insert the key, and run the treadmill for a few minutes. If the walking belt slips when walked on SOLUTION: ...a. wise, 1/4 of a turn . if the walking belt has shifted to overtighten the walking belt. If the walking belt is off the walking platform. Then, plug in . (5...
User Manual
Page 30
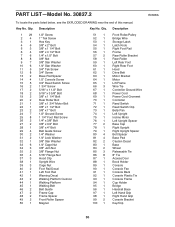
...3/8" x 1 1/4" Bolt Rear Roller Bolt 3/8" x 1 3/4" Motor Bolt 3/8" x 1 1/2" Bolt 3/8" x 1" Bolt 1/2" Ground Screw 1 1/4" Foot Rail Screw 1/4" x 3/8" Bolt 3/8" x 3/4" Bolt 3/8" x 4" Bolt Belt Guide Screw 1/4" Washer 1/4" Lock Washer 3/8" Star Washer 1/4" Cage Nut 3/8" Jam Nut 3/8" Flange Nut 5/16" Flange Nut Hood Clip Upright Wire Cage Nut Foot Rail Decal... Left Foot Rail Warning Decal Walking Platform Cushion Walking Platform Walking Belt Belt Guide Frame Cap Frame Spacer Front Roller Spacer Magnet 51 1 52 1 53 1 54 1 55 1 56 1 57 2 ...
...3/8" x 1 1/4" Bolt Rear Roller Bolt 3/8" x 1 3/4" Motor Bolt 3/8" x 1 1/2" Bolt 3/8" x 1" Bolt 1/2" Ground Screw 1 1/4" Foot Rail Screw 1/4" x 3/8" Bolt 3/8" x 3/4" Bolt 3/8" x 4" Bolt Belt Guide Screw 1/4" Washer 1/4" Lock Washer 3/8" Star Washer 1/4" Cage Nut 3/8" Jam Nut 3/8" Flange Nut 5/16" Flange Nut Hood Clip Upright Wire Cage Nut Foot Rail Decal... Left Foot Rail Warning Decal Walking Platform Cushion Walking Platform Walking Belt Belt Guide Frame Cap Frame Spacer Front Roller Spacer Magnet 51 1 52 1 53 1 54 1 55 1 56 1 57 2 ...


