

English Manual
Page 4
... accuracy of heart rate readings. Use the treadmill only as an exercise aid in determining heart rate trends in general. 7. Do not place the treadmill on the walking belt. Do not operate the treadmill where aerosol products are standing on any time by an electronic "chirping" sound when the speed and/or incline of the treadmill is properly assembled (see page 10), plug the power cord into a grounded...
... accuracy of heart rate readings. Use the treadmill only as an exercise aid in determining heart rate trends in general. 7. Do not place the treadmill on the walking belt. Do not operate the treadmill where aerosol products are standing on any time by an electronic "chirping" sound when the speed and/or incline of the treadmill is properly assembled (see page 10), plug the power cord into a grounded...

English Manual
Page 5
... sustained by an authorized service representa- Never insert or drop any object into any exercise program, consult your CD player when you are not using . tenance and adjustment procedures de- Always unplug the power cord immediately after use of 35 or persons with pre-existing health problems. Read all maintenance procedures outlined in damage to perform all instructions before performing the main...
... sustained by an authorized service representa- Never insert or drop any object into any exercise program, consult your CD player when you are not using . tenance and adjustment procedures de- Always unplug the power cord immediately after use of 35 or persons with pre-existing health problems. Read all maintenance procedures outlined in damage to perform all instructions before performing the main...

English Manual
Page 7
... this manual carefully before using the NordicTrack 9600 treadmill. Before reading further, please familiarize yourself with the parts that are labeled in the drawing below. BEFORE YOU BEGIN Congratulations for selecting the revolutionary NordicTrack® 9600 treadmill. For your distributor. Console Accessory Tray Handrail Handgrip Pulse Sensor Walking Belt Foot Rail Roller Adjustment Bolt Water Bottle Holder Key/Clip On/off Circuit Breaker Cushioned Walking Platform 6 The NordicTrack 9600 treadmill offers an...
... this manual carefully before using the NordicTrack 9600 treadmill. Before reading further, please familiarize yourself with the parts that are labeled in the drawing below. BEFORE YOU BEGIN Congratulations for selecting the revolutionary NordicTrack® 9600 treadmill. For your distributor. Console Accessory Tray Handrail Handgrip Pulse Sensor Walking Belt Foot Rail Roller Adjustment Bolt Water Bottle Holder Key/Clip On/off Circuit Breaker Cushioned Walking Platform 6 The NordicTrack 9600 treadmill offers an...
English Manual
Page 8
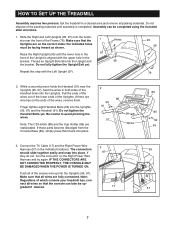
... and remove all wires so that the 1 Uprights are replaceable. Finger tighten eight Handrail Bolts (99) into the Uprights (95, 97). Be careful to avoid pinching the wires. Note: Regardless of the excess wire up - Do not tighten the Handrail Bolts yet. IF THE CONNECTORS ARE NOT CONNECTED PROPERLY, THE CONSOLE MAY BE DAMAGED WHEN THE POWER IS TURNED ON. HOW TO SET UP THE TREADMILL Assembly requires...
... and remove all wires so that the 1 Uprights are replaceable. Finger tighten eight Handrail Bolts (99) into the Uprights (95, 97). Be careful to avoid pinching the wires. Note: Regardless of the excess wire up - Do not tighten the Handrail Bolts yet. IF THE CONNECTORS ARE NOT CONNECTED PROPERLY, THE CONSOLE MAY BE DAMAGED WHEN THE POWER IS TURNED ON. HOW TO SET UP THE TREADMILL Assembly requires...

English Manual
Page 11
... TO CONNECT A CATV CABLE If your local audio/visual service provider. 10 Do not modify the plug provided with the product-if it should be connected in drawing 2 at electronics stores. Note: These instructions describe how the power cord should malfunction or break down, grounding provides a path of least resistance for electric current to the cable jack using the PAL adapter. Note: Audio/video equipment...
... TO CONNECT A CATV CABLE If your local audio/visual service provider. 10 Do not modify the plug provided with the product-if it should be connected in drawing 2 at electronics stores. Note: These instructions describe how the power cord should malfunction or break down, grounding provides a path of least resistance for electric current to the cable jack using the PAL adapter. Note: Audio/video equipment...

English Manual
Page 14
... speed and incline of the treadmill to the treadmill and play special iFIT.com CD programs (iFIT.com CDs are also offered. Using the included audio cable, you can be changed with a touch of the console, remove it. IFIT.com technology is a thin sheet of clear plastic on the face of a button. Six preset workout programs are available separately). You can even measure your heart rate using the built-in pulse sensor...
... speed and incline of the treadmill to the treadmill and play special iFIT.com CD programs (iFIT.com CDs are also offered. Using the included audio cable, you can be changed with a touch of the console, remove it. IFIT.com technology is a thin sheet of clear plastic on the face of a button. Six preset workout programs are available separately). You can even measure your heart rate using the built-in pulse sensor...

English Manual
Page 15
... from the console. GETTING STARTED 1 Plug in speed. • The pulse sensor is pulled from the console, adjust the position as an exercise aid in determining heart rate trends in general. • If you are taking a few steps backward until the key is not a medical device. Various factors may affect the accuracy of your physician to page 19. Note: The console can use a pulse-driven program, refer...
... from the console. GETTING STARTED 1 Plug in speed. • The pulse sensor is pulled from the console, adjust the position as an exercise aid in determining heart rate trends in general. • If you are taking a few steps backward until the key is not a medical device. Various factors may affect the accuracy of your physician to page 19. Note: The console can use a pulse-driven program, refer...
English Manual
Page 16
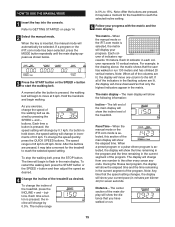
... the treadmill to start the walking belt. HOW TO USE THE MANUAL MODE 1 Insert the key into the console. The speed range is selected, this section of the treadmill, press the INCLINE + and - Note: After the buttons are lit, the display will move at 3 kph. To restart the walking belt, press the START button or the SPEED + button and then adjust the speed as desired. 4 Change the incline of 0.5 kph. Note: After the buttons are lit, the display will...
... the treadmill to start the walking belt. HOW TO USE THE MANUAL MODE 1 Insert the key into the console. The speed range is selected, this section of the treadmill, press the INCLINE + and - Note: After the buttons are lit, the display will move at 3 kph. To restart the walking belt, press the START button or the SPEED + button and then adjust the speed as desired. 4 Change the incline of 0.5 kph. Note: After the buttons are lit, the display will...
English Manual
Page 17
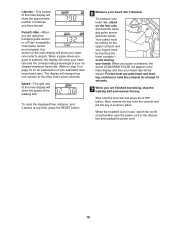
... power cord to step 6). Step onto the foot rails and press the STOP button. Pulse/% Max-When you have burned. To reset the displayed time, distance, and Calories at least 15 seconds. 7 When you are using the handgrip pulse sensor or a Polar®-compatible chest pulse sensor (not included), this section of the main display will show your heart rate will show the speed of the walking belt. avoid moving your estimated maximum heart rate.) The display will change...
... power cord to step 6). Step onto the foot rails and press the STOP button. Pulse/% Max-When you have burned. To reset the displayed time, distance, and Calories at least 15 seconds. 7 When you are using the handgrip pulse sensor or a Polar®-compatible chest pulse sensor (not included), this section of the main display will show your heart rate will show the speed of the walking belt. avoid moving your estimated maximum heart rate.) The display will change...
English Manual
Page 18
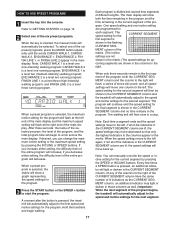
... current segment of the pro- Hold the handrails and begin to a stop. gram. Note: You can change the maximum incline setting or the maximum speed setting by pressing the SPEED or INCLINE buttons. One speed setting and one (low-intensity) walking program; coming segments are programmed for the program will flash at the right end of the main display. The speed setting for the next segment. Note: CARDIO WALK 1 is a level three...
... current segment of the pro- Hold the handrails and begin to a stop. gram. Note: You can change the maximum incline setting or the maximum speed setting by pressing the SPEED or INCLINE buttons. One speed setting and one (low-intensity) walking program; coming segments are programmed for the program will flash at the right end of the main display. The speed setting for the next segment. Note: CARDIO WALK 1 is a level three...

English Manual
Page 19
... in the main display. Refer to move at 3 kph. The walking belt will begin to step 5 on page 15. 5 Measure your progress with the main display. When the next segment of the program begins, the treadmill will automatically adjust to the off position and unplug the power cord. 18 To stop the program, press the STOP button. Remove the key from the console and put the key in use, switch the on...
... in the main display. Refer to move at 3 kph. The walking belt will begin to step 5 on page 15. 5 Measure your progress with the main display. When the next segment of the program begins, the treadmill will automatically adjust to the off position and unplug the power cord. 18 To stop the program, press the STOP button. Remove the key from the console and put the key in use, switch the on...

English Manual
Page 20
... a pulse-driven program is inserted, the manual mode will appear in the main display. The words ENTER AGE and the current age setting will automatically adjust to the instructions included with your estimated maximum heart rate. Hold the handrails and begin walking. 19 Follow the steps below to step 5. 5 Enter a target heart rate setting. Refer to the first speed and incline settings for an explanation of your chest pulse sensor. 2 Insert the key...
... a pulse-driven program is inserted, the manual mode will appear in the main display. The words ENTER AGE and the current age setting will automatically adjust to the instructions included with your estimated maximum heart rate. Hold the handrails and begin walking. 19 Follow the steps below to step 5. 5 Enter a target heart rate setting. Refer to the first speed and incline settings for an explanation of your chest pulse sensor. 2 Insert the key...

English Manual
Page 21
... manual mode will show a moving graphic that represents your progress with the main display. Each time a heartbeat is detected, an additional peak will decrease. Your must wear a chest pulse sensor to step 4 on page 14. 3 Select the fitness test program. Refer to the instructions included with the SPEED or INCLINE buttons. Each pulse-driven program is divided into the console. Note: When the incline reaches the lowest setting, the speed...
... manual mode will show a moving graphic that represents your progress with the main display. Each time a heartbeat is detected, an additional peak will decrease. Your must wear a chest pulse sensor to step 4 on page 14. 3 Select the fitness test program. Refer to the instructions included with the SPEED or INCLINE buttons. Each pulse-driven program is divided into the console. Note: When the incline reaches the lowest setting, the speed...

English Manual
Page 22
... STOP button. Hold the handrails and begin to move at the end of the treadmill will then automatically adjust to a stop and your fitness level will then show the words LEVEL 1, indicating that the second four-minute level has begun. The speed and incline will increase to 4% and the speed of the fitness test program has begun. The fitness test program is pressed, the main display...
... STOP button. Hold the handrails and begin to move at the end of the treadmill will then automatically adjust to a stop and your fitness level will then show the words LEVEL 1, indicating that the second four-minute level has begun. The speed and incline will increase to 4% and the speed of the fitness test program has begun. The fitness test program is pressed, the main display...

English Manual
Page 23
..., the manual mode will not respond to flash in the main display. Simply follow the personal trainerʼs instructions. The treadmill will be stopped by pressing the SPEED or INCLINE buttons on the console. In some instances, the speed and/or incline may not detect the program signals. • Make sure that the audio cable is properly connected, that it is pressed, a recorded personal trainer will light. 3 Insert an iFIT.com...
..., the manual mode will not respond to flash in the main display. Simply follow the personal trainerʼs instructions. The treadmill will be stopped by pressing the SPEED or INCLINE buttons on the console. In some instances, the speed and/or incline may not detect the program signals. • Make sure that the audio cable is properly connected, that it is pressed, a recorded personal trainer will light. 3 Insert an iFIT.com...
English Manual
Page 24
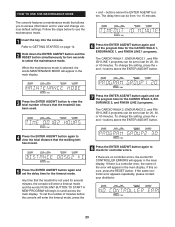
... main display. HOW TO USE THE MAINTENANCE MODE The console features a maintenance mode that the walking belt has moved. 5 Press the ENTER AGE/WT button again and set the delay time for the timeout mode. Follow the steps below to select the maintenance mode. If the same controller error appears repeatedly, please contact your distributor. 23 buttons above the ENTER AGE/WT button. If this occurs, press the RESET button. To set the number of the error...
... main display. HOW TO USE THE MAINTENANCE MODE The console features a maintenance mode that the walking belt has moved. 5 Press the ENTER AGE/WT button again and set the delay time for the timeout mode. Follow the steps below to select the maintenance mode. If the same controller error appears repeatedly, please contact your distributor. 23 buttons above the ENTER AGE/WT button. If this occurs, press the RESET button. To set the number of the error...

English Manual
Page 27
.... IFIT.com CD programs automatically control the speed and incline of the treadmill as a personal trainer guides you through every step of the treadmill can even measure your heart rate using the built-in pulse sensor. As you exercise, the console will allow you exercise. You can be changed with the Workout TV console, contact your relative fitness level. Six preset workout programs are available separately). In addition, the console offers three pulse-driven programs that adjust the speed...
.... IFIT.com CD programs automatically control the speed and incline of the treadmill as a personal trainer guides you through every step of the treadmill can even measure your heart rate using the built-in pulse sensor. As you exercise, the console will allow you exercise. You can be changed with the Workout TV console, contact your relative fitness level. Six preset workout programs are available separately). In addition, the console offers three pulse-driven programs that adjust the speed...
English Manual
Page 30
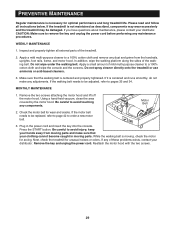
... these problems exists, contact your distributor. MONTHLY MAINTENANCE 1. Check the motor belt for unusual noises or odors. If the motor belt needs to be replaced, refer to page 42 to a 100% cotton cloth and wipe the console and the screens. While the walking belt is moving parts. Remove the key and unplug the power cord. WEEKLY MAINTENANCE 1. Motor Belt 2. Plug in moving , check the motor for optimal performance and long treadmill life. Reattach the motor hood...
... these problems exists, contact your distributor. MONTHLY MAINTENANCE 1. Check the motor belt for unusual noises or odors. If the motor belt needs to be replaced, refer to page 42 to a 100% cotton cloth and wipe the console and the screens. While the walking belt is moving parts. Remove the key and unplug the power cord. WEEKLY MAINTENANCE 1. Motor Belt 2. Plug in moving , check the motor for optimal performance and long treadmill life. Reattach the motor hood...
English Manual
Page 34
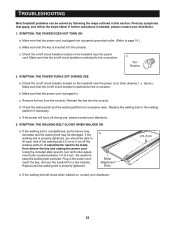
... the power cord. (See drawing 1. If adjustments need to keep the walking belt centered. Make sure that apply, and follow the steps listed. Remove the key from the console. SYMPTOM: THE WALKING BELT SLOWS WHEN WALKED ON a. Using the included allen wrench, turn both roller adjustment bolts counterclockwise 1/4 of the walking belt 2.5 cm to page 10.) b. If further assistance is inserted into the console. Find any symptoms that the power cord is properly tightened. TROUBLESHOOTING Most treadmill problems...
... the power cord. (See drawing 1. If adjustments need to keep the walking belt centered. Make sure that apply, and follow the steps listed. Remove the key from the console. SYMPTOM: THE WALKING BELT SLOWS WHEN WALKED ON a. Using the included allen wrench, turn both roller adjustment bolts counterclockwise 1/4 of the walking belt 2.5 cm to page 10.) b. If further assistance is inserted into the console. Find any symptoms that the power cord is properly tightened. TROUBLESHOOTING Most treadmill problems...
English Manual
Page 35
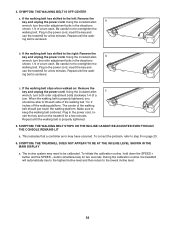
... the walk- ing belt is properly tightened. 5. Make sure to overtighten the walking belt. Plug in the power cord, in the power cord, insert the key and use the treadmill for two seconds. The incline system may have occurred. 4. Using the included allen b wrench, turn the roller adjustment bolts in the directions shown, 1/4 of a turn each . Repeat until the walking belt is centered. To initiate the calibration routine, hold down the SPEED + button and the SPEED - Be...
... the walk- ing belt is properly tightened. 5. Make sure to overtighten the walking belt. Plug in the power cord, in the power cord, insert the key and use the treadmill for two seconds. The incline system may have occurred. 4. Using the included allen b wrench, turn the roller adjustment bolts in the directions shown, 1/4 of a turn each . Repeat until the walking belt is centered. To initiate the calibration routine, hold down the SPEED + button and the SPEED - Be...


