

Uk Manual
Page 4
... elliptical trainer in this product. See HOW TO REPLACE THE BATTERY PACK on a level surface. SAVE THESE INSTRUCTIONS 3 Do not modify the power cord or use it is intended only as described in a garage or covered patio or near water. 5. Make sure that are adequately informed of the elliptical trainer are considered hazardous to the environment. do not arch your physician. The pulse sensor...
... elliptical trainer in this product. See HOW TO REPLACE THE BATTERY PACK on a level surface. SAVE THESE INSTRUCTIONS 3 Do not modify the power cord or use it is intended only as described in a garage or covered patio or near water. 5. Make sure that are adequately informed of the elliptical trainer are considered hazardous to the environment. do not arch your physician. The pulse sensor...
Uk Manual
Page 6
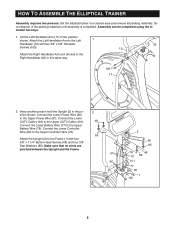
Set the elliptical trainer in the same way. 100 17 2. Assembly can be completed using the included hex keys. 1. Connect the Lower Controller Wire (80) to the Upper Power Wire (97). Attach the Left Handlebar Arm to the Left 1 Handlebar (19) with four 3/8" x 1 1/4" Button Head Screws (48) and four 3/8" Star Washers (85). Connect the Lower Power Wire (96) to the Upper Controller Wire (79). Make sure that no wires are pinched between the Upright and...
Set the elliptical trainer in the same way. 100 17 2. Assembly can be completed using the included hex keys. 1. Connect the Lower Controller Wire (80) to the Upper Power Wire (97). Attach the Left Handlebar Arm to the Left 1 Handlebar (19) with four 3/8" x 1 1/4" Button Head Screws (48) and four 3/8" Star Washers (85). Connect the Lower Power Wire (96) to the Upper Controller Wire (79). Make sure that no wires are pinched between the Upright and...

Uk Manual
Page 8
... the Workout TV console. Carefully move the elliptical trainer over an uneven surface. Do not attempt to move the elliptical trainer to the desired location and then lower it requires two persons. To use your legs rather than your back straight. HOW TO SET UP THE ELLIPTICAL TRAINER HOW TO MOVE AND LEVEL THE ELLIPTICAL TRAINER Make sure that the power cord is unplugged. (Note: If a CATV cable is connected to the elliptical trainer...
... the Workout TV console. Carefully move the elliptical trainer over an uneven surface. Do not attempt to move the elliptical trainer to the desired location and then lower it requires two persons. To use your legs rather than your back straight. HOW TO SET UP THE ELLIPTICAL TRAINER HOW TO MOVE AND LEVEL THE ELLIPTICAL TRAINER Make sure that the power cord is unplugged. (Note: If a CATV cable is connected to the elliptical trainer...
Uk Manual
Page 10
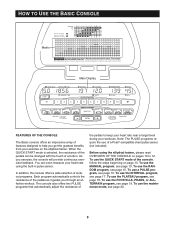
... the pedals as it guides you exercise, the console will provide continuous exercise feedback. Before using the built-in pulse sensor. To use the FOOTHILLS, PEAKS, or ALLTERRAIN program, see page 20. 9 To use of a Polar®-compatible chest pulse sensor (not included). Note: The PULSE programs require the use the maintenance mode, see page 19. When the QUICK START mode is selected, the resistance of the pedals can even measure your heart rate using the elliptical trainer...
... the pedals as it guides you exercise, the console will provide continuous exercise feedback. Before using the built-in pulse sensor. To use the FOOTHILLS, PEAKS, or ALLTERRAIN program, see page 20. 9 To use of a Polar®-compatible chest pulse sensor (not included). Note: The PULSE programs require the use the maintenance mode, see page 19. When the QUICK START mode is selected, the resistance of the pedals can even measure your heart rate using the elliptical trainer...

Uk Manual
Page 11
... scroll across the main display. If the power cord is pressed, the resistance setting will change by a generator; The QUICKTOUCH RESISTANCE buttons-These buttons control the resistance of time, the console will automatically turn off. When one program is started and then a different program is selected, the main display will not be reset unless the CLEAR button is pressed before you pedal, power will be reset and the words "PLEASE SELECT A PROGRAM TO BEGIN" will...
... scroll across the main display. If the power cord is pressed, the resistance setting will change by a generator; The QUICKTOUCH RESISTANCE buttons-These buttons control the resistance of time, the console will automatically turn off. When one program is started and then a different program is selected, the main display will not be reset unless the CLEAR button is pressed before you pedal, power will be reset and the words "PLEASE SELECT A PROGRAM TO BEGIN" will...
Uk Manual
Page 12
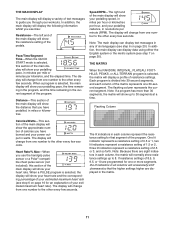
... use the handgrip pulse sensor or a Polar®-compatible chest pulse sensor (not included), this section of six languages (see step 7 on page 20). The display will change from one number to the other every few seconds. The display will change from one number to the other every few seconds. If resistance settings of 8.5, 9, 9.5, or 10 are programmed for one number to guide you through your estimated maximum heart rate...
... use the handgrip pulse sensor or a Polar®-compatible chest pulse sensor (not included), this section of six languages (see step 7 on page 20). The display will change from one number to the other every few seconds. The display will change from one number to the other every few seconds. If resistance settings of 8.5, 9, 9.5, or 10 are programmed for one number to guide you through your estimated maximum heart rate...

Uk Manual
Page 14
... USE THE MANUAL PROGRAM The MANUAL program will light. 3 Begin exercising and change the resistance of the pedals as you control the resistance of the pedals. 1 Plug in the power cord or begin pedalling to activate the console. Each time you change the resistance of the pedals by pressing the RESISTANCE + and - See HOW TO ACTIVATE THE CONSOLE on page 11. 2 Select the QUICK START mode. To select the QUICK START mode, press the QUICK START button. When you have exercised...
... USE THE MANUAL PROGRAM The MANUAL program will light. 3 Begin exercising and change the resistance of the pedals as you control the resistance of the pedals. 1 Plug in the power cord or begin pedalling to activate the console. Each time you change the resistance of the pedals by pressing the RESISTANCE + and - See HOW TO ACTIVATE THE CONSOLE on page 11. 2 Select the QUICK START mode. To select the QUICK START mode, press the QUICK START button. When you have exercised...

Uk Manual
Page 15
... finished using the elliptical trainer, the console will automatically enter an idle mode or turn off. See HOW TO TURN OFF THE CONSOLE on page 11. 8 Measure your progress and the resistance settings that the program will show your heart rate if desired. As you change the resistance of 35 will appear in increments of 5 years. A moment after the program is shown, press the ENTER button. 4 Enter your weight...
... finished using the elliptical trainer, the console will automatically enter an idle mode or turn off. See HOW TO TURN OFF THE CONSOLE on page 11. 8 Measure your progress and the resistance settings that the program will show your heart rate if desired. As you change the resistance of 35 will appear in increments of 5 years. A moment after the program is shown, press the ENTER button. 4 Enter your weight...
Uk Manual
Page 16
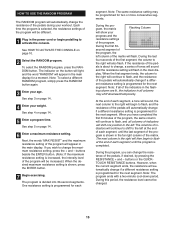
... step 4 on page 14. 6 Enter a maximum resistance setting. Next, the words "MAX RESIST" and the maximum resistance setting of the pedals during your weight. During the program, the matrix Flashing Column will appear in the flash- If the resistance of the indicators in the main display. Note: To select a different RANDOM program, simply press the RANDOM button again. 3 Enter your progress and the resistance settings of the program...
... step 4 on page 14. 6 Enter a maximum resistance setting. Next, the words "MAX RESIST" and the maximum resistance setting of the pedals during your weight. During the program, the matrix Flashing Column will appear in the flash- If the resistance of the indicators in the main display. Note: To select a different RANDOM program, simply press the RANDOM button again. 3 Enter your progress and the resistance settings of the program...

Uk Manual
Page 17
... with the chest pulse sensor. 2 Plug in the main display. See THE MAIN DISPLAY on page 14. 5 Enter your workout. 1 Put on a Polar®-compatible chest pulse sensor (not included). HOW TO USE THE PULSE PROGRAMS Next, the words "CONSTANT MODE" will appear in the power cord or begin pedalling to keep your heart rate within a target range during your estimated maximum heart rate is 95). button beside the ENTER button so that...
... with the chest pulse sensor. 2 Plug in the main display. See THE MAIN DISPLAY on page 14. 5 Enter your workout. 1 Put on a Polar®-compatible chest pulse sensor (not included). HOW TO USE THE PULSE PROGRAMS Next, the words "CONSTANT MODE" will appear in the power cord or begin pedalling to keep your heart rate within a target range during your estimated maximum heart rate is 95). button beside the ENTER button so that...

Uk Manual
Page 18
... the CONSTANT PULSE program is selected, the same target heart rate setting is divided into 30-second segments. See THE MAIN DISPLAY on page 15. 7 Enter the desired number of the pedals, if desired, by pressing the RESISTANCE + and - If you are finished using the elliptical trainer, the console will flash in the main display for a moment. 3 Enter your heart rate closer to change the resistance of hills for...
... the CONSTANT PULSE program is selected, the same target heart rate setting is divided into 30-second segments. See THE MAIN DISPLAY on page 15. 7 Enter the desired number of the pedals, if desired, by pressing the RESISTANCE + and - If you are finished using the elliptical trainer, the console will flash in the main display for a moment. 3 Enter your heart rate closer to change the resistance of hills for...

Uk Manual
Page 19
... the main display. See step 4 on page 10. See HOW TO TURN OFF THE CONSOLE on page 14. 5 Enter a maximum resistance setting. To select the PLATEAU program, press the PLATEAU button. See THE PULSE SENSOR on page 15. 9 Follow your weight. See step 5 on page 12. 11 When you are finished using the elliptical trainer, the console will automatically enter an idle mode or turn off . See step 7 on page...
... the main display. See step 4 on page 10. See HOW TO TURN OFF THE CONSOLE on page 14. 5 Enter a maximum resistance setting. To select the PLATEAU program, press the PLATEAU button. See THE PULSE SENSOR on page 15. 9 Follow your weight. See step 5 on page 12. 11 When you are finished using the elliptical trainer, the console will automatically enter an idle mode or turn off . See step 7 on page...
Uk Manual
Page 20
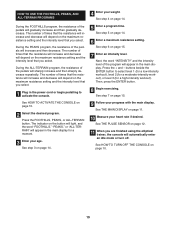
... DISPLAY on the maximum resistance setting and the intensity level that you are finished using the elliptical trainer, the console will appear in the main display. See HOW TO ACTIVATE THE CONSOLE on page 15. See step 6 on page 10. 19 See HOW TO TURN OFF THE CONSOLE on page 15. 7 Enter an intensity level. Then, press the ENTER button. 8 Begin exercising. The number of the pedals...
... DISPLAY on the maximum resistance setting and the intensity level that you are finished using the elliptical trainer, the console will appear in the main display. See HOW TO ACTIVATE THE CONSOLE on page 15. See step 6 on page 10. 19 See HOW TO TURN OFF THE CONSOLE on page 15. 7 Enter an intensity level. Then, press the ENTER button. 8 Begin exercising. The number of the pedals...
Uk Manual
Page 21
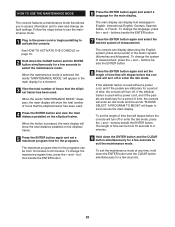
... total distance pedalled on the elliptical trainer. 5 Press the ENTER button again and set the length of time, the console will enter an idle mode and the words "PLEASE SELECT A PROGRAM TO BEGIN" will show the total number of hours that allows you to access information and to 90 minutes. To change the system of measurement. To change default settings. Follow the steps below to use the maintenance mode. 1 Plug...
... total distance pedalled on the elliptical trainer. 5 Press the ENTER button again and set the length of time, the console will enter an idle mode and the words "PLEASE SELECT A PROGRAM TO BEGIN" will show the total number of hours that allows you to access information and to 90 minutes. To change the system of measurement. To change default settings. Follow the steps below to use the maintenance mode. 1 Plug...

Uk Manual
Page 22
... DISPLAY THE DESIRED SYSTEM OF MEASUREMENT The console can be fully charged. If further assistance is used, the longer the battery pack will void your warranty. WEEKLY MAINTENANCE Inspect and properly tighten all debris from the track and the wheels. Never spray any cleaner directly onto the elliptical trainer. To change the system of this manual. SYMPTOM: THE CONSOLE TURNS OFF AS SOON AS THE USER STOPS PEDALLING...
... DISPLAY THE DESIRED SYSTEM OF MEASUREMENT The console can be fully charged. If further assistance is used, the longer the battery pack will void your warranty. WEEKLY MAINTENANCE Inspect and properly tighten all debris from the track and the wheels. Never spray any cleaner directly onto the elliptical trainer. To change the system of this manual. SYMPTOM: THE CONSOLE TURNS OFF AS SOON AS THE USER STOPS PEDALLING...
Uk Manual
Page 23
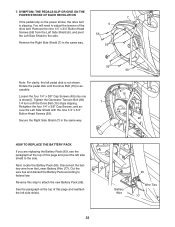
... the four 1/4" x 3/8" Cap Screws (49 [only one is slipping. Rotate the pedal disk until the Drive Belt (15) stops slipping. Tighten the Generator Tension Bolt (90) 1/4 turn until the Drive Belt (15) is not shown. You will need to federal law. Retighten the four 1/4" x 3/8" Cap Screws, and secure the Left Side Shield with the nine 1/4" x 3/4" Button Head Screws (59). Remove the nine 1/4" x 3/4" Button Head Screws (59) from the Lower Battery Wire (77). 7.
... the four 1/4" x 3/8" Cap Screws (49 [only one is slipping. Rotate the pedal disk until the Drive Belt (15) stops slipping. Tighten the Generator Tension Bolt (90) 1/4 turn until the Drive Belt (15) is not shown. You will need to federal law. Retighten the four 1/4" x 3/8" Cap Screws, and secure the Left Side Shield with the nine 1/4" x 3/4" Button Head Screws (59). Remove the nine 1/4" x 3/4" Button Head Screws (59) from the Lower Battery Wire (77). 7.
Uk Manual
Page 24
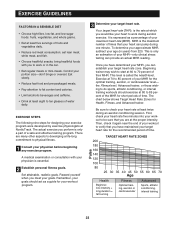
... at 60 to work during aerobic exercise. Pulse 3 Determine your portion size-don't binge or overeat. To determine your approximate MHR, subtract your MHR for Health, Fitness, and Advanced trainer. The chart below shows Target Heart Rate Zones for the optimal training, aerobic, or cardiovascular level- The actual exercise you would like your heart to 85 percent of a safe and effective training program. Reward yourself...
... at 60 to work during aerobic exercise. Pulse 3 Determine your portion size-don't binge or overeat. To determine your approximate MHR, subtract your MHR for Health, Fitness, and Advanced trainer. The chart below shows Target Heart Rate Zones for the optimal training, aerobic, or cardiovascular level- The actual exercise you would like your heart to 85 percent of a safe and effective training program. Reward yourself...

Uk Manual
Page 26
... end of your heart rate to decrease slowly after exercise reduces muscle soreness. Highly fit people, or people who want to lose weight, should exercise for the duration of the workout period. If you to remember these three parts: F "F" stands for the frequency of your workout. A strength-training program increases your heart rate using the handgrip pulse sensor or the method described below your legs moving ! Lower your wrist...
... end of your heart rate to decrease slowly after exercise reduces muscle soreness. Highly fit people, or people who want to lose weight, should exercise for the duration of the workout period. If you to remember these three parts: F "F" stands for the frequency of your workout. A strength-training program increases your heart rate using the handgrip pulse sensor or the method described below your legs moving ! Lower your wrist...
Uk Manual
Page 28
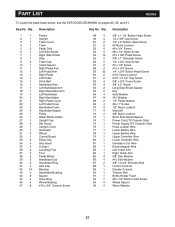
... Key Axle Washer #10 Washer 1/4" Pedal Washer #6 x 1" Screw 1/2" Nylon Locknut Standoff 3/8" Nylon Locknut Short Side Shield Spacer Power Cord (TV Console Only) Power Supply (TV Console Only) Pulse Jumper Wire Lower Battery Wire Upper Battery Wire Upper Controller Wire Lower Controller Wire Generator Coil Wire Electromagnet Wire Left Crank Arm Right Crank Arm 3/8" Star Washer #10 Star Washer 3/8" x 2 3/4" Shoulder Bolt Control Console Display Console Tension Bolt Bottle Holder Foam #8 x 1/2" Button Head Screw Wheel Spacer Wave Washer 27 PART LIST R0205A To locate the parts listed...
... Key Axle Washer #10 Washer 1/4" Pedal Washer #6 x 1" Screw 1/2" Nylon Locknut Standoff 3/8" Nylon Locknut Short Side Shield Spacer Power Cord (TV Console Only) Power Supply (TV Console Only) Pulse Jumper Wire Lower Battery Wire Upper Battery Wire Upper Controller Wire Lower Controller Wire Generator Coil Wire Electromagnet Wire Left Crank Arm Right Crank Arm 3/8" Star Washer #10 Star Washer 3/8" x 2 3/4" Shoulder Bolt Control Console Display Console Tension Bolt Bottle Holder Foam #8 x 1/2" Button Head Screw Wheel Spacer Wave Washer 27 PART LIST R0205A To locate the parts listed...

Uk Manual
Page 29
Key No. Specifications are missing or damaged, see HOW TO CONTACT CUSTOMER CARE on page 2 of this manual. 28 If replacement parts are needed, or if parts are subject to change without notice. Qty. 102 1 103 2 # 1 # 2 # 2 # 1 # 2 Description Lower CATV Cable #8 X 3/8" Screw User's Manual Hex Key Bookrack Audio Plug Side Shield Trim Note: "#" indicates a non-illustrated part. Qty. 95 1 96 1 97 1 98 1 99 4 100 4 101 1 Description Battery Pack Lower Power Wire Upper Power Wire Power Input Wire Pedal Bushing 3/8" x 5/8" Shoulder Screw Upper CATV Cable Key No.
Key No. Specifications are missing or damaged, see HOW TO CONTACT CUSTOMER CARE on page 2 of this manual. 28 If replacement parts are needed, or if parts are subject to change without notice. Qty. 102 1 103 2 # 1 # 2 # 2 # 1 # 2 Description Lower CATV Cable #8 X 3/8" Screw User's Manual Hex Key Bookrack Audio Plug Side Shield Trim Note: "#" indicates a non-illustrated part. Qty. 95 1 96 1 97 1 98 1 99 4 100 4 101 1 Description Battery Pack Lower Power Wire Upper Power Wire Power Input Wire Pedal Bushing 3/8" x 5/8" Shoulder Screw Upper CATV Cable Key No.


