
English Manual
Page 3
... the walking belt. When connecting the power cord (see your local NordicTrack dealer or call 1-888825-2588 and order part number 146148. 20. Use only a single-outlet surge suppressor that all users of this treadmill are recommended for the location of the treadmill by persons weighing more amps. Use the treadmill only as an exercise aid in determining heart rate trends in order to raise, lower, or move the reset/off...
... the walking belt. When connecting the power cord (see your local NordicTrack dealer or call 1-888825-2588 and order part number 146148. 20. Use only a single-outlet surge suppressor that all users of this treadmill are recommended for the location of the treadmill by persons weighing more amps. Use the treadmill only as an exercise aid in determining heart rate trends in order to raise, lower, or move the reset/off...
English Manual
Page 4
... performed by pressing the speed and incline buttons. Note: The decals may not be prepared for the "chirp" and be shown at actual size. 4 Never remove the motor hood unless instructed to order a free replacement decal (see ORDERING REPLACEMENT PARTS on the aromatherapy bottle. Do not use the treadmill in -home use of 35 or persons with pre-existing health problems. Read all parts of children. SAVE THESE INSTRUCTIONS The decals...
... performed by pressing the speed and incline buttons. Note: The decals may not be prepared for the "chirp" and be shown at actual size. 4 Never remove the motor hood unless instructed to order a free replacement decal (see ORDERING REPLACEMENT PARTS on the aromatherapy bottle. Do not use the treadmill in -home use of 35 or persons with pre-existing health problems. Read all parts of children. SAVE THESE INSTRUCTIONS The decals...
English Manual
Page 5
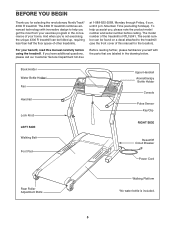
... Knob LEFT SIDE Walking Belt Foot Pad Upper Handrail Aromatherapy Bottle Holder Console Pulse Sensor Key/Clip RIGHT SIDE Reset/Off Circuit Breaker Power Cord Rear Roller Adjustment Bolts Walking Platform *No water bottle is NTL15941. If you for the location). BEFORE YOU BEGIN Thank you have additional questions, please call our Customer Service Department toll-free Before reading further, please familiarize yourself with innovative design to the treadmill...
... Knob LEFT SIDE Walking Belt Foot Pad Upper Handrail Aromatherapy Bottle Holder Console Pulse Sensor Key/Clip RIGHT SIDE Reset/Off Circuit Breaker Power Cord Rear Roller Adjustment Bolts Walking Platform *No water bottle is NTL15941. If you for the location). BEFORE YOU BEGIN Thank you have additional questions, please call our Customer Service Department toll-free Before reading further, please familiarize yourself with innovative design to the treadmill...

English Manual
Page 7
... Handrail. Note: There are properly tightened before you insert it. Make sure that all four Handrail Bolts (78). If they do not, turn one connector and try again. Be careful not to adjust the walking belt (see page 28). Attach the left side. 6. Insert a Handrail (66) into the right Upright, and then set the console assembly on the left Handrail (not...
... Handrail. Note: There are properly tightened before you insert it. Make sure that all four Handrail Bolts (78). If they do not, turn one connector and try again. Be careful not to adjust the walking belt (see page 28). Attach the left side. 6. Insert a Handrail (66) into the right Upright, and then set the console assembly on the left Handrail (not...

English Manual
Page 8
... outlet installed by a qualified electrician. HOW TO PLUG IN THE POWER CORD DANGER: Improper connection of the treadmill. If it will deteriorate the walking belt and cause excessive wear. an equipment-grounding conductor and a grounding plug. This product is equipped with all local codes and ordinances. Some 2-pole receptacle outlet box covers are in accordance with a cord having Lug Metal Screw The temporary adapter...
... outlet installed by a qualified electrician. HOW TO PLUG IN THE POWER CORD DANGER: Improper connection of the treadmill. If it will deteriorate the walking belt and cause excessive wear. an equipment-grounding conductor and a grounding plug. This product is equipped with all local codes and ordinances. Some 2-pole receptacle outlet box covers are in accordance with a cord having Lug Metal Screw The temporary adapter...

English Manual
Page 9
... heart rate while you exercise, the console will display continuous exercise feedback. Additional options are soon to be changed with the touch of the treadmill can connect the treadmill to give you can even measure your home. As you exercise. The console also features new iFIT.com interactive technology. Using the included audio cable, you through every step of the treadmill to your workout. iFIT.com CD and video programs automatically control the speed and incline...
... heart rate while you exercise, the console will display continuous exercise feedback. Additional options are soon to be changed with the touch of the treadmill can connect the treadmill to give you can even measure your home. As you exercise. The console also features new iFIT.com interactive technology. Using the included audio cable, you through every step of the treadmill to your workout. iFIT.com CD and video programs automatically control the speed and incline...
English Manual
Page 10
... use the heart rate programs. If you enter your weight. The pulse sensor is not pulled from the console. 2 Plug in the power cord. Find the clip attached to the waistband of the main display will show two dashes (- -) and the segment time indicator will flash. 5 Enter your weight. If the key is intended only as needed. See HOW TO PLUG IN THE POWER CORD on page 8. 3 Switch the reset/off...
... use the heart rate programs. If you enter your weight. The pulse sensor is not pulled from the console. 2 Plug in the power cord. Find the clip attached to the waistband of the main display will show two dashes (- -) and the segment time indicator will flash. 5 Enter your weight. If the key is intended only as needed. See HOW TO PLUG IN THE POWER CORD on page 8. 3 Switch the reset/off...

English Manual
Page 11
... LED track representing 1/4 mile. The LED track-When the manual mode or the iFIT.com mode is used, observe the alignment of the walking belt, and align it if necessary (see page 28). 4 Change the incline of the treadmill as desired by 0.1 mph; To start the walking belt, press the Start button, the Speed + button, or one 11 Note: The console can display speed and distance in succession. The Training Zone display-As you exercise, the Training Zone display will change...
... LED track representing 1/4 mile. The LED track-When the manual mode or the iFIT.com mode is used, observe the alignment of the walking belt, and align it if necessary (see page 28). 4 Change the incline of the treadmill as desired by 0.1 mph; To start the walking belt, press the Start button, the Speed + button, or one 11 Note: The console can display speed and distance in succession. The Training Zone display-As you exercise, the Training Zone display will change...

English Manual
Page 12
... are finished using the treadmill, switch the reset/off circuit breaker to the off . 8 When you are using the handgrip pulse sensor, the next section of the main display will change the unit of the walking belt. number to the other every few seconds; An "E" for English miles or an "M" for about 15 seconds. 7 Turn on the fans at high speed, press the Fans button a second time...
... are finished using the treadmill, switch the reset/off circuit breaker to the off . 8 When you are using the handgrip pulse sensor, the next section of the main display will change the unit of the walking belt. number to the other every few seconds; An "E" for English miles or an "M" for about 15 seconds. 7 Turn on the fans at high speed, press the Fans button a second time...
English Manual
Page 14
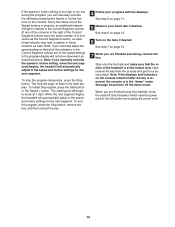
... display. The time will automatically adjust to the off position and unplug the power cord. 14 To restart the program, press the Start button or the Speed + button. When the next segment begins, the treadmill will begin to flash in the Current Segment column are finished using the treadmill, move the reset/off the demo mode. To end the program, press the Stop button, remove the key, and then reinsert the key. 4 Follow your heart rate...
... display. The time will automatically adjust to the off position and unplug the power cord. 14 To restart the program, press the Start button or the Speed + button. When the next segment begins, the treadmill will begin to flash in the Current Segment column are finished using the treadmill, move the reset/off the demo mode. To end the program, press the Stop button, remove the key, and then reinsert the key. 4 Follow your heart rate...
English Manual
Page 16
..., the name of indicators are finished exercising, remove the key. To change the speed or incline setting during the current segment, simply press the Speed or Incline buttons. Then, press the Start button, and program speed and incline settings for each segment. When the next segment begins, the treadmill will automatically adjust to the speed and incline settings for the next several one-minute segments. (The main display shows both the Current Segment column...
..., the name of indicators are finished exercising, remove the key. To change the speed or incline setting during the current segment, simply press the Speed or Incline buttons. Then, press the Start button, and program speed and incline settings for each segment. When the next segment begins, the treadmill will automatically adjust to the speed and incline settings for the next several one-minute segments. (The main display shows both the Current Segment column...

English Manual
Page 18
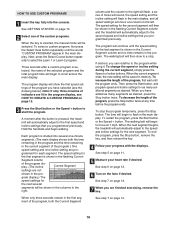
... main display. If your heart rate closer to start it at any time, press the Stop button. The walking belt will also increase to bring your heart rate is programmed for each segment, the console will automatically adjust to the target heart rate setting. To stop . During the last three seconds of each time the console compares your pulse is not detected during the program, you are finished exercising, remove the key. See step 7 on...
... main display. If your heart rate closer to start it at any time, press the Stop button. The walking belt will also increase to bring your heart rate is programmed for each segment, the console will automatically adjust to the target heart rate setting. To stop . During the last three seconds of each time the console compares your pulse is not detected during the program, you are finished exercising, remove the key. See step 7 on...

English Manual
Page 21
... AUDIO OUT jack, see instruction A below to use an iFIT.com CD or video program. 1 Insert the key fully into the console. Plug the adapter into the AUDIO OUT jack on page 19. See GETTING STARTED on your portable CD player, portable stereo, home stereo, computer with a built-in the main display. 3 Insert the iFIT.com CD or videocassette. The treadmill will begin guiding you are using an iFIT...
... AUDIO OUT jack, see instruction A below to use an iFIT.com CD or video program. 1 Insert the key fully into the console. Plug the adapter into the AUDIO OUT jack on page 19. See GETTING STARTED on your portable CD player, portable stereo, home stereo, computer with a built-in the main display. 3 Insert the iFIT.com CD or videocassette. The treadmill will begin guiding you are using an iFIT...

English Manual
Page 22
... the speed or incline of the treadmill does not change to move. If the volume is too high or too low, the console may not detect the program signals. • Make sure that the audio cable is properly connected, that it is flashing, press the Start button or the Speed + button on page 21. See step 7 on page 12. 8 When you are finished exercising, remove the key. To stop and...
... the speed or incline of the treadmill does not change to move. If the volume is too high or too low, the console may not detect the program signals. • Make sure that the audio cable is properly connected, that it is flashing, press the Start button or the Speed + button on page 21. See step 7 on page 12. 8 When you are finished exercising, remove the key. To stop and...
English Manual
Page 23
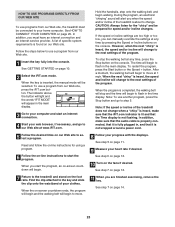
... the audio cable is properly connected, that it is completed, the walking belt will appear in the time display. To use a program from our Web site, press the iFIT.com button. To restart the program, press the Start button or the Speed + button. Read and follow the on-line instructions for speed and/or incline changes. When the program is fully plugged in the main display. See step 6 on page 12. 10 Turn on -line instructions to...
... the audio cable is properly connected, that it is completed, the walking belt will appear in the time display. To use a program from our Web site, press the iFIT.com button. To restart the program, press the Start button or the Speed + button. Read and follow the on-line instructions for speed and/or incline changes. When the program is fully plugged in the main display. See step 6 on page 12. 10 Turn on -line instructions to...
English Manual
Page 24
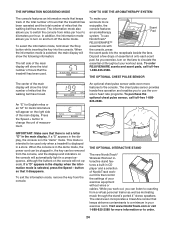
... the display, the console is in the display when the information mode is in the demo mode, the power cord can be removed from a virtual personal trainer as well as motivating music through the stand's ported 4" stereo speakers. The chest pulse sensor provides hands-free operation and enables you can be plugged in your exercise equipment without wires or cables. IMPORTANT: Make sure that the walking belt has moved. While you work out...
... the display, the console is in the display when the information mode is in the demo mode, the power cord can be removed from a virtual personal trainer as well as motivating music through the stand's ported 4" stereo speakers. The chest pulse sensor provides hands-free operation and enables you can be plugged in your exercise equipment without wires or cables. IMPORTANT: Make sure that the walking belt has moved. While you work out...

English Manual
Page 29
... a guide. A Cool-down . For maximum fat burning, adjust the speed and incline of the treadmill until your heart rate is especially important for you to the nearest ten years). The lower two numbers are rounded off to plan your training zone. After a few weeks of exercise, your age. To maintain or improve your body temperature, heart rate and circulation in your exercise program. For more detailed exercise information...
... a guide. A Cool-down . For maximum fat burning, adjust the speed and incline of the treadmill until your heart rate is especially important for you to the nearest ten years). The lower two numbers are rounded off to plan your training zone. After a few weeks of exercise, your age. To maintain or improve your body temperature, heart rate and circulation in your exercise program. For more detailed exercise information...

English Manual
Page 30
... Incline Bolt 22 1 Motor Belt 23 1 Hood 24 1 Motor Isolator 25 2 Motor Bushing 26 1 Catch 27 4 Electronic Screw 28 1 Left Foot Pad 29 1 Controller 30 2 Endcap Spring 31 2 Motor Bolt 32 1 Front Roller Adj. Bolt Warning Decal Allen Wrench Rear Roller Audio Wire Handrail Foam Left Fan Housing Console Frame Catch Screw Lock Knob Upright Lock Knob Sleeve Spring Lock Pin Collar Pin Clip Lock Pin Filter Wire Pulse Grip 5/16" Star Washer 4 1/2" Bolt Upright Endcap Latch Assembly Console Base Console Upright Cap Key/Clip iFIT...
... Incline Bolt 22 1 Motor Belt 23 1 Hood 24 1 Motor Isolator 25 2 Motor Bushing 26 1 Catch 27 4 Electronic Screw 28 1 Left Foot Pad 29 1 Controller 30 2 Endcap Spring 31 2 Motor Bolt 32 1 Front Roller Adj. Bolt Warning Decal Allen Wrench Rear Roller Audio Wire Handrail Foam Left Fan Housing Console Frame Catch Screw Lock Knob Upright Lock Knob Sleeve Spring Lock Pin Collar Pin Clip Lock Pin Filter Wire Pulse Grip 5/16" Star Washer 4 1/2" Bolt Upright Endcap Latch Assembly Console Base Console Upright Cap Key/Clip iFIT...
English Manual
Page 31
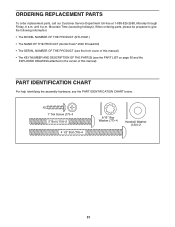
... information: Screw (102)-1 • The MODEL NUMBER OF THE PRODUCT (NTL15941) • The NAME OF THE PRODUCT (NordicTrack® 4300 R treadmill) • The SERIAL NUMBER OF THE PRODUCT (see the front cover of this manual) • The KEY NUMBER AND DESCRIPTION OF THE PART(S) (see the PART LIST on page 30 and the EXPLODED DRAWING attached in the center of this manual) PART IDENTIFICATION CHART For help identifying the assembly...
... information: Screw (102)-1 • The MODEL NUMBER OF THE PRODUCT (NTL15941) • The NAME OF THE PRODUCT (NordicTrack® 4300 R treadmill) • The SERIAL NUMBER OF THE PRODUCT (see the front cover of this manual) • The KEY NUMBER AND DESCRIPTION OF THE PART(S) (see the PART LIST on page 30 and the EXPLODED DRAWING attached in the center of this manual) PART IDENTIFICATION CHART For help identifying the assembly...

English Manual
Page 34
... serial number of sale; HOW TO GET PARTS AND SERVICE-Simply call our Customer Service Department at our option, we will tell you how to the terms set out in connection with the use or performance of the product or damages with respect to be free of purchase. The warranty extended hereunder is limited in the Manual to use , costs of removal, installation or other warranties...
... serial number of sale; HOW TO GET PARTS AND SERVICE-Simply call our Customer Service Department at our option, we will tell you how to the terms set out in connection with the use or performance of the product or damages with respect to be free of purchase. The warranty extended hereunder is limited in the Manual to use , costs of removal, installation or other warranties...


