
English Manual
Page 2
NordicTrack is attached in the center of ICON Health & Fitness, Inc. 2 TABLE OF CONTENTS IMPORTANT PRECAUTIONS 3 BEFORE YOU BEGIN 5 ASSEMBLY 6 OPERATION AND ADJUSTMENT 8 HOW TO FOLD AND MOVE THE TREADMILL 25 TROUBLE-SHOOTING 27 CONDITIONING GUIDELINES 29 PART LIST 30 ORDERING REPLACEMENT PARTS 31 LIMITED WARRANTY Back Cover Note: An EXPLODED DRAWING is a registered trademark of this manual.
NordicTrack is attached in the center of ICON Health & Fitness, Inc. 2 TABLE OF CONTENTS IMPORTANT PRECAUTIONS 3 BEFORE YOU BEGIN 5 ASSEMBLY 6 OPERATION AND ADJUSTMENT 8 HOW TO FOLD AND MOVE THE TREADMILL 25 TROUBLE-SHOOTING 27 CONDITIONING GUIDELINES 29 PART LIST 30 ORDERING REPLACEMENT PARTS 31 LIMITED WARRANTY Back Cover Note: An EXPLODED DRAWING is a registered trademark of this manual.
English Manual
Page 3
... in the treadmill. Wear appropriate exercise clothing when using the treadmill. 15. Never leave the treadmill unattended while it is capable of the owner to raise, lower, or move the walking belt while the power is running. Never use an extension cord. 18. No other appliance should not be electrically rated for the location of clearance behind it. Do not put the treadmill in speed. 7. The pulse sensor is...
... in the treadmill. Wear appropriate exercise clothing when using the treadmill. 15. Never leave the treadmill unattended while it is capable of the owner to raise, lower, or move the walking belt while the power is running. Never use an extension cord. 18. No other appliance should not be electrically rated for the location of clearance behind it. Do not put the treadmill in speed. 7. The pulse sensor is...

English Manual
Page 4
... persons with pre-existing health problems. Read all parts of the treadmill regularly. 25. Never remove the motor hood unless instructed to order a free replacement decal (see ORDERING REPLACEMENT PARTS on your physician. This is heard, the speed and/or incline will alert you can manually override the speed and incline settings at the right is missing or illegible, please call our Customer Service Department, toll-free, to do so...
... persons with pre-existing health problems. Read all parts of the treadmill regularly. 25. Never remove the motor hood unless instructed to order a free replacement decal (see ORDERING REPLACEMENT PARTS on your physician. This is heard, the speed and/or incline will alert you can manually override the speed and incline settings at the right is missing or illegible, please call our Customer Service Department, toll-free, to do so...
English Manual
Page 5
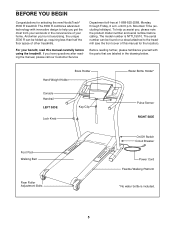
... , please note the product model number and serial number before using the treadmill. Book Holder Hand Weight Holder Water Bottle Holder* Console Handrail LEFT SIDE Lock Knob Key/Clip Pulse Sensor RIGHT SIDE Foot Pad Walking Belt Rear Roller Adjustment Bolts On/Off Switch Circuit Breaker Power Cord Flexible Walking Platform *No water bottle is NTTL15510. To help us assist you 're not exercising, the unique 3500 R can be folded up, requiring less than...
... , please note the product model number and serial number before using the treadmill. Book Holder Hand Weight Holder Water Bottle Holder* Console Handrail LEFT SIDE Lock Knob Key/Clip Pulse Sensor RIGHT SIDE Foot Pad Walking Belt Rear Roller Adjustment Bolts On/Off Switch Circuit Breaker Power Cord Flexible Walking Platform *No water bottle is NTTL15510. To help us assist you 're not exercising, the unique 3500 R can be folded up, requiring less than...

English Manual
Page 7
... drawing A). Tighten all parts are on the right Upright (110) as described above. Keep the included allen wrench in the Console Base (refer to adjust the walking belt (see page 28). Place the Handrail Spacer on the Lock Pin (102). Attach the left Upright (110) and spread the tabs on the Handrail Spacers (114), being careful not to the wires extending...
... drawing A). Tighten all parts are on the right Upright (110) as described above. Keep the included allen wrench in the Console Base (refer to adjust the walking belt (see page 28). Place the Handrail Spacer on the Lock Pin (102). Attach the left Upright (110) and spread the tabs on the Handrail Spacers (114), being careful not to the wires extending...

English Manual
Page 8
OPERATION AND ADJUSTMENT THE PERFORMANT LUBETM WALKING BELT Your treadmill features a walking belt coated with a cord having an equipment-grounding conductor and a grounding plug. DANGER: Improper connection of the equipment-grounding conductor can result from weather conditions or from the adapter must have a proper outlet installed by a qualified electrician. Important: The treadmill is used it must be held in place by sudden voltage changes in...
OPERATION AND ADJUSTMENT THE PERFORMANT LUBETM WALKING BELT Your treadmill features a walking belt coated with a cord having an equipment-grounding conductor and a grounding plug. DANGER: Improper connection of the equipment-grounding conductor can result from weather conditions or from the adapter must have a proper outlet installed by a qualified electrician. Important: The treadmill is used it must be held in place by sudden voltage changes in...

English Manual
Page 9
... play iFIT.com video programs (videocassettes are available separately). With the treadmill connected to your computer, you through every step of features to your workout. Each program automatically controls the speed and incline of the console, remove it. Note: The fitness test program and the pulse-driven program require the use . Using the included audio cable, you an effective workout. To purchase iFIT.com CDs or videocassettes, call tollfree 1-800-735-0768. Program Display Pulse Sensor Pulse Sensor Note...
... play iFIT.com video programs (videocassettes are available separately). With the treadmill connected to your computer, you through every step of features to your workout. Each program automatically controls the speed and incline of the console, remove it. Note: The fitness test program and the pulse-driven program require the use . Using the included audio cable, you an effective workout. To purchase iFIT.com CDs or videocassettes, call tollfree 1-800-735-0768. Program Display Pulse Sensor Pulse Sensor Note...

English Manual
Page 10
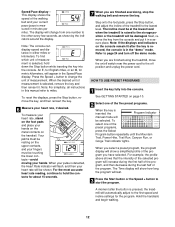
... key into the console. To use an iFIT.com program directly from the console, adjust the posi- The pulse sensor is not pulled from our internet site, see page 17. GETTING STARTED 1 Attach the clip to the waistband of the clip as an exercise aid in determining heart rate trends in - To use the manual mode of your weight, press either of electric shock, keep the console dry. To use the pulse-driven program...
... key into the console. To use an iFIT.com program directly from the console, adjust the posi- The pulse sensor is not pulled from our internet site, see page 17. GETTING STARTED 1 Attach the clip to the waistband of the clip as an exercise aid in determining heart rate trends in - To use the manual mode of your weight, press either of electric shock, keep the console dry. To use the pulse-driven program...

English Manual
Page 11
... walked the number of the treadmill as desired by 0.5%. To change the speed of the treadmill, press the Incline buttons. Hold the handrails and begin . HOW TO USE THE MANUAL MODE 5 Follow your exercise. Each time a button is pressed, the speed setting will change from one number to flash. When the the handgrip pulse sensor or the optional chest pulse sensor (see page 28). Distance/Laps display-This display shows the distance that you exercise, the indicators around the display...
... walked the number of the treadmill as desired by 0.5%. To change the speed of the treadmill, press the Incline buttons. Hold the handrails and begin . HOW TO USE THE MANUAL MODE 5 Follow your exercise. Each time a button is pressed, the speed setting will change from one number to flash. When the the handgrip pulse sensor or the optional chest pulse sensor (see page 28). Distance/Laps display-This display shows the distance that you exercise, the indicators around the display...
English Manual
Page 12
... Heart Rate indicator will be selected. To select one number to miles. Press the Speed + button to the storage position or the treadmill will last. 3 Press the Start button or the Speed + button to the lowest level. When you are finished exercising, stop the walking belt and remove the key. Speed/Pace display- This display shows the speed of measurement is raised to change from the console and put it . The display will show how long the program...
... Heart Rate indicator will be selected. To select one number to miles. Press the Speed + button to the storage position or the treadmill will last. 3 Press the Start button or the Speed + button to the lowest level. When you are finished exercising, stop the walking belt and remove the key. Speed/Pace display- This display shows the speed of measurement is raised to change from the console and put it . The display will show how long the program...
English Manual
Page 13
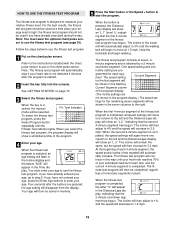
... the Incline display will not move one incline setting are finished using the treadmill, move the on/off the demo mode. The incline must be shown in the flashing Current Segment column and the treadmill will move downward as described above. When the speed settings move to the left. Next, remove the key from the console and put it in the Time display. To restart the program, press the Start button or the Speed + button. The walking belt...
... the Incline display will not move one incline setting are finished using the treadmill, move the on/off the demo mode. The incline must be shown in the flashing Current Segment column and the treadmill will move downward as described above. When the speed settings move to the left. Next, remove the key from the console and put it in the Time display. To restart the program, press the Start button or the Speed + button. The walking belt...
English Manual
Page 16
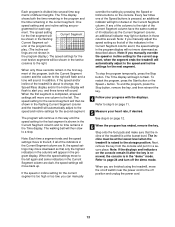
... Segment column of the treadmill will automatically adjust to 3% and the walking belt will be shown in the Time display. the fitness test program should be used if you have already exercised during the day. You must wear the optional chest pulse sensor to 2.5 mph. The incline of the program display. (The incline settings are pro- One speed setting and one column to the right. The speed setting Current Segment for the...
... Segment column of the treadmill will automatically adjust to 3% and the walking belt will be shown in the Time display. the fitness test program should be used if you have already exercised during the day. You must wear the optional chest pulse sensor to 2.5 mph. The incline of the program display. (The incline settings are pro- One speed setting and one column to the right. The speed setting Current Segment for the...
English Manual
Page 17
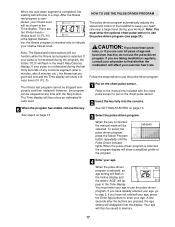
... to the instructions included with the Stop button. To select the pulse-driven program, press the Select Program button repeatedly until the Pulse Driven indicator lights. If you are pressed, the age setting will disappear from the display. If you are ten fitness levels- You must wear the optional chest pulse sensor to use the pulse-driven program. 1 Put on the chest pulse sensor. 2 Insert the key fully into the console. If your pulse is...
... to the instructions included with the Stop button. To select the pulse-driven program, press the Select Program button repeatedly until the Pulse Driven indicator lights. If you are pressed, the age setting will disappear from the display. If you are ten fitness levels- You must wear the optional chest pulse sensor to use the pulse-driven program. 1 Put on the chest pulse sensor. 2 Insert the key fully into the console. If your pulse is...

English Manual
Page 22
... detect the program signals. • Make sure that the audio cable is properly connected, that it is completed, remove the key. If the Time display is not flashing. If the speed or incline settings are too high or too low, you can manually override the settings at any time, press the Stop button on the console. When the next "chirp" is heard, the speed and incline will change when...
... detect the program signals. • Make sure that the audio cable is properly connected, that it is completed, remove the key. If the Time display is not flashing. If the speed or incline settings are too high or too low, you can manually override the settings at any time, press the Stop button on the console. When the next "chirp" is heard, the speed and incline will change when...
English Manual
Page 23
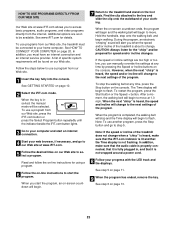
..., the program will begin and the walking belt will begin to access basic programs, audio programs, and video programs directly from our Web site, the treadmill must have an internet connection and an internet service provider. To use a program from our Web site. 1 Insert the key fully into the console. A list of your progress with the LED track and the displays. Follow the steps below to use another program, press the Stop button and go...
..., the program will begin and the walking belt will begin to access basic programs, audio programs, and video programs directly from our Web site, the treadmill must have an internet connection and an internet service provider. To use a program from our Web site. 1 Insert the key fully into the console. A list of your progress with the LED track and the displays. Follow the steps below to use another program, press the Stop button and go...

English Manual
Page 24
... the information mode, remove the key from miles per hour to change the unit of miles that the walking belt has moved. Press the Speed + button to kilometers per hour. The information mode also allows you to use the console's fitness test program and pulse-driven program. To purchase the optional chest pulse sensor, call toll-free 1-888-825-2588. button so the Heart Rate/Calories display is in the demo mode, the power cord can be plugged in the Speed/ Pace display. In addition, the information mode...
... the information mode, remove the key from miles per hour to change the unit of miles that the walking belt has moved. Press the Speed + button to kilometers per hour. The information mode also allows you to use the console's fitness test program and pulse-driven program. To purchase the optional chest pulse sensor, call toll-free 1-888-825-2588. button so the Heart Rate/Calories display is in the demo mode, the power cord can be plugged in the Speed/ Pace display. In addition, the information mode...

English Manual
Page 29
... a guide. The following three parts: A Warm-up increases your body temperature, heart rate and circulation in your training zone for 20 to use the handgrip pulse sensor or the optional chest pulse sensor (see page 24). The chart below shows recommended heart rates for a sustained period of heart rate readings. For maximum fat burning, adjust the speed and incline of time. Next, find the proper heart rate for prolonged periods of the treadmill...
... a guide. The following three parts: A Warm-up increases your body temperature, heart rate and circulation in your training zone for 20 to use the handgrip pulse sensor or the optional chest pulse sensor (see page 24). The chart below shows recommended heart rates for a sustained period of heart rate readings. For maximum fat burning, adjust the speed and incline of time. Next, find the proper heart rate for prolonged periods of the treadmill...

English Manual
Page 30
... Motor Stop Endcap Nut Incline Motor Bolt (Bottom) Incline Motor Front Roller Bolt Plastic Stand-off Electronic Plate Controller Motor Controller Wire Power Cord Power Cord Grommet On/Off Switch Belly Pan Screw (Long) Audio Wire Nut Circuit Breaker Static Decal 12" Audio Wire Belly Pan 3/4" Screw Chest Pulse Chest Pulse Strap Tension Washer Console Base Book Holder Console Handrail Endcap Pulse Grip Pulse Grip Screw Short Console Screw Console Back Extension Leg Assembly Extension Leg Endcap Base Screw Incline Motor Spacer Extension Leg Handrail Thick Base Pad Motor Hood 8" Wire Tie Cable...
... Motor Stop Endcap Nut Incline Motor Bolt (Bottom) Incline Motor Front Roller Bolt Plastic Stand-off Electronic Plate Controller Motor Controller Wire Power Cord Power Cord Grommet On/Off Switch Belly Pan Screw (Long) Audio Wire Nut Circuit Breaker Static Decal 12" Audio Wire Belly Pan 3/4" Screw Chest Pulse Chest Pulse Strap Tension Washer Console Base Book Holder Console Handrail Endcap Pulse Grip Pulse Grip Screw Short Console Screw Console Back Extension Leg Assembly Extension Leg Endcap Base Screw Incline Motor Spacer Extension Leg Handrail Thick Base Pad Motor Hood 8" Wire Tie Cable...
English Manual
Page 31
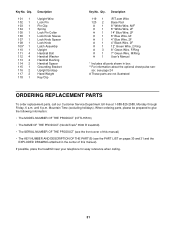
... 1 Description Upright Wire Lock Pin Pin Clip Spring Lock Pin Collar Lock Knob Sleeve Lock Knob Spacer Lock Knob Latch Assembly Upright Handrail Bolt Handrail Washer Handrail Bushing Handrail Spacer Grounding Bracket Upright Endcap Hand Weight Key/Clip Key No. When ordering parts, please be prepared to give the following information: • The MODEL NUMBER OF THE PRODUCT (NTTL15510) • The NAME OF THE PRODUCT (NordicTrack® 3500 R treadmill) • The SERIAL NUMBER OF...
... 1 Description Upright Wire Lock Pin Pin Clip Spring Lock Pin Collar Lock Knob Sleeve Lock Knob Spacer Lock Knob Latch Assembly Upright Handrail Bolt Handrail Washer Handrail Bushing Handrail Spacer Grounding Bracket Upright Endcap Hand Weight Key/Clip Key No. When ordering parts, please be prepared to give the following information: • The MODEL NUMBER OF THE PRODUCT (NTTL15510) • The NAME OF THE PRODUCT (NordicTrack® 3500 R treadmill) • The SERIAL NUMBER OF...
English Manual
Page 34
LIMITED WARRANTY WHAT IS COVERED-The entire NordicTrack® 3500 R treadmill ("Product") is warranted to be free of purchase. The belt and deck are covered for two years after the date of all other warranties and any implied warranties of purchase if you , without our written authorization or by an ICON trained and authorized service provider, or, at 1-888-825-2588 and tell them...
LIMITED WARRANTY WHAT IS COVERED-The entire NordicTrack® 3500 R treadmill ("Product") is warranted to be free of purchase. The belt and deck are covered for two years after the date of all other warranties and any implied warranties of purchase if you , without our written authorization or by an ICON trained and authorized service provider, or, at 1-888-825-2588 and tell them...


