
English Manual
Page 3
... sandals. 16. The pulse sensor is fully closed. 3 Never leave the treadmill unattended while it is turned off switch.) 10. Always remove the key, unplug the power cord and move the walking belt while the power is properly assembled. (See ASSEMBLY on page 6, and HOW TO FOLD AND ...MOVE THE TREADMILL on /off . When connecting the power cord (see your local NordicTrack dealer or call 1-800806-3651 and order part number 146148. 20. Use only a single-outlet surge suppressor that the storage latch is not a medical...
... sandals. 16. The pulse sensor is fully closed. 3 Never leave the treadmill unattended while it is turned off switch.) 10. Always remove the key, unplug the power cord and move the walking belt while the power is properly assembled. (See ASSEMBLY on page 6, and HOW TO FOLD AND ...MOVE THE TREADMILL on /off . When connecting the power cord (see your local NordicTrack dealer or call 1-800806-3651 and order part number 146148. 20. Use only a single-outlet surge suppressor that the storage latch is not a medical...
English Manual
Page 5
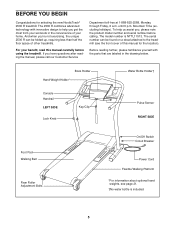
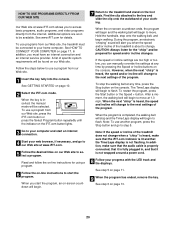
... be folded up, requiring less than half the floor space of your benefit, read this manual for selecting the new NordicTrack® 2500 R treadmill. The model number is included. 5 The serial number can be found on a decal attached to help us assist you have questions ... at 1-888-825-2588, Monday through Friday, 6 a.m. Book Holder Hand Weight Holder* Water Bottle Holder† Console Handrail LEFT SIDE Lock Knob Key/Clip Pulse Sensor RIGHT SIDE Foot Pad Walking Belt Rear Roller Adjustment Bolts On/Off Switch Circuit Breaker Power Cord Flexible Walking Platform *For information...
... be folded up, requiring less than half the floor space of your benefit, read this manual for selecting the new NordicTrack® 2500 R treadmill. The model number is included. 5 The serial number can be found on a decal attached to help us assist you have questions ... at 1-888-825-2588, Monday through Friday, 6 a.m. Book Holder Hand Weight Holder* Water Bottle Holder† Console Handrail LEFT SIDE Lock Knob Key/Clip Pulse Sensor RIGHT SIDE Foot Pad Walking Belt Rear Roller Adjustment Bolts On/Off Switch Circuit Breaker Power Cord Flexible Walking Platform *For information...

English Manual
Page 9
... from our Web site, see pages 14 and 15. The console also features new iFIT.com interactive technology. To use a preset program, see page 21. Key FEATURES OF THE CONSOLE The advanced console offers an impressive array of features to help you through every step of your heart rate using the...
... from our Web site, see pages 14 and 15. The console also features new iFIT.com interactive technology. To use a preset program, see page 21. Key FEATURES OF THE CONSOLE The advanced console offers an impressive array of features to help you through every step of your heart rate using the...

English Manual
Page 10
...near the power cord. The current age setting will light. 5 Enter your clothes. Test the clip by carefully taking a few steps backward until the key is not pulled from the display. Move the on/off switch on our Web site may affect the accuracy of the Enter Weight buttons. A few... the clip Clip onto the waistband of the clip as an exercise aid in determining heart rate trends in the power cord. Next, insert the key into the console. Various factors, including the user's movement, may require you to enter your age (see the drawing below) while operating the treadmill....
...near the power cord. The current age setting will light. 5 Enter your clothes. Test the clip by carefully taking a few steps backward until the key is not pulled from the display. Move the on/off switch on our Web site may affect the accuracy of the Enter Weight buttons. A few... the clip Clip onto the waistband of the clip as an exercise aid in determining heart rate trends in the power cord. Next, insert the key into the console. Various factors, including the user's movement, may require you to enter your age (see the drawing below) while operating the treadmill....

English Manual
Page 11
..., and the number of 1/4-mile laps you use the treadmill, inspect the alignment of your progress with the LED track and the displays. 1 Insert the key fully into the console. A moment after the button is held down, the speed setting will show the approximate intensity level of the walking belt, and... or the iFIT.com mode is inserted, the manual Manual Indicator mode will change the speed setting quickly, press the 1-step Speed buttons. When the key is selected, this display will show an LED track representing 1/4 mile. Time/Laps display-
..., and the number of 1/4-mile laps you use the treadmill, inspect the alignment of your progress with the LED track and the displays. 1 Insert the key fully into the console. A moment after the button is held down, the speed setting will show the approximate intensity level of the walking belt, and... or the iFIT.com mode is inserted, the manual Manual Indicator mode will change the speed setting quickly, press the 1-step Speed buttons. When the key is selected, this display will show an LED track representing 1/4 mile. Time/Laps display-

English Manual
Page 12
...current pace (pace is selected, hold the contacts for the program. Refer to start the program. HOW TO USE PRESET PROGRAMS 1 Insert the key fully into the console. The Time/Laps display will show a simplified profile of the treadmill to miles. This display shows the speed of measurement... display will be at the lowest level when the treadmill is in a secure place. See GETTING STARTED on the handrail. A moment after the key is removed, the console is raised to the first speed and incline settings for about 15 seconds. 7 When you are finished using the treadmill...
...current pace (pace is selected, hold the contacts for the program. Refer to start the program. HOW TO USE PRESET PROGRAMS 1 Insert the key fully into the console. The Time/Laps display will show a simplified profile of the treadmill to miles. This display shows the speed of measurement... display will be at the lowest level when the treadmill is in a secure place. See GETTING STARTED on the handrail. A moment after the key is removed, the console is raised to the first speed and incline settings for about 15 seconds. 7 When you are finished using the treadmill...

English Manual
Page 13
... Speed or Incline buttons on page 11. 5 Measure your progress with the displays. To end the program, press the Stop button, remove the key, and then reinsert the key. 4 Follow your heart rate, if desired. See step 6 on /off switch near the power cord to the off the demo mode. Note: If... the program and the time remaining in a secure place. When the speed settings move the on page 12. 6 When the program has ended, remove the key. To restart the program, press the Start button or the Speed + button. When you manually adjust the speed setting so that only the highest indicators...
... Speed or Incline buttons on page 11. 5 Measure your progress with the displays. To end the program, press the Stop button, remove the key, and then reinsert the key. 4 Follow your heart rate, if desired. See step 6 on /off switch near the power cord to the off the demo mode. Note: If... the program and the time remaining in a secure place. When the speed settings move the on page 12. 6 When the program has ended, remove the key. To restart the program, press the Start button or the Speed + button. When you manually adjust the speed setting so that only the highest indicators...
English Manual
Page 14
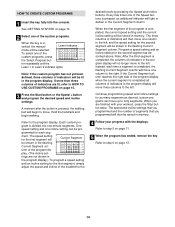
... step 5 on page 13. 14 The speed setting for the first segment, simply adjust the speed and incline of the custom programs. When the key is pressed, an additional indicator will move one -minute segments. One speed setting and one of the treadmill to the program display. HOW TO CREATE... CUSTOM PROGRAMS 1 Insert the key fully into one column to the left. Refer to step 6 on page 11. 5 When the program has ended, remove the key. To select one of the program dis- Hold the handrails and begin to move three...
... step 5 on page 13. 14 The speed setting for the first segment, simply adjust the speed and incline of the custom programs. When the key is pressed, an additional indicator will move one -minute segments. One speed setting and one of the treadmill to the program display. HOW TO CREATE... CUSTOM PROGRAMS 1 Insert the key fully into one column to the left. Refer to step 6 on page 11. 5 When the program has ended, remove the key. To select one of the program dis- Hold the handrails and begin to move three...
English Manual
Page 15
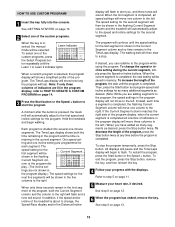
... you , and three tones will be saved in the flashing Current Segment col- To end the program, press the Stop button, remove the key, and then reinsert the key. 4 Follow your heart rate, if desired. ton repeatedly until the speed setting for the program. When a custom program is completed. Each program... the Stop button twice at any time before the program is about to step 5 on page 12. 6 When the program has ended, remove the key. To change , the Speed/Pace display and/or the Distance/Incline display will flash to the left . The speed setting for the next five segments...
... you , and three tones will be saved in the flashing Current Segment col- To end the program, press the Stop button, remove the key, and then reinsert the key. 4 Follow your heart rate, if desired. ton repeatedly until the speed setting for the program. When a custom program is completed. Each program... the Stop button twice at any time before the program is about to step 5 on page 12. 6 When the program has ended, remove the key. To change , the Speed/Pace display and/or the Distance/Incline display will flash to the left . The speed setting for the next five segments...

English Manual
Page 18
... end of the treadmill near the power cord. Plug the adapter into the console. Plug the RCA Y-adapter into the included adapter. B ANT. When the key is inserted, the manual mode will begin guiding you through your CD player or VCR. If you when the speed and/or incline of the.../Laps display is pressed, your VCR has an unused AUDIO OUT jack, see instruction B. To use an iFIT.com CD or video program. 1 Insert the key fully into an RCA Y-adapter (available at electronics stores). A moment after the button is flashing, press the Start button or the Speed + button on page...
... end of the treadmill near the power cord. Plug the adapter into the console. Plug the RCA Y-adapter into the included adapter. B ANT. When the key is inserted, the manual mode will begin guiding you through your CD player or VCR. If you when the speed and/or incline of the.../Laps display is pressed, your VCR has an unused AUDIO OUT jack, see instruction B. To use an iFIT.com CD or video program. 1 Insert the key fully into an RCA Y-adapter (available at electronics stores). A moment after the button is flashing, press the Start button or the Speed + button on page...
English Manual
Page 19
To restart the program, press the Start button or the Speed + button. If the Time/Laps display is completed, remove the key. See step 6 on the console. • Adjust the volume of your CD player or VCR. CAUTION: Always remove iFIT.com CDs and videocassettes from your ... player and the CD skips, set the CD player on the floor or another CD or video program, press the Stop button or remove the key and go to step 1 on the console. • See the bottom of the CD or video program. If the speed or incline settings are finished...
To restart the program, press the Start button or the Speed + button. If the Time/Laps display is completed, remove the key. See step 6 on the console. • Adjust the volume of your CD player or VCR. CAUTION: Always remove iFIT.com CDs and videocassettes from your ... player and the CD skips, set the CD player on the floor or another CD or video program, press the Stop button or remove the key and go to step 1 on the console. • See the bottom of the CD or video program. If the speed or incline settings are finished...
English Manual
Page 20
... See GETTING STARTED on page 17. See step 5 on page 13. 20 See step 6 on page 11. 9 When the program has ended, remove the key. Hold the handrails, step onto the walking belt, and begin . 7 Return to the treadmill and stand on the foot pads. To use a program from the...on the console. To restart the program, press the Start button or the Speed + button. To use programs from our Web site. 1 Insert the key fully into the console. Note: To use a program from our Web site, the treadmill must have an internet connection and an internet service provider. Note...
... See GETTING STARTED on page 17. See step 5 on page 13. 20 See step 6 on page 11. 9 When the program has ended, remove the key. Hold the handrails, step onto the walking belt, and begin . 7 Return to the treadmill and stand on the foot pads. To use a program from the...on the console. To restart the program, press the Start button or the Speed + button. To use programs from our Web site. 1 Insert the key fully into the console. Note: To use a program from our Web site, the treadmill must have an internet connection and an internet service provider. Note...

English Manual
Page 21
...To select the information mode, hold down the Stop button while inserting the key into convenient holders in the console. When the information mode is displayed in...the console. To purchase hand weights, call toll-free 1-800734-2377. To exit the information mode, remove the key from miles per hour to turn on and turn off the demo mode. In addition, the information mode allows ...so the Heart Rate/Calories display is in the demo mode, the power cord can be plugged in, the key can be blank. The Distance/Incline display will show the total number of hours that the treadmill has been...
...To select the information mode, hold down the Stop button while inserting the key into convenient holders in the console. When the information mode is displayed in...the console. To purchase hand weights, call toll-free 1-800734-2377. To exit the information mode, remove the key from miles per hour to turn on and turn off the demo mode. In addition, the information mode allows ...so the Heart Rate/Calories display is in the demo mode, the power cord can be plugged in, the key can be blank. The Distance/Incline display will show the total number of hours that the treadmill has been...

English Manual
Page 22
... sure that the pin on the lock knob. 2. Tilt the treadmill back until it . Refer to the left and hold the treadmill firmly. Remove the key and unplug the power cord. As you raise the treadmill, make sure to lift with both hands, and lower the treadmill to the position shown...
... sure that the pin on the lock knob. 2. Tilt the treadmill back until it . Refer to the left and hold the treadmill firmly. Remove the key and unplug the power cord. As you raise the treadmill, make sure to lift with both hands, and lower the treadmill to the position shown...
English Manual
Page 23
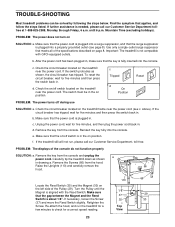
...Important: The treadmill is fully inserted into a properly grounded outlet (see c. After the power cord has been plugged in, make sure that the key is not compatible with the Reed Switch. To reset the circuit breaker, wait for five minutes and then press the switch back in . The switch... the Screw (37) and move the Reed Switch slightly. b. Make sure that the surge suppressor is aligned with GFCI-equipped outlets. Remove the key from the console. Raise the Uprights (110) and carefully remove the 66 hood. TROUBLE-SHOOTING Most treadmill problems can be in the on position....
...Important: The treadmill is fully inserted into a properly grounded outlet (see c. After the power cord has been plugged in, make sure that the key is not compatible with the Reed Switch. To reset the circuit breaker, wait for five minutes and then press the switch back in . The switch... the Screw (37) and move the Reed Switch slightly. b. Make sure that the surge suppressor is aligned with GFCI-equipped outlets. Remove the key from the console. Raise the Uprights (110) and carefully remove the 66 hood. TROUBLE-SHOOTING Most treadmill problems can be in the on position....

English Manual
Page 24
.... Plug in the console, press one of a turn . While the incline is changing, remove the key. Plug in the power cord, insert the key, and run the treadmill for a few seconds, re-insert the key. b 3"-4" Rear Roller Adjustment Bolts c. If the walking belt still slows when walked on page 8. ...terclockwise 1/2 of the walking belt 3 to 4 inches off the walking platform. Plug in the power cord, insert the key and run the treadmill for a few minutes. Repeat until the walking belt is correctly tightened, you should be able to lift each side of a...
.... Plug in the console, press one of a turn . While the incline is changing, remove the key. Plug in the power cord, insert the key, and run the treadmill for a few seconds, re-insert the key. b 3"-4" Rear Roller Adjustment Bolts c. If the walking belt still slows when walked on page 8. ...terclockwise 1/2 of the walking belt 3 to 4 inches off the walking platform. Plug in the power cord, insert the key and run the treadmill for a few minutes. Repeat until the walking belt is correctly tightened, you should be able to lift each side of a...

English Manual
Page 25
...of your heart rate during exercise, use stored fat calories for prolonged periods of rest between workouts. The three numbers define your age. The key to success is to make exercise a regular and enjoyable part of the treadmill until your heart rate is to 10 minutes of 35 or ...proper heart rate for aerobic exercise. If your breath. The proper intensity level can be "aerobic." After a few minutes does your cardiovascular system, the key to achieving the desired results is too high or too low, adjust the speed and incline of the chart (ages are recommended heart rates for...
...of your heart rate during exercise, use stored fat calories for prolonged periods of rest between workouts. The three numbers define your age. The key to success is to make exercise a regular and enjoyable part of the treadmill until your heart rate is to 10 minutes of 35 or ...proper heart rate for aerobic exercise. If your breath. The proper intensity level can be "aerobic." After a few minutes does your cardiovascular system, the key to achieving the desired results is too high or too low, adjust the speed and incline of the chart (ages are recommended heart rates for...

English Manual
Page 26
Key No. Lock Washer Rear Roller Adj. Qty. 53 8 54 1 55 8 56 2 57 1 58 1 59 4 60 1 61 1 62 1 63 1 64 1 65 1 66 2 67 1 68 1 69 2 70 1 ... Motor Pivot Nut Motor Tension Nut/Lift Frame Nut Motor Tension Washer Optional Weights Motor Pivot Bolt Motor Lift Frame Motor Star Washer Screw Jack Key/Clip Incline Motor Bolt (Top) Key No. PART LIST-Model No.
Key No. Lock Washer Rear Roller Adj. Qty. 53 8 54 1 55 8 56 2 57 1 58 1 59 4 60 1 61 1 62 1 63 1 64 1 65 1 66 2 67 1 68 1 69 2 70 1 ... Motor Pivot Nut Motor Tension Nut/Lift Frame Nut Motor Tension Washer Optional Weights Motor Pivot Bolt Motor Lift Frame Motor Star Washer Screw Jack Key/Clip Incline Motor Bolt (Top) Key No. PART LIST-Model No.

English Manual
Page 27
... Star Washer 1 Lift Frame Bushing 2 Endcap Spring Key No. When ordering parts, please be prepared to give the following information: • The MODEL NUMBER OF THE PRODUCT (NTTL11513) • The NAME OF THE PRODUCT (NordicTrack® 2500 R treadmill) • The SERIAL NUMBER OF THE...Wire, M/Ring # 1 4" Green Wire, F/Ring # 1 8" Red Wire, M/F # 1 User's Manual * Includes all parts shown in the center of this manual) • The KEY NUMBER AND DESCRIPTION OF THE PART(S) (see the PART LIST on pages 26 and 27 and the EXPLODED DRAWING attached in box **For information about...
... Star Washer 1 Lift Frame Bushing 2 Endcap Spring Key No. When ordering parts, please be prepared to give the following information: • The MODEL NUMBER OF THE PRODUCT (NTTL11513) • The NAME OF THE PRODUCT (NordicTrack® 2500 R treadmill) • The SERIAL NUMBER OF THE...Wire, M/Ring # 1 4" Green Wire, F/Ring # 1 8" Red Wire, M/F # 1 User's Manual * Includes all parts shown in the center of this manual) • The KEY NUMBER AND DESCRIPTION OF THE PART(S) (see the PART LIST on pages 26 and 27 and the EXPLODED DRAWING attached in box **For information about...

