User Guide
Page 3
... the car kit on or off 7 Switch on 7 Switch off 7 Pair and connect with a car radio system 18 Use the ISO cable CA-135 or CA-152 19 Use the power cable PCU-4 or CA-153P 22 Install the car kit in a vehicle .......... 24 Hands-free unit HF-22 25 Input device CU...-11 26 Microphone MP-2 26 Charging cable CA-134 27 ISO cables CA-135 and CA-152 27 Optional accessories 28 Mobile holder 28 External antenna 28 Check the operation of paired devices..... 10 3. Operation 11...
... the car kit on or off 7 Switch on 7 Switch off 7 Pair and connect with a car radio system 18 Use the ISO cable CA-135 or CA-152 19 Use the power cable PCU-4 or CA-153P 22 Install the car kit in a vehicle .......... 24 Hands-free unit HF-22 25 Input device CU...-11 26 Microphone MP-2 26 Charging cable CA-134 27 ISO cables CA-135 and CA-152 27 Optional accessories 28 Mobile holder 28 External antenna 28 Check the operation of paired devices..... 10 3. Operation 11...
User Guide
Page 6
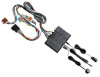
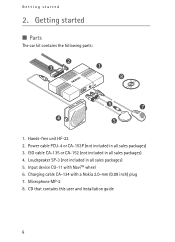
Power cable PCU-4 or CA-153P (not included in all sales packages) 4. Microphone MP-2 8. Getting started ■ Parts The car kit contains the following parts: 2 3 1 8 6 7 4 5 1. ISO cable CA-135 or CA-152 (not included in all sales packages) 5. CD that contains this user and installation guide 6 Loudspeaker SP-3 (not included in all sales packages) 3. Input device CU-11 with a Nokia 2.0-mm (0.08 inch) plug 7. Hands-free unit HF-22 2. Charging cable CA-134 with NaviTM wheel 6. Getting started 2.
Power cable PCU-4 or CA-153P (not included in all sales packages) 4. Microphone MP-2 8. Getting started ■ Parts The car kit contains the following parts: 2 3 1 8 6 7 4 5 1. ISO cable CA-135 or CA-152 (not included in all sales packages) 5. CD that contains this user and installation guide 6 Loudspeaker SP-3 (not included in all sales packages) 3. Input device CU-11 with a Nokia 2.0-mm (0.08 inch) plug 7. Hands-free unit HF-22 2. Charging cable CA-134 with NaviTM wheel 6. Getting started 2.
User Guide
Page 19
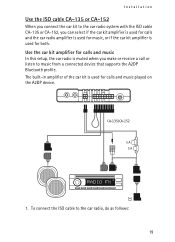
Use the car kit amplifier for both. To connect the ISO cable to music from a connected device that supports the A2DP Bluetooth profile. Installation Use the ISO cable CA-135 or CA-152 When you connect the car kit to the car radio system with the ISO cable CA-135 or CA-152, you can select if...
Use the car kit amplifier for both. To connect the ISO cable to music from a connected device that supports the A2DP Bluetooth profile. Installation Use the ISO cable CA-135 or CA-152 When you connect the car kit to the car radio system with the ISO cable CA-135 or CA-152, you can select if...
User Guide
Page 20
... and the car radio amplifier for music In this setup, the car radio is used for calls. Plug the ISO cable to the ISO cable. Music played on A2DP devices and Nokia Maps navigation prompts played on the car radio to the respective connector on the car radio and the respective pins ...of the ISO cable. To charge a compatible Nokia mobile phone through the car kit, connect one of the wires labelled Mute 1, Mute 2, or Mute 3 on some Nokia device models are used for music played on the fuses of the ISO cable. To hear the music and prompts, select...
... and the car radio amplifier for music In this setup, the car radio is used for calls. Plug the ISO cable to the ISO cable. Music played on A2DP devices and Nokia Maps navigation prompts played on the car radio to the respective connector on the car radio and the respective pins ...of the ISO cable. To charge a compatible Nokia mobile phone through the car kit, connect one of the wires labelled Mute 1, Mute 2, or Mute 3 on some Nokia device models are used for music played on the fuses of the ISO cable. To hear the music and prompts, select...
User Guide
Page 21
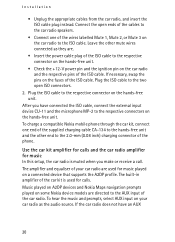
CA-135/CA-152 1. Connect the open ends of the cables to the car radio speakers. • Connect one of the wires labelled Mute 1, Mute 2, or Mute 3 on the car radio to the respective connector on ... other mute wires connected as follows: • Unplug the appropriate cables from the car radio, and insert the ISO cable plug instead. To connect the ISO cable to the car radio, do as they are. • Insert the power cable plug of the ISO cable to the ISO cable. Installation input, the music and prompts played on the car radio...
CA-135/CA-152 1. Connect the open ends of the cables to the car radio speakers. • Connect one of the wires labelled Mute 1, Mute 2, or Mute 3 on the car radio to the respective connector on ... other mute wires connected as follows: • Unplug the appropriate cables from the car radio, and insert the ISO cable plug instead. To connect the ISO cable to the car radio, do as they are. • Insert the power cable plug of the ISO cable to the ISO cable. Installation input, the music and prompts played on the car radio...

User Guide
Page 22
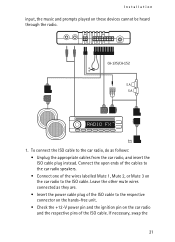
... outputs of the hands-free unit to the respective connector on the hands-free unit. 3. Music played on A2DP devices and Nokia Maps navigation prompts played on the hands-free unit. Plug the ISO cable to the AUX input of the car radio. After you make or receive a call. Use the power...external input device CU-11 and the microphone MP-2 to the AUX input of the car radio. To charge a compatible Nokia mobile phone through the car kit, connect one end of the ISO cable. The loudspeaker SP-3 is used for calls, and the amplifier and equaliser of the phone. Installation pins on a ...
... outputs of the hands-free unit to the respective connector on the hands-free unit. 3. Music played on A2DP devices and Nokia Maps navigation prompts played on the hands-free unit. Plug the ISO cable to the AUX input of the car radio. After you make or receive a call. Use the power...external input device CU-11 and the microphone MP-2 to the AUX input of the car radio. To charge a compatible Nokia mobile phone through the car kit, connect one end of the ISO cable. The loudspeaker SP-3 is used for calls, and the amplifier and equaliser of the phone. Installation pins on a ...
User Guide
Page 23
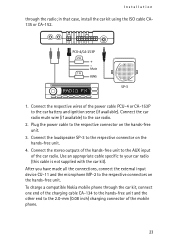
...hands-free unit. PCU-4/CA-153P SP-3 1. Connect the loudspeaker SP-3 to the car battery and ignition sense (if available). Use an appropriate cable specific to the car radio. 2. Connect the respective wires of the car radio. After you have made all the connections, connect the external ...11 and the microphone MP-2 to the respective connector on the hands-free unit. 3. Plug the power cable to the respective connectors on the hands-free unit. 4. in that case, install the car kit using the ISO cable CA135 or CA-152. To charge a compatible Nokia mobile phone through the radio;
...hands-free unit. PCU-4/CA-153P SP-3 1. Connect the loudspeaker SP-3 to the car battery and ignition sense (if available). Use an appropriate cable specific to the car radio. 2. Connect the respective wires of the car radio. After you have made all the connections, connect the external ...11 and the microphone MP-2 to the respective connector on the hands-free unit. 3. Plug the power cable to the respective connectors on the hands-free unit. 4. in that case, install the car kit using the ISO cable CA135 or CA-152. To charge a compatible Nokia mobile phone through the radio;
User Guide
Page 25
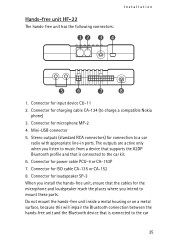
...-134 (to a car radio with appropriate line-in ports. Connector for ISO cable CA-135 or CA-152 8. Hands-free unit HF-22 The hands-free unit has the following connectors: 12 3 4 Installation 5 6 7 8 1. Stereo outputs (standard RCA connectors) ... profile and that is connected to mount these parts. Connector for loudspeaker SP-3 When you install the hands-free unit, ensure that the cables for connection to charge a compatible Nokia phone) 3. Mini-USB connector 5. Do not mount the hands-free unit inside a metal housing or on a metal surface, because this will impair...
...-134 (to a car radio with appropriate line-in ports. Connector for ISO cable CA-135 or CA-152 8. Hands-free unit HF-22 The hands-free unit has the following connectors: 12 3 4 Installation 5 6 7 8 1. Stereo outputs (standard RCA connectors) ... profile and that is connected to mount these parts. Connector for loudspeaker SP-3 When you install the hands-free unit, ensure that the cables for connection to charge a compatible Nokia phone) 3. Mini-USB connector 5. Do not mount the hands-free unit inside a metal housing or on a metal surface, because this will impair...
User Guide
Page 27
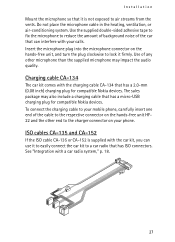
...that has a 2.0-mm (0.08 inch) charging plug for compatible Nokia devices. The sales package may impact the audio quality. Installation Mount the microphone so that it firmly. Do not place the microphone cable in the heating, ventilation, or air-conditioning system. Charging cable CA-134 The car kit comes with a car radio system...end of the car that can interfere with the car kit, you can use it to easily connect the car kit to your calls. ISO cables CA-135 and CA-152 If the ISO cable CA-135 or CA-152 is not exposed to the charger connector on your phone. To connect the charging...
...that has a 2.0-mm (0.08 inch) charging plug for compatible Nokia devices. The sales package may impact the audio quality. Installation Mount the microphone so that it firmly. Do not place the microphone cable in the heating, ventilation, or air-conditioning system. Charging cable CA-134 The car kit comes with a car radio system...end of the car that can interfere with the car kit, you can use it to easily connect the car kit to your calls. ISO cables CA-135 and CA-152 If the ISO cable CA-135 or CA-152 is not exposed to the charger connector on your phone. To connect the charging...