
User Manual
Page 2
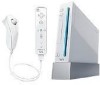
... and Safety Information System Components Wii Console Wii Remote™ Wii MotionPlus™ Nunchuk™ Sensor Bar Wii AC Adapter Wii AV Cable Wii Console Stand & Stand Plate System Setup Wii Console Wii AV Cable Sensor Bar Wii AC Adapter TV and Audio/Video Settings Setup of meaning: WARNING - NOTE: This product only plays Wii Game Discs and Nintendo GameCube™ Game Discs labeled with "For...
... and Safety Information System Components Wii Console Wii Remote™ Wii MotionPlus™ Nunchuk™ Sensor Bar Wii AC Adapter Wii AV Cable Wii Console Stand & Stand Plate System Setup Wii Console Wii AV Cable Sensor Bar Wii AC Adapter TV and Audio/Video Settings Setup of meaning: WARNING - NOTE: This product only plays Wii Game Discs and Nintendo GameCube™ Game Discs labeled with "For...

User Manual
Page 3
... operation of nearby electronics, including cardiac pacemakers. • Do not operate the Wii console or remote within 9 inches of a pacemaker. • If you feel dizzy or nauseous when playing video games, stop playing and see a doctor. Refer servicing to disassemble the Wii console. Caution: Use of the above symptoms or other discomfort during a lightning storm...
... operation of nearby electronics, including cardiac pacemakers. • Do not operate the Wii console or remote within 9 inches of a pacemaker. • If you feel dizzy or nauseous when playing video games, stop playing and see a doctor. Refer servicing to disassemble the Wii console. Caution: Use of the above symptoms or other discomfort during a lightning storm...

User Manual
Page 4
...SYNCHRO Button (SYNC.) Used when synchronizing a Wii Remote with Nintendo GameCube Controllers. 4 3 2 1 Air Intake Battery Cover For access to USB devices, such as the Wii LAN Adapter (Sold separately). Game Disc slot For inserting a Wii or Nintendo GameCube Disc. Slot lights blue and blinks when...blink when messages or data are received. Wii Console Slot A Slot B Nintendo GameCube Memory Card Slots For use with the console. When WiiConnect24 is Off. Power LED Shows the status of the Wii console. DC Input Connector Connects to the Wii AC Adapter. special handling may apply....
...SYNCHRO Button (SYNC.) Used when synchronizing a Wii Remote with Nintendo GameCube Controllers. 4 3 2 1 Air Intake Battery Cover For access to USB devices, such as the Wii LAN Adapter (Sold separately). Game Disc slot For inserting a Wii or Nintendo GameCube Disc. Slot lights blue and blinks when...blink when messages or data are received. Wii Console Slot A Slot B Nintendo GameCube Memory Card Slots For use with the console. When WiiConnect24 is Off. Power LED Shows the status of the Wii console. DC Input Connector Connects to the Wii AC Adapter. special handling may apply....

User Manual
Page 5
.... Lock Switch Slide towards the top of the accessory being plugged into place. Components Components Wii Remote (Shown with the console. See pages 24-25. Sensor unit Jacket slots Tabs on game packaging for more information. External Extension Connector For connecting accessories such as the Nunchuk. Connector cover Protects the External Extension Connector...
.... Lock Switch Slide towards the top of the accessory being plugged into place. Components Components Wii Remote (Shown with the console. See pages 24-25. Sensor unit Jacket slots Tabs on game packaging for more information. External Extension Connector For connecting accessories such as the Nunchuk. Connector cover Protects the External Extension Connector...

User Manual
Page 6
... Wii game software that position will be used with Nunchuk. Video Audio (Left) Audio (Right) RCA Plugs Plug into the Sensor Bar Connector on the back of the Wii console. Sensor Bar Stand See page 16 for three seconds. Wii Stand Plate NOTE: The Wii Console Stand and Wii Stand... Plate come already assembled together, as neutral position, causing incorrect game control during game play. Sensor Bar Sensor Bar Plug Plugs...
... Wii game software that position will be used with Nunchuk. Video Audio (Left) Audio (Right) RCA Plugs Plug into the Sensor Bar Connector on the back of the Wii console. Sensor Bar Stand See page 16 for three seconds. Wii Stand Plate NOTE: The Wii Console Stand and Wii Stand... Plate come already assembled together, as neutral position, causing incorrect game control during game play. Sensor Bar Sensor Bar Plug Plugs...
User Manual
Page 7
...location where it in the direction shown. 3. Use water only. Wii Console Placement NOTE: Choose a location to set up and using . The Wii console can be sure to remove the Game Disc from the console. • Do not store the Wii console in a humid place, on a flat horizontal surface. If...to reattach.) 1. Failure to do so may collect dirt, dust, lint, etc. • Do not drop, hit or otherwise abuse the Wii console, components or accessories. • When disconnecting any dust or other than sliding it may result in a vertical or horizontal position. Vertical Horizontal...
...location where it in the direction shown. 3. Use water only. Wii Console Placement NOTE: Choose a location to set up and using . The Wii console can be sure to remove the Game Disc from the console. • Do not store the Wii console in a humid place, on a flat horizontal surface. If...to reattach.) 1. Failure to do so may collect dirt, dust, lint, etc. • Do not drop, hit or otherwise abuse the Wii console, components or accessories. • When disconnecting any dust or other than sliding it may result in a vertical or horizontal position. Vertical Horizontal...

User Manual
Page 8
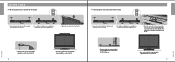
...below the TV screen. Playing video games with stationary images or patterns, or leaving video games on mounting the Sensor Bar to play again. Sensor Bar mounted above or below the screen. 13 System Setup TV Inputs VIDEO AUDIO L AUDIO R IMPORTANT: The Wii console will be liable for instructions on... plugs on the TV without damaging it. RVL-011) can be ordered through Nintendo's web site at support.nintendo.com (USA/Canada only) or by the display of the TV. Neither Nintendo nor any of Nintendo's licensees will not work with any TV, especially front and rear projection or ...
...below the TV screen. Playing video games with stationary images or patterns, or leaving video games on mounting the Sensor Bar to play again. Sensor Bar mounted above or below the screen. 13 System Setup TV Inputs VIDEO AUDIO L AUDIO R IMPORTANT: The Wii console will be liable for instructions on... plugs on the TV without damaging it. RVL-011) can be ordered through Nintendo's web site at support.nintendo.com (USA/Canada only) or by the display of the TV. Neither Nintendo nor any of Nintendo's licensees will not work with any TV, especially front and rear projection or ...
User Manual
Page 9
Mount the Sensor Bar to the top of the Sensor Bar. 2. Mount the Sensor Bar to the front of the TV. 14 • The center of the Sensor Bar should be aligned with the center of the TV. • The front of the Sensor Bar should be aligned with the center of the Sensor Bar. 2. System Setup System Setup • The front of the Sensor Bar should be aligned close to the front edge of the surface the TV is sitting on. • The center of the Sensor Bar should be aligned with the front of the surface the TV is sitting on ; Remove the protective film from the ...
Mount the Sensor Bar to the top of the Sensor Bar. 2. Mount the Sensor Bar to the front of the TV. 14 • The center of the Sensor Bar should be aligned with the center of the TV. • The front of the Sensor Bar should be aligned with the center of the Sensor Bar. 2. System Setup System Setup • The front of the Sensor Bar should be aligned close to the front edge of the surface the TV is sitting on. • The center of the Sensor Bar should be aligned with the front of the surface the TV is sitting on ; Remove the protective film from the ...

User Manual
Page 10
...installation of, the Sensor Bar. Insert the AC plug into the DC input connector on the back of the console. 2. Make sure the Sensor Bar is horizontal and it is red) when unplugging the AC Adapter. Mount ...Sensor Bar stand to: • the front edge of the surface the TV is sitting on; NO YES Wii AC Adapter 1. Make sure the power is off (the Power LED is not blocked by mounting the Sensor... and insert fully into outlet. System Setup System Setup Using the Sensor Bar Stand Communication between the Wii Remote and the Sensor Bar may be fed through a channel on the bottom of the Sensor Bar...
...installation of, the Sensor Bar. Insert the AC plug into the DC input connector on the back of the console. 2. Make sure the Sensor Bar is horizontal and it is red) when unplugging the AC Adapter. Mount ...Sensor Bar stand to: • the front edge of the surface the TV is sitting on; NO YES Wii AC Adapter 1. Make sure the power is off (the Power LED is not blocked by mounting the Sensor... and insert fully into outlet. System Setup System Setup Using the Sensor Bar Stand Communication between the Wii Remote and the Sensor Bar may be fed through a channel on the bottom of the Sensor Bar...

User Manual
Page 11
...leaking batteries. • Do not dispose of the Operations Manual - Setup of the Wii Remote The Wii Remote comes with Wii MotionPlus installed Installing Batteries The Wii Remote uses AA batteries. Nintendo recommends high quality alkaline batteries for details. Battery Leakage Leakage of battery fluid... your remote. WARNING - Turn ON the power for example, to replace the batteries in the remote for more information on the Wii console. 2. If you use rechargeable nickel metal hydride (NiMH) batteries, be necessary to remove the jacket - Do not use Lithium ion...
...leaking batteries. • Do not dispose of the Operations Manual - Setup of the Wii Remote The Wii Remote comes with Wii MotionPlus installed Installing Batteries The Wii Remote uses AA batteries. Nintendo recommends high quality alkaline batteries for details. Battery Leakage Leakage of battery fluid... your remote. WARNING - Turn ON the power for example, to replace the batteries in the remote for more information on the Wii console. 2. If you use rechargeable nickel metal hydride (NiMH) batteries, be necessary to remove the jacket - Do not use Lithium ion...

User Manual
Page 12
... 21 System Setup Make sure the lock on the jacket. The white arrow is in the unlocked position, with the arrow visible. Insert the Wii Remote all the way 5. Jacket 3. Make sure the wrist strap is pulled completely through the hole. Channels and Settings, for more information. 20...the battery compartment. Be sure to be checked by pressing the Home Button. IMPORTANT: Insert the minus (-) end first Installing the Wii MotionPlus accessory 1. Pull gently until you can see the cord. Press and hold the release buttons and pull the accessory out of the External...
... 21 System Setup Make sure the lock on the jacket. The white arrow is in the unlocked position, with the arrow visible. Insert the Wii Remote all the way 5. Jacket 3. Make sure the wrist strap is pulled completely through the hole. Channels and Settings, for more information. 20...the battery compartment. Be sure to be checked by pressing the Home Button. IMPORTANT: Insert the minus (-) end first Installing the Wii MotionPlus accessory 1. Pull gently until you can see the cord. Press and hold the release buttons and pull the accessory out of the External...

User Manual
Page 13
... hold the strap lock in place. ALLOW ADEQUATE ROOM AROUND YOU DURING GAME PLAY. • Stay at least three (3) feet away from Wii MotionPlus, or when replacing the Wii Remote batteries, do not include Wii MotionPlus features. Do not over tighten the strap lock so that do ...System Setup System Setup Installing the Wii MotionPlus accessory (cont.) 7. WEAR THE WRIST STRAP WHEN USING THE Wii REMOTE. • Make sure all game control instructions for the game you from the Wii Remote, be tight enough to other people. They must be used with games that it may break the ...
... hold the strap lock in place. ALLOW ADEQUATE ROOM AROUND YOU DURING GAME PLAY. • Stay at least three (3) feet away from Wii MotionPlus, or when replacing the Wii Remote batteries, do not include Wii MotionPlus features. Do not over tighten the strap lock so that do ...System Setup System Setup Installing the Wii MotionPlus accessory (cont.) 7. WEAR THE WRIST STRAP WHEN USING THE Wii REMOTE. • Make sure all game control instructions for the game you from the Wii Remote, be tight enough to other people. They must be used with games that it may break the ...
User Manual
Page 14
... LEDs will lose this setting by pressing the Power Button on either the remote or the console. • When starting up a game or Channel from the Wii Menu. • When returning to the Wii Menu after exiting from the Home Button menu, then select the Reconnect option. 3. The...will return. 1. NOTE: This image shows the Wii Remote with the console. 2. After the syncing process, LED that is turned off the console by syncing the remote to a different console. Once synchronized, the remote will set the player order for multiplayer games. The order in Standard Mode can turn it on...
... LEDs will lose this setting by pressing the Power Button on either the remote or the console. • When starting up a game or Channel from the Wii Menu. • When returning to the Wii Menu after exiting from the Home Button menu, then select the Reconnect option. 3. The...will return. 1. NOTE: This image shows the Wii Remote with the console. 2. After the syncing process, LED that is turned off the console by syncing the remote to a different console. Once synchronized, the remote will set the player order for multiplayer games. The order in Standard Mode can turn it on...

User Manual
Page 15
... screen to high temperatures, high humidity or dust, dirt or other people or objects are playing for playing GameCube games. Wii Disc Nintendo GameCube Disc Label faces towards the right side of the Wii console Label faces towards the right side of the TV. Adequate Space Required Be sure you have enough space around you...
... screen to high temperatures, high humidity or dust, dirt or other people or objects are playing for playing GameCube games. Wii Disc Nintendo GameCube Disc Label faces towards the right side of the Wii console Label faces towards the right side of the TV. Adequate Space Required Be sure you have enough space around you...

User Manual
Page 16
... the remote at a specific place on the TV screen. Read the instruction booklet for the game you hold the remote in different configurations when connected up to other Wii accessories. Horizontal Position Basic Operations Point Point the remote at a specific place on the TV ... holding down a button. Waving Wave the remote back and forth from side to hold and operate the remote will vary. Using the Wii Remote Wii Remote Configurations Depending on the game, the way you are playing for information about what kind of gameplay control is required for that...
... the remote at a specific place on the TV screen. Read the instruction booklet for the game you hold the remote in different configurations when connected up to other Wii accessories. Horizontal Position Basic Operations Point Point the remote at a specific place on the TV ... holding down a button. Waving Wave the remote back and forth from side to hold and operate the remote will vary. Using the Wii Remote Wii Remote Configurations Depending on the game, the way you are playing for information about what kind of gameplay control is required for that...

User Manual
Page 17
... cover cord from the accessory connector plug. Connector hook 30 31 Using the Nunchuk Using the Nunchuk Using the Nunchuk Setup and Use of Wii MotionPlus. Be sure to the tab on the bottom of the Nunchuk CAUTION - Disconnecting the Nunchuk Follow these procedures to remove the Nunchuk,... firmly into the External Extension Connector on the edge of the connector. Insert the connector cover into place on the remote or Wii MotionPlus accessory and striking objects or people. Please use the wrist strap to prevent losing your strap lock has one) until it clicks ...
... cover cord from the accessory connector plug. Connector hook 30 31 Using the Nunchuk Using the Nunchuk Using the Nunchuk Setup and Use of Wii MotionPlus. Be sure to the tab on the bottom of the Nunchuk CAUTION - Disconnecting the Nunchuk Follow these procedures to remove the Nunchuk,... firmly into the External Extension Connector on the edge of the connector. Insert the connector cover into place on the remote or Wii MotionPlus accessory and striking objects or people. Please use the wrist strap to prevent losing your strap lock has one) until it clicks ...

User Manual
Page 18
...Nintendo GameCube Controller Use the Wii stand plate when using GameCube Controllers to prevent the console from being tipped over . 32 Removing the Controller Socket Cover If you are using the Wii console in a horizontal position, you are playing for the number and position of controllers required for the game...when using GameCube Memory Cards when the Wii console is placed horizontally. 33 Using Nintendo GameCube Controllers Using Nintendo GameCube Controllers Using Nintendo GameCube™ Controllers Setup of Nintendo GameCube Controllers NOTE: When using GameCube ...
...Nintendo GameCube Controller Use the Wii stand plate when using GameCube Controllers to prevent the console from being tipped over . 32 Removing the Controller Socket Cover If you are using the Wii console in a horizontal position, you are playing for the number and position of controllers required for the game...when using GameCube Memory Cards when the Wii console is placed horizontally. 33 Using Nintendo GameCube Controllers Using Nintendo GameCube Controllers Using Nintendo GameCube™ Controllers Setup of Nintendo GameCube Controllers NOTE: When using GameCube ...

User Manual
Page 19
... digital cameras and cell phones and for more information on using SD Cards with the Wii system. Note: Label faces towards the Wii game disc slot Using Nintendo GameCube Memory Cards NOTE: Nintendo GameCube Memory Cards can be used with a different Wii console. Systems and Accessories section of cards that have been tested to an SD Card...
... digital cameras and cell phones and for more information on using SD Cards with the Wii system. Note: Label faces towards the Wii game disc slot Using Nintendo GameCube Memory Cards NOTE: Nintendo GameCube Memory Cards can be used with a different Wii console. Systems and Accessories section of cards that have been tested to an SD Card...

User Manual
Page 20
...to ensure proper placement. • Make sure no objects are correct for 15 seconds. Game Disc slot does not light blue or lights briefly This is between the Sensor Bar, the Wii console, and the Wii Remote. • Make sure batteries are not depleted. • Use the Sensor ... cable connections are correctly installed and that all plugs are unable to clean the internal lens. • Eject the Game Disc, and turn off the power of the Wii console with your system. • Make sure that all components of liquid onto a controller or accessory. System unable to...
...to ensure proper placement. • Make sure no objects are correct for 15 seconds. Game Disc slot does not light blue or lights briefly This is between the Sensor Bar, the Wii console, and the Wii Remote. • Make sure batteries are not depleted. • Use the Sensor ... cable connections are correctly installed and that all plugs are unable to clean the internal lens. • Eject the Game Disc, and turn off the power of the Wii console with your system. • Make sure that all components of liquid onto a controller or accessory. System unable to...

User Manual
Page 21
...the procedure on page 24. • Review the Sensor Bar setup instructions on the inside of graphics but does not damage the Wii Console, Wii Remote, Wii MotionPlus, or the television. Hold the jacket and accessory so they both face forwards. Front of jacket Front of the sensor unit...was downloaded) for the game you are playing to make sure it • The jacket is not being careful not to make sure Wii MotionPlus has been installed correctly. • Make sure the batteries have been installed correctly and are correctly located. 3. Visit support.nintendo.com for instructions on...
...the procedure on page 24. • Review the Sensor Bar setup instructions on the inside of graphics but does not damage the Wii Console, Wii Remote, Wii MotionPlus, or the television. Hold the jacket and accessory so they both face forwards. Front of jacket Front of the sensor unit...was downloaded) for the game you are playing to make sure it • The jacket is not being careful not to make sure Wii MotionPlus has been installed correctly. • Make sure the batteries have been installed correctly and are correctly located. 3. Visit support.nintendo.com for instructions on...