
User Manual
Page 1
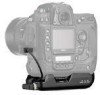
En Fr Es Wireless Transmitter CLC S OAU/VT DC IN LOCK POWER LINK BUSY User's Manual
En Fr Es Wireless Transmitter CLC S OAU/VT DC IN LOCK POWER LINK BUSY User's Manual

User Manual
Page 2
En Wireless Transmitter CLC S OAU/VT DC IN LOCK POWER LINK BUSY User's Manual
En Wireless Transmitter CLC S OAU/VT DC IN LOCK POWER LINK BUSY User's Manual
User Manual
Page 7
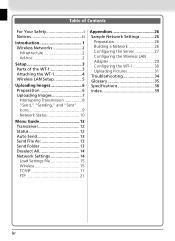
Table of Contents For Your Safety i Notices ii Introduction 1 Wireless Networks 2 Infrastructure 2 Ad-hoc 2 Setup 3 Parts of the WT-1 3 Attaching the WT-1 4 Wireless LAN Setup 5 Uploading Images 6 Preparation 6 Uploading Images 7 Interrupting Transmission 8 "Send," "Sending," and "Sent" Icons 9 Network Status 10...Load Settings File 15 Wireless 15 TCP/IP 17 FTP 21 Appendices 26 Sample Network Settings 26 Preparation 26 Building a Network 26 Configuring the Server 27 Configuring the Wireless LAN Adapter 29 Configuring the WT-1 30 Uploading Pictures ...
Table of Contents For Your Safety i Notices ii Introduction 1 Wireless Networks 2 Infrastructure 2 Ad-hoc 2 Setup 3 Parts of the WT-1 3 Attaching the WT-1 4 Wireless LAN Setup 5 Uploading Images 6 Preparation 6 Uploading Images 7 Interrupting Transmission 8 "Send," "Sending," and "Sent" Icons 9 Network Status 10...Load Settings File 15 Wireless 15 TCP/IP 17 FTP 21 Appendices 26 Sample Network Settings 26 Preparation 26 Building a Network 26 Configuring the Server 27 Configuring the Wireless LAN Adapter 29 Configuring the WT-1 30 Uploading Pictures ...
User Manual
Page 8
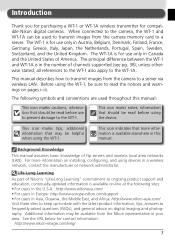
... for purchasing a WT-1 or WT-1A wireless transmitter for contact information: http://www.nikon-image.com/eng/ 1 The following sites: • For users in the U.S.A.: http://www.nikonusa.com/ • For users in Europe: http://www.europe-nikon.com/support • For users in a wireless network, contact the... indicates that should be helpful when using the WT-1. Life-Long Learning As part of America. See the URL below for compatible Nikon digital cameras. The WT-1 is for use only in Canada and the United States of Nikon's "Life-Long Learning" commitment to ongoing product...
... for purchasing a WT-1 or WT-1A wireless transmitter for contact information: http://www.nikon-image.com/eng/ 1 The following sites: • For users in the U.S.A.: http://www.nikonusa.com/ • For users in Europe: http://www.europe-nikon.com/support • For users in a wireless network, contact the... indicates that should be helpful when using the WT-1. Life-Long Learning As part of America. See the URL below for compatible Nikon digital cameras. The WT-1 is for use only in Canada and the United States of Nikon's "Life-Long Learning" commitment to ongoing product...

User Manual
Page 9
...camera memory card can be uploaded as they are taken, or photographs already on the following two types of network: Infrastructure Devices in an ad-hoc wireless network communicate directly ("peer-to an ftp server via one or more wireless access points. Wireless Networks The WT-1 wireless transmitter... is not supported). The WT-1 supports an ad-hoc mode for connection to be selected...
...camera memory card can be uploaded as they are taken, or photographs already on the following two types of network: Infrastructure Devices in an ad-hoc wireless network communicate directly ("peer-to an ftp server via one or more wireless access points. Wireless Networks The WT-1 wireless transmitter... is not supported). The WT-1 supports an ad-hoc mode for connection to be selected...
User Manual
Page 12
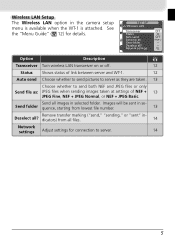
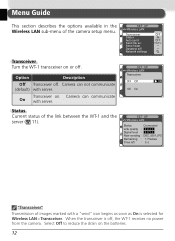
...64257;le number. 13 Remove transfer marking ("send," "sending," or "sent" in the camera setup menu is available when the WT-1 is attached. Send all ? Wireless LAN Setup The Wireless LAN option in - SET UP Wireless LAN Transceiver Status Auto send Send file as: Send folder Deselect all images in se- ...13 Choose whether to server. 14 5 Network settings OFF OFF RAW+J Option Description Transceiver Turn wireless LAN transceiver on or off. 12 Status Shows status of link between server and WT-1. 12 Auto send Choose whether to send pictures to server as : JPEG files when ...
...64257;le number. 13 Remove transfer marking ("send," "sending," or "sent" in the camera setup menu is available when the WT-1 is attached. Send all ? Wireless LAN Setup The Wireless LAN option in - SET UP Wireless LAN Transceiver Status Auto send Send file as: Send folder Deselect all images in se- ...13 Choose whether to server. 14 5 Network settings OFF OFF RAW+J Option Description Transceiver Turn wireless LAN transceiver on or off. 12 Status Shows status of link between server and WT-1. 12 Auto send Choose whether to send pictures to server as : JPEG files when ...

User Manual
Page 13
...Firmware Version 4 Select On for "Status" ( 11). SET UP Wireless LAN Transceiver OFF Off ON On OK 5 Select Status from the Wireless LAN menu and confirm that "Connected" is shown for the Wireless LAN > Transceiver option in the camera setup menu ( 12). For information on . 2 Reverse side 1... 3 Adjust network settings ( 16-25). SET UP Wireless LAN Status Link quality Signal ...
...Firmware Version 4 Select On for "Status" ( 11). SET UP Wireless LAN Transceiver OFF Off ON On OK 5 Select Status from the Wireless LAN menu and confirm that "Connected" is shown for the Wireless LAN > Transceiver option in the camera setup menu ( 12). For information on . 2 Reverse side 1... 3 Adjust network settings ( 16-25). SET UP Wireless LAN Status Link quality Signal ...

User Manual
Page 14
... > Auto send (if Auto Send is on, new photographs can not be SET UP Wireless LAN Auto send selected for upload, the files on the server will be replaced by the files uploaded from the camera during upload. Repeat this process to send additional images (pictures will be sent in... to view pictures on the ftp server contains files with a blue "sent" icon. 100-1 During Upload Do not remove the memory card from the camera. 7 The image will be marked with a green "sending" icon. OFF Off OK ON On 2 Press the button to the server as files selected for...
... > Auto send (if Auto Send is on, new photographs can not be SET UP Wireless LAN Auto send selected for upload, the files on the server will be replaced by the files uploaded from the camera during upload. Repeat this process to send additional images (pictures will be sent in... to view pictures on the ftp server contains files with a blue "sent" icon. 100-1 During Upload Do not remove the memory card from the camera. 7 The image will be marked with a green "sending" icon. OFF Off OK ON On 2 Press the button to the server as files selected for...

User Manual
Page 15
Any of the following actions will be removed. in the Wireless LAN menu • Deleting the images by turning the camera off and then on or On is selected for Wireless LAN > Transceiver while transmission is lost ( 11). lected • Formatting the memory card ... button while the images are transmitted. 8 Turning the Camera Off "Send" marking will resume when the camera is turned on again, activating the camera exposure meters, or selecting On for Wireless LAN > Transceiver once the signal is selected for Wireless LAN > Transceiver. Transmission of images marked with a...
Any of the following actions will be removed. in the Wireless LAN menu • Deleting the images by turning the camera off and then on or On is selected for Wireless LAN > Transceiver while transmission is lost ( 11). lected • Formatting the memory card ... button while the images are transmitted. 8 Turning the Camera Off "Send" marking will resume when the camera is turned on again, activating the camera exposure meters, or selecting On for Wireless LAN > Transceiver once the signal is selected for Wireless LAN > Transceiver. Transmission of images marked with a...

User Manual
Page 16
"Send" Images that have been selected for upload are marked with a blue icon. 100-1 Removing "Send," "Sending," and "Sent" Icons "Send," "sending," and "sent" icons can be removed from the Wireless LAN menu ( 14). 9 from all images by selecting Deselect all? "Send," "Sending," and "Sent" Icons The following icons are displayed when images selected for upload are marked with a white "send" icon ( ). 100-1 "Sending" During upload, the icon is displayed in green. 100-1 "Sent" Images that have been uploaded successfully are viewed during playback.
"Send" Images that have been selected for upload are marked with a blue icon. 100-1 Removing "Send," "Sending," and "Sent" Icons "Send," "sending," and "sent" icons can be removed from the Wireless LAN menu ( 14). 9 from all images by selecting Deselect all? "Send," "Sending," and "Sent" Icons The following icons are displayed when images selected for upload are marked with a white "send" icon ( ). 100-1 "Sending" During upload, the icon is displayed in green. 100-1 "Sent" Images that have been uploaded successfully are viewed during playback.

User Manual
Page 17
The Status LEDs The POWER LED lights when the WT-1 is receiving power from the camera. The status of the link between the WT-1 and the server is shown by the Status display in the Wireless LAN menu. The BUSY LED lights while data are being sent. Network Status The status of the link between...
The Status LEDs The POWER LED lights when the WT-1 is receiving power from the camera. The status of the link between the WT-1 and the server is shown by the Status display in the Wireless LAN menu. The BUSY LED lights while data are being sent. Network Status The status of the link between...

User Manual
Page 18
... left Connected DSC_0001.JPG 1 Frames 5 s Status The status of the link between the server and the camera. • Connected: connection established • Not connected: camera not currently connected • Failure: can also be sent. SET UP Wireless LAN Status Link quality Signal level Now sending Remaining Time left 1 Frames 5 s 11 Signal level Now... send remaining data. Now sending Remaining Time left DSC_0001.JPG 1 Frames 5s Time left Estimated time required to be viewed by selecting Status from the Wireless LAN menu.
... left Connected DSC_0001.JPG 1 Frames 5 s Status The status of the link between the server and the camera. • Connected: connection established • Not connected: camera not currently connected • Failure: can also be sent. SET UP Wireless LAN Status Link quality Signal level Now sending Remaining Time left 1 Frames 5 s 11 Signal level Now... send remaining data. Now sending Remaining Time left DSC_0001.JPG 1 Frames 5s Time left Estimated time required to be viewed by selecting Status from the Wireless LAN menu.
User Manual
Page 19
... > Transceiver. Network settings OFF OFF RAW+J Transceiver Turn the WT-1 transceiver on . Transceiver on or off. Status Current status of the camera setup menu. Camera can communicate On with server. SET UP Wireless LAN Transceiver Status Auto send Send file as On is off . Camera can not communicate (default) with a "send" icon begins as soon...
... > Transceiver. Network settings OFF OFF RAW+J Transceiver Turn the WT-1 transceiver on . Transceiver on or off. Status Current status of the camera setup menu. Camera can communicate On with server. SET UP Wireless LAN Transceiver Status Auto send Send file as On is off . Camera can not communicate (default) with a "send" icon begins as soon...

User Manual
Page 20
...;rst. Pictures will not be uploaded to the server if Off is inserted in camera before shooting. * Pictures will instead be uploaded. JPEG only Send JPEG files only. Be sure memory card is selected in ascending Wireless LAN 100NCD2H OK order by file number. Option Description NEF(Raw) +...pictures to the server as they are taken.* Transmission begins On as soon as picture has been recorded to camera memory card. Transmission begins when the folder is in playback mode. SET UP Wireless LAN Send file as: NEF(Raw) + JPEG OK JPEG only Send Folder All files in ...
...;rst. Pictures will not be uploaded to the server if Off is inserted in camera before shooting. * Pictures will instead be uploaded. JPEG only Send JPEG files only. Be sure memory card is selected in ascending Wireless LAN 100NCD2H OK order by file number. Option Description NEF(Raw) +...pictures to the server as they are taken.* Transmission begins On as soon as picture has been recorded to camera memory card. Transmission begins when the folder is in playback mode. SET UP Wireless LAN Send file as: NEF(Raw) + JPEG OK JPEG only Send Folder All files in ...
User Manual
Page 21
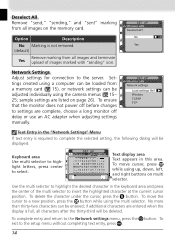
... All Remove "send," "sending," and "sent" marking from a memory card ( 15), or network settings can be adjusted individually using the camera menus ( 15- 25; SET UP Wireless LAN Deselect all images and terminate Yes upload of the multi selector to a new position, press the button while using the multi selector.... Wireless TCP/IP FTP Text Entry in the "Network Settings" Menu If text entry is not removed. (default) No OK Yes Remove marking from ...
... All Remove "send," "sending," and "sent" marking from a memory card ( 15), or network settings can be adjusted individually using the camera menus ( 15- 25; SET UP Wireless LAN Deselect all images and terminate Yes upload of the multi selector to a new position, press the button while using the multi selector.... Wireless TCP/IP FTP Text Entry in the "Network Settings" Menu If text entry is not removed. (default) No OK Yes Remove marking from ...
User Manual
Page 22
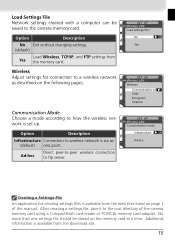
...Additional information is set up. No OK Yes SET UP Wireless LAN Wireless Communication mode SSID Encryption Channel SET UP Wireless LAN Communication mode Infrastructure OK Ad-hoc Creating a Settings File An application for connection to the camera memory card. After creating a settings file, ...sites listed on page 1 of the camera memory card using a CompactFlash card reader or PCMCIA memory card adapter. Option Description Infrastructure Connection to how the wireless network is available from Yes the memory card. SET UP Wireless LAN Load settings file? Load Settings ...
...Additional information is set up. No OK Yes SET UP Wireless LAN Wireless Communication mode SSID Encryption Channel SET UP Wireless LAN Communication mode Infrastructure OK Ad-hoc Creating a Settings File An application for connection to the camera memory card. After creating a settings file, ...sites listed on page 1 of the camera memory card using a CompactFlash card reader or PCMCIA memory card adapter. Option Description Infrastructure Connection to how the wireless network is available from Yes the memory card. SET UP Wireless LAN Load settings file? Load Settings ...

User Manual
Page 23
..., press the multi selector to the SS-ID display. Leave this field blank to allow network to change the current BSS- SET UP Wireless LAN SSID Encryption Enter encryption settings according to encryption menu. Press to return to how the net- Press the multi selector up or down to... option and press the multi selector to Done OK the right to select. ˘ On ˘ Base 16 • Done: Save changes and exit to wireless menu. ˘ 128 bit • On: Enable or disable encryption. ✔ appears when encryption is enabled. • Base 16: Enable or disable base-16...
..., press the multi selector to the SS-ID display. Leave this field blank to allow network to change the current BSS- SET UP Wireless LAN SSID Encryption Enter encryption settings according to encryption menu. Press to return to how the net- Press the multi selector up or down to... option and press the multi selector to Done OK the right to select. ˘ On ˘ Base 16 • Done: Save changes and exit to wireless menu. ˘ 128 bit • On: Enable or disable encryption. ✔ appears when encryption is enabled. • Base 16: Enable or disable base-16...
User Manual
Page 24
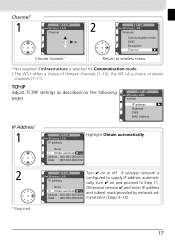
.... * Not required if Infrastructure is selected for Communication mode. † The WT-1 offers a choice of thirteen channels (1-13), the WT-1A a choice of eleven channels (1-11). Channel* 1 SET UP Wireless LAN Channel 01 OK Choose channel.† 2 SET UP Wireless LAN Wireless Communication mode SSID Encryption Channel Return to Step 11. TCP/IP Adjust TCP/IP...
.... * Not required if Infrastructure is selected for Communication mode. † The WT-1 offers a choice of thirteen channels (1-13), the WT-1A a choice of eleven channels (1-11). Channel* 1 SET UP Wireless LAN Channel 01 OK Choose channel.† 2 SET UP Wireless LAN Wireless Communication mode SSID Encryption Channel Return to Step 11. TCP/IP Adjust TCP/IP...

User Manual
Page 25
... Address 000.000.000.000 Mask 000.000.000.000 Highlight Address. Enter edit mode. 9 SET UP Wireless LAN IP address Set OK Mask 255.255.255.000 Choose subnet mask. 10 SET UP Wireless LAN IP address Done OK Obtain automatically Address 192.168.001.002 Mask 255.255.255.000... Exit to IP address menu. 11Highlight Done and press multi selector to right to return to Step 11. 7 SET UP Wireless LAN 8 SET UP Wireless LAN IP address IP address Done Set OK Obtain automatically Address 192.168.001.002 Mask 000.000.000.000 Mask 000.000.000...
... Address 000.000.000.000 Mask 000.000.000.000 Highlight Address. Enter edit mode. 9 SET UP Wireless LAN IP address Set OK Mask 255.255.255.000 Choose subnet mask. 10 SET UP Wireless LAN IP address Done OK Obtain automatically Address 192.168.001.002 Mask 255.255.255.000... Exit to IP address menu. 11Highlight Done and press multi selector to right to return to Step 11. 7 SET UP Wireless LAN 8 SET UP Wireless LAN IP address IP address Done Set OK Obtain automatically Address 192.168.001.002 Mask 000.000.000.000 Mask 000.000.000...

User Manual
Page 26
... Otherwise remove ✔ and Use gateway Set proceed to TCP/IP menu. 19 Done Use gateway Set Address 000.000.000.000 2 SET UP Wireless LAN Turn ✔ on and enter Gateway address provided by network administra- Return to gateway menu. 7 Highlight Done and press multi selector to right... to return to Step 7. Enter edit mode. 5 SET UP Wireless LAN 6 SET UP Wireless LAN Gateway Gateway Set OK Done OK Address 100.000.000.000 Use gateway Address 192.168.001.254 Press multi selector left or...
... Otherwise remove ✔ and Use gateway Set proceed to TCP/IP menu. 19 Done Use gateway Set Address 000.000.000.000 2 SET UP Wireless LAN Turn ✔ on and enter Gateway address provided by network administra- Return to gateway menu. 7 Highlight Done and press multi selector to right... to return to Step 7. Enter edit mode. 5 SET UP Wireless LAN 6 SET UP Wireless LAN Gateway Gateway Set OK Done OK Address 100.000.000.000 Use gateway Address 192.168.001.254 Press multi selector left or...