Instruction Manual
Page 4
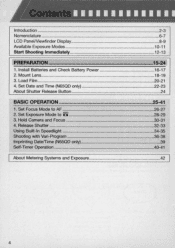
Load Film 20-21 4. Hold Camera and Focus 30-31 4. Introduction ...2-3 Nomenclature 6-7 LCD PanelNiewfinder Display 8-9 Available Exposure Modes 10- 11 Start Shooting Immediately 12-13 PREPARATION 15-24 1. Set Exposure Mode ...-35 Shooting with Vari-Program 36-38 Imprinting DatefTime (N65QD only 39 Self-Timer Operation 40-41 About Metering Systems and Exposure 42 4 Install Batteries and Check Battery Power 16-17 2. Set Date and Time (N65QD only 22-23 About Shutter Release Button 24 BASIC OPERATION 25-41 1. Mount Lens 18-19...
Load Film 20-21 4. Hold Camera and Focus 30-31 4. Introduction ...2-3 Nomenclature 6-7 LCD PanelNiewfinder Display 8-9 Available Exposure Modes 10- 11 Start Shooting Immediately 12-13 PREPARATION 15-24 1. Set Exposure Mode ...-35 Shooting with Vari-Program 36-38 Imprinting DatefTime (N65QD only 39 Self-Timer Operation 40-41 About Metering Systems and Exposure 42 4 Install Batteries and Check Battery Power 16-17 2. Set Date and Time (N65QD only 22-23 About Shutter Release Button 24 BASIC OPERATION 25-41 1. Mount Lens 18-19...

Instruction Manual
Page 5
...-In SpeedlighL 85 Available Flash Sync Mode Combinations 86 MISCELLANEOUS 87-113 Lens Compatibility 88-90 Usable Optional Speedlights 91-93 Optional Accessories 94-95 Camera Care 96-97 Notes on Batteries 98 Troubleshooting 99-101 Glossary...102- 105 Specifications 106-11 0 Index ...112- 113 5
...-In SpeedlighL 85 Available Flash Sync Mode Combinations 86 MISCELLANEOUS 87-113 Lens Compatibility 88-90 Usable Optional Speedlights 91-93 Optional Accessories 94-95 Camera Care 96-97 Notes on Batteries 98 Troubleshooting 99-101 Glossary...102- 105 Specifications 106-11 0 Index ...112- 113 5

Instruction Manual
Page 12
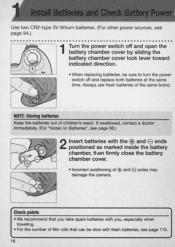
.. ", ,, ' - 1 Open the battery chamber and install batteries while the camera's power is off (page 16). 2 Attach the lens and turn the power switch on (page 18). • With CPU Nikkor lens other than G-type, set the lens aperture to its minimum and lock. 3 Open the camera back and install the film (page 20). .4 Set the focus mode selector to AF (autofocus) (page 26). 12
.. ", ,, ' - 1 Open the battery chamber and install batteries while the camera's power is off (page 16). 2 Attach the lens and turn the power switch on (page 18). • With CPU Nikkor lens other than G-type, set the lens aperture to its minimum and lock. 3 Open the camera back and install the film (page 20). .4 Set the focus mode selector to AF (autofocus) (page 26). 12
Instruction Manual
Page 16
... switch off and replace both batteries at the same time. Always use fresh batteries of children's reach. Check points • We recommend that you take spare batteries with you, especially when traveling. • For the number of EEl and poles may damage the camera. e • Incorrect positioning... of film rolls that can be sure to turn the power switch off and open the battery chamber cover by sliding the battery chamber cover lock lever toward indicated direction. • When replacing batteries, be shot with the...
... switch off and replace both batteries at the same time. Always use fresh batteries of children's reach. Check points • We recommend that you take spare batteries with you, especially when traveling. • For the number of EEl and poles may damage the camera. e • Incorrect positioning... of film rolls that can be sure to turn the power switch off and open the battery chamber cover by sliding the battery chamber cover lock lever toward indicated direction. • When replacing batteries, be shot with the...

Instruction Manual
Page 17
...meter and indications in the LCD panel. -- [ EJ 17 -- - - -- - ---~- 3 Turn the power switch on and confirm battery power with batteries installed, the frame counter display remains on and the camera remains unused. (All indications in the viewfinder turn off 5 sec. after taking the picture.) :;:~;::: blinks...: Batteries are nearing exhaustion. LCD panel when the power switch is off When the power switch is ...
...meter and indications in the LCD panel. -- [ EJ 17 -- - - -- - ---~- 3 Turn the power switch on and confirm battery power with batteries installed, the frame counter display remains on and the camera remains unused. (All indications in the viewfinder turn off 5 sec. after taking the picture.) :;:~;::: blinks...: Batteries are nearing exhaustion. LCD panel when the power switch is off When the power switch is ...

Instruction Manual
Page 22
...for more than 1 sec. • Push SELECT button until the date/time display stops blinking. This camera allows you push the ADJUST button, year section moves up from the batteries required for imprinting Imprinting of the date or time displays. When the imprint indicator appears in Day/ Hour/.../Minute (24hour clock), Month/Day/Year or Day/Month/Year on the LCD becomes faint or disappears, this indicates low battery power. NOTE: Battery requirements for the camera body. When the imprinting on the photo appears faded and/or the display of the data imprint on your picture in any ...
...for more than 1 sec. • Push SELECT button until the date/time display stops blinking. This camera allows you push the ADJUST button, year section moves up from the batteries required for imprinting Imprinting of the date or time displays. When the imprint indicator appears in Day/ Hour/.../Minute (24hour clock), Month/Day/Year or Day/Month/Year on the LCD becomes faint or disappears, this indicates low battery power. NOTE: Battery requirements for the camera body. When the imprinting on the photo appears faded and/or the display of the data imprint on your picture in any ...
Instruction Manual
Page 23
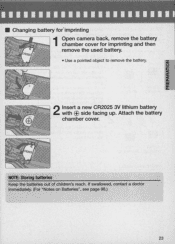
• Changing battery for"imprinting 1 Open camera back, remove the battery chamber cover for imprinting and then remove the used battery. • Use a pointed object to remove the battery. Z o ~ a: ~ aw : Il. 2 Insert a new CR2025 3V lithium battery with EB side facing up. If swallowed, contact a doctor immediately. (For " Notes on Batteries", see page 98.) 23 NOTE: Storing batteries Keep the batteries out of children 's reach . Attach the battery chamber cover.
• Changing battery for"imprinting 1 Open camera back, remove the battery chamber cover for imprinting and then remove the used battery. • Use a pointed object to remove the battery. Z o ~ a: ~ aw : Il. 2 Insert a new CR2025 3V lithium battery with EB side facing up. If swallowed, contact a doctor immediately. (For " Notes on Batteries", see page 98.) 23 NOTE: Storing batteries Keep the batteries out of children 's reach . Attach the battery chamber cover.

Instruction Manual
Page 60
... button once opens the shutter and the self-timer lamp flickers slightly once every 2 sec. but all the indications turn off in the LCD panel. Camera shake can be performed during Long Time (Time) exposure. - - Remote Control (page 69) and tripod. Note that continuous exposure time is useful for approx. 4 hours... with a fresh set Long Time (Time) exposure. during Long Time (Time) exposure. 60 Lightly press the shutter release button again to set of batteries. This function is reduced when shooting in low temperatures.
... button once opens the shutter and the self-timer lamp flickers slightly once every 2 sec. but all the indications turn off in the LCD panel. Camera shake can be performed during Long Time (Time) exposure. - - Remote Control (page 69) and tripod. Note that continuous exposure time is useful for approx. 4 hours... with a fresh set Long Time (Time) exposure. during Long Time (Time) exposure. 60 Lightly press the shutter release button again to set of batteries. This function is reduced when shooting in low temperatures.

Instruction Manual
Page 66
... film at mid-roll , and 0 _ _ and frame number will blink in the frame counter. (E appears without blinking when the exposure meter is off , change batteries, then turn the power switch on and press the two film rewind buttons e~ simultaneously for approx. 1 sec. • 0 __ , 0 _ and then 0 ...press the two film rewind buttons e~ simultaneously for approx. 1 sec. In this case, turn the power switch off .) Make sure E is blinking , open the camera back and remove the film cartridge. \ I r- 0 __ ~ I \EH":~H3~6~ If film does not start rewinding or film rewind may not start to rewind...
... film at mid-roll , and 0 _ _ and frame number will blink in the frame counter. (E appears without blinking when the exposure meter is off , change batteries, then turn the power switch on and press the two film rewind buttons e~ simultaneously for approx. 1 sec. • 0 __ , 0 _ and then 0 ...press the two film rewind buttons e~ simultaneously for approx. 1 sec. In this case, turn the power switch off .) Make sure E is blinking , open the camera back and remove the film cartridge. \ I r- 0 __ ~ I \EH":~H3~6~ If film does not start rewinding or film rewind may not start to rewind...

Instruction Manual
Page 69
... ready to ,!elease the shutter either Ii immediately after (~) the shutter release button on the battery inside the remote control unit that is released, the camera remains ready to reduce camera shake. - If no signal is sent for the first time, make sure to be in the LCD ... sec., the remote control mode is set when purchased. 69 Use the optional remote control to release the camera's shutter from the LCD panel. • The remote control cannot be operated unless the camera's shutter can be released (Le. Ii'S W"S.6 E::3 [ IJ 1 Press the ~ remote control button a number...
... ready to ,!elease the shutter either Ii immediately after (~) the shutter release button on the battery inside the remote control unit that is released, the camera remains ready to reduce camera shake. - If no signal is sent for the first time, make sure to be in the LCD ... sec., the remote control mode is set when purchased. 69 Use the optional remote control to release the camera's shutter from the LCD panel. • The remote control cannot be operated unless the camera's shutter can be released (Le. Ii'S W"S.6 E::3 [ IJ 1 Press the ~ remote control button a number...

Instruction Manual
Page 71
...before pressing the shutter release button to Long Time (Time) exposure (page 60), pressing the remote control's shutter release button opens the camera's shutter and pressing i the shutter release button again closes the shutter. This function is useful for remote control operation is recommended .) ... exposure with the remote control, change the battery inside the remote control unit (page 72). (The life of the battery inside the remote control unit is approx. 5 years.) • Use one 3V CR2025 lithium battery in front of the camera. Change the camera position in this case. • If ...
...before pressing the shutter release button to Long Time (Time) exposure (page 60), pressing the remote control's shutter release button opens the camera's shutter and pressing i the shutter release button again closes the shutter. This function is useful for remote control operation is recommended .) ... exposure with the remote control, change the battery inside the remote control unit (page 72). (The life of the battery inside the remote control unit is approx. 5 years.) • Use one 3V CR2025 lithium battery in front of the camera. Change the camera position in this case. • If ...

Instruction Manual
Page 87
"l . . ,:0 '", • ., .t,·:.·, "c'" Index ~;, .~ - MISCELLANEOUS This section explains miscellaneous information. • Lens compatibility • Usable optional Speedlights • Optional accessories • Camera care • Notes on batteries • Troubleshooting • Glossary • Specifications -
"l . . ,:0 '", • ., .t,·:.·, "c'" Index ~;, .~ - MISCELLANEOUS This section explains miscellaneous information. • Lens compatibility • Usable optional Speedlights • Optional accessories • Camera care • Notes on batteries • Troubleshooting • Glossary • Specifications -
Instruction Manual
Page 94
...With the N65/N65QD, the filter factor need eyepiece correction over - 1.5 to +0.8m-1 that when special filters available from manufacturers other than Nikon are used...power the N65/ N65QD. A variety of optional accessories, including power source and Speed light ·is.a.v.a.ila.b.l.e.fo.r.t.h.e.N.6.5./N..65.Q..D Battery Pack MB-17 • With Battery Pack MB-...Control Unit ML-L3 • Remote control releases the camera's shutter from one person to reduce camera shake. is maintained at low temperatures. (Film advance speed in the camera body] with setting on camera body).
...With the N65/N65QD, the filter factor need eyepiece correction over - 1.5 to +0.8m-1 that when special filters available from manufacturers other than Nikon are used...power the N65/ N65QD. A variety of optional accessories, including power source and Speed light ·is.a.v.a.ila.b.l.e.fo.r.t.h.e.N.6.5./N..65.Q..D Battery Pack MB-17 • With Battery Pack MB-...Control Unit ML-L3 • Remote control releases the camera's shutter from one person to reduce camera shake. is maintained at low temperatures. (Film advance speed in the camera body] with setting on camera body).

Instruction Manual
Page 95
...S8-27 • Speed light SB-28/SB-27 normally uses four AA-type alkaline-manganese batteries with the built-in Speedlight or optional Speedlight attached to which enables natural-looking overall exposures and ...light and the fill-flash is compatible with the SB-28/ SB-27. The camera body fits inside the case with the N65/ N65QO. • Use NC filter when using the filter to the lens' ... attached. Soft case (CF-61 ) • Camera case CF-61 is fired simultaneously with a guide number of 36/ 118 (SB-28) and 30/ 98 (SB-27) (manual flash , 35mm zoom -head position, ISO 100, m/ft. ,...
...S8-27 • Speed light SB-28/SB-27 normally uses four AA-type alkaline-manganese batteries with the built-in Speedlight or optional Speedlight attached to which enables natural-looking overall exposures and ...light and the fill-flash is compatible with the SB-28/ SB-27. The camera body fits inside the case with the N65/ N65QO. • Use NC filter when using the filter to the lens' ... attached. Soft case (CF-61 ) • Camera case CF-61 is fired simultaneously with a guide number of 36/ 118 (SB-28) and 30/ 98 (SB-27) (manual flash , 35mm zoom -head position, ISO 100, m/ft. ,...

Instruction Manual
Page 97
... absorb moisture effectively after a while. • Leaving the camera unused for any malfunction resulting from battery leakage. • In a humid environment, store the camera inside a plastic bag with a desiccant to keep out dust, moisture and salt. Nikon cannot be held responsible for a long period of the camera other than as specified in this manual. 97...
... absorb moisture effectively after a while. • Leaving the camera unused for any malfunction resulting from battery leakage. • In a humid environment, store the camera inside a plastic bag with a desiccant to keep out dust, moisture and salt. Nikon cannot be held responsible for a long period of the camera other than as specified in this manual. 97...

Instruction Manual
Page 98
... CR2-type 3V lithium batteries Use two CR2-type 3V lithium batteries. • Change the batteries well before the end of their life and prepare spare batteries before important photographic occasions. • Turn the camera power off when changing batteries e Turn the camera power off before installing. • Use fresh batteries at low temperatures Battery power diminishes at low...
... CR2-type 3V lithium batteries Use two CR2-type 3V lithium batteries. • Change the batteries well before the end of their life and prepare spare batteries before important photographic occasions. • Turn the camera power off when changing batteries e Turn the camera power off before installing. • Use fresh batteries at low temperatures Battery power diminishes at low...

Instruction Manual
Page 99
If this warning appears frequently, contact authorized Nikon dealer or service center. and E blink • Film is not (except IX-Nikkor). to S, A or M. blinks • Non-CPU lens is •...; Remove the film 33 exposure meter exposure meter camera after film cartridge. exposure mode to M and set to aperture. C]!!J blinks • Batteries are nearing • Have fresh ones ready. 17 exhaustion . replace batteries with newones. 0 __ and frame counter blink • Batteries are • Replace batteries with lens' aperture ring. • Reload film...
If this warning appears frequently, contact authorized Nikon dealer or service center. and E blink • Film is not (except IX-Nikkor). to S, A or M. blinks • Non-CPU lens is •...; Remove the film 33 exposure meter exposure meter camera after film cartridge. exposure mode to M and set to aperture. C]!!J blinks • Batteries are nearing • Have fresh ones ready. 17 exhaustion . replace batteries with newones. 0 __ and frame counter blink • Batteries are • Replace batteries with lens' aperture ring. • Reload film...

Instruction Manual
Page 101
...same reason, the film may turn the camera off , then turn the power off , even with fresh , properly installed batteries. or faster shutter speed, or select M...for 3 sec. blinks E,.,. If the warning indication remains, or this warning appears frequently, contact authorized Nikon dealer or service center. by selecting 30 sec. E,.,. blinks • Malfunction detected. • ... operation, simply turn it on again. Or, remove and reinstall the batteries. In each of these cases, to static electricity, the N65/N65QO's microcomputer may not advance properly. LCD panel - - blinks ...
...same reason, the film may turn the camera off , then turn the power off , even with fresh , properly installed batteries. or faster shutter speed, or select M...for 3 sec. blinks E,.,. If the warning indication remains, or this warning appears frequently, contact authorized Nikon dealer or service center. by selecting 30 sec. E,.,. blinks • Malfunction detected. • ... operation, simply turn it on again. Or, remove and reinstall the batteries. In each of these cases, to static electricity, the N65/N65QO's microcomputer may not advance properly. LCD panel - - blinks ...

Instruction Manual
Page 108
..., ~ , ~Q" ~ Automatically activated • In P, S, A, M: Activated by pressing flash lock-release button Guide number: 12/40 (at ISO 100, m/ft.); battery life: approx. 5 years (may differ with Slow Sync, Flash Cancel Ready-light • Flash fully charged: ready-ligh lights • Full output warning : ready-light...release button; delay mode; dimensions: approx. 60 x 28 x 7mm or 2.4 x 1.1 x 0.3 in front of the camera; battery: one 3V CR2025 lithium battery; flash coverage: 28mm or longer lens; weight: approx. 10g or 0.35 oz. immediate release mode and 2-sec. operating distance...
..., ~ , ~Q" ~ Automatically activated • In P, S, A, M: Activated by pressing flash lock-release button Guide number: 12/40 (at ISO 100, m/ft.); battery life: approx. 5 years (may differ with Slow Sync, Flash Cancel Ready-light • Flash fully charged: ready-ligh lights • Full output warning : ready-light...release button; delay mode; dimensions: approx. 60 x 28 x 7mm or 2.4 x 1.1 x 0.3 in front of the camera; battery: one 3V CR2025 lithium battery; flash coverage: 28mm or longer lens; weight: approx. 10g or 0.35 oz. immediate release mode and 2-sec. operating distance...
Instruction Manual
Page 109
... Month/ Day/Year and Day/ Month/Year Power source: one 3V CR2025 lithium battery, battery life; with fresh batteries: approx. 16 sec. leap year adjustment until December 31 , 2049 Usable film : ISO 32 to first frame when camera back is also available (for four AA-type alkaline-manganese, lithium, NiCd or... NiMH batteries) Power switch Exposure meter Power ON and OFF pOSition Auto meter shut-off 5 sec. Depth-of-...
... Month/ Day/Year and Day/ Month/Year Power source: one 3V CR2025 lithium battery, battery life; with fresh batteries: approx. 16 sec. leap year adjustment until December 31 , 2049 Usable film : ISO 32 to first frame when camera back is also available (for four AA-type alkaline-manganese, lithium, NiCd or... NiMH batteries) Power switch Exposure meter Power ON and OFF pOSition Auto meter shut-off 5 sec. Depth-of-...
