
Instruction Manual
Page 2
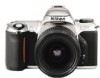
Main features of your N65/ N65QD camera, and be a pro to take better pictures-just press the shutter release button. • 3D Matrix Metering can handle it 2 - . Get to know your life. i ~- • Thank you for purchasing the Nikon N65/ N65QD-a camera that you don 't have to be... sure to make photography a bigger part of the N65/N65QD: • Exposure mode dial makes operation simple and intuitive, so great pictures are a snap ...
Main features of your N65/ N65QD camera, and be a pro to take better pictures-just press the shutter release button. • 3D Matrix Metering can handle it 2 - . Get to know your life. i ~- • Thank you for purchasing the Nikon N65/ N65QD-a camera that you don 't have to be... sure to make photography a bigger part of the N65/N65QD: • Exposure mode dial makes operation simple and intuitive, so great pictures are a snap ...

Instruction Manual
Page 3
... weddings or graduations. • Have Nikon spot-check your camera regularly Nikon recommends that you have your camera correctly The Nikon N65/N65QD's performance has been optimized for specifications, and nonconforming accessories could damage the N65/N65QD's components. Nikon cannot guarantee the N65/N65QD's performance when it is used with Nikon brand accessories. Supplied accessories Body cap (P. 19) Accessory shoe cover...
... weddings or graduations. • Have Nikon spot-check your camera regularly Nikon recommends that you have your camera correctly The Nikon N65/N65QD's performance has been optimized for specifications, and nonconforming accessories could damage the N65/N65QD's components. Nikon cannot guarantee the N65/N65QD's performance when it is used with Nikon brand accessories. Supplied accessories Body cap (P. 19) Accessory shoe cover...
Instruction Manual
Page 4
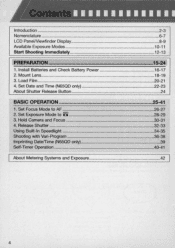
... 18-19 3. Introduction ...2-3 Nomenclature 6-7 LCD PanelNiewfinder Display 8-9 Available Exposure Modes 10- 11 Start Shooting Immediately 12-13 PREPARATION 15-24 1. Load Film 20-21 4. Hold Camera and Focus 30-31 4. Set Exposure Mode to AF 26-27 2.
... 18-19 3. Introduction ...2-3 Nomenclature 6-7 LCD PanelNiewfinder Display 8-9 Available Exposure Modes 10- 11 Start Shooting Immediately 12-13 PREPARATION 15-24 1. Load Film 20-21 4. Hold Camera and Focus 30-31 4. Set Exposure Mode to AF 26-27 2.

Instruction Manual
Page 5
...-In SpeedlighL 85 Available Flash Sync Mode Combinations 86 MISCELLANEOUS 87-113 Lens Compatibility 88-90 Usable Optional Speedlights 91-93 Optional Accessories 94-95 Camera Care 96-97 Notes on Batteries 98 Troubleshooting 99-101 Glossary...102- 105 Specifications 106-11 0 Index ...112- 113 5
...-In SpeedlighL 85 Available Flash Sync Mode Combinations 86 MISCELLANEOUS 87-113 Lens Compatibility 88-90 Usable Optional Speedlights 91-93 Optional Accessories 94-95 Camera Care 96-97 Notes on Batteries 98 Troubleshooting 99-101 Glossary...102- 105 Specifications 106-11 0 Index ...112- 113 5

Instruction Manual
Page 6
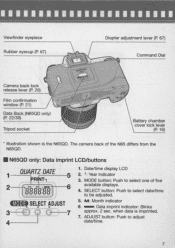
...rewind button (P. 66) Accessory shoe (P. 77) Depth -of-field preview button (P. 68) Remote control sensor (P. 69) Shutter release button (P. 17/24) Camera strap eyelet Aperture (P. 59)/ Exposure Compensation button (P. 61)/ Film rewind button (P. 66) LCD panel (P. 8) Self-timer (P. 40)/ AF-Assist Illuminator (P. ...(P.19) Flash lock-release (P. 80)/ Flash sync mode button (P. 78) Focus area (P. 46)/ AF-Assist Illuminator cancel button (P. 49) Camera strap eyelet Exposure mode dial (P. 10) Self-timer/Remote control button (P. 40/69) Auto Exposure Bracketing (P. 62)! Multiple Exposure (P. 64)!
...rewind button (P. 66) Accessory shoe (P. 77) Depth -of-field preview button (P. 68) Remote control sensor (P. 69) Shutter release button (P. 17/24) Camera strap eyelet Aperture (P. 59)/ Exposure Compensation button (P. 61)/ Film rewind button (P. 66) LCD panel (P. 8) Self-timer (P. 40)/ AF-Assist Illuminator (P. ...(P.19) Flash lock-release (P. 80)/ Flash sync mode button (P. 78) Focus area (P. 46)/ AF-Assist Illuminator cancel button (P. 49) Camera strap eyelet Exposure mode dial (P. 10) Self-timer/Remote control button (P. 40/69) Auto Exposure Bracketing (P. 62)! Multiple Exposure (P. 64)!
Instruction Manual
Page 7
MODE button: Push to select one of the N65 differs from the N65QD . • N65QD only: Data imprint LCD/buttons 1 RI T.., 2 ~OO-'Ot-O;;.-'o:nCli~ li I fimD• SEL•ECT A•...: Month indicator 6. - : Data imprint indicator: Blinks approx. 2 sec. Date/time display LCD 2. ' : Year indicator 3. ~ Viewfinder eyepiece Rubber eyecup (P. 67) Diopter adjustment lever (P. 67) Command Dial Camera back lock release lever (P. 20) Film confirmation window (P. 21) Data Back (N65QD only) (P. 22/39) Tripod socket • Illustration shown is imprinted. 7. SELECT button : Push...
MODE button: Push to select one of the N65 differs from the N65QD . • N65QD only: Data imprint LCD/buttons 1 RI T.., 2 ~OO-'Ot-O;;.-'o:nCli~ li I fimD• SEL•ECT A•...: Month indicator 6. - : Data imprint indicator: Blinks approx. 2 sec. Date/time display LCD 2. ' : Year indicator 3. ~ Viewfinder eyepiece Rubber eyecup (P. 67) Diopter adjustment lever (P. 67) Command Dial Camera back lock release lever (P. 20) Film confirmation window (P. 21) Data Back (N65QD only) (P. 22/39) Tripod socket • Illustration shown is imprinted. 7. SELECT button : Push...

Instruction Manual
Page 10
... mode in -focus area. Freeze the motion of the in which the camera automatically controls various exposure settings. • User-controlled exposure mode P: Auto-Multi Program (P. 52) Camera controls shutter speed and aperture automatically. " ... ~- - - ------- - ~~-----~ The exposure mode dial of the Nikon N65/N65QD can determine various exposure factors. The other section is the user...
... mode in -focus area. Freeze the motion of the in which the camera automatically controls various exposure settings. • User-controlled exposure mode P: Auto-Multi Program (P. 52) Camera controls shutter speed and aperture automatically. " ... ~- - - ------- - ~~-----~ The exposure mode dial of the Nikon N65/N65QD can determine various exposure factors. The other section is the user...

Instruction Manual
Page 11
... (P. 38) Use this mode to freeze the motion of subjects such as flowers or insects. - .. ~ ._'.- . -'. • Point-and-shoot exposure mode 8: AUTO mode (P. 28, 51) Camera automatically controls all the exposure settings. J.~: .;...." ..,. . .. Iiii: Landscape mode (P. 37) Use this mode to take up-close pictures of fast- ".. The background is also possible...
... (P. 38) Use this mode to freeze the motion of subjects such as flowers or insects. - .. ~ ._'.- . -'. • Point-and-shoot exposure mode 8: AUTO mode (P. 28, 51) Camera automatically controls all the exposure settings. J.~: .;...." ..,. . .. Iiii: Landscape mode (P. 37) Use this mode to take up-close pictures of fast- ".. The background is also possible...

Instruction Manual
Page 12
", ,, ' - 1 Open the battery chamber and install batteries while the camera's power is off (page 16). 2 Attach the lens and turn the power switch on (page 18). • With CPU Nikkor lens other than G-type, set the lens aperture to its minimum and lock. 3 Open the camera back and install the film (page 20). .4 Set the focus mode selector to AF (autofocus) (page 26). 12 ..
", ,, ' - 1 Open the battery chamber and install batteries while the camera's power is off (page 16). 2 Attach the lens and turn the power switch on (page 18). • With CPU Nikkor lens other than G-type, set the lens aperture to its minimum and lock. 3 Open the camera back and install the film (page 20). .4 Set the focus mode selector to AF (autofocus) (page 26). 12 ..

Instruction Manual
Page 13
appears without blinking and slowly depress the shutter release button (page 32). 8 Film starts to 8 (AUTO mode) (page 28). 6 Hold the camera properly, compose frame and focus by lightly pressing the shutter release button (page 30). 7 Confirm focus indicator. 5 Set the exposure mode dial to rewind automatically when it reaches the end of the roll (page 33). ~ 0 __J @ B --- @ ~ AUTO EH3 (36] 13
appears without blinking and slowly depress the shutter release button (page 32). 8 Film starts to 8 (AUTO mode) (page 28). 6 Hold the camera properly, compose frame and focus by lightly pressing the shutter release button (page 30). 7 Confirm focus indicator. 5 Set the exposure mode dial to rewind automatically when it reaches the end of the roll (page 33). ~ 0 __J @ B --- @ ~ AUTO EH3 (36] 13
Instruction Manual
Page 16
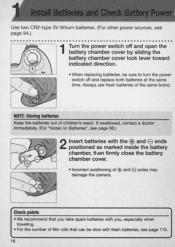
... points • We recommend that you take spare batteries with you, especially when traveling. • For the number of EEl and poles may damage the camera. -- -- Use two CR2-type 3V lithium batteries. (For other power sources, see .p.ag.e..9.4 1 Turn the power switch off and open the battery chamber cover by...
... points • We recommend that you take spare batteries with you, especially when traveling. • For the number of EEl and poles may damage the camera. -- -- Use two CR2-type 3V lithium batteries. (For other power sources, see .p.ag.e..9.4 1 Turn the power switch off and open the battery chamber cover by...

Instruction Manual
Page 17
... the LCD panel. -- [ EJ 17 -- - - -- - ---~- 3 Turn the power switch on and confirm battery power with batteries installed, the frame counter display remains on and the camera remains unused. (All indications in the viewfinder turn off .) • 4 Lightly press the shutter release button to activate the exposure meter. Replace i 0 ~ batteries. (Shutter locks...
... the LCD panel. -- [ EJ 17 -- - - -- - ---~- 3 Turn the power switch on and confirm battery power with batteries installed, the frame counter display remains on and the camera remains unused. (All indications in the viewfinder turn off .) • 4 Lightly press the shutter release button to activate the exposure meter. Replace i 0 ~ batteries. (Shutter locks...

Instruction Manual
Page 18
...; aperture should be released . 18 Unlike other than G-type) Position lens in the LCD panel and viewfinder and the shutter cannot be selected from camera body. CDCPU Nikkor lenses other than G-type Check the lens type. CPU contacts of CPU Nikkor lens CD CPU Nikkor lens @ G-type Nikkor lens 1other...be set to its minimum and lock• • When the lens is turned on, FEE blinks in the camera's bayonet mount so that the mounting indexes on lens and camera body are aligned, then twist lens counterclockwise until it locks into place. (Be sure not to touch the lens release ...
...; aperture should be released . 18 Unlike other than G-type) Position lens in the LCD panel and viewfinder and the shutter cannot be selected from camera body. CDCPU Nikkor lenses other than G-type Check the lens type. CPU contacts of CPU Nikkor lens CD CPU Nikkor lens @ G-type Nikkor lens 1other...be set to its minimum and lock• • When the lens is turned on, FEE blinks in the camera's bayonet mount so that the mounting indexes on lens and camera body are aligned, then twist lens counterclockwise until it locks into place. (Be sure not to touch the lens release ...

Instruction Manual
Page 19
... Lens Compatibility.) • Make sure to turn the lens clockwise to utilize all of this camera's functions. (See page 88 for a non-CPU lens. When camera is left unattended without lens When you leave the camera unattended without a lens attached , be used.) NOTE: Non-CPU Nikkor lens When a non...detach the lens. blinks in the LCD panel and viewfinder, and the shutter cannot be released (except in the camera's bayonet mount so that the mounting indexes on lens and camera body are aligned, then twist lens counterclockwise until it locks into place. (Be sure not to attach the supplied...
... Lens Compatibility.) • Make sure to turn the lens clockwise to utilize all of this camera's functions. (See page 88 for a non-CPU lens. When camera is left unattended without lens When you leave the camera unattended without a lens attached , be used.) NOTE: Non-CPU Nikkor lens When a non...detach the lens. blinks in the LCD panel and viewfinder, and the shutter cannot be released (except in the camera's bayonet mount so that the mounting indexes on lens and camera body are aligned, then twist lens counterclockwise until it locks into place. (Be sure not to attach the supplied...

Instruction Manual
Page 20
... lock release lever and load film. • Film cartridge can be set automatically (ISO 25-5000). Closing the camera back after loading film automatically advances the film to red index mark. • Do not insert the film leader beyond the red index mark . • ...
... lock release lever and load film. • Film cartridge can be set automatically (ISO 25-5000). Closing the camera back after loading film automatically advances the film to red index mark. • Do not insert the film leader beyond the red index mark . • ...

Instruction Manual
Page 21
...between ISO 25 to ISO 5000. ~ISO Film speed is set to the first frame. • When E,.,. - - - - - -~ - - ~ 3 Gently close the camera back until the camera back snaps closed. in the LCD panel and E,.,. w a: A. Film automatically advances to the first frame. :~S FS.6 B ---rn AUTO E::3 ( • When : appears ...detection of available exposures on the LCD panel, the film has advanced to ISO 100 with this camera since an infrared sensor is used with non-DX- Open Q the camera back again and reload film. • Frame number display remains when the power if switch is...
...between ISO 25 to ISO 5000. ~ISO Film speed is set to the first frame. • When E,.,. - - - - - -~ - - ~ 3 Gently close the camera back until the camera back snaps closed. in the LCD panel and E,.,. w a: A. Film automatically advances to the first frame. :~S FS.6 B ---rn AUTO E::3 ( • When : appears ...detection of available exposures on the LCD panel, the film has advanced to ISO 100 with this camera since an infrared sensor is used with non-DX- Open Q the camera back again and reload film. • Frame number display remains when the power if switch is...

Instruction Manual
Page 22
... of the date or time displays. When the imprint indicator appears in Day/ Hour/ Minute display. Battery life is complete. ! ' ~ J .i.- ~--- This camera allows you push the ADJUST button, year section moves up from 98 to 49 (back to select one CR2025 3V lithium battery separate from the... .(F.o.r.im..pr.in.t.in Day/ Hour/ Minute display. 2 Push ADJUST button to change the numerical indication rapidly, hold the ADJUST button down for the camera body. Push SELECT button so section to set date, select Year/ Month/ Day, Month/ Day/Year or Day/Month/Year. • Set the time ...
... of the date or time displays. When the imprint indicator appears in Day/ Hour/ Minute display. Battery life is complete. ! ' ~ J .i.- ~--- This camera allows you push the ADJUST button, year section moves up from 98 to 49 (back to select one CR2025 3V lithium battery separate from the... .(F.o.r.im..pr.in.t.in Day/ Hour/ Minute display. 2 Push ADJUST button to change the numerical indication rapidly, hold the ADJUST button down for the camera body. Push SELECT button so section to set date, select Year/ Month/ Day, Month/ Day/Year or Day/Month/Year. • Set the time ...
Instruction Manual
Page 23
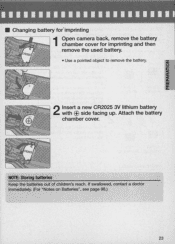
If swallowed, contact a doctor immediately. (For " Notes on Batteries", see page 98.) 23 NOTE: Storing batteries Keep the batteries out of children 's reach . Z o ~ a: ~ aw : Il. 2 Insert a new CR2025 3V lithium battery with EB side facing up. Attach the battery chamber cover. • Changing battery for"imprinting 1 Open camera back, remove the battery chamber cover for imprinting and then remove the used battery. • Use a pointed object to remove the battery.
If swallowed, contact a doctor immediately. (For " Notes on Batteries", see page 98.) 23 NOTE: Storing batteries Keep the batteries out of children 's reach . Z o ~ a: ~ aw : Il. 2 Insert a new CR2025 3V lithium battery with EB side facing up. Attach the battery chamber cover. • Changing battery for"imprinting 1 Open camera back, remove the battery chamber cover for imprinting and then remove the used battery. • Use a pointed object to remove the battery.

Instruction Manual
Page 24
...picture blur. from removal of finger) . (See page 17 for approx. 5 sec. Lightly pressing the shutter release button and holding it halfway down activates the camera's exposure meter and pressing it all the way down .re.le.a.s.e.s.th.e..sh..ut.te.r Lightly press the shutter release button. NOTE...: Camera shake Pressing the shutter release button abruptly can result in the LCD panel and viewfinder (for the exposure meter.) Lightly Fully pressing depressing Fully ...
...picture blur. from removal of finger) . (See page 17 for approx. 5 sec. Lightly pressing the shutter release button and holding it halfway down activates the camera's exposure meter and pressing it all the way down .re.le.a.s.e.s.th.e..sh..ut.te.r Lightly press the shutter release button. NOTE...: Camera shake Pressing the shutter release button abruptly can result in the LCD panel and viewfinder (for the exposure meter.) Lightly Fully pressing depressing Fully ...
Instruction Manual
Page 26
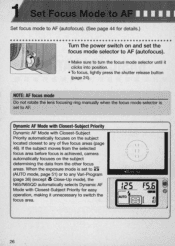
..., making it clicks into position . • To focus, lightly press the shutter release button (page 24). When the exposure mode is achieved , camera automatically focuses on the subject located closest to AF. If the subject moves from the selected focus area before focus is set to ~ (AUTO mode...-Subject Priority for details.) Turn the power switch on and set to any Vari-Program (page 36) (except ~ Close-Up mode), the N65/N65QD automatically selects Dynamic AF Mode with Closest-Subject Priority automatically focuses on the subject determining the data from the other focus areas.
..., making it clicks into position . • To focus, lightly press the shutter release button (page 24). When the exposure mode is achieved , camera automatically focuses on the subject located closest to AF. If the subject moves from the selected focus area before focus is set to ~ (AUTO mode...-Subject Priority for details.) Turn the power switch on and set to any Vari-Program (page 36) (except ~ Close-Up mode), the N65/N65QD automatically selects Dynamic AF Mode with Closest-Subject Priority automatically focuses on the subject determining the data from the other focus areas.
