Instruction Manual
Page 2
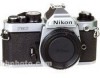
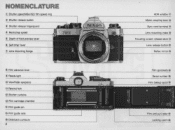
... speedlASAIiSO film speed ® Shutter release button ® Shutter release fingerguard ® Depth-of-field preview lever ® Self-timer lever (J) Lens flange ® Film advance lever ® @J Viewfinder eyepiece (jj) Rewind fork @ Shutter curtains @ Film cartridge chamber ® Film guide ...pin @ Film guide rails @ Data back contacts 2 ADR window @ Meter coupling lever @ Sync cord terminal @ Lens mounting index @ Focusing screen release latch @ Lens release button @ Reflex mirror @ Film sprockets ® Serial number ® Film anti-curl roller @ Locking catch @
... speedlASAIiSO film speed ® Shutter release button ® Shutter release fingerguard ® Depth-of-field preview lever ® Self-timer lever (J) Lens flange ® Film advance lever ® @J Viewfinder eyepiece (jj) Rewind fork @ Shutter curtains @ Film cartridge chamber ® Film guide ...pin @ Film guide rails @ Data back contacts 2 ADR window @ Meter coupling lever @ Sync cord terminal @ Lens mounting index @ Focusing screen release latch @ Lens release button @ Reflex mirror @ Film sprockets ® Serial number ® Film anti-curl roller @ Locking catch @
Instruction Manual
Page 4
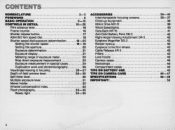
...Flash photography 33-35 Ready-light 34-35 ACCESSORIES 36-44 Interchangeable focusing screens 36- 37 Close-up equipment 38 Motor Drive MD-12 39 Nikon Speedlights 40 Data Back MF-16 41 Anti -Cold Battery Pack OB·2 42 Right-Angle Viewing Attachment DR-3 42 Eyepiece Magnifier DG-2 ...42 Rubber eyecup 42 Eyepiece correction lemles 42 Cable Release AR-3 42 Filters 43 Lens hoods 43 Camera cases 44 Neckstraps 44 Compartment cases 44 TIPS ON BATTERY USE 45 TIPS ON CAMERA CARE 46-47 SPECIFICATIONS 48-49 IMPORTANT...
...Flash photography 33-35 Ready-light 34-35 ACCESSORIES 36-44 Interchangeable focusing screens 36- 37 Close-up equipment 38 Motor Drive MD-12 39 Nikon Speedlights 40 Data Back MF-16 41 Anti -Cold Battery Pack OB·2 42 Right-Angle Viewing Attachment DR-3 42 Eyepiece Magnifier DG-2 ...42 Rubber eyecup 42 Eyepiece correction lemles 42 Cable Release AR-3 42 Filters 43 Lens hoods 43 Camera cases 44 Neckstraps 44 Compartment cases 44 TIPS ON BATTERY USE 45 TIPS ON CAMERA CARE 46-47 SPECIFICATIONS 48-49 IMPORTANT...
Instruction Manual
Page 8
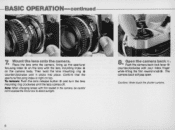
...to direct sunlight. 8 Open the camera back 60 • • Push the camera back lock lever ® counterclockwise with the lens mounting index ® on the camera body. The camera back will pop open. Caution: Never touch the shutter curtains. 8 To remove: Push the... lens release button @ and turn the lens mounting ring clockwise until it clicks into place. Then twist the lens mounting ring ~ counterclockwise until the lens comes off. Mount the lens onto the ...
...to direct sunlight. 8 Open the camera back 60 • • Push the camera back lock lever ® counterclockwise with the lens mounting index ® on the camera body. The camera back will pop open. Caution: Never touch the shutter curtains. 8 To remove: Push the... lens release button @ and turn the lens mounting ring clockwise until it clicks into place. Then twist the lens mounting ring ~ counterclockwise until the lens comes off. Mount the lens onto the ...
Instruction Manual
Page 11
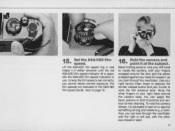
...the ASAIISO film speed indication in the ASAIISO film speed dial ®, refer to depress the shutter release button and your right hand around the lens and the elbow propped against something strong and stable (e.g., a wall). For film speeds not indicated in use. Basic holding posture: Use your ...left eye, with your fingers wrapped around the camera body. Wrap the other eye closed or open. 11 Use your right hand 's index finger to page 18. 16 Hold the camera and • ...
...the ASAIISO film speed indication in the ASAIISO film speed dial ®, refer to depress the shutter release button and your right hand around the lens and the elbow propped against something strong and stable (e.g., a wall). For film speeds not indicated in use. Basic holding posture: Use your ...left eye, with your fingers wrapped around the camera body. Wrap the other eye closed or open. 11 Use your right hand 's index finger to page 18. 16 Hold the camera and • ...
Instruction Manual
Page 12
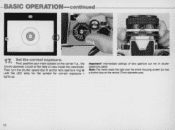
Then turn the shutter speed dial ® and/or lens aperture ring @ until the LED lamp for the symbol for correct exposure 0 lights up. Important! Intermediate settings of lens aperture but has a distinct bias on the central 12mm-diameter area. 12 -BASIC OPERATION-continued---------- 1l Set the correct exposure. • First, position your main subject at the center (i.e., the 12mm-diameter circle) of the field of shutter speed are usable. Nota: The meter reads the light over the entire focusing screen but not of view inside the viewfinder.
Then turn the shutter speed dial ® and/or lens aperture ring @ until the LED lamp for the symbol for correct exposure 0 lights up. Important! Intermediate settings of lens aperture but has a distinct bias on the central 12mm-diameter area. 12 -BASIC OPERATION-continued---------- 1l Set the correct exposure. • First, position your main subject at the center (i.e., the 12mm-diameter circle) of the field of shutter speed are usable. Nota: The meter reads the light over the entire focusing screen but not of view inside the viewfinder.

Instruction Manual
Page 13
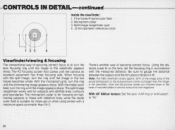
Correct focus will then be secured. 13 18 Focus on the subject • by rotating the lens focusing ring 46 • The FM2 is provided with the Type K2 focusing screen as standard. Look through the viewfinder while turning the focusing ring until the two halves of the split image rangefinder coincide perfectly to form a single unbroken image and the image in the microprism grid appears sharp.
Correct focus will then be secured. 13 18 Focus on the subject • by rotating the lens focusing ring 46 • The FM2 is provided with the Type K2 focusing screen as standard. Look through the viewfinder while turning the focusing ring until the two halves of the split image rangefinder coincide perfectly to form a single unbroken image and the image in the microprism grid appears sharp.
Instruction Manual
Page 17
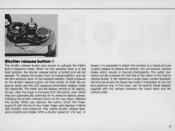
...down releases the shutter. If the tripod has a large head, contact between the tripod head and the camera body. 17 or slower, it is locked and will not operate. The cable connector can be screwed into the ... your index finger and depress it impossible to turn the lens aperture ring . When you depress the button , touch the fingerguard ® with the camera between the lens barrel and the head may make it lightly with smooth,...8226;e button ® The shutter release button also serves to activate the FM2's built-in blurred photographs. Slight pressure on for approx. 30 sec .
...down releases the shutter. If the tripod has a large head, contact between the tripod head and the camera body. 17 or slower, it is locked and will not operate. The cable connector can be screwed into the ... your index finger and depress it impossible to turn the lens aperture ring . When you depress the button , touch the fingerguard ® with the camera between the lens barrel and the head may make it lightly with smooth,...8226;e button ® The shutter release button also serves to activate the FM2's built-in blurred photographs. Slight pressure on for approx. 30 sec .

Instruction Manual
Page 20
...Nikkor and Nikon Series E lenses enable full-aperture light measurement even when the aperture ring is depressed . 20 These lenses, which are said to the set aperture only at the position of light is doubled. (This is known as opening the aperture by 1 stop.) The lens aperture ring ...clicks at the instant the shutter release button is moved . - CONTROLS IN DETAIL-continued Setting the aperture The lens aperture determines the amount of field (see page 28). Lens aperture greatly affects depth of light reaching the film plane. Generally, when you turn the aperture ring one ...
...Nikkor and Nikon Series E lenses enable full-aperture light measurement even when the aperture ring is depressed . 20 These lenses, which are said to the set aperture only at the position of light is doubled. (This is known as opening the aperture by 1 stop.) The lens aperture ring ...clicks at the instant the shutter release button is moved . - CONTROLS IN DETAIL-continued Setting the aperture The lens aperture determines the amount of field (see page 28). Lens aperture greatly affects depth of light reaching the film plane. Generally, when you turn the aperture ring one ...
Instruction Manual
Page 21
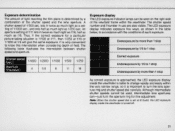
... as much light as 1116, half as much as shown in the table below, in accordance with the conditions of the shutter speed and the lens aperture. Thus, if the correct exposure for fine adjustment. Note: When the shutter speed dial is turned off. 21 Overexposure by more than 1 stop Overexposure... the interrelation between shutter speed and aperture. 1/4000 112000 1/1000 1/500 1/250 4 5.6 8 11 16 Exposure display The LED exposure indicator lamps can be used, intermediate lens apertures can-just turn the lens aperture ring and shutter speed dial carefully.
... as much light as 1116, half as much as shown in the table below, in accordance with the conditions of the shutter speed and the lens aperture. Thus, if the correct exposure for fine adjustment. Note: When the shutter speed dial is turned off. 21 Overexposure by more than 1 stop Overexposure... the interrelation between shutter speed and aperture. 1/4000 112000 1/1000 1/500 1/250 4 5.6 8 11 16 Exposure display The LED exposure indicator lamps can be used, intermediate lens apertures can-just turn the lens aperture ring and shutter speed dial carefully.

Instruction Manual
Page 22
... Note that in full-aperture measurement, the range of brightness that can be measured by the meter varies with the maximum flnumber of the lens in use an NO (neutral density) filter to EV 1B. at f/16) and ASAIISO 100 film, the EV range is from EV ...you vary the neighboring settings within a very narrow range . -CONTROLS IN DETAIL-contlnued----------, Metering range of exposure meter When there is a proper combination of lens aperture and shutter speed, 0 lights up when the aperture and shutter speed combination is not suitable for correct exposure. With a 135mm f/2 .8lens (1 sec...
... Note that in full-aperture measurement, the range of brightness that can be measured by the meter varies with the maximum flnumber of the lens in use an NO (neutral density) filter to EV 1B. at f/16) and ASAIISO 100 film, the EV range is from EV ...you vary the neighboring settings within a very narrow range . -CONTROLS IN DETAIL-contlnued----------, Metering range of exposure meter When there is a proper combination of lens aperture and shutter speed, 0 lights up when the aperture and shutter speed combination is not suitable for correct exposure. With a 135mm f/2 .8lens (1 sec...

Instruction Manual
Page 23
...get the desired composition. Stop-down exposure measurement This exposure measurement method is used when the diaphragm on the lens does not link with the meter coupling lever on the camera body, such as follows: 1) Set the ASA/ ISO number. 2) Compose your finger off the lever and depress... the shutter release button . • Lens without automatic diaphragm (PC -Nikkor lens) First, determine the correct exposure by turning the shutter ...
...get the desired composition. Stop-down exposure measurement This exposure measurement method is used when the diaphragm on the lens does not link with the meter coupling lever on the camera body, such as follows: 1) Set the ASA/ ISO number. 2) Compose your finger off the lever and depress... the shutter release button . • Lens without automatic diaphragm (PC -Nikkor lens) First, determine the correct exposure by turning the shutter ...
Instruction Manual
Page 25
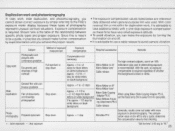
Stop-down Stop-down Compensation not necessary Approx. +1 to +2 stops for black letters on black Nikon Slide Copying Adapter PS-6 Nikon Bellows Focus- ing Attachment PB-6 background Cable release Approx. + 1 stop Microflex PFX Generally, results come out better with more ...simply referring to approx. -1 /2 stop -down Approx. +1 to +2 stops Micro-Nikkor or AF Micro-Nikkor lens' oApprox. +1-112 to + 2-1/2 stops for black letters on white background to the FM2 's exposure meter display because these films have ve ry small exposure latitude . • To avoid vibration, ...
Stop-down Stop-down Compensation not necessary Approx. +1 to +2 stops for black letters on black Nikon Slide Copying Adapter PS-6 Nikon Bellows Focus- ing Attachment PB-6 background Cable release Approx. + 1 stop Microflex PFX Generally, results come out better with more ...simply referring to approx. -1 /2 stop -down Approx. +1 to +2 stops Micro-Nikkor or AF Micro-Nikkor lens' oApprox. +1-112 to + 2-1/2 stops for black letters on white background to the FM2 's exposure meter display because these films have ve ry small exposure latitude . • To avoid vibration, ...
Instruction Manual
Page 26
... ring until the image in the viewfinder appears sharp. Be sure to "M." 26 With AF Nikkor lenses: Set the lens' A-M ring or A-M switch to gauge the distance between the subject and the film plane indicator-e-@ . With the microprism grid, turn the ring until the shimmering ...image appears sharp . With the matte outer field, turn the ring until the image appears sharp. Note: The FM2 viewfinder covers approx. 93 % of the image area of the actual photograph so the actual picture comes out larger tha n the image in the case...
... ring until the image in the viewfinder appears sharp. Be sure to "M." 26 With AF Nikkor lenses: Set the lens' A-M ring or A-M switch to gauge the distance between the subject and the film plane indicator-e-@ . With the microprism grid, turn the ring until the shimmering ...image appears sharp . With the matte outer field, turn the ring until the image appears sharp. Note: The FM2 viewfinder covers approx. 93 % of the image area of the actual photograph so the actual picture comes out larger tha n the image in the case...
Instruction Manual
Page 28
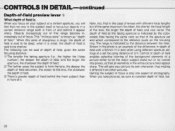
...depth of field . 3) There 's greater depth of field behind it different from the lens, the deeper the depth of field is small, the depth of field becomes ; Note... distance range both in focus is an example of the difference in the case of lenses with a 50mm f/1.4 lens when using different aperture set focusing distance of field, too. 28 When this range become increasingly out of field ... subject itself in focus but of the same maximum flnumber, the shorter the focal length of the lens, the larger the depth of focus. This " in-focus zone" is known as that not only is from ...
...depth of field . 3) There 's greater depth of field behind it different from the lens, the deeper the depth of field is small, the depth of field becomes ; Note... distance range both in focus is an example of the difference in the case of lenses with a 50mm f/1.4 lens when using different aperture set focusing distance of field, too. 28 When this range become increasingly out of field ... subject itself in focus but of the same maximum flnumber, the shorter the focal length of the lens, the larger the depth of focus. This " in-focus zone" is known as that not only is from ...

Instruction Manual
Page 29
Lens set at 1/16 Most objects near to far are in focus. Lens set at 1/1.4 Only major subject is in focus. 29
Lens set at 1/16 Most objects near to far are in focus. Lens set at 1/1.4 Only major subject is in focus. 29

Instruction Manual
Page 30
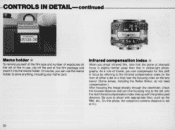
... in the photo. -CONTROLS IN DETAIL-continued--------- Components of the picture that appear in focus when the lever is useful in operation will cause the lens to operate ; Self·tlmer lever ® This device is pressed wi ll be used , the image in the viewfinder is already in self-portraits.... 10 sec. Set the self-timer by turning the lever as far as before or after a delay of yourself with your finger. Depth-of the lens wide open. However, turning the self-timer lever when it will start to be done either before . Except for B (bulb), the self-timer can then...
... in the photo. -CONTROLS IN DETAIL-continued--------- Components of the picture that appear in focus when the lever is useful in operation will cause the lens to operate ; Self·tlmer lever ® This device is pressed wi ll be used , the image in the viewfinder is already in self-portraits.... 10 sec. Set the self-timer by turning the lever as far as before or after a delay of yourself with your finger. Depth-of the lens wide open. However, turning the self-timer lever when it will start to be done either before . Except for B (bulb), the self-timer can then...
Instruction Manual
Page 32
... photo, the subject-to-camera distance is slightly farther away than that the plane of either a dot or a line) near the focusing index on the lens barrel. (Some lenses, including the Reflex Nikkor, do not need compensation .) After focusing the image sharply through the viewfinder, check the focused distance and turn...
... photo, the subject-to-camera distance is slightly farther away than that the plane of either a dot or a line) near the focusing index on the lens barrel. (Some lenses, including the Reflex Nikkor, do not need compensation .) After focusing the image sharply through the viewfinder, check the focused distance and turn...
Instruction Manual
Page 35
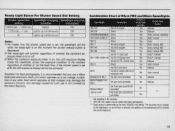
...is set, the speedlight will fire when the ready-light is not covered by the lens' ASA/ISO ring setting. Use of any other flash which operates at B, the ...LED expcsure display inside the viewfinder shows the expcsure condition of the moment regardless of Nlkon FM2 and Nlkon Speedlights Speedloght Connection Camera's ready-light I Shutler speed dial Speedlight charging Speedlight... complete incomplete 1/4000 sec. - 1/500 sec. If the shutter speed is determined by the Nikon Warrant y. Not available in EUcountries. .. Combination Chart of whether or not the flash fires. Ready...
...is set, the speedlight will fire when the ready-light is not covered by the lens' ASA/ISO ring setting. Use of any other flash which operates at B, the ...LED expcsure display inside the viewfinder shows the expcsure condition of the moment regardless of Nlkon FM2 and Nlkon Speedlights Speedloght Connection Camera's ready-light I Shutler speed dial Speedlight charging Speedlight... complete incomplete 1/4000 sec. - 1/500 sec. If the shutter speed is determined by the Nikon Warrant y. Not available in EUcountries. .. Combination Chart of whether or not the flash fires. Ready...
Instruction Manual
Page 36
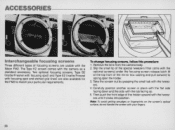
... getting smudges or fingerprints on the screen 's optical surface, do not handle the screen with the Nikon FM2 . Take the screen out by grasping the small tab with the tab facing up. 5. Remove the lens from the camera body. 2. Carefully position another screen in place with the flat side facing down and the side...
... getting smudges or fingerprints on the screen 's optical surface, do not handle the screen with the Nikon FM2 . Take the screen out by grasping the small tab with the tab facing up. 5. Remove the lens from the camera body. 2. Carefully position another screen in place with the flat side facing down and the side...
Instruction Manual
Page 38
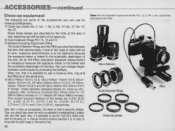
... (1.03 ft.) and 0.5m (1.64 ft.) , respectively. The closest focused distance of the lenses are attached between the lens and camera body. Also, it is used with very little depth. Auto Extension Rings Close-Up lenses As for focusing (or to 1/2 ... the split-Image or microprism ring. 38 Note: Non-AI extension rings such as possible in photographing a subject with an AI lens, exposure determination is at full aperture because the exposure meter is generally shallow. A C C E S S O RIE S ... because the exposure meter is advisable to the FM2. Since these lenses are some of the...
... (1.03 ft.) and 0.5m (1.64 ft.) , respectively. The closest focused distance of the lenses are attached between the lens and camera body. Also, it is used with very little depth. Auto Extension Rings Close-Up lenses As for focusing (or to 1/2 ... the split-Image or microprism ring. 38 Note: Non-AI extension rings such as possible in photographing a subject with an AI lens, exposure determination is at full aperture because the exposure meter is generally shallow. A C C E S S O RIE S ... because the exposure meter is advisable to the FM2. Since these lenses are some of the...
