Instruction Manual
Page 3
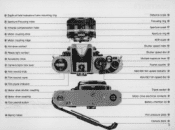
@ Meter coupling shoe @ Meter coupling ridge ® Hot-shoe contact @ R.."nv-linlht contact @ Accessory shoe ® Camera back lock lever @ Film rewind knob @ Film rewind crank ® Film plane indicator @ Motor drive shutter coupling @ Motor drive coupling @ Film rewind button @ Memo holder ... counter @ ASAIISO film speed indicator ® ASA/ISO film speed dial ® Tripoc socket @ Motor drive electrical contacts ® Battery chamber lid @ Film pressure plate @ camera back @ 3
@ Meter coupling shoe @ Meter coupling ridge ® Hot-shoe contact @ R.."nv-linlht contact @ Accessory shoe ® Camera back lock lever @ Film rewind knob @ Film rewind crank ® Film plane indicator @ Motor drive shutter coupling @ Motor drive coupling @ Film rewind button @ Memo holder ... counter @ ASAIISO film speed indicator ® ASA/ISO film speed dial ® Tripoc socket @ Motor drive electrical contacts ® Battery chamber lid @ Film pressure plate @ camera back @ 3
Instruction Manual
Page 4
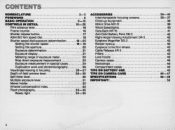
... Flash photography 33-35 Ready-light 34-35 ACCESSORIES 36-44 Interchangeable focusing screens 36- 37 Close-up equipment 38 Motor Drive MD-12 39 Nikon Speedlights 40 Data Back MF-16 41 Anti -Cold Battery Pack OB·2 42 Right-Angle Viewing Attachment DR-3 42 Eyepiece Magnifier DG-2 42 Rubber... eyecup 42 Eyepiece correction lemles 42 Cable Release AR-3 42 Filters 43 Lens hoods 43 Camera cases 44 Neckstraps 44 Compartment cases 44 TIPS ON BATTERY USE 45 TIPS ON...
... Flash photography 33-35 Ready-light 34-35 ACCESSORIES 36-44 Interchangeable focusing screens 36- 37 Close-up equipment 38 Motor Drive MD-12 39 Nikon Speedlights 40 Data Back MF-16 41 Anti -Cold Battery Pack OB·2 42 Right-Angle Viewing Attachment DR-3 42 Eyepiece Magnifier DG-2 42 Rubber... eyecup 42 Eyepiece correction lemles 42 Cable Release AR-3 42 Filters 43 Lens hoods 43 Camera cases 44 Neckstraps 44 Compartment cases 44 TIPS ON BATTERY USE 45 TIPS ON...
Instruction Manual
Page 6
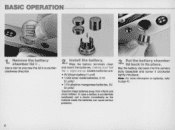
Slip the battery clip back into the camera body baseplate and screw it clockwise tightly into place. Usable batteries are up. In case a battery is accidentally swallowed, call a doctor immediately as the material inside ...
Slip the battery clip back into the camera body baseplate and screw it clockwise tightly into place. Usable batteries are up. In case a battery is accidentally swallowed, call a doctor immediately as the material inside ...
Instruction Manual
Page 8
Confirm that the aperture/focusing index is right on the camera body. The camera back will pop open. Mount the lens onto the camera. • Place the lens onto the camera, lining up the aperture/ focusing index @ on the lens with your index finger while lifting the film rewind knob @. Then ... until the lens comes off. Note: When changing lenses with film loaded in the camera, be careful not to expose the mirror box to direct sunlight. 8 Open the camera back 60 • • Push the camera back lock lever ® counterclockwise with the lens mounting index ® on top....
Confirm that the aperture/focusing index is right on the camera body. The camera back will pop open. Mount the lens onto the camera. • Place the lens onto the camera, lining up the aperture/ focusing index @ on the lens with your index finger while lifting the film rewind knob @. Then ... until the lens comes off. Note: When changing lenses with film loaded in the camera, be careful not to expose the mirror box to direct sunlight. 8 Open the camera back 60 • • Push the camera back lock lever ® counterclockwise with the lens mounting index ® on top....

Instruction Manual
Page 10
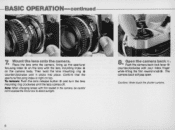
Close the camera back until it snaps shut, making sure that the perforations are perfectly meshed with the sprockets and that the film rewind knob rotates counterclockwise. Then ... cartridge. 10 Press the shutter release button and wind the film advance lever until the frame counter reaches frame 1. -BASIC OPERATION-continued---------- 12 Close the camera • back.
Close the camera back until it snaps shut, making sure that the perforations are perfectly meshed with the sprockets and that the film rewind knob rotates counterclockwise. Then ... cartridge. 10 Press the shutter release button and wind the film advance lever until the frame counter reaches frame 1. -BASIC OPERATION-continued---------- 12 Close the camera • back.
Instruction Manual
Page 11
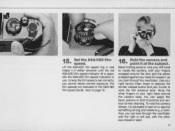
...as you cannot obtain correct exposure. Also, you can adapt this basic posture to lean on or against your fingers wrapped around the camera body. To hold the camera steady, it in either direction until the red ASAIISO film speed indicator ® is set correctly, you look through the viewfinder. ...You can look through the viewfinder with the right or left hand to cradle the camera, with the other fingers of your thumb to page 18. 16 Hold the camera and • point It at the subject. Wrap the other eye closed or open. 11 Use...
...as you cannot obtain correct exposure. Also, you can adapt this basic posture to lean on or against your fingers wrapped around the camera body. To hold the camera steady, it in either direction until the red ASAIISO film speed indicator ® is set correctly, you look through the viewfinder. ...You can look through the viewfinder with the right or left hand to cradle the camera, with the other fingers of your thumb to page 18. 16 Hold the camera and • point It at the subject. Wrap the other eye closed or open. 11 Use...

Instruction Manual
Page 14
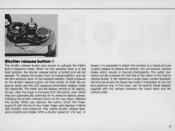
...-you should then rewind the film . 21 Press the film rewind • button '43 • After the last exposure has been made, turn the camera upside down and press the film rewind button , so that might result in winding the lever. -BASIC OPERATION-continued----------- 19 Depress the shutter • release...it will go to transport the film to depress the button all the way. 14 You don 't have to the next frame and ready the camera for the next shot. Look through the viewfinder, and depress the shutter release button. In depressing the shutter release button, apply light but steady ...
...-you should then rewind the film . 21 Press the film rewind • button '43 • After the last exposure has been made, turn the camera upside down and press the film rewind button , so that might result in winding the lever. -BASIC OPERATION-continued----------- 19 Depress the shutter • release...it will go to transport the film to depress the button all the way. 14 You don 't have to the next frame and ready the camera for the next shot. Look through the viewfinder, and depress the shutter release button. In depressing the shutter release button, apply light but steady ...

Instruction Manual
Page 15
...switched off even if the shutter release button is accidentally pressed . When you 're not using the camera, you should set the film advance lever to open the camera back. Close the camera back and push the film advance lever into place. Note: Even if the exposure indicator lamp is... now fully rewound into the cartridge. 23 Remove the film • cartridge. Push the camera back lock lever in approx. 30 sec. , and the exposure measuring circuit will feel a slight resistance. Take out the film cartridge. Continue winding...
...switched off even if the shutter release button is accidentally pressed . When you 're not using the camera, you should set the film advance lever to open the camera back. Close the camera back and push the film advance lever into place. Note: Even if the exposure indicator lamp is... now fully rewound into the cartridge. 23 Remove the film • cartridge. Push the camera back lock lever in approx. 30 sec. , and the exposure measuring circuit will feel a slight resistance. Take out the film cartridge. Continue winding...

Instruction Manual
Page 16
... however, until it . Frame counter ®l The additive type frame counter is opened. 16 The counter is automatically reset to S when the camera back is graduated from S· ·1 24up to the standoff position the moment you repeatedly press the shutter release button and wind the film ...is unlocked when the lever is fully wound. It automatically returns to 36 in even numbers with odd numbers indicated by white dots in the camera, the frame counter is operative, advancing by a single frame and simultaneously cocks the shutter. Even if there 's no film in between the...
... however, until it . Frame counter ®l The additive type frame counter is opened. 16 The counter is automatically reset to S when the camera back is graduated from S· ·1 24up to the standoff position the moment you repeatedly press the shutter release button and wind the film ...is unlocked when the lever is fully wound. It automatically returns to 36 in even numbers with odd numbers indicated by white dots in the camera, the frame counter is operative, advancing by a single frame and simultaneously cocks the shutter. Even if there 's no film in between the...
Instruction Manual
Page 17
...inside the viewfinder. To release the button from the button, after the finger is advisable to attach the camera to a tripod and use ,he special tripod adapter supplied with smooth, even pressure. or slower, it ... large head, contact between the lens barrel and the head may make it lightly with the camera between the tripod head and the camera body. 17 Slight pressure on for approx. 30 sec . When you depress the button , touch...® The shutter release button also serves to activate the FM2's built-in blurred photographs. With a shutter speed of the shutter release button.
...inside the viewfinder. To release the button from the button, after the finger is advisable to attach the camera to a tripod and use ,he special tripod adapter supplied with smooth, even pressure. or slower, it ... large head, contact between the lens barrel and the head may make it lightly with the camera between the tripod head and the camera body. 17 Slight pressure on for approx. 30 sec . When you depress the button , touch...® The shutter release button also serves to activate the FM2's built-in blurred photographs. With a shutter speed of the shutter release button.

Instruction Manual
Page 23
... the aperture because in this type of lens used when the diaphragm on the lens does not link with the meter coupling lever on the camera body, such as when a non-AI lens or an extension ring is as follows: 1) Set the ASA/ ISO number. 2) Compose your finger off the lever and... correct exposure by turning the shutter speed dial. Determine the correct exposure by adjusting the shutter speed and aperture. The procedure is mounted on the camera. Then, focus at full aperture. Shift the lens so that you get the desired composition. Return the aperture setting to the preset posi tion and...
... the aperture because in this type of lens used when the diaphragm on the lens does not link with the meter coupling lever on the camera body, such as when a non-AI lens or an extension ring is as follows: 1) Set the ASA/ ISO number. 2) Compose your finger off the lever and... correct exposure by turning the shutter speed dial. Determine the correct exposure by adjusting the shutter speed and aperture. The procedure is mounted on the camera. Then, focus at full aperture. Shift the lens so that you get the desired composition. Return the aperture setting to the preset posi tion and...
Instruction Manual
Page 24
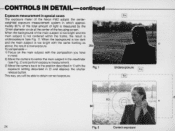
... 3) Move the camera back to the position described in 1) with the exposure setting described in 2) and depress the shutter release button. When the background is too dark and the main subject is measured by the 12 mm·diameter circle at the center of the Nikon FM2 adopts the centerweighted ...exposure measurement system in the viewfinder (see Fig . 1). This way, you have in mind. 2) Move the camera to obtain correct exposure. mately 60 % of the total amount of light is ...
... 3) Move the camera back to the position described in 1) with the exposure setting described in 2) and depress the shutter release button. When the background is too dark and the main subject is measured by the 12 mm·diameter circle at the center of the Nikon FM2 adopts the centerweighted ...exposure measurement system in the viewfinder (see Fig . 1). This way, you have in mind. 2) Move the camera to obtain correct exposure. mately 60 % of the total amount of light is ...
Instruction Manual
Page 25
...exposure in determining exposure is the table of whether the background is meant to avoid camera vibration . Micro-Nikkor or AF Micro-Nikkor lens' Cable release For high-contrast subjects...AF Micro-Nikkor lens' oApprox. +1-112 to + 2-1/2 stops for white letters on black Nikon Slide Copying Adapter PS-6 Nikon Bellows Focus- Shown here is recommended. determine the compensation value by test shooting. 'Set... advisable to +2 stops for white letters on black background. approx. -112 to the FM2 's exposure meter display because these films have ve ry small exposure latitude . •...
...exposure in determining exposure is the table of whether the background is meant to avoid camera vibration . Micro-Nikkor or AF Micro-Nikkor lens' Cable release For high-contrast subjects...AF Micro-Nikkor lens' oApprox. +1-112 to + 2-1/2 stops for white letters on black Nikon Slide Copying Adapter PS-6 Nikon Bellows Focus- Shown here is recommended. determine the compensation value by test shooting. 'Set... advisable to +2 stops for white letters on black background. approx. -112 to the FM2 's exposure meter display because these films have ve ry small exposure latitude . •...
Instruction Manual
Page 26
...switch to gauge the distance between the subject and the film plane indicator-e-@ . When focusing with definite lines, contours and boundaries. Note: The FM2 viewfinder covers approx. 93 % of the image area of mounted slides or service-size prints from negatives. Inside the viewfinder: 1. With the ...microprism grid, turn the lens focusing ring until the image in accordance with the camera as standard equipment has three focusing aids. The microprism collar is to turn the ring until the image appears sharp. Be sure to...
...switch to gauge the distance between the subject and the film plane indicator-e-@ . When focusing with definite lines, contours and boundaries. Note: The FM2 viewfinder covers approx. 93 % of the image area of mounted slides or service-size prints from negatives. Inside the viewfinder: 1. With the ...microprism grid, turn the lens focusing ring until the image in accordance with the camera as standard equipment has three focusing aids. The microprism collar is to turn the ring until the image appears sharp. Be sure to...
Instruction Manual
Page 32
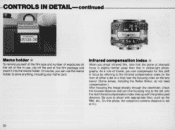
... until the red infrared compensation index lines up with appropriate filter, such as the R60, etc ., (In this shift in use the memo holder to -camera distance is slightly farther away than that the plane of thumb, you shoot infrared film , note that in visible -light photo graphy. As a rule of...
... until the red infrared compensation index lines up with appropriate filter, such as the R60, etc ., (In this shift in use the memo holder to -camera distance is slightly farther away than that the plane of thumb, you shoot infrared film , note that in visible -light photo graphy. As a rule of...
Instruction Manual
Page 33
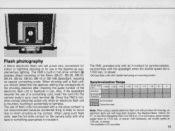
... units, seal the hot-shoe contact on mounting portion. Flash photography A Nikon electronic flash unit will prove very convenient for indoor or nighttime shooting or for use of a connecting cord, insert the cord into the camera body's sync cord terminal @. When shooting with a hot-shoe contact' is ...contact becomes active only when an electronic flash unit is 1/250 sec. The FM2's built-in the daytime as supplementary lighting . or slower. 'Old type flash units with metallic leaf spring on the camera body with vinyl tape or something appropriate to short circuiting at 112 or full ...
... units, seal the hot-shoe contact on mounting portion. Flash photography A Nikon electronic flash unit will prove very convenient for indoor or nighttime shooting or for use of a connecting cord, insert the cord into the camera body's sync cord terminal @. When shooting with a hot-shoe contact' is ...contact becomes active only when an electronic flash unit is 1/250 sec. The FM2's built-in the daytime as supplementary lighting . or slower. 'Old type flash units with metallic leaf spring on the camera body with vinyl tape or something appropriate to short circuiting at 112 or full ...
Instruction Manual
Page 35
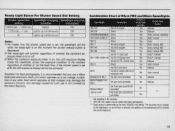
... of any other flash which operates at B, the LED exposure display will function regardless of Nlkon FM2 and Nlkon Speedlights Speedloght Connection Camera's ready-light I Shutler speed dial Speedlight charging Speedlight charging setting complete incomplete 1/4000 sec. -...Any damage caused by such use a Nlkon dedicated electronic flash unit which operates at high voltages may damage the camera 's circuitry. With S8-140, usable only for visible-light flash photography. .., Flash output is set to ... 1) No matter how the shutter speed dial is determined by the Nikon Warrant y.
... of any other flash which operates at B, the LED exposure display will function regardless of Nlkon FM2 and Nlkon Speedlights Speedloght Connection Camera's ready-light I Shutler speed dial Speedlight charging Speedlight charging setting complete incomplete 1/4000 sec. -...Any damage caused by such use a Nlkon dedicated electronic flash unit which operates at high voltages may damage the camera 's circuitry. With S8-140, usable only for visible-light flash photography. .., Flash output is set to ... 1) No matter how the shutter speed dial is determined by the Nikon Warrant y.
Instruction Manual
Page 36
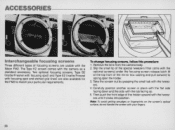
...latch ® at the top front of the mirror box casting and pull outward to match your fingers. 36 Remove the lens from the camera body. 2. Note: To avoid getting smudges or fingerprints on the screen 's optical surface, do not handle the screen with the tweezers . 4....lines) are usable with the camera as a standard accessory. Two optional focusing screens , Type B2 (matte/Fresnel with focusing spot) and Type E2 (matte/Fresnel with the tweezers until it clicks into position . The Type K2 screen comes with the Nikon FM2 . ACCESSORIES Interchangeable focusing screens Three...
...latch ® at the top front of the mirror box casting and pull outward to match your fingers. 36 Remove the lens from the camera body. 2. Note: To avoid getting smudges or fingerprints on the screen 's optical surface, do not handle the screen with the tweezers . 4....lines) are usable with the camera as a standard accessory. Two optional focusing screens , Type B2 (matte/Fresnel with focusing spot) and Type E2 (matte/Fresnel with the tweezers until it clicks into position . The Type K2 screen comes with the Nikon FM2 . ACCESSORIES Interchangeable focusing screens Three...
Instruction Manual
Page 38
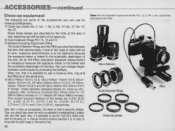
... close -up photography. 1) Close-Up Lenses No. 0, No. 1, No. 2, No. 3T, No. 4T, No. 5T, NO. 6T. Also, it is no easy to the FM2. Auto Extension Rings Close-Up lenses The Auto Extension Rings and the PB-6 are 0.25m (0.82 ft.) , 0.23m (0.75 ft.), 0.41m (1.34 ft .), 0.219m (0.719.... You can use a close -up photography, the depth of field is linked to the automatic diaphragm of the lenses are attached between the lens and camera body. Note, too, that in use, metering can still be attached to focus with very little depth. cannot be done at the same time. 4) Micro-...
... close -up photography. 1) Close-Up Lenses No. 0, No. 1, No. 2, No. 3T, No. 4T, No. 5T, NO. 6T. Also, it is no easy to the FM2. Auto Extension Rings Close-Up lenses The Auto Extension Rings and the PB-6 are 0.25m (0.82 ft.) , 0.23m (0.75 ft.), 0.41m (1.34 ft .), 0.219m (0.719.... You can use a close -up photography, the depth of field is linked to the automatic diaphragm of the lenses are attached between the lens and camera body. Note, too, that in use, metering can still be attached to focus with very little depth. cannot be done at the same time. 4) Micro-...
Instruction Manual
Page 39
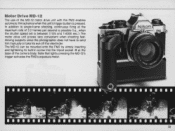
...of 3.2 frames per second is possible (i.e., when the shutter speed set is pressed. Note that lightly pressing the MO-12's trigger activates the FM2's exposure meter. 39 The motor drive unit proves very convenient when shooting fastmoving subjects since the photographer does not have to single -frame shooting..., continuous firing at the base of the camera body. Motor Drive MD·12 The use of the MO-12 motor drive unit with the FM2 enables automatic film advance when the unit's trigger button is between 1/125 and 1/4000 sec.)....
...of 3.2 frames per second is possible (i.e., when the shutter speed set is pressed. Note that lightly pressing the MO-12's trigger activates the FM2's exposure meter. 39 The motor drive unit proves very convenient when shooting fastmoving subjects since the photographer does not have to single -frame shooting..., continuous firing at the base of the camera body. Motor Drive MD·12 The use of the MO-12 motor drive unit with the FM2 enables automatic film advance when the unit's trigger button is between 1/125 and 1/4000 sec.)....
