

S60 User's Manual
Page 4
...equipment to a Nikon-authorized service representative for inspection, after unplugging the product and/or removing the battery. Repairs should be performed only by the following safety precautions in their mouths. Keep out of reach of the camera or AC adapter could result from the camera or AC ... coming from failure to observe the precautions listed in this equipment. Should the camera or AC adapter break open as this Nikon product, to a Nikon-authorized service representative for inspection. Handle the camera strap with care Never place the strap around the neck of a fall or...
...equipment to a Nikon-authorized service representative for inspection, after unplugging the product and/or removing the battery. Repairs should be performed only by the following safety precautions in their mouths. Keep out of reach of the camera or AC adapter could result from the camera or AC ... coming from failure to observe the precautions listed in this equipment. Should the camera or AC adapter break open as this Nikon product, to a Nikon-authorized service representative for inspection. Handle the camera strap with care Never place the strap around the neck of a fall or...

S60 User's Manual
Page 9
... (Operation Controls)...10 Playback (Information Display)...11 HOME Screen Controls...12 Menu Screen...13 First Steps ...14 Charging the Battery ...14 Inserting the Battery ...16 Removing the Battery ...17 Turning On and Off the Camera...17 Setting Display Language, Date and Time 18 Inserting Memory Cards ...20 Removing Memory Cards...20 A Basic Photography and...
... (Operation Controls)...10 Playback (Information Display)...11 HOME Screen Controls...12 Menu Screen...13 First Steps ...14 Charging the Battery ...14 Inserting the Battery ...16 Removing the Battery ...17 Turning On and Off the Camera...17 Setting Display Language, Date and Time 18 Inserting Memory Cards ...20 Removing Memory Cards...20 A Basic Photography and...

S60 User's Manual
Page 14
... at any time and without prior notice. • Nikon will not be held liable for use with this Nikon digital camera are designed to the highest standards and include complex electronic circuitry. Rechargeable Li-ion Battery EN-EL10 Before Taking Important Pictures Before taking the camera on digital imaging and photography. Nikon will not be available from product malfunction. THE...
... at any time and without prior notice. • Nikon will not be held liable for use with this Nikon digital camera are designed to the highest standards and include complex electronic circuitry. Rechargeable Li-ion Battery EN-EL10 Before Taking Important Pictures Before taking the camera on digital imaging and photography. Nikon will not be available from product malfunction. THE...

S60 User's Manual
Page 17
Introduction 1 54 3 Parts of the Camera 6 7 2 1 Monitor/touch panel 8 2 Eyelet for camera strap 5 3 Battery-chamber/ memory card slot cover 16, 20 4 Tripod socket 5 Multi connector 99, 102, 106 10 9 8 6 HDMI connector cover 99 7 HDMI Mini Connector 99 8 Battery-chamber 16 9 Memory card slot 20 10 Battery latch 16, 17 Attaching the Camera Strap 5
Introduction 1 54 3 Parts of the Camera 6 7 2 1 Monitor/touch panel 8 2 Eyelet for camera strap 5 3 Battery-chamber/ memory card slot cover 16, 20 4 Tripod socket 5 Multi connector 99, 102, 106 10 9 8 6 HDMI connector cover 99 7 HDMI Mini Connector 99 8 Battery-chamber 16 9 Memory card slot 20 10 Battery latch 16, 17 Attaching the Camera Strap 5

S60 User's Manual
Page 21
... not set" indicator 155 Time zone indicator 136 5 Date imprint 140 q R 6 Vibration reduction icon (still pictures 142 Electronic VR icon (movies 90 7 B Battery level indicator 22 8 Focus area 26, 124 9 Focus area (Face Priority 26, 124 15 Smile timer guide (when the smile timer is activated 33 Image...length 87 10 Focus area (touch AF/AE 24 C Information Displayed in the Monitor • The indicators displayed vary with current camera settings and shooting mode. • Information on settings applied from the shooting menu is displayed for only a few seconds (A 139). 9
... not set" indicator 155 Time zone indicator 136 5 Date imprint 140 q R 6 Vibration reduction icon (still pictures 142 Electronic VR icon (movies 90 7 B Battery level indicator 22 8 Focus area 26, 124 9 Focus area (Face Priority 26, 124 15 Smile timer guide (when the smile timer is activated 33 Image...length 87 10 Focus area (touch AF/AE 24 C Information Displayed in the Monitor • The indicators displayed vary with current camera settings and shooting mode. • Information on settings applied from the shooting menu is displayed for only a few seconds (A 139). 9

S60 User's Manual
Page 23
.../ 2008 12 00 9999 Introduction 999/ 999 78 9 9 9 9 / 9 9 9 10 9999 / 9999 59 59 9 59 59 1 File number and type 151 2 Date/time of recording 18 6 B Battery level indicator 22 3 Print-order icon 111 4 Protect icon 131 7 Movie playback guide 93 Editing functions Paint icon 55 P Stretch icon 59 5 O Perspective control icon... mode 116 8 Movie options 88 9 C Internal memory indicator 28 Current frame number/ 10 total number of frames 28 Movie length 93 C Picture Display When the camera is rotated, the picture displayed is pointing up or down. 11
.../ 2008 12 00 9999 Introduction 999/ 999 78 9 9 9 9 / 9 9 9 10 9999 / 9999 59 59 9 59 59 1 File number and type 151 2 Date/time of recording 18 6 B Battery level indicator 22 3 Print-order icon 111 4 Protect icon 131 7 Movie playback guide 93 Editing functions Paint icon 55 P Stretch icon 59 5 O Perspective control icon... mode 116 8 Movie options 88 9 C Internal memory indicator 28 Current frame number/ 10 total number of frames 28 Movie length 93 C Picture Display When the camera is rotated, the picture displayed is pointing up or down. 11

S60 User's Manual
Page 26
... wall plug into a power outlet 2. First Steps First Steps Charging the Battery The camera uses a Rechargeable Li-ion Battery EN-EL10 (supplied). Charging is running low. 1 Connect the power cable. Charge the battery with the Battery Charger MH-63 (supplied) before first use or when the battery is complete when lamp stops blinking 4. Connect the power cable to...
... wall plug into a power outlet 2. First Steps First Steps Charging the Battery The camera uses a Rechargeable Li-ion Battery EN-EL10 (supplied). Charging is running low. 1 Connect the power cable. Charge the battery with the Battery Charger MH-63 (supplied) before first use or when the battery is complete when lamp stops blinking 4. Connect the power cable to...

S60 User's Manual
Page 27
...power the camera continuously for the battery charger on the Battery Charger • The supplied battery charger is lying flat. • Charge the battery indoors with an ambient temperature of AC adapter. Remove the battery and reinsert it into the battery charger so that the battery is for...available separately from Nikon) (A 150). Do not, under any circumstances, use another make or model of 5 °C to 35 °C (41 °F to read and follow the warnings for extended periods, use with a Rechargeable Li-ion Battery EN-EL10. The battery is faulty. Battery fully charged....
...power the camera continuously for the battery charger on the Battery Charger • The supplied battery charger is lying flat. • Charge the battery indoors with an ambient temperature of AC adapter. Remove the battery and reinsert it into the battery charger so that the battery is for...available separately from Nikon) (A 150). Do not, under any circumstances, use another make or model of 5 °C to 35 °C (41 °F to read and follow the warnings for extended periods, use with a Rechargeable Li-ion Battery EN-EL10. The battery is faulty. Battery fully charged....
S60 User's Manual
Page 28
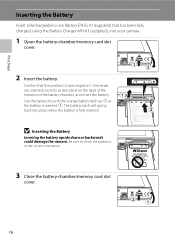
.... B Inserting the Battery Inserting the battery upside down or backwards could damage the camera. Confirm that has been fully charged, using the Battery Charger MH-63 (supplied), into place when the battery is in the correct orientation. 3 Close the battery-chamber/memory card slot cover. 16 First Steps Inserting the Battery Insert a Rechargeable Li-ion Battery EN-EL10 (supplied) that...
.... B Inserting the Battery Inserting the battery upside down or backwards could damage the camera. Confirm that has been fully charged, using the Battery Charger MH-63 (supplied), into place when the battery is in the correct orientation. 3 Close the battery-chamber/memory card slot cover. 16 First Steps Inserting the Battery Insert a Rechargeable Li-ion Battery EN-EL10 (supplied) that...

S60 User's Manual
Page 29
...a minute (default setting), the monitor will turn off automatically and the camera will turn off the camera, press the power switch again. To eject the battery, open the battery-chamber/ memory card slot cover and slide the battery latch in standby mode will turn on. observe due caution when removing ...the power switch, or the shutter-release button, while the monitor is off and make sure that the battery may become hot during use; First Steps Removing the Battery Turn the camera off in the direction shown 1. To turn on lamp (green) will light for another three minutes, ...
...a minute (default setting), the monitor will turn off automatically and the camera will turn off the camera, press the power switch again. To eject the battery, open the battery-chamber/ memory card slot cover and slide the battery latch in standby mode will turn on. observe due caution when removing ...the power switch, or the shutter-release button, while the monitor is off and make sure that the battery may become hot during use; First Steps Removing the Battery Turn the camera off in the direction shown 1. To turn on lamp (green) will light for another three minutes, ...

S60 User's Manual
Page 32
...on lamp and the monitor are off. B Inserting Memory Cards Inserting the memory card upside down or backwards could damage the camera or the memory card. Open the battery-chamber/memory card slot cover and press the card in 1 to store data in the internal memory, or play back, ... and confirm that the memory card is inserted in correctly until it clicks into place. Slide the memory card in the camera, data are off the camera before opening the battery-chamber/memory card slot cover. 2 Insert the memory card. Make sure that the power-on removable memory cards (available separately) ...
...on lamp and the monitor are off. B Inserting Memory Cards Inserting the memory card upside down or backwards could damage the camera or the memory card. Open the battery-chamber/memory card slot cover and press the card in 1 to store data in the internal memory, or play back, ... and confirm that the memory card is inserted in correctly until it clicks into place. Slide the memory card in the camera, data are off the camera before opening the battery-chamber/memory card slot cover. 2 Insert the memory card. Make sure that the power-on removable memory cards (available separately) ...
S60 User's Manual
Page 33
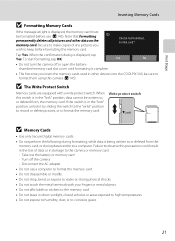
... with a write protect switch. Failure to observe this camera (A 145). Write protect switch B Memory Cards • Use only Secure Digital memory cards. • Do not perform the following ...during formatting, while data is in other data on the memory card. When the confirmation dialog is not formatted. Take out the battery ... memory card. Note that formatting permanently deletes all pictures and other devices into the COOLPIX S60, be written to, or deleted from the memory card, or during data transfer...
... with a write protect switch. Failure to observe this camera (A 145). Write protect switch B Memory Cards • Use only Secure Digital memory cards. • Do not perform the following ...during formatting, while data is in other data on the memory card. When the confirmation dialog is not formatted. Take out the battery ... memory card. Note that formatting permanently deletes all pictures and other devices into the COOLPIX S60, be written to, or deleted from the memory card, or during data transfer...

S60 User's Manual
Page 34
... Number of Exposures Remaining The number of pictures that can also be stored depends on the camera. Battery Level Battery level indicator Monitor NO INDICATOR B N Battery exhausted. The power-on lamp (green) will light for first-time users of digital cameras. 1 Press the power switch to turn on. A (auto) mode can be applied by tapping A in...
... Number of Exposures Remaining The number of pictures that can also be stored depends on the camera. Battery Level Battery level indicator Monitor NO INDICATOR B N Battery exhausted. The power-on lamp (green) will light for first-time users of digital cameras. 1 Press the power switch to turn on. A (auto) mode can be applied by tapping A in...

S60 User's Manual
Page 39
... taken in face priority mode, the eyes of a white wall, wearing a white shirt) • Several objects are at different distances from the camera (e.g. B Autofocus Autofocus may have been closed when the picture was taken, will blink. Check the picture and decide whether or not another subject and...times, or focus on another picture should be framed by pressing the shutter-release button all the way down. 27 Do not open the battery-chamber/memory card slot cover while pictures are being recorded, the number of data or in damage to shooting mode. the subject is inside...
... taken in face priority mode, the eyes of a white wall, wearing a white shirt) • Several objects are at different distances from the camera (e.g. B Autofocus Autofocus may have been closed when the picture was taken, will blink. Check the picture and decide whether or not another subject and...times, or focus on another picture should be framed by pressing the shutter-release button all the way down. 27 Do not open the battery-chamber/memory card slot cover while pictures are being recorded, the number of data or in damage to shooting mode. the subject is inside...

S60 User's Manual
Page 43
Pictures taken when E is displayed may appear as bright spots in the camera's memory even after the camera is turned off, and reapplied the next time A (auto) mode is selected. If the battery is low, the monitor display will be shot also increases slightly. if redeye is detected, the ...-eye. Basic Photography and Playback: Auto Mode Using the Flash B Shooting When Lighting is Poor and the Flash is Disabled (W) • Use of camera shake. Advanced red-eye reduction may be slightly mottled. Set Vibration reduction (A 142) in the setup menu (A 133) to Off when using the ...
Pictures taken when E is displayed may appear as bright spots in the camera's memory even after the camera is turned off, and reapplied the next time A (auto) mode is selected. If the battery is low, the monitor display will be shot also increases slightly. if redeye is detected, the ...-eye. Basic Photography and Playback: Auto Mode Using the Flash B Shooting When Lighting is Poor and the Flash is Disabled (W) • Use of camera shake. Advanced red-eye reduction may be slightly mottled. Set Vibration reduction (A 142) in the setup menu (A 133) to Off when using the ...
S60 User's Manual
Page 99
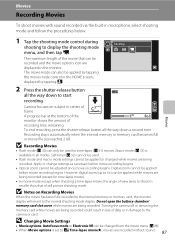
...time-lapse movie). • In movie mode except when shooting a time-lapse movie, the angle of view (area to the camera or card. Camera focuses on Recording Movies When the movie has been fully recorded to the internal memory or memory card, the monitor display will revert ... mode control during shooting to 2×) can be applied while movies are being recorded (except for time-lapse (A 91) movies. However, digital zoom (up to display the shooting mode menu, and then tap D. Do not open the battery-chamber/ memory card slot cover while movies are being recorded.
...time-lapse movie). • In movie mode except when shooting a time-lapse movie, the angle of view (area to the camera or card. Camera focuses on Recording Movies When the movie has been fully recorded to the internal memory or memory card, the monitor display will revert ... mode control during shooting to 2×) can be applied while movies are being recorded (except for time-lapse (A 91) movies. However, digital zoom (up to display the shooting mode menu, and then tap D. Do not open the battery-chamber/ memory card slot cover while movies are being recorded.

S60 User's Manual
Page 104
Apply the appropriate settings before shooting begins. Movies The Movie Menu B Time-Lapse Movie • Flash mode (A 30) and macro mode (A 35) cannot be adjusted after the first picture is taken. Flash mode and macro mode settings for the second picture or later are fixed at those for the first picture. • To prevent the camera from turning off unexpectedly during recording, use a fully charged battery. 92
Apply the appropriate settings before shooting begins. Movies The Movie Menu B Time-Lapse Movie • Flash mode (A 30) and macro mode (A 35) cannot be adjusted after the first picture is taken. Flash mode and macro mode settings for the second picture or later are fixed at those for the first picture. • To prevent the camera from turning off unexpectedly during recording, use a fully charged battery. 92

S60 User's Manual
Page 113
... turning off unexpectedly. B Note on Power Source When connecting the camera to a computer or printer, use a fully charged battery to a computer, software, including Nikon Transfer and Panorama Maker for the latest information on the memory card to the computer (A 104). • If the camera has been connected to close the dialog and disconnect the...
... turning off unexpectedly. B Note on Power Source When connecting the camera to a computer or printer, use a fully charged battery to a computer, software, including Nikon Transfer and Panorama Maker for the latest information on the memory card to the computer (A 104). • If the camera has been connected to close the dialog and disconnect the...
S60 User's Manual
Page 117
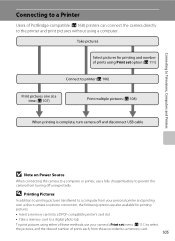
... methods, use a fully charged battery to the printer and print pictures without using a computer. Take pictures Select pictures for printing pictures: • Insert a memory card into a DPOF-compatible printer's card slot • Take a memory card to a digital photo lab To print pictures using...either of PictBridge-compatible (A 168) printers can connect the camera directly to prevent the camera from turning off and disconnect USB cable B Note on Power Source When connecting the camera to a computer or printer, use your camera's Print set option (A 111) Connect to printer (A 106...
... methods, use a fully charged battery to the printer and print pictures without using a computer. Take pictures Select pictures for printing pictures: • Insert a memory card into a DPOF-compatible printer's card slot • Take a memory card to a digital photo lab To print pictures using...either of PictBridge-compatible (A 168) printers can connect the camera directly to prevent the camera from turning off and disconnect USB cable B Note on Power Source When connecting the camera to a computer or printer, use your camera's Print set option (A 111) Connect to printer (A 106...

S60 User's Manual
Page 179
...) (excluding power cable) Technical Notes B Specifications Nikon will not be held liable for measuring the life of this manual may contain. zoom adjusted with each shot, flash fired with a fully-charged Rechargeable Li-ion Battery EN-EL10 operated at 23 °C (73 °F); Battery life may vary depending on Camera and Imaging Products Association (CIPA) standards...
...) (excluding power cable) Technical Notes B Specifications Nikon will not be held liable for measuring the life of this manual may contain. zoom adjusted with each shot, flash fired with a fully-charged Rechargeable Li-ion Battery EN-EL10 operated at 23 °C (73 °F); Battery life may vary depending on Camera and Imaging Products Association (CIPA) standards...


