
Product Manual
Page 6
Release Mode 102 Choosing a Release Mode 102 Power Source and Frame Rate 104 Self-Timer Mode (E 106 Mirror up Mode (V 108 ISO Sensitivity 109 Manual Adjustment 109 Auto ISO Sensitivity ...
Release Mode 102 Choosing a Release Mode 102 Power Source and Frame Rate 104 Self-Timer Mode (E 106 Mirror up Mode (V 108 ISO Sensitivity 109 Manual Adjustment 109 Auto ISO Sensitivity ...

Product Manual
Page 10
...Easy Exposure Compensation 316 b5: Matrix Metering 317 b6: Center-Weighted Area 317 b7: Fine-Tune Optimal Exposure 318 c: Timers/AE Lock 319 c1: Shutter-Release Button AE-L 319 c2: Standby Timer 319 c3: Self-Timer 319 c4: Monitor off Delay 320 d: Shooting/Display 321 d1: Beep 321 d2: CL ...Mode Shooting Speed 321 d3: Max. Continuous Release 322 d4: Exposure Delay Mode 322 d5: Electronic Front-Curtain Shutter 323 d6: File Number Sequence 324 d7: Viewfinder Grid Display 325 d8: ISO Display...
...Easy Exposure Compensation 316 b5: Matrix Metering 317 b6: Center-Weighted Area 317 b7: Fine-Tune Optimal Exposure 318 c: Timers/AE Lock 319 c1: Shutter-Release Button AE-L 319 c2: Standby Timer 319 c3: Self-Timer 319 c4: Monitor off Delay 320 d: Shooting/Display 321 d1: Beep 321 d2: CL ...Mode Shooting Speed 321 d3: Max. Continuous Release 322 d4: Exposure Delay Mode 322 d5: Electronic Front-Curtain Shutter 323 d6: File Number Sequence 324 d7: Viewfinder Grid Display 325 d8: ISO Display...
Product Manual
Page 11
... AE-L/AF-L button 349 f7: Shutter Spd & Aperture Lock 350 f8: Assign BKT Button 350 f9: Customize Command Dials 351 f10: Release Button to Use Dial 353 f11: Slot Empty Release Lock 354 f12: Reverse Indicators 354 f13: Assign Movie Record Button 355 f14: Live View Button Options 356 f15: Assign MB...
... AE-L/AF-L button 349 f7: Shutter Spd & Aperture Lock 350 f8: Assign BKT Button 350 f9: Customize Command Dials 351 f10: Release Button to Use Dial 353 f11: Slot Empty Release Lock 354 f12: Reverse Indicators 354 f13: Assign Movie Record Button 355 f14: Live View Button Options 356 f15: Assign MB...

Product Manual
Page 25
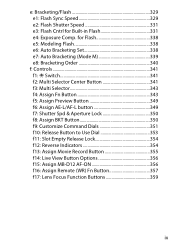
... helpful to bookmark this section and refer to familiarize yourself with camera controls and displays. Camera Body 1 Release mode dial 102 8 Sub-command dial 351 2 Release mode dial 9 Power switch 16 lock release 102 10 Shutter-release button 30 3 T button 79, 83, 206 11 E button 130, 206 4 U button 149, 153, 157 12 Movie-record...
... helpful to bookmark this section and refer to familiarize yourself with camera controls and displays. Camera Body 1 Release mode dial 102 8 Sub-command dial 351 2 Release mode dial 9 Power switch 16 lock release 102 10 Shutter-release button 30 3 T button 79, 83, 206 11 E button 130, 206 4 U button 149, 153, 157 12 Movie-record...
Product Manual
Page 26
... 5 Audio connector cover..........56, 63 14 Headphone connector 56 6 USB connector cover ........ 257,263 15 Connector for external 7 HDMI connector cover 269 microphone 63 8 Lens release button 23 16 USB connector 257, 263 9 AF-mode button ........39, 41, 88, 91 17 HDMI connector 269 D The Speaker Do not place the speaker...
... 5 Audio connector cover..........56, 63 14 Headphone connector 56 6 USB connector cover ........ 257,263 15 Connector for external 7 HDMI connector cover 269 microphone 63 8 Lens release button 23 16 USB connector 257, 263 9 AF-mode button ........39, 41, 88, 91 17 HDMI connector 269 D The Speaker Do not place the speaker...

Product Manual
Page 40
Power switch Control panel A LCD Illuminators Rotating the power switch toward D again. 16 After the power switch is released, the illuminators will light. The control panel will remain lit for six seconds while the standby timer is active or until the shutter is released or the power switch is rotated toward D activates the standby timer and control panel backlight (LCD illuminator), allowing the display to be read in the dark. Turn the camera on . 5 Turn the camera on .
Power switch Control panel A LCD Illuminators Rotating the power switch toward D again. 16 After the power switch is released, the illuminators will light. The control panel will remain lit for six seconds while the standby timer is active or until the shutter is released or the power switch is rotated toward D activates the standby timer and control panel backlight (LCD illuminator), allowing the display to be read in the dark. Turn the camera on . 5 Turn the camera on .

Product Manual
Page 43
d d (flashes) Description Battery fully charged. Low battery. Control panel Control panel L K J I H H (flashes) Viewfinder Viewfinder - - - - Battery partially discharged. Charge or exchange battery. 19 Charge battery or ready spare battery. Shutter release disabled. ❚❚ Battery Level The battery level is shown in the control panel and viewfinder.
d d (flashes) Description Battery fully charged. Low battery. Control panel Control panel L K J I H H (flashes) Viewfinder Viewfinder - - - - Battery partially discharged. Charge or exchange battery. 19 Charge battery or ready spare battery. Shutter release disabled. ❚❚ Battery Level The battery level is shown in the control panel and viewfinder.

Product Manual
Page 45
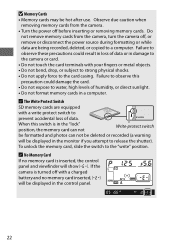
... the camera off and open the memory card slot cover. • SD memory cards: Press the card in the direction shown by the arrow to release the battery and then remove the battery by hand. The memory card can then be removed by hand. Press the battery latch in and then... release it (q). Do not push on the memory card while pressing the eject button. The memory card can then be removed by hand (w). • CompactFlash memory ...
... the camera off and open the memory card slot cover. • SD memory cards: Press the card in the direction shown by the arrow to release the battery and then remove the battery by hand. The memory card can then be removed by hand. Press the battery latch in and then... release it (q). Do not push on the memory card while pressing the eject button. The memory card can then be removed by hand (w). • CompactFlash memory ...
Product Manual
Page 46
.... When this precaution could result in loss of humidity, or direct sunlight. • Do not format memory cards in the monitor if you attempt to release the shutter). Failure to observe these precautions could damage the card. • Do not expose to water, high levels of data or in the control...
.... When this precaution could result in loss of humidity, or direct sunlight. • Do not format memory cards in the monitor if you attempt to release the shutter). Failure to observe these precautions could damage the card. • Do not expose to water, high levels of data or in the control...
Product Manual
Page 47
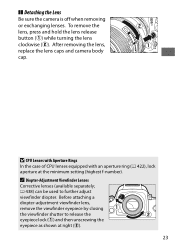
... viewfinder eyepiece by closing the viewfinder shutter to further adjust viewfinder diopter. A Diopter-Adjustment Viewfinder Lenses Corrective lenses (available separately; 0 438) can be used to release the eyepiece lock (q) and then unscrewing the eyepiece as shown at the minimum setting (highest f-number). After removing the lens, replace the lens caps and...
... viewfinder eyepiece by closing the viewfinder shutter to further adjust viewfinder diopter. A Diopter-Adjustment Viewfinder Lenses Corrective lenses (available separately; 0 438) can be used to release the eyepiece lock (q) and then unscrewing the eyepiece as shown at the minimum setting (highest f-number). After removing the lens, replace the lens caps and...

Product Manual
Page 52
To exit without making a selection, press the G button. J button Note the following points: • Menu items that are displayed in gray are not currently available. • While pressing 2 or the center of the multi selector generally has the same effect as pressing J, there are some cases in which selection can only be made by pressing J. • To exit the menus and return to select the highlighted item. 8 Select the highlighted item. Press J to shooting mode, press the shutter-release button halfway. 28
To exit without making a selection, press the G button. J button Note the following points: • Menu items that are displayed in gray are not currently available. • While pressing 2 or the center of the multi selector generally has the same effect as pressing J, there are some cases in which selection can only be made by pressing J. • To exit the menus and return to select the highlighted item. 8 Select the highlighted item. Press J to shooting mode, press the shutter-release button halfway. 28

Product Manual
Page 54
.... See page 99. 4 Shoot. FH Camera unable to focus on subject in the viewfinder when the focus operation is complete. Smoothly press the shutter-release-button the rest of the way down to focus (if the subject is between camera and subject. Press the shutter...-release button halfway to take the photograph. 3 Press the shutter-release button halfway. The in-focus Focus indicator indicator (I Subject in the monitor for a few seconds. H Focus point is complete. 30 Do ...
.... See page 99. 4 Shoot. FH Camera unable to focus on subject in the viewfinder when the focus operation is complete. Smoothly press the shutter-release-button the rest of the way down to focus (if the subject is between camera and subject. Press the shutter...-release button halfway to take the photograph. 3 Press the shutter-release button halfway. The in-focus Focus indicator indicator (I Subject in the monitor for a few seconds. H Focus point is complete. 30 Do ...

Product Manual
Page 55
K button 2 View additional pictures. The memory card containing the picture currently displayed is shown by pressing 4 or 2. Additional pictures can be displayed in the monitor. To end playback and return to shooting mode, press the shutter-release button halfway. 31 A photograph will be displayed by an icon. To view additional information on the current photograph, press 1 and 3 (0 238). Basic Playback 1 Press the K button.
K button 2 View additional pictures. The memory card containing the picture currently displayed is shown by pressing 4 or 2. Additional pictures can be displayed in the monitor. To end playback and return to shooting mode, press the shutter-release button halfway. 31 A photograph will be displayed by an icon. To view additional information on the current photograph, press 1 and 3 (0 238). Basic Playback 1 Press the K button.
Product Manual
Page 58
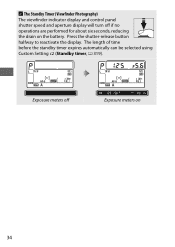
The length of time before the standby timer expires automatically can be selected using Custom Setting c2 (Standby timer, 0 319). A The Standby Timer (Viewfinder Photography) The viewfinder indicator display and control panel shutter speed and aperture display will turn off Exposure meters on the battery. Press the shutter-release button halfway to reactivate the display. Exposure meters off if no operations are performed for about six seconds, reducing the drain on 34
The length of time before the standby timer expires automatically can be selected using Custom Setting c2 (Standby timer, 0 319). A The Standby Timer (Viewfinder Photography) The viewfinder indicator display and control panel shutter speed and aperture display will turn off Exposure meters on the battery. Press the shutter-release button halfway to reactivate the display. Exposure meters off if no operations are performed for about six seconds, reducing the drain on 34

Product Manual
Page 60
... only values between -3 and +3 EV are reflected in the monitor before shooting). if the camera is selected for shutter speed. focus locks while the shutter-release button is very bright or very dark, the exposure indicators will flash green while the camera focuses. The focus point will flash to focus. check... focus in the preview display. If the subject is pressed halfway. Exposure can be adjusted by pressing the A AE-L/AF-L button (0 128); Press the shutter-release button halfway to warn that pictures can be taken even when the focus point flashes red;
... only values between -3 and +3 EV are reflected in the monitor before shooting). if the camera is selected for shutter speed. focus locks while the shutter-release button is very bright or very dark, the exposure indicators will flash green while the camera focuses. The focus point will flash to focus. check... focus in the preview display. If the subject is pressed halfway. Exposure can be adjusted by pressing the A AE-L/AF-L button (0 128); Press the shutter-release button halfway to warn that pictures can be taken even when the focus point flashes red;
Product Manual
Page 61
... dominated by regular geometric patterns (e.g., blinds or a row of windows in Live View Photography and Movie Live View Use an AF-S lens. Press the shutter-release button the rest of the setting selected for Custom Setting c2 (Standby timer, 0 319), the standby timer will turn off. 37 The monitor will not...
... dominated by regular geometric patterns (e.g., blinds or a row of windows in Live View Photography and Movie Live View Use an AF-S lens. Press the shutter-release button the rest of the setting selected for Custom Setting c2 (Standby timer, 0 319), the standby timer will turn off. 37 The monitor will not...

Product Manual
Page 63
... locks when shutterrelease button is pressed halfway. To choose an autofocus mode, press the AF-mode button and rotate the main command dial until shutter-release button is displayed in the monitor. Camera focuses AF-F continuously until the desired mode is pressed. Focus To focus using autofocus, rotate the focus-mode... autofocus modes are available during live view photography and movie live view: Mode Description AF-S Single-servo AF: For stationary subjects. Focus locks when shutter-release button is pressed halfway.
... locks when shutterrelease button is pressed halfway. To choose an autofocus mode, press the AF-mode button and rotate the main command dial until shutter-release button is displayed in the monitor. Camera focuses AF-F continuously until the desired mode is pressed. Focus To focus using autofocus, rotate the focus-mode... autofocus modes are available during live view photography and movie live view: Mode Description AF-S Single-servo AF: For stationary subjects. Focus locks when shutter-release button is pressed halfway.

Product Manual
Page 65
... Focus To focus in manual focus mode (0 100), rotate the lens focus ring until the desired mode is displayed in the monitor. If the shutter-release button is pressed all the way down to take a picture during live view photography, press the Pv button. To choose an AF-area mode, press...
... Focus To focus in manual focus mode (0 100), rotate the lens focus ring until the desired mode is displayed in the monitor. If the shutter-release button is pressed all the way down to take a picture during live view photography, press the Pv button. To choose an AF-area mode, press...

Product Manual
Page 68
The positions of the magnified areas are shown in focus the shutter-release button halfway. To focus on the subject at a high zoom ratio. To exit the split-screen display, press the b button. 44 Pressing 1 or 3 scrolls both ...
The positions of the magnified areas are shown in focus the shutter-release button halfway. To focus on the subject at a high zoom ratio. To exit the split-screen display, press the b button. 44 Pressing 1 or 3 scrolls both ...

Product Manual
Page 74
B button A Focusing in face-priority AF drops during movie recording. Note that the number of subjects that can also be detected in Movie Live View Focus can be adjusted by pressing the shutter-release button halfway before beginning recording. 50 3 Choose a focus mode (0 39). 4 Choose an AF-area mode (0 40). 5 Focus. Frame the opening shot and press the B button to focus.
B button A Focusing in face-priority AF drops during movie recording. Note that the number of subjects that can also be detected in Movie Live View Focus can be adjusted by pressing the shutter-release button halfway before beginning recording. 50 3 Choose a focus mode (0 39). 4 Choose an AF-area mode (0 40). 5 Focus. Frame the opening shot and press the B button to focus.

