
Product Manual
Page 6
User Settings: U1 and U2 Modes 62 Saving User Settings 62 Recalling User Settings 64 Resetting User Settings 65 Release Mode 66 Choosing a Release Mode 66 Frame Advance Rate 67 Self-Timer Mode (E 69 Mirror up Mode (MUP 71 Image Recording Options 73 Image Area 73 Image Quality and Size 77 Image Quality 77 Image Size 81 Using Two Memory Cards 82 Focus 83 Autofocus 83 Autofocus Mode 83 AF-Area Mode 86 Focus Lock 93 Manual Focus 97 ISO Sensitivity 99 Auto ISO Sensitivity Control 102 iv
User Settings: U1 and U2 Modes 62 Saving User Settings 62 Recalling User Settings 64 Resetting User Settings 65 Release Mode 66 Choosing a Release Mode 66 Frame Advance Rate 67 Self-Timer Mode (E 69 Mirror up Mode (MUP 71 Image Recording Options 73 Image Area 73 Image Quality and Size 77 Image Quality 77 Image Size 81 Using Two Memory Cards 82 Focus 83 Autofocus 83 Autofocus Mode 83 AF-Area Mode 86 Focus Lock 93 Manual Focus 97 ISO Sensitivity 99 Auto ISO Sensitivity Control 102 iv

Product Manual
Page 25
... 8, 66 9 Movie-record button 163 3 Mode dial 6 10 Power switch 5, 24 4 Mode dial lock release 6 11 Shutter-release button..........34, 35 5 Eyelet for camera strap 20 12 E button 109, 194 6 Release mode dial lock 13 Focal plane mark (E 98 release 8, 66 14 Control panel 9 7 Accessory shoe (for optional flash unit 311, 319 1 Introduction Getting...
... 8, 66 9 Movie-record button 163 3 Mode dial 6 10 Power switch 5, 24 4 Mode dial lock release 6 11 Shutter-release button..........34, 35 5 Eyelet for camera strap 20 12 E button 109, 194 6 Release mode dial lock 13 Focal plane mark (E 98 release 8, 66 14 Control panel 9 7 Accessory shoe (for optional flash unit 311, 319 1 Introduction Getting...

Product Manual
Page 26
..., 144 10 Cover for accessory terminal and 2 Mirror 71, 324 headphone connector 3 Meter coupling lever 352 160, 193, 227 4 Lens mounting mark 23 11 Lens release button 29 5 M/Y button 144, 146, 151 12 AF-mode button 84, 90 6 Infrared receiver (front 157 13 Focus-mode selector 83, 97 7 D button 198, 203...
..., 144 10 Cover for accessory terminal and 2 Mirror 71, 324 headphone connector 3 Meter coupling lever 352 160, 193, 227 4 Lens mounting mark 23 11 Lens release button 29 5 M/Y button 144, 146, 151 12 AF-mode button 84, 90 6 Infrared receiver (front 157 13 Focus-mode selector 83, 97 7 D button 198, 203...

Product Manual
Page 29
After the power switch is released, the illuminators will remain lit for a few seconds while the standby timer is active or until the shutter is released or the power switch is rotated toward D activates the standby timer and control panel backlight (LCD illuminator), allowing the display to be read in close proximity to observe this precaution could affect the data recorded on the magnetic devices. 5 Power switch D The Speaker Do not place the speaker in the dark. A LCD Illuminators Rotating the power switch toward D again. Failure to magnetic devices.
After the power switch is released, the illuminators will remain lit for a few seconds while the standby timer is active or until the shutter is released or the power switch is rotated toward D activates the standby timer and control panel backlight (LCD illuminator), allowing the display to be read in close proximity to observe this precaution could affect the data recorded on the magnetic devices. 5 Power switch D The Speaker Do not place the speaker in the dark. A LCD Illuminators Rotating the power switch toward D again. Failure to magnetic devices.

Product Manual
Page 30
Mode dial Mode dial lock release e, f, g, and h modes: • e -Programmed auto (0 52) • f-Shutter-priority auto (0 53) • g-Aperture-priority auto (0 54) • h-Manual (0 56) Auto modes: • i Auto (0 30) • j Auto (flash off) (0 30) Scene modes (0 41) j and k modes (0 62) Special effects modes (0 44) 6 To choose a mode, press the mode dial lock release and rotate the mode dial. The Mode Dial The camera offers the modes listed below.
Mode dial Mode dial lock release e, f, g, and h modes: • e -Programmed auto (0 52) • f-Shutter-priority auto (0 53) • g-Aperture-priority auto (0 54) • h-Manual (0 56) Auto modes: • i Auto (0 30) • j Auto (flash off) (0 30) Scene modes (0 41) j and k modes (0 62) Special effects modes (0 44) 6 To choose a mode, press the mode dial lock release and rotate the mode dial. The Mode Dial The camera offers the modes listed below.

Product Manual
Page 31
Selecting another mode when a non-CPU lens is attached disables the shutter release. 7 A Non-CPU Lenses Non-CPU (0 305) lenses can be used only in modes A and M.
Selecting another mode when a non-CPU lens is attached disables the shutter release. 7 A Non-CPU Lenses Non-CPU (0 305) lenses can be used only in modes A and M.

Product Manual
Page 32
Release mode dial lock release Release mode dial 12 345 6 1 S Single frame 66 2 T Continuous low speed ...........66 3 U Continuous high speed .........66 4 J Quiet shutter-release 66 5 E Self-timer 66, 69 6 V Mirror up 66, 71 8 The Release-Mode Dial To choose a release mode, press the release mode dial lock release and turn the release mode dial to the desired setting (0 66).
Release mode dial lock release Release mode dial 12 345 6 1 S Single frame 66 2 T Continuous low speed ...........66 3 U Continuous high speed .........66 4 J Quiet shutter-release 66 5 E Self-timer 66, 69 6 V Mirror up 66, 71 8 The Release-Mode Dial To choose a release mode, press the release mode dial lock release and turn the release mode dial to the desired setting (0 66).

Product Manual
Page 43
... exit the menus and return to select the highlighted item. To exit without making a selection, press the G button. Press J to shooting mode, press the shutter-release button halfway. 19 5 Highlight a menu item. Press 1 or 3 to display options for the selected menu item. 7 Highlight an option. Press 2 to highlight an option. 8 Select...
... exit the menus and return to select the highlighted item. To exit without making a selection, press the G button. Press J to shooting mode, press the shutter-release button halfway. 19 5 Highlight a menu item. Press 1 or 3 to display options for the selected menu item. 7 Highlight an option. Press 2 to highlight an option. 8 Select...
Product Manual
Page 50
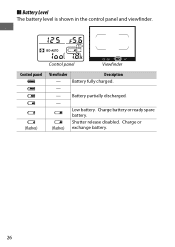
❚❚ Battery Level The battery level is shown in the control panel and viewfinder. Battery partially discharged. Charge battery or ready spare battery. Charge or exchange battery. 26 d d (flashes) Description Battery fully charged. Control panel Viewfinder Control panel L K J I H H (flashes) Viewfinder - - - - Low battery. Shutter release disabled.
❚❚ Battery Level The battery level is shown in the control panel and viewfinder. Battery partially discharged. Charge battery or ready spare battery. Charge or exchange battery. 26 d d (flashes) Description Battery fully charged. Control panel Viewfinder Control panel L K J I H H (flashes) Viewfinder - - - - Low battery. Shutter release disabled.
Product Manual
Page 52
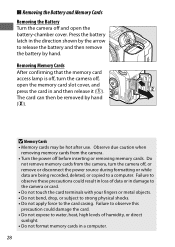
.... • Turn the power off , or remove or disconnect the power source during formatting or while data are being recorded, deleted, or copied to release the battery and then remove the battery by hand (w). 16GB ❚❚ Removing the Battery and Memory Cards Removing the Battery Turn the camera off... and open the memory card slot cover, and press the card in and then release it (q). D Memory Cards • Memory cards may be removed by hand. Failure to observe this precaution could result in loss of data or in...
.... • Turn the power off , or remove or disconnect the power source during formatting or while data are being recorded, deleted, or copied to release the battery and then remove the battery by hand (w). 16GB ❚❚ Removing the Battery and Memory Cards Removing the Battery Turn the camera off... and open the memory card slot cover, and press the card in and then release it (q). D Memory Cards • Memory cards may be removed by hand. Failure to observe this precaution could result in loss of data or in...
Product Manual
Page 53
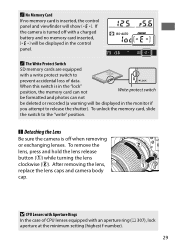
... equipped 16GB with an aperture ring (0 307), lock aperture at the minimum setting (highest f-number). 29 To remove the lens, press and hold the lens release button (q) while turning the lens clockwise (w). D CPU Lenses with Aperture Rings In the case of data. When this switch is in the "lock" position, the... panel and viewfinder will be displayed in the monitor if you attempt to prevent accidental loss of CPU lenses equipped with a write protect switch to release the shutter). A No Memory Card If no memory card inserted, S will be displayed in the control panel.
... equipped 16GB with an aperture ring (0 307), lock aperture at the minimum setting (highest f-number). 29 To remove the lens, press and hold the lens release button (q) while turning the lens clockwise (w). D CPU Lenses with Aperture Rings In the case of data. When this switch is in the "lock" position, the... panel and viewfinder will be displayed in the monitor if you attempt to prevent accidental loss of CPU lenses equipped with a write protect switch to release the shutter). A No Memory Card If no memory card inserted, S will be displayed in the control panel.

Product Manual
Page 55
Live view selector a button Framing pictures in the Framing pictures in the monitor (live view). To start live view, rotate the live view) 31 2 Pressing the mode dial lock release on top of the camera, rotate the mode dial to C and press the a button. Mode dial Mode dial lock release Photographs can be framed in the viewfinder or in the viewfinder monitor (live view selector to i or j.
Live view selector a button Framing pictures in the Framing pictures in the monitor (live view). To start live view, rotate the live view) 31 2 Pressing the mode dial lock release on top of the camera, rotate the mode dial to C and press the a button. Mode dial Mode dial lock release Photographs can be framed in the viewfinder or in the viewfinder monitor (live view selector to i or j.

Product Manual
Page 58
... operation is complete, the active focus point and in-focus indicator (I F H FH (flashes) Description Subject in the viewfinder. 5 Press the shutter-release button halfway. Focus point is between camera and subject. Camera unable to focus, the focus point will appear in focus. If the camera is poorly...while the camera focuses. Focus point Focus indicator In-focus indicator I ) will be displayed in green; Viewfinder photography: Press the shutter-release button halfway to focus (the AF-assist illuminator may light if the subject is able to focus using autofocus.
... operation is complete, the active focus point and in-focus indicator (I F H FH (flashes) Description Subject in the viewfinder. 5 Press the shutter-release button halfway. Focus point is between camera and subject. Camera unable to focus, the focus point will appear in focus. If the camera is poorly...while the camera focuses. Focus point Focus indicator In-focus indicator I ) will be displayed in green; Viewfinder photography: Press the shutter-release button halfway to focus (the AF-assist illuminator may light if the subject is able to focus using autofocus.

Product Manual
Page 59
6 Shoot. Do not eject the memory card or remove or disconnect the power source until the lamp has gone out and recording is complete. The memory card access lamp will light and the photograph will be Memory card access displayed in the monitor lamp for a few seconds. a button 35 To end live view, press the a button. Smoothly press the shutter-release button the rest of the way down to take the photograph.
6 Shoot. Do not eject the memory card or remove or disconnect the power source until the lamp has gone out and recording is complete. The memory card access lamp will light and the photograph will be Memory card access displayed in the monitor lamp for a few seconds. a button 35 To end live view, press the a button. Smoothly press the shutter-release button the rest of the way down to take the photograph.

Product Manual
Page 60
remove your finger briefly from the shutter-release button and try again. A The Built-in Flash If additional lighting is required for correct exposure in i mode, the built-in use, press it gently downward until the latch clicks into place. 36 If the flash is raised, photographs can only be taken when the flash-ready indicator (M) is pressed halfway. Viewfinder Live view To save power when the flash is charging; If the flash-ready indicator is not displayed, the flash is not in flash will pop up automatically when the shutterrelease button is displayed.
remove your finger briefly from the shutter-release button and try again. A The Built-in Flash If additional lighting is required for correct exposure in i mode, the built-in use, press it gently downward until the latch clicks into place. 36 If the flash is raised, photographs can only be taken when the flash-ready indicator (M) is pressed halfway. Viewfinder Live view To save power when the flash is charging; If the flash-ready indicator is not displayed, the flash is not in flash will pop up automatically when the shutterrelease button is displayed.
Product Manual
Page 61
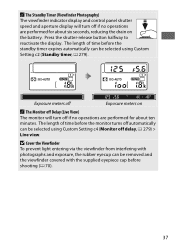
Press the shutter-release button halfway to reactivate the display. D Cover the Viewfinder To prevent light entering via the viewfinder from interfering with photographs and exposure, the rubber eyecup ...
Press the shutter-release button halfway to reactivate the display. D Cover the Viewfinder To prevent light entering via the viewfinder from interfering with photographs and exposure, the rubber eyecup ...

Product Manual
Page 63
... can be displayed in the monitor for information on choosing a memory card slot. 39 To end playback and return to shooting mode, press the shutter-release button halfway. A See Also See page 233 for a few seconds after shooting. A photograph will be displayed by an icon. A Image Review When On is shown...
... can be displayed in the monitor for information on choosing a memory card slot. 39 To end playback and return to shooting mode, press the shutter-release button halfway. A See Also See page 233 for a few seconds after shooting. A photograph will be displayed by an icon. A Image Review When On is shown...

Product Manual
Page 69
... speed, compressing about three minutes. using autofocus during movie recording. A Preventing Blur Use a tripod to create dark, lowkey images with the frame rate for continuous release mode; Option Description Create photos that plays back in about 45 minutes of footage shot at 1920 × 1080/30p into a silent movie that appear...
... speed, compressing about three minutes. using autofocus during movie recording. A Preventing Blur Use a tripod to create dark, lowkey images with the frame rate for continuous release mode; Option Description Create photos that plays back in about 45 minutes of footage shot at 1920 × 1080/30p into a silent movie that appear...

Product Manual
Page 75
... Time (%) for long time- M Set shutter speed to freeze or blur motion. Non-CPU lenses can only be used in other mode disables the shutter release. P, S, A, and M Modes P, S, A, and M modes offer different degrees of control over shutter speed and aperture. Manual (0 56): User controls both foreground and background into focus. A Lens...
... Time (%) for long time- M Set shutter speed to freeze or blur motion. Non-CPU lenses can only be used in other mode disables the shutter release. P, S, A, and M Modes P, S, A, and M modes offer different degrees of control over shutter speed and aperture. Manual (0 56): User controls both foreground and background into focus. A Lens...

Product Manual
Page 82
Bright spots and fog can be present in long exposures. The shutter remains open while the shutter-release button is pressed a second time. Before proceeding, mount the camera on a tripod or place it on an optional remote control, remote cord, or wireless ... of exposure: 35 s an optional wireless remote controller Aperture: f/25 (0 160, 319) or remote cord (0 319). • Time (%): Start the exposure using the shutter-release button on the camera or on a stable, level surface. To prevent blur, use a tripod or Length of moving lights, the stars, night scenery, or fireworks...
Bright spots and fog can be present in long exposures. The shutter remains open while the shutter-release button is pressed a second time. Before proceeding, mount the camera on a tripod or place it on an optional remote control, remote cord, or wireless ... of exposure: 35 s an optional wireless remote controller Aperture: f/25 (0 160, 319) or remote cord (0 319). • Time (%): Start the exposure using the shutter-release button on the camera or on a stable, level surface. To prevent blur, use a tripod or Length of moving lights, the stars, night scenery, or fireworks...

