
Product Manual
Page 2
... Purchasers of "watch and learn" manuals in movie form, is available from the following items: BS-1 accessory shoe cover DK-23 rubber eyecup D7100 camera BF-1B body cap EN-EL15 rechargeable Li-ion battery (with terminal cover) MH-25 battery charger (AC wall adapter supplied only in countries or regions where...
... Purchasers of "watch and learn" manuals in movie form, is available from the following items: BS-1 accessory shoe cover DK-23 rubber eyecup D7100 camera BF-1B body cap EN-EL15 rechargeable Li-ion battery (with terminal cover) MH-25 battery charger (AC wall adapter supplied only in countries or regions where...

Product Manual
Page 14
Table of Contents Q&A Index ...ii Quick Start Guide...iv Menu Options ...vi For Your Safety ...xxi Notices ...xxiii Introduction 1 Overview...1 Getting to Know the Camera 2 The Camera Body ...2 The Mode Dial...6 The Release Mode Dial ...7 The Control Panel...8 The Viewfinder...9 The Information Display...10 The Command Dials ...13 The P button ...18 Camera Menus...19 Using Camera Menus ...20 First Steps ...22 Charge the Battery ...22 Insert the Battery ...24 Attach a Lens...26 Basic Setup...28 Insert a Memory Card...30 Format the Memory Card ...32 Adjust Viewfinder Focus ...33 xii
Table of Contents Q&A Index ...ii Quick Start Guide...iv Menu Options ...vi For Your Safety ...xxi Notices ...xxiii Introduction 1 Overview...1 Getting to Know the Camera 2 The Camera Body ...2 The Mode Dial...6 The Release Mode Dial ...7 The Control Panel...8 The Viewfinder...9 The Information Display...10 The Command Dials ...13 The P button ...18 Camera Menus...19 Using Camera Menus ...20 First Steps ...22 Charge the Battery ...22 Insert the Battery ...24 Attach a Lens...26 Basic Setup...28 Insert a Memory Card...30 Format the Memory Card ...32 Adjust Viewfinder Focus ...33 xii
Product Manual
Page 30
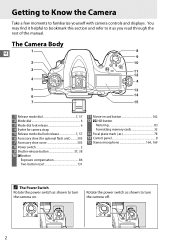
... to it as shown to turn the camera off. 2 Rotate the power switch as shown to familiarize yourself with camera controls and displays. The Camera Body X 1 8 9 2 10 3 11 12 4 4 5 13 6 14 7 15 1 Release mode dial 7, 57 2 Mode dial 6 3 Mode dial lock release 6 4 Eyelet for camera strap 5 Release mode dial lock release...
... to it as shown to turn the camera off. 2 Rotate the power switch as shown to familiarize yourself with camera controls and displays. The Camera Body X 1 8 9 2 10 3 11 12 4 4 5 13 6 14 7 15 1 Release mode dial 7, 57 2 Mode dial 6 3 Mode dial lock release 6 4 Eyelet for camera strap 5 Release mode dial lock release...
Product Manual
Page 31
Power switch 3 After the power switch is rotated toward D again. The Camera Body (Continued) 1 5 6 X 7 14 8 15 9 16 10 17 2 11 18 3 4 12 13 1 Built-in flash 119 2 Mirror 61, 315 3 Meter coupling lever 338 4 Lens mounting mark 27 5 M/Y ...
Power switch 3 After the power switch is rotated toward D again. The Camera Body (Continued) 1 5 6 X 7 14 8 15 9 16 10 17 2 11 18 3 4 12 13 1 Built-in flash 119 2 Mirror 61, 315 3 Meter coupling lever 338 4 Lens mounting mark 27 5 M/Y ...

Product Manual
Page 32
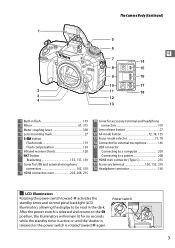
1 2 X 3 4 5 6 7 The Camera Body (Continued) 9 10 11 12 8 13 1 AF-assist illuminator 233 Self-timer lamp 59 Red-eye reduction lamp 121 2 Sub-command dial 13, 257 3 Depth-of-... for optional MB-D15 battery pack 308 8 Power connector cover 311 9 CPU contacts 10 Lens mount 27, 78 11 AF coupling 12 Tripod socket 13 Body cap 26, 309 D The Microphone and Speaker Do not place the microphone or speaker in close proximity to observe this precaution could affect the data...
1 2 X 3 4 5 6 7 The Camera Body (Continued) 9 10 11 12 8 13 1 AF-assist illuminator 233 Self-timer lamp 59 Red-eye reduction lamp 121 2 Sub-command dial 13, 257 3 Depth-of-... for optional MB-D15 battery pack 308 8 Power connector cover 311 9 CPU contacts 10 Lens mount 27, 78 11 AF coupling 12 Tripod socket 13 Body cap 26, 309 D The Microphone and Speaker Do not place the microphone or speaker in close proximity to observe this precaution could affect the data...

Product Manual
Page 33
The Camera Body (Continued) 2 1 3 4 5 6 7 8 9 10 1 Viewfinder eyepiece 33 2 Rubber eyecup 60 3 O/Q button Delete 40, 197 Formatting memory cards 32 4 K button Playback 39, 185 5 Monitor Viewing settings 10 Live ...
The Camera Body (Continued) 2 1 3 4 5 6 7 8 9 10 1 Viewfinder eyepiece 33 2 Rubber eyecup 60 3 O/Q button Delete 40, 197 Formatting memory cards 32 4 K button Playback 39, 185 5 Monitor Viewing settings 10 Live ...

Product Manual
Page 54
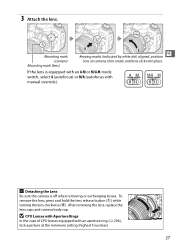
Focal length scale Lens mounting mark Focal length mark Lens hood X Lens cap CPU contacts (0 296) Zoom ring Rear lens cap A-M mode switch (0 27, 78) Vibration reduction ON/OFF switch Focus ring ( 0 78, 159) Care should be taken to prevent dust from entering the camera when the lens is an AF-S DX NIKKOR 18-105mm f/3.5-5.6G ED VR. Attach a Lens The lens generally used in this manual for illustrative purposes is removed. 1 Turn the camera off. 2 Remove the rear lens cap and the camera body cap. 26
Focal length scale Lens mounting mark Focal length mark Lens hood X Lens cap CPU contacts (0 296) Zoom ring Rear lens cap A-M mode switch (0 27, 78) Vibration reduction ON/OFF switch Focus ring ( 0 78, 159) Care should be taken to prevent dust from entering the camera when the lens is an AF-S DX NIKKOR 18-105mm f/3.5-5.6G ED VR. Attach a Lens The lens generally used in this manual for illustrative purposes is removed. 1 Turn the camera off. 2 Remove the rear lens cap and the camera body cap. 26
Product Manual
Page 55
... remove the lens, press and hold the lens release button (q) while turning the lens clockwise (w). After removing the lens, replace the lens caps and camera body cap. D CPU Lenses with Aperture Rings In the case of CPU lenses equipped with manual override). Mounting mark (camera) Mounting mark (lens) X Keeping marks (indicated...
... remove the lens, press and hold the lens release button (q) while turning the lens clockwise (w). After removing the lens, replace the lens caps and camera body cap. D CPU Lenses with Aperture Rings In the case of CPU lenses equipped with manual override). Mounting mark (camera) Mounting mark (lens) X Keeping marks (indicated...

Product Manual
Page 64
... lengths on the subject so that it fills a larger area of the other to zoom in your right hand and cradle the camera body or lens with your upper body stable. A Using a Zoom Lens Use the zoom ring to keep your left. When framing photographs in the viewfinder, hold the camera as...
... lengths on the subject so that it fills a larger area of the other to zoom in your right hand and cradle the camera body or lens with your upper body stable. A Using a Zoom Lens Use the zoom ring to keep your left. When framing photographs in the viewfinder, hold the camera as...
Product Manual
Page 106
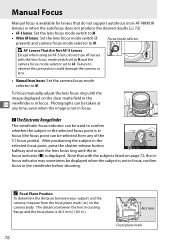
... not in the selected focus point, press the shutter-release button halfway and rotate the lens focus ring until the image displayed on the camera body. Manual Focus Manual focus is available for lenses that with the lens focus mode switch set to M and the camera focus-mode selector set to...
... not in the selected focus point, press the shutter-release button halfway and rotate the lens focus ring until the image displayed on the camera body. Manual Focus Manual focus is available for lenses that with the lens focus mode switch set to M and the camera focus-mode selector set to...

Product Manual
Page 324
... photograph. • PF-4 Reprocopy Outfit requires PA-4 Camera Holder. • Noise in manual mode M at ISO sensitivities of CPU contacts, type G and D lenses by camera body. use manual focus or focus lock. - In mode A, preset aperture using Non-CPU lens data (0 149). Filters can be used only if lens focal length...
... photograph. • PF-4 Reprocopy Outfit requires PA-4 Camera Holder. • Noise in manual mode M at ISO sensitivities of CPU contacts, type G and D lenses by camera body. use manual focus or focus lock. - In mode A, preset aperture using Non-CPU lens data (0 149). Filters can be used only if lens focal length...

Product Manual
Page 337
...WR-1 units are used in to an account on supported operating systems. At default settings, Nikon Message Center 2 will periodically check for updates to the Internet. Body Cap BF-1B/Body Cap BF-1A: The body cap keeps the mirror, viewfinder screen, and image sensor free of two or more, ..., the camera can be used to the computer hard disk. Insert a fingernail into the gap and open the battery chamber (q). n 309 Software Body cap • Capture NX 2: A complete photo editing package with one or more cameras, allowing the transmitter to be controlled wirelessly using a WR...
...WR-1 units are used in to an account on supported operating systems. At default settings, Nikon Message Center 2 will periodically check for updates to the Internet. Body Cap BF-1B/Body Cap BF-1A: The body cap keeps the mirror, viewfinder screen, and image sensor free of two or more, ..., the camera can be used to the computer hard disk. Insert a fingernail into the gap and open the battery chamber (q). n 309 Software Body cap • Capture NX 2: A complete photo editing package with one or more cameras, allowing the transmitter to be controlled wirelessly using a WR...

Product Manual
Page 340
... or chamois leather. Frequent inspection and servicing are easily damaged. After Camera body using the camera at the beach or seaside, wipe off sand or salt with a blower. Nikon recommends that the camera be inspected by the original retailer or Nikon-authorized service representative once every one to two years, and that it...
... or chamois leather. Frequent inspection and servicing are easily damaged. After Camera body using the camera at the beach or seaside, wipe off sand or salt with a blower. Nikon recommends that the camera be inspected by the original retailer or Nikon-authorized service representative once every one to two years, and that it...

Product Manual
Page 344
... use a blower-brush, as the bristles could damage the sensor. n 316 Under no foreign objects are present, proceed to the down . Replace the lens or body cap. Press the shutter-release button all the way down position and the shutter curtain will return to Step 8. 7 Clean the sensor. The display in... sensor. 5 Raise the mirror. Dirt that light falls on the image sensor, examine the sensor for dust or lint. The mirror will be removed by Nikon-authorized service personnel. Remove any dust and lint from the sensor with a blower can not be removed with a blower.
... use a blower-brush, as the bristles could damage the sensor. n 316 Under no foreign objects are present, proceed to the down . Replace the lens or body cap. Press the shutter-release button all the way down position and the shutter curtain will return to Step 8. 7 Clean the sensor. The display in... sensor. 5 Raise the mirror. Dirt that light falls on the image sensor, examine the sensor for dust or lint. The mirror will be removed by Nikon-authorized service personnel. Remove any dust and lint from the sensor with a blower can not be removed with a blower.

Product Manual
Page 345
...by the presence of foreign matter on the Image Sensor Nikon takes every possible precaution to warn that may adhere to the body cap. Avoid exchanging lenses in some third-party imaging applications. Photographs affected by authorized Nikon service personnel. n 317 If the camera powers off ...or remove or disconnect the power source while the mirror is raised. • If the battery runs low while the mirror is raised, the curtain will close and the mirror will close automatically. The D7100, however...
...by the presence of foreign matter on the Image Sensor Nikon takes every possible precaution to warn that may adhere to the body cap. Avoid exchanging lenses in some third-party imaging applications. Photographs affected by authorized Nikon service personnel. n 317 If the camera powers off ...or remove or disconnect the power source while the mirror is raised. • If the battery runs low while the mirror is raised, the curtain will close and the mirror will close automatically. The D7100, however...

Product Manual
Page 346
... cause the image sensor to deteriorate or produce a white blur effect in pure water and then dry the camera thoroughly. Cleaning: When cleaning the camera body, use or store this device in temperature, such as radio transmitters could interfere with cleaning tools, or subject it with the monitor, damage data stored...
... cause the image sensor to deteriorate or produce a white blur effect in pure water and then dry the camera thoroughly. Cleaning: When cleaning the camera body, use or store this device in temperature, such as radio transmitters could interfere with cleaning tools, or subject it with the monitor, damage data stored...

Product Manual
Page 369
...; 3.0 in .) Weight Approx. 88 g (3.1 oz), excluding terminal cover n 341 Nikon will not be held liable for a camera with battery and memory card but without prior notice. approx. 675 g (1 lb 7.8 oz; camera body only) Operating environment Temperature 0 °C-40 °C (+32 °F-104 °... at the temperature specified by the Camera and Imaging Products Association (CIPA): 23 ±3 °C (73.4 ±5.4 °F). • Nikon reserves the right to change the specifications of power cable Approx. 1.8 m/6 ft (U.S.A. and Canada) or 1.5 m/4.9 ft (other regions) AC ...
...; 3.0 in .) Weight Approx. 88 g (3.1 oz), excluding terminal cover n 341 Nikon will not be held liable for a camera with battery and memory card but without prior notice. approx. 675 g (1 lb 7.8 oz; camera body only) Operating environment Temperature 0 °C-40 °C (+32 °F-104 °... at the temperature specified by the Camera and Imaging Products Association (CIPA): 23 ±3 °C (73.4 ±5.4 °F). • Nikon reserves the right to change the specifications of power cable Approx. 1.8 m/6 ft (U.S.A. and Canada) or 1.5 m/4.9 ft (other regions) AC ...

Product Manual
Page 380
... Battery order 243 Battery pack 242, 243, 259, 266, 308 Beep 238 Bit rate 169 Black-and-white (Monochrome) 277 Blue intensifier (Filter effects) ..278 Body cap 4, 26, 309 Border (PictBridge 209 Bracketing 133, 251 Bracketing order 251 Built-in AF-assist illuminator ....233 Built-in flash 38, 119, 299 Bulb...
... Battery order 243 Battery pack 242, 243, 259, 266, 308 Beep 238 Bit rate 169 Black-and-white (Monochrome) 277 Blue intensifier (Filter effects) ..278 Body cap 4, 26, 309 Border (PictBridge 209 Bracketing 133, 251 Bracketing order 251 Built-in AF-assist illuminator ....233 Built-in flash 38, 119, 299 Bulb...


