D7000 User's Manual
Page 12
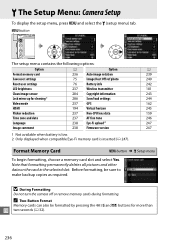
B The Setup Menu: Camera Setup 236 Format Memory Card ...236 LCD Brightness...237 Video Mode...237 Flicker Reduction...237 Time Zone and Date...Save/Load Settings...244 Virtual Horizon ...245 AF Fine Tune ...246 Eye-Fi Upload ...247 Firmware Version ...247 N The Retouch Menu: Creating Retouched Copies 248 Creating Retouched Copies 249 D-Lighting...251 Red-Eye Correction...251 Trim ...252 Monochrome...253 Filter Effects...254 ... Outline ...262 Color Sketch...262 Perspective Control...263 Miniature Effect ...263 Side-by-side Comparison 264 O My Menu/m Recent Settings 265 Recent Settings ...268 x
B The Setup Menu: Camera Setup 236 Format Memory Card ...236 LCD Brightness...237 Video Mode...237 Flicker Reduction...237 Time Zone and Date...Save/Load Settings...244 Virtual Horizon ...245 AF Fine Tune ...246 Eye-Fi Upload ...247 Firmware Version ...247 N The Retouch Menu: Creating Retouched Copies 248 Creating Retouched Copies 249 D-Lighting...251 Red-Eye Correction...251 Trim ...252 Monochrome...253 Filter Effects...254 ... Outline ...262 Color Sketch...262 Perspective Control...263 Miniature Effect ...263 Side-by-side Comparison 264 O My Menu/m Recent Settings 265 Recent Settings ...268 x

D7000 User's Manual
Page 38
.... A description of the monitor, help can be accessed from the following menus: • D: Playback (0 195) • C: Shooting (0 202) • A: Custom Settings (0 206) • B: Setup (0 236) • N: Retouch (0 248) • O/m: My Menu or Recent settings (defaults to scroll through the display. Current settings are shown by pressing the L button. Press 1 or 3 to My...
.... A description of the monitor, help can be accessed from the following menus: • D: Playback (0 195) • C: Shooting (0 202) • A: Custom Settings (0 206) • B: Setup (0 236) • N: Retouch (0 248) • O/m: My Menu or Recent settings (defaults to scroll through the display. Current settings are shown by pressing the L button. Press 1 or 3 to My...
D7000 User's Manual
Page 43
... 45°C/113°F to show battery charge state in six levels (0 35). Remove and reinsert the battery to your retailer or a Nikon-authorized service representative. A EN-EL15 Rechargeable Li-ion Batteries The supplied EN-EL15 shares information with compatible batteries only. D The Battery and Charger... remove and reinsert the battery. The supplied power cable and AC wall adapter are for use . The Battery info option in the setup menu details battery charge, battery life, and the number of this precaution could in very rare instances result in the charger showing that the...
... 45°C/113°F to show battery charge state in six levels (0 35). Remove and reinsert the battery to your retailer or a Nikon-authorized service representative. A EN-EL15 Rechargeable Li-ion Batteries The supplied EN-EL15 shares information with compatible batteries only. D The Battery and Charger... remove and reinsert the battery. The supplied power cable and AC wall adapter are for use . The Battery info option in the setup menu details battery charge, battery life, and the number of this precaution could in very rare instances result in the charger showing that the...
D7000 User's Manual
Page 48
The camera clock can be synchronized with GPS devices (0 162). If the B icon flashes in the setup menu. A The Camera Clock The camera clock is powered by an independent, rechargeable power source, which is X charged as necessary. 28 Check the clock regularly against ...
The camera clock can be synchronized with GPS devices (0 162). If the B icon flashes in the setup menu. A The Camera Clock The camera clock is powered by an independent, rechargeable power source, which is X charged as necessary. 28 Check the clock regularly against ...
D7000 User's Manual
Page 53
To unlock the memory card, slide the switch to the "write" position. 4GB Write-protect switch X A See Also See page 236 for information on formatting memory cards using the Format memory card option in the monitor if you attempt to prevent accidental loss of data. A The Write Protect Switch Memory cards are equipped with a write protect switch to release the shutter). When this switch is in the "lock" position, the memory card can not be formatted and photos can not be deleted or recorded (a warning will be displayed in the setup menu. 33
To unlock the memory card, slide the switch to the "write" position. 4GB Write-protect switch X A See Also See page 236 for information on formatting memory cards using the Format memory card option in the monitor if you attempt to prevent accidental loss of data. A The Write Protect Switch Memory cards are equipped with a write protect switch to release the shutter). When this switch is in the "lock" position, the memory card can not be formatted and photos can not be deleted or recorded (a warning will be displayed in the setup menu. 33

D7000 User's Manual
Page 74
... live view is panned. Live view ends automatically if the lens is not use. Note that although the count down will be visible in the setup menu (0 194) before shooting (0 81). If the device supports HDMI-CEC, select Off for the internal circuits to cool and then try again. D Shooting in Live...
... live view is panned. Live view ends automatically if the lens is not use. Note that although the count down will be visible in the setup menu (0 194) before shooting (0 81). If the device supports HDMI-CEC, select Off for the internal circuits to cool and then try again. D Shooting in Live...
D7000 User's Manual
Page 80
...and Hi 2 (0 101). selecting any other option turns recording on or off ; ❚❚ Movie Settings Use the Movie settings option in the shooting menu to the card in Slot 2. Select Slot 2 to record movies to choose movie quality, sound, destination, and manual movie settings options. • Movie ... the time available on the option currently selected for ISO sensitivity settings > Auto ISO sensitivity control in the setup menu (0 237): NTSC PAL Frame size (pixels) Frame rate Maximum length Frame rate Maximum length 1920 × 1080 24 fps * 24 fps * 1280 &#...
...and Hi 2 (0 101). selecting any other option turns recording on or off ; ❚❚ Movie Settings Use the Movie settings option in the shooting menu to the card in Slot 2. Select Slot 2 to record movies to choose movie quality, sound, destination, and manual movie settings options. • Movie ... the time available on the option currently selected for ISO sensitivity settings > Auto ISO sensitivity control in the setup menu (0 237): NTSC PAL Frame size (pixels) Frame rate Maximum length Frame rate Maximum length 1920 × 1080 24 fps * 24 fps * 1280 &#...
D7000 User's Manual
Page 90
... on, rotate the sub-command dial to A. If the maximum aperture of the lens has been specified using the Non-CPU lens data item in setup menu (0 159) when a non-CPU lens is attached, the current f-number will be read from values between the minimum and maximum for the lens. Otherwise the...
... on, rotate the sub-command dial to A. If the maximum aperture of the lens has been specified using the Non-CPU lens data item in setup menu (0 159) when a non-CPU lens is attached, the current f-number will be read from values between the minimum and maximum for the lens. Otherwise the...
D7000 User's Manual
Page 95
... M), aperture (modes A and M), exposure and flash compensation, flash mode, focus point, metering, AF and AF-area modes (viewfinder photography only), bracketing, and settings in the setup menu and press 2. Highlight Save user settings in the shooting (0 202) and Custom Settings (0 206) menus (note that the camera will not store the options selected...
... M), aperture (modes A and M), exposure and flash compensation, flash mode, focus point, metering, AF and AF-area modes (viewfinder photography only), bracketing, and settings in the setup menu and press 2. Highlight Save user settings in the shooting (0 202) and Custom Settings (0 206) menus (note that the camera will not store the options selected...

D7000 User's Manual
Page 96
... to U1 to recall the settings assigned to U1, or to U2 to recall the settings assigned to the mode dial position selected in the setup menu and press 2. G button 2 Select U1 or U2. Highlight U1 or U2 and press 2. 3 Reset user settings. 5 Save user settings. Highlight Save settings and press J to...
... to U1 to recall the settings assigned to U1, or to U2 to recall the settings assigned to the mode dial position selected in the setup menu and press 2. G button 2 Select U1 or U2. Highlight U1 or U2 and press 2. 3 Reset user settings. 5 Save user settings. Highlight Save settings and press J to...
D7000 User's Manual
Page 125
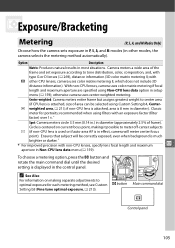
... meters a wide area of the frame and set exposure according to optimal exposure for portraits; otherwise camera uses center-weighted metering. Circle is displayed in setup menu (0 159); Z button Main command dial Control panel 105 With non-CPU lenses, camera uses color matrix metering if focal length and maximum aperture are specified...). Option Description Matrix: Produces natural results in diameter (approximately 2.5% of area can be correctly exposed, even when background is 8 mm in Non-CPU lens data menu (0 159).
... meters a wide area of the frame and set exposure according to optimal exposure for portraits; otherwise camera uses center-weighted metering. Circle is displayed in setup menu (0 159); Z button Main command dial Control panel 105 With non-CPU lenses, camera uses color matrix metering if focal length and maximum aperture are specified...). Option Description Matrix: Produces natural results in diameter (approximately 2.5% of area can be correctly exposed, even when background is 8 mm in Non-CPU lens data menu (0 159).

D7000 User's Manual
Page 175
... to continue. 3 Choose the interval. Before beginning interval timer photography, take photographs automatically at current settings and view the results in the shooting menu and press 2. Press the G button to choose an interval longer than the slowest anticipated shutter speed. Press 4 or 2 to highlight hours or... t and press 1 or 3 to display the menus. Chose from the following starting time, select Time zone and date in the setup menu and make sure that shooting is not interrupted, be sure the battery is recommended. To ensure that the camera clock is set to ...
... to continue. 3 Choose the interval. Before beginning interval timer photography, take photographs automatically at current settings and view the results in the shooting menu and press 2. Press the G button to choose an interval longer than the slowest anticipated shutter speed. Press 4 or 2 to highlight hours or... t and press 1 or 3 to display the menus. Chose from the following starting time, select Time zone and date in the setup menu and make sure that shooting is not interrupted, be sure the battery is recommended. To ensure that the camera clock is set to ...
D7000 User's Manual
Page 179
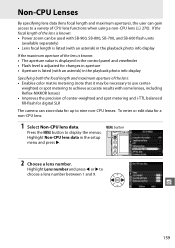
... can store data for a non-CPU lens: 1 Select Non-CPU lens data. weighted or spot metering to achieve accurate results with an asterisk) in the setup menu and press 2.
... can store data for a non-CPU lens: 1 Select Non-CPU lens data. weighted or spot metering to achieve accurate results with an asterisk) in the setup menu and press 2.

D7000 User's Manual
Page 182
... if the GP-1 is searching for at least two seconds. Icon Connection status is attached. for more information, see the GP-1 manual. ❚❚ Setup Menu Options The GPS item in the setup menu contains the options listed below. • Auto meter-off: Choose whether the exposure meters turn off before connecting the GP-1;
... if the GP-1 is searching for at least two seconds. Icon Connection status is attached. for more information, see the GP-1 manual. ❚❚ Setup Menu Options The GPS item in the setup menu contains the options listed below. • Auto meter-off: Choose whether the exposure meters turn off before connecting the GP-1;

D7000 User's Manual
Page 214
...that allows HDMI devices to be used to control the camera. Q 194 Device Control If On is selected for HDMI >Device control in the setup menu when the camera is selected, the camera will appear in the control panel in place of the number of the camera multi selector and J ...camera is selected, the television remote can be used in place of exposures remaining. ❚❚ HDMI Options The HDMI option in the setup menu controls output resolution and can be used to enable the camera for remote control from devices that support HDMI-CEC (HighDefinition Multimedia Interface-Consumer ...
...that allows HDMI devices to be used to control the camera. Q 194 Device Control If On is selected for HDMI >Device control in the setup menu when the camera is selected, the camera will appear in the control panel in place of the number of the camera multi selector and J ...camera is selected, the television remote can be used in place of exposures remaining. ❚❚ HDMI Options The HDMI option in the setup menu controls output resolution and can be used to enable the camera for remote control from devices that support HDMI-CEC (HighDefinition Multimedia Interface-Consumer ...
D7000 User's Manual
Page 256
G button The setup menu contains the following options: Option 0 Option 0 Format memory card 236 Auto image rotation 239 Save user settings 75 Image Dust Off ref photo 240 Reset ... Firmware version 247 1 Not available when battery is low. 2 Only displayed when compatible Eye-Fi memory card is inserted (0 247). Format Memory Card G button ➜ B Setup menu To begin formatting, choose a memory card slot and select Yes. A Two-Button Format Memory cards can also be sure to make backup copies as required...
G button The setup menu contains the following options: Option 0 Option 0 Format memory card 236 Auto image rotation 239 Save user settings 75 Image Dust Off ref photo 240 Reset ... Firmware version 247 1 Not available when battery is low. 2 Only displayed when compatible Eye-Fi memory card is inserted (0 247). Format Memory Card G button ➜ B Setup menu To begin formatting, choose a memory card slot and select Yes. A Two-Button Format Memory cards can also be sure to make backup copies as required...

D7000 User's Manual
Page 257
...for reduced brightness. If the clock is very bright, in which case you are displayed. Time Zone and Date G button ➜ B Setup menu Change time zones, set , a blinking B icon will automatically be sure the camera video mode matches the device video standard (NTSC or PAL...). Flicker Reduction G button ➜ B setup menu Reduce flicker and banding when shooting under fluorescent or mercury-vapor lighting during movie recording. Date format Choose the order in which the day...
...for reduced brightness. If the clock is very bright, in which case you are displayed. Time Zone and Date G button ➜ B Setup menu Change time zones, set , a blinking B icon will automatically be sure the camera video mode matches the device video standard (NTSC or PAL...). Flicker Reduction G button ➜ B setup menu Reduce flicker and banding when shooting under fluorescent or mercury-vapor lighting during movie recording. Date format Choose the order in which the day...
D7000 User's Manual
Page 258
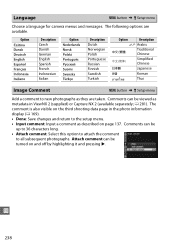
... Description Arabic Traditional Chinese Simplified Chinese Japanese Korean Thai Image Comment G button ➜ B Setup menu Add a comment to new photographs as described on page 137. Language G button ➜ B Setup menu Choose a language for camera menus and messages. Comments can be viewed as metadata in the...2. Attach comment can be up to 36 characters long. • Attach comment: Select this option to attach the comment to the setup menu. • Input comment: Input a comment as they are available. The following options are taken. Comments can be turned on the...
... Description Arabic Traditional Chinese Simplified Chinese Japanese Korean Thai Image Comment G button ➜ B Setup menu Add a comment to new photographs as described on page 137. Language G button ➜ B Setup menu Choose a language for camera menus and messages. Comments can be viewed as metadata in the...2. Attach comment can be up to 36 characters long. • Attach comment: Select this option to attach the comment to the setup menu. • Input comment: Input a comment as they are available. The following options are taken. Comments can be turned on the...
D7000 User's Manual
Page 259
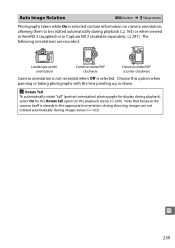
... when panning or taking photographs with the lens pointing up or down. Auto Image Rotation G button ➜ B Setup menu Photographs taken while On is selected. Note that because the camera itself is already in the playback menu (0 200). A Rotate Tall To automatically rotate "tall" (portrait-orientation) photographs for display during playback, select On...
... when panning or taking photographs with the lens pointing up or down. Auto Image Rotation G button ➜ B Setup menu Photographs taken while On is selected. Note that because the camera itself is already in the playback menu (0 200). A Rotate Tall To automatically rotate "tall" (portrait-orientation) photographs for display during playback, select On...

D7000 User's Manual
Page 260
... data, press G. • Start: The message shown at least 50 mm is complete. in Capture NX 2 (available separately; Image Dust Off Ref Photo G button ➜ B Setup menu Acquire reference data for more information, see the Capture NX 2 manual). Image Dust Off ref photo is available only when a CPU lens is performed.
... data, press G. • Start: The message shown at least 50 mm is complete. in Capture NX 2 (available separately; Image Dust Off Ref Photo G button ➜ B Setup menu Acquire reference data for more information, see the Capture NX 2 manual). Image Dust Off ref photo is available only when a CPU lens is performed.
