User Manual
Page 3
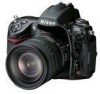
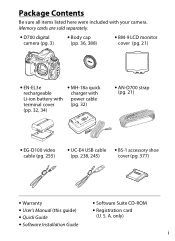
S. A. only) i Memory cards are sold separately. • D700 digital camera (pg. 3) • Body cap (pp. 36, 388) • BM-9 LCD monitor cover (pg. 21) • EN-EL3e • MH-18a quick rechargeable charger with Li-ion battery with your camera. Package Contents Be sure all items listed here were ...included with power cable terminal cover (pg. 32) (pp. 32, 34) • AN-D700 strap (pg. 21) • EG-D100 video cable (pg. 255...
S. A. only) i Memory cards are sold separately. • D700 digital camera (pg. 3) • Body cap (pp. 36, 388) • BM-9 LCD monitor cover (pg. 21) • EN-EL3e • MH-18a quick rechargeable charger with Li-ion battery with your camera. Package Contents Be sure all items listed here were ...included with power cable terminal cover (pg. 32) (pp. 32, 34) • AN-D700 strap (pg. 21) • EG-D100 video cable (pg. 255...

User Manual
Page 8
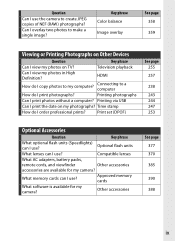
... How do I clean the camera or lens? Cleaning the camera See page 8, 10, 12 409 46 340 300 391 Taking Photographs Question How many more photos on the memory card? Can I shoot a self-portrait? Viewfinder, control What information is in the shooting panel, shooting information display? Can I insert a new memory card? information display What does this...
... How do I clean the camera or lens? Cleaning the camera See page 8, 10, 12 409 46 340 300 391 Taking Photographs Question How many more photos on the memory card? Can I shoot a self-portrait? Viewfinder, control What information is in the shooting panel, shooting information display? Can I insert a new memory card? information display What does this...
User Manual
Page 11
...a computer How do I use ? Time stamp How do I use ? Optional flash units What lenses can I print photographs? Approved memory cards What software is available for my camera? Question Can I copy photos to my computer? HDMI How do I use ? Print set (DPOF) See page 255 257 238..., battery packs, remote cords, and viewfinder Other accessories accessories are available for my camera? Television playback Can I print the date on Other Devices Question Key phrase Can I use the camera to create JPEG copies of NEF (RAW) photographs? Printing via USB Can I ...
...a computer How do I use ? Time stamp How do I use ? Optional flash units What lenses can I print photographs? Approved memory cards What software is available for my camera? Question Can I copy photos to my computer? HDMI How do I use ? Print set (DPOF) See page 255 257 238..., battery packs, remote cords, and viewfinder Other accessories accessories are available for my camera? Television playback Can I print the date on Other Devices Question Key phrase Can I use the camera to create JPEG copies of NEF (RAW) photographs? Printing via USB Can I ...
User Manual
Page 12
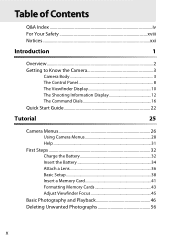
Table of Contents Q&A Index iv For Your Safety xviii Notices...xxi Introduction 1 Overview...2 Getting to Know the Camera 3 Camera Body 3 The Control Panel 8 The Viewfinder Display 10 The Shooting Information Display 12 The Command Dials 16 Quick Start Guide 22 Tutorial 25 Camera Menus 26 Using Camera Menus 28 Help ...31 First Steps 32 Charge the Battery 32 Insert the Battery 34 Attach a Lens 36 Basic Setup 38 Insert a Memory Card 41 Formatting Memory Cards 43 Adjust Viewfinder Focus 45 Basic Photography and Playback 46 Deleting Unwanted Photographs 56 x
Table of Contents Q&A Index iv For Your Safety xviii Notices...xxi Introduction 1 Overview...2 Getting to Know the Camera 3 Camera Body 3 The Control Panel 8 The Viewfinder Display 10 The Shooting Information Display 12 The Command Dials 16 Quick Start Guide 22 Tutorial 25 Camera Menus 26 Using Camera Menus 28 Help ...31 First Steps 32 Charge the Battery 32 Insert the Battery 34 Attach a Lens 36 Basic Setup 38 Insert a Memory Card 41 Formatting Memory Cards 43 Adjust Viewfinder Focus 45 Basic Photography and Playback 46 Deleting Unwanted Photographs 56 x
User Manual
Page 17
... AE-L/AF-L Button 325 f8: Shutter Speed and Aperture Lock 326 f9: Customize Command Dials 326 f10: Release Button to Use Dial 328 f11: No Memory Card 329 xv
... AE-L/AF-L Button 325 f8: Shutter Speed and Aperture Lock 326 f9: Customize Command Dials 326 f10: Release Button to Use Dial 328 f11: No Memory Card 329 xv

User Manual
Page 18
f12: Reverse Indicators 330 B The Setup Menu: Camera Setup 331 Format Memory Card 332 LCD Brightness 332 Clean Image Sensor 332 Lock Mirror up for Cleaning 332 Video Mode 333 HDMI 333 World Time 334 Language 334 Image ...
f12: Reverse Indicators 330 B The Setup Menu: Camera Setup 331 Format Memory Card 332 LCD Brightness 332 Clean Image Sensor 332 Lock Mirror up for Cleaning 332 Video Mode 333 HDMI 333 World Time 334 Language 334 Image ...
User Manual
Page 25
... privacy of Data Storage Devices Please note that deleting images or formatting memory cards or other data storage devices does not completely erase the original image data. Be sure to also replace any pictures selected for example, pictures of this Nikon digital camera are designed to avoid injury when physically destroying data storage devices. Care...
... privacy of Data Storage Devices Please note that deleting images or formatting memory cards or other data storage devices does not completely erase the original image data. Be sure to also replace any pictures selected for example, pictures of this Nikon digital camera are designed to avoid injury when physically destroying data storage devices. Care...
User Manual
Page 33
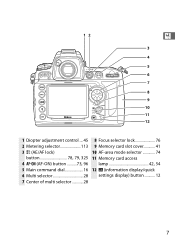
X 1 Diopter adjustment control ....45 2 Metering selector 113 3 A (AE/AF lock) button 78, 79, 325 4 B (AF-ON) button ..........73, 96 5 Main command dial 16 6 Multi selector 28 7 Center of multi selector 28 8 Focus selector lock 76 9 Memory card slot cover 41 10 AF-area mode selector 74 11 Memory card access lamp 42, 54 12 R (information display/quick settings display) button 12 7
X 1 Diopter adjustment control ....45 2 Metering selector 113 3 A (AE/AF lock) button 78, 79, 325 4 B (AF-ON) button ..........73, 96 5 Main command dial 16 6 Multi selector 28 7 Center of multi selector 28 8 Focus selector lock 76 9 Memory card slot cover 41 10 AF-area mode selector 74 11 Memory card access lamp 42, 54 12 R (information display/quick settings display) button 12 7
User Manual
Page 48
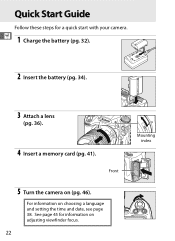
X 1 Charge the battery (pg. 32). 2 Insert the battery (pg. 34). 3 Attach a lens (pg. 36). 4 Insert a memory card (pg. 41). Front 5 Turn the camera on choosing a language and setting the time and date, see page 38. For information on (pg. 46). See page 45 for a quick start with your camera. Quick Start Guide Follow these steps for information on adjusting viewfinder focus. 22 Mounting index
X 1 Charge the battery (pg. 32). 2 Insert the battery (pg. 34). 3 Attach a lens (pg. 36). 4 Insert a memory card (pg. 41). Front 5 Turn the camera on choosing a language and setting the time and date, see page 38. For information on (pg. 46). See page 45 for a quick start with your camera. Quick Start Guide Follow these steps for information on adjusting viewfinder focus. 22 Mounting index
User Manual
Page 51
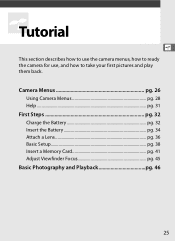
Camera Menus pg. 26 Using Camera Menus pg. 28 Help ...pg. 31 First Steps pg. 32 Charge the Battery pg. 32 Insert the Battery pg. 34 Attach a Lens pg. 36 Basic Setup pg. 38 Insert a Memory Card pg. 41 Adjust Viewfinder Focus pg. 45 Basic Photography and Playback pg. 46 25 sTutorial s This section describes how to use the camera menus, how to ready the camera for use, and how to take your first pictures and play them back.
Camera Menus pg. 26 Using Camera Menus pg. 28 Help ...pg. 31 First Steps pg. 32 Charge the Battery pg. 32 Insert the Battery pg. 34 Attach a Lens pg. 36 Basic Setup pg. 38 Insert a Memory Card pg. 41 Adjust Viewfinder Focus pg. 45 Basic Photography and Playback pg. 46 25 sTutorial s This section describes how to use the camera menus, how to ready the camera for use, and how to take your first pictures and play them back.
User Manual
Page 53
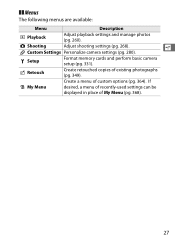
N Retouch Create retouched copies of custom options (pg. 364). C Shooting Adjust shooting settings (pg. 268). O My Menu Create a menu of existing photographs (pg. 349). ❚❚ Menus The following menus are available: Menu Description D Playback Adjust playback settings and manage photos (pg. 260). If desired, a menu of recently-used settings can be displayed in place of My Menu (pg. 368). 27 s A Custom Settings Personalize camera settings (pg. 280). B Setup Format memory cards and perform basic camera setup (pg. 331).
N Retouch Create retouched copies of custom options (pg. 364). C Shooting Adjust shooting settings (pg. 268). O My Menu Create a menu of existing photographs (pg. 349). ❚❚ Menus The following menus are available: Menu Description D Playback Adjust playback settings and manage photos (pg. 260). If desired, a menu of recently-used settings can be displayed in place of My Menu (pg. 368). 27 s A Custom Settings Personalize camera settings (pg. 280). B Setup Format memory cards and perform basic camera setup (pg. 331).
User Manual
Page 67
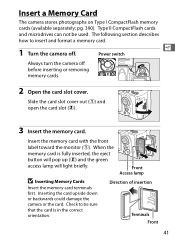
... camera off . Front Access lamp D Inserting Memory Cards Insert the memory card terminals first. Inserting the card upside down or backwards could damage the camera or the card. The following section describes how to be used. Insert the memory card with the front label toward the monitor (q). Direction of insertion Terminals Front 41 Insert a Memory Card The camera stores photographs on Type I CompactFlash memory cards...
... camera off . Front Access lamp D Inserting Memory Cards Insert the memory card terminals first. Inserting the card upside down or backwards could damage the camera or the card. The following section describes how to be used. Insert the memory card with the front label toward the monitor (q). Direction of insertion Terminals Front 41 Insert a Memory Card The camera stores photographs on Type I CompactFlash memory cards...
User Manual
Page 68
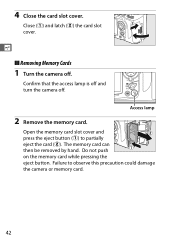
4 Close the card slot cover. The memory card can then be removed by hand. Close (q) and latch (w) the card slot cover. s ❚❚ Removing Memory Cards 1 Turn the camera off . Open the memory card slot cover and press the eject button (q) to observe this precaution could damage the camera or memory card. 42 Do not push on the memory card while pressing the eject button. Access lamp 2 Remove the memory card. Confirm that the access lamp is off and turn the camera off . Failure to partially eject the card (w).
4 Close the card slot cover. The memory card can then be removed by hand. Close (q) and latch (w) the card slot cover. s ❚❚ Removing Memory Cards 1 Turn the camera off . Open the memory card slot cover and press the eject button (q) to observe this precaution could damage the camera or memory card. 42 Do not push on the memory card while pressing the eject button. Access lamp 2 Remove the memory card. Confirm that the access lamp is off and turn the camera off . Failure to partially eject the card (w).
User Manual
Page 69
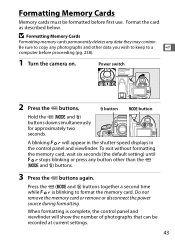
.... Be sure to format the memory card. Formatting Memory Cards Memory cards must be recorded at current settings. 43 Format the card as described below. O button I button Hold the Q (I and O) buttons. 3 Press the Q buttons again. A blinking C will show the number of photographs that can be formatted before proceeding (pg. 238). 1 Turn the camera on. Press the Q (I and O) buttons...
.... Be sure to format the memory card. Formatting Memory Cards Memory cards must be recorded at current settings. 43 Format the card as described below. O button I button Hold the Q (I and O) buttons. 3 Press the Q buttons again. A blinking C will show the number of photographs that can be formatted before proceeding (pg. 238). 1 Turn the camera on. Press the Q (I and O) buttons...
User Manual
Page 70
... or while data are being recorded, deleted, or copied to the card casing. If the camera is inserted, the control panel and viewfinder will be used for information on formatting memory cards using the Format memory card option in the setup menu. 44 s • Turn the power... drop, or subject to strong physical shocks. • Do not apply force to a computer. A No Memory Card If no memory card inserted, S will show S. Do not remove memory cards from the camera. • Memory cards that have been formatted in a computer or other device must be hot after use. A See Also See ...
... or while data are being recorded, deleted, or copied to the card casing. If the camera is inserted, the control panel and viewfinder will be used for information on formatting memory cards using the Format memory card option in the setup menu. 44 s • Turn the power... drop, or subject to strong physical shocks. • Do not apply force to a computer. A No Memory Card If no memory card inserted, S will show S. Do not remove memory cards from the camera. • Memory cards that have been formatted in a computer or other device must be hot after use. A See Also See ...
User Manual
Page 73
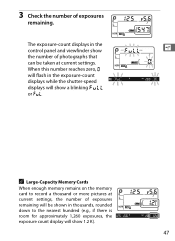
... a thousand or more pictures at current settings. The exposure-count displays in the control panel and viewfinder show a blinking n or j. A Large-Capacity Memory Cards When enough memory remains on the memory card to the nearest hundred (e.g., if there is room for approximately 1,260 exposures, the exposure count display will show s the number of photographs that...
... a thousand or more pictures at current settings. The exposure-count displays in the control panel and viewfinder show a blinking n or j. A Large-Capacity Memory Cards When enough memory remains on the memory card to the nearest hundred (e.g., if there is room for approximately 1,260 exposures, the exposure count display will show s the number of photographs that...

User Manual
Page 74
...54). 6 s Exposure meters on Exposure meters off Exposure meters on The length of exposures remaining will be displayed (some memory cards may only display this information when the camera is on the battery. Control panel 48 After the power s switch is released, the illuminator will turn off automatically ...viewfinder will remain lit for six seconds (at default settings) while the camera exposure meters are active or until the shutter is released or the power switch is turned off with a battery and memory card inserted, the frame count and number of time before the exposure meters ...
...54). 6 s Exposure meters on Exposure meters off Exposure meters on The length of exposures remaining will be displayed (some memory cards may only display this information when the camera is on the battery. Control panel 48 After the power s switch is released, the illuminator will turn off automatically ...viewfinder will remain lit for six seconds (at default settings) while the camera exposure meters are active or until the shutter is released or the power switch is turned off with a battery and memory card inserted, the frame count and number of time before the exposure meters ...
User Manual
Page 80
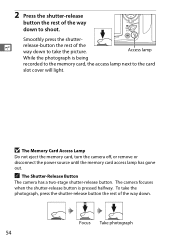
... is pressed halfway. The camera focuses when the shutter-release button is being recorded to the memory card, the access lamp next to shoot. s release-button the rest of the way down . D The Memory Card Access Lamp Do not eject the memory card, turn the camera off, or remove or ...disconnect the power source until the memory card access lamp has gone out. To take the picture. Smoothly press the shutter- A...
... is pressed halfway. The camera focuses when the shutter-release button is being recorded to the memory card, the access lamp next to shoot. s release-button the rest of the way down . D The Memory Card Access Lamp Do not eject the memory card, turn the camera off, or remove or ...disconnect the power source until the memory card access lamp has gone out. To take the picture. Smoothly press the shutter- A...
User Manual
Page 90
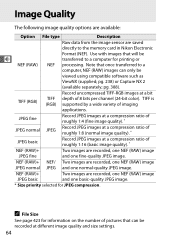
... image quality). * JPEG basic Record JPEG images at a compression ratio of pictures that once transferred to a computer, NEF (RAW) images can be transferred to the memory card in Nikon Electronic d NEF (RAW) Format (NEF). NEF (RAW)+ Two images are saved directly to a computer for printing or NEF processing. Image Quality The following image...
... image quality). * JPEG basic Record JPEG images at a compression ratio of pictures that once transferred to a computer, NEF (RAW) images can be transferred to the memory card in Nikon Electronic d NEF (RAW) Format (NEF). NEF (RAW)+ Two images are saved directly to a computer for printing or NEF processing. Image Quality The following image...
User Manual
Page 114
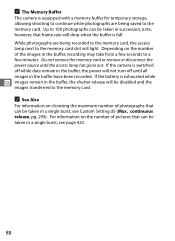
... may take from a few seconds to a few minutes. A The Memory Buffer The camera is equipped with a memory buffer for temporary storage, allowing shooting to continue while photographs are being saved to the memory card. Up to the memory card. A See Also For information on the number of photographs that frame ...until the access lamp has gone out. continuous release, pg. 299). If the camera is full. Depending on choosing the maximum number of the images in succession; Do not remove the memory card or remove or disconnect the power source until all images in a single burst, ...
... may take from a few seconds to a few minutes. A The Memory Buffer The camera is equipped with a memory buffer for temporary storage, allowing shooting to continue while photographs are being saved to the memory card. Up to the memory card. A See Also For information on the number of photographs that frame ...until the access lamp has gone out. continuous release, pg. 299). If the camera is full. Depending on choosing the maximum number of the images in succession; Do not remove the memory card or remove or disconnect the power source until all images in a single burst, ...

