
Reference Manual
Page 3
Table of Contents For Your Safety ...viii Notices...xi Location Data ...xv Wireless ...xvi Introduction 1 Getting to Know the Camera 1 The Camera Body...1 The Mode Dial ...3 The Viewfinder...4 The Monitor ...5 The Information Display ...6 Camera Menus: An Overview 8 First Steps ...11 "Point-and-Shoot" Modes (i and j) 19 Framing Photos ...
Table of Contents For Your Safety ...viii Notices...xi Location Data ...xv Wireless ...xvi Introduction 1 Getting to Know the Camera 1 The Camera Body...1 The Mode Dial ...3 The Viewfinder...4 The Monitor ...5 The Information Display ...6 Camera Menus: An Overview 8 First Steps ...11 "Point-and-Shoot" Modes (i and j) 19 Framing Photos ...
Reference Manual
Page 21
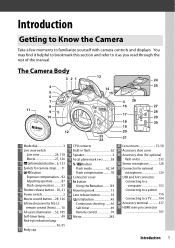
... find it helpful to bookmark this section and refer to a TV......... 164 29 Accessory terminal 237 30 HDMI mini-pin connector 165 Introduction 1 The Camera Body 3 21 13 24 4 5 6 7 8 11 9 10 12 25 14 15 4 26 16 27 28 17 29 18 30 19 20 22 23 21 1 Mode dial 3 2 Live... receiver for ML-L3 remote control (front) ....... 70 10 AF-assist illuminator ....52, 185 Self-timer lamp 49 Red-eye reduction lamp 63, 65 11 Body cap 12 CPU contacts 13 Built-in flash 62 14 Speaker 2 15 Focal plane mark (E 58 16 M/ Y button Flash mode 62, 64 Flash compensation ......... 93...
... find it helpful to bookmark this section and refer to a TV......... 164 29 Accessory terminal 237 30 HDMI mini-pin connector 165 Introduction 1 The Camera Body 3 21 13 24 4 5 6 7 8 11 9 10 12 25 14 15 4 26 16 27 28 17 29 18 30 19 20 22 23 21 1 Mode dial 3 2 Live... receiver for ML-L3 remote control (front) ....... 70 10 AF-assist illuminator ....52, 185 Self-timer lamp 49 Red-eye reduction lamp 63, 65 11 Body cap 12 CPU contacts 13 Built-in flash 62 14 Speaker 2 15 Focal plane mark (E 58 16 M/ Y button Flash mode 62, 64 Flash compensation ......... 93...

Reference Manual
Page 25
Do not use Fold the monitor against the camera body. To protect the monitor when the camera is recommended for self-portraits in live view. The Monitor The monitor can be angled and rotated as .... High-angle shots Frame live view shots with the camera close to observe these precautions could damage the connection between the monitor and the camera body. This position is not in the final picture. Introduction 5
Do not use Fold the monitor against the camera body. To protect the monitor when the camera is recommended for self-portraits in live view. The Monitor The monitor can be angled and rotated as .... High-angle shots Frame live view shots with the camera close to observe these precautions could damage the connection between the monitor and the camera body. This position is not in the final picture. Introduction 5

Reference Manual
Page 33
Be careful to remove the lens cap before taking pictures. Introduction 13 Remove the camera body cap Remove the rear lens cap Mounting mark (camera) Align the mounting marks Mounting mark (lens) Rotate the lens as shown until it clicks into place. 4 Attach a lens. Be sure to prevent dust from entering the camera when the lens or body cap is removed.
Be careful to remove the lens cap before taking pictures. Introduction 13 Remove the camera body cap Remove the rear lens cap Mounting mark (camera) Align the mounting marks Mounting mark (lens) Rotate the lens as shown until it clicks into place. 4 Attach a lens. Be sure to prevent dust from entering the camera when the lens or body cap is removed.

Reference Manual
Page 38
... as necessary. Set the clock to A (if the lens has an M/A-M or A/M-M switch, select M/A or A/M). After removing the lens, replace the lens caps and camera body cap. Zoom out A The Camera Clock The camera clock is installed. Check the clock regularly against more accurate time pieces and reset as necessary when...
... as necessary. Set the clock to A (if the lens has an M/A-M or A/M-M switch, select M/A or A/M). After removing the lens, replace the lens caps and camera body cap. Zoom out A The Camera Clock The camera clock is installed. Check the clock regularly against more accurate time pieces and reset as necessary when...

Reference Manual
Page 40
Framing Photos in portrait (tall) orientation, hold the handgrip in your right hand and cradle the camera body or lens with the main subject in the viewfinder with your left. When framing photographs in the Viewfinder 1 Ready the camera. Frame a photograph in the ...
Framing Photos in portrait (tall) orientation, hold the handgrip in your right hand and cradle the camera body or lens with the main subject in the viewfinder with your left. When framing photographs in the Viewfinder 1 Ready the camera. Frame a photograph in the ...

Reference Manual
Page 44
The focus point will be displayed in green; Live view switch When framing photographs in your right hand and cradle the camera body or lens with your left. if the camera is able to focus, the focus point will be displayed in the camera monitor (live view switch. ...
The focus point will be displayed in green; Live view switch When framing photographs in your right hand and cradle the camera body or lens with your left. if the camera is able to focus, the focus point will be displayed in the camera monitor (live view switch. ...

Reference Manual
Page 47
The view through the lens is displayed in live view mode. 1 Rotate the live view switch. Live view switch 3 Focus. Recording Movies Movies can be recorded in the monitor. 2 Ready the camera. Focus point "Point-and-Shoot" Modes (i and j) 27 Press the shutter-release button halfway to focus. Hold the handgrip in your right hand and cradle the camera body or lens with your left.
The view through the lens is displayed in live view mode. 1 Rotate the live view switch. Live view switch 3 Focus. Recording Movies Movies can be recorded in the monitor. 2 Ready the camera. Focus point "Point-and-Shoot" Modes (i and j) 27 Press the shutter-release button halfway to focus. Hold the handgrip in your right hand and cradle the camera body or lens with your left.

Reference Manual
Page 78
... can also be adjusted manually, regardless of the focal plane is 46.5 mm (1.83 in.). 46.5 mm Focal plane mark 58 More on the camera body.
... can also be adjusted manually, regardless of the focal plane is 46.5 mm (1.83 in.). 46.5 mm Focal plane mark 58 More on the camera body.

Reference Manual
Page 246
...) lenses. Focus manually until image in viewfinder is in focus. 9 With maximum aperture of f/5.6 or faster. • Noise in -focus indicator may contact the camera body and cause damage or injury. 3 Shifting and/or tilting the lens interferes with electronic LM Lens/accessory AF rangefinder) MF M Other modes 3D Color N AF...
...) lenses. Focus manually until image in viewfinder is in focus. 9 With maximum aperture of f/5.6 or faster. • Noise in -focus indicator may contact the camera body and cause damage or injury. 3 Shifting and/or tilting the lens interferes with electronic LM Lens/accessory AF rangefinder) MF M Other modes 3D Color N AF...

Reference Manual
Page 257
... the connector cover when the terminal is equipped with an accessory terminal for separate purchase; Microphones Stereo Microphone ME-1 (0 129) * Accessory terminal accessories The D5300 is not in place. • Wireless Remote Control ML-L3 (0 70): The ML-L3 uses a 3 V CR2025 battery. purchase UC-E6 cables ...instead. Technical Notes 237 Body cap Body Cap BF-1B/Body Cap BF-1A: The body cap keeps the mirror, viewfinder screen, and image sensor free of dust when a lens is attached, the camera can be used...
... the connector cover when the terminal is equipped with an accessory terminal for separate purchase; Microphones Stereo Microphone ME-1 (0 129) * Accessory terminal accessories The D5300 is not in place. • Wireless Remote Control ML-L3 (0 70): The ML-L3 uses a 3 V CR2025 battery. purchase UC-E6 cables ...instead. Technical Notes 237 Body cap Body Cap BF-1B/Body Cap BF-1A: The body cap keeps the mirror, viewfinder screen, and image sensor free of dust when a lens is attached, the camera can be used...

Reference Manual
Page 260
... If using the camera at the beach or seaside, wipe off sand or salt with a blower. Remove dust and lint with a cloth lightly body dampened in locations that: • are poorly ventilated or subject to humidities of over 60% • are next to equipment that fees apply to... prevent the discharge of lens cleaner to two years, and that the camera be inspected by the original retailer or Nikon-authorized service representative once every one to a soft cloth and clean with a soft cloth or chamois leather. Important: Dust or other volatile ...
... If using the camera at the beach or seaside, wipe off sand or salt with a blower. Remove dust and lint with a cloth lightly body dampened in locations that: • are poorly ventilated or subject to humidities of over 60% • are next to equipment that fees apply to... prevent the discharge of lens cleaner to two years, and that the camera be inspected by the original retailer or Nikon-authorized service representative once every one to a soft cloth and clean with a soft cloth or chamois leather. Important: Dust or other volatile ...

Reference Manual
Page 264
... image sensor, clean the sensor as the bristles could damage the sensor. Photographs affected by the presence of foreign matter on the Image Sensor Nikon takes every possible precaution to the curtain, observe the following precautions: • Do not turn the camera off . Remove any dust and ...lint from coming into contact with a blower. Replace the lens or body cap. The D5300, however, is raised, a beep will sound and the self-timer lamp will be lowered after about two minutes. The mirror will return to...
... image sensor, clean the sensor as the bristles could damage the sensor. Photographs affected by the presence of foreign matter on the Image Sensor Nikon takes every possible precaution to the curtain, observe the following precautions: • Do not turn the camera off . Remove any dust and ...lint from coming into contact with a blower. Replace the lens or body cap. The D5300, however, is raised, a beep will sound and the self-timer lamp will be lowered after about two minutes. The mirror will return to...

Reference Manual
Page 265
... of the internal mechanism can cause condensation inside the device. Keep dry: This product is extremely thin and easily damaged. Cleaning: When cleaning the camera body, use or store this device in pure water and then dry the camera thoroughly.
... of the internal mechanism can cause condensation inside the device. Keep dry: This product is extremely thin and easily damaged. Cleaning: When cleaning the camera body, use or store this device in pure water and then dry the camera thoroughly.

Reference Manual
Page 283
...manual may vary with battery and memory card but without prior notice. Actual rates may result from any time and without body cap; Technical Notes 263 approx. 480 g/1 lb 0.9 oz (camera body only) Operating environment Temperature 0 °C-40 °C (+32 °F-104 °F) Humidity 85% or less ...802.11b: DSSS/CCK • IEEE 802.11g: OFDM 2412-2462 MHz (channels 1-11) Approximately 30 m/98 ft (assumes no interference; Nikon will not be held liable for a camera with a fully-charged battery operating at any mistakes that this manual at the temperature specified by ...
...manual may vary with battery and memory card but without prior notice. Actual rates may result from any time and without body cap; Technical Notes 263 approx. 480 g/1 lb 0.9 oz (camera body only) Operating environment Temperature 0 °C-40 °C (+32 °F-104 °F) Humidity 85% or less ...802.11b: DSSS/CCK • IEEE 802.11g: OFDM 2412-2462 MHz (channels 1-11) Approximately 30 m/98 ft (assumes no interference; Nikon will not be held liable for a camera with a fully-charged battery operating at any mistakes that this manual at the temperature specified by ...
Reference Manual
Page 294
...-56, 119-121 Auto-servo AF 51 Available settings 248 B Battery 11, 236, 264 Beep 187 Black-and-white 208 Blue intensifier (Filter effects) ..209 Body cap 1, 237 Border (PictBridge 157 Bracketing 108, 192 Built-in AF-assist illuminator ..... 52, 185, 229 Built-in flash 62, 230 Bulb 88 Burst 46...
...-56, 119-121 Auto-servo AF 51 Available settings 248 B Battery 11, 236, 264 Beep 187 Black-and-white 208 Blue intensifier (Filter effects) ..209 Body cap 1, 237 Border (PictBridge 157 Bracketing 108, 192 Built-in AF-assist illuminator ..... 52, 185, 229 Built-in flash 62, 230 Bulb 88 Burst 46...
Users Manual
Page 2
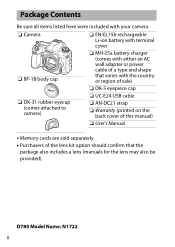
... sure all items listed here were included with your camera. ❏ Camera ❏ EN-EL15b rechargeable Li-ion battery with terminal cover ❏ BF-1B body cap ❏ MH-25a battery charger (comes with either an AC wall adapter or power cable of a type and shape that varies with the country...
... sure all items listed here were included with your camera. ❏ Camera ❏ EN-EL15b rechargeable Li-ion battery with terminal cover ❏ BF-1B body cap ❏ MH-25a battery charger (comes with either an AC wall adapter or power cable of a type and shape that varies with the country...

Users Manual
Page 6
... Contents ii About This Manual iv Menu List ix For Your Safety xv Notices ...xxi Getting to Know the Camera 1 Parts of the Camera 1 Camera Body 1 The Control Panel 7 The Viewfinder 8 The Live View Displays (Photos/Movies 11 The G Button 13 First Steps 19 Readying the Camera 19 Attaching the Strap...
... Contents ii About This Manual iv Menu List ix For Your Safety xv Notices ...xxi Getting to Know the Camera 1 Parts of the Camera 1 Camera Body 1 The Control Panel 7 The Viewfinder 8 The Live View Displays (Photos/Movies 11 The G Button 13 First Steps 19 Readying the Camera 19 Attaching the Strap...
Users Manual
Page 25
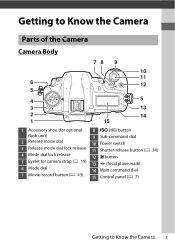
Getting to Know the Camera Parts of the Camera Camera Body 78 9 10 11 6 12 5 4 5 3 13 2 14 1 15 1 Accessory shoe (for optional 8 S (Q) button flash unit) 9 Sub-command dial 2 Release mode dial 10 Power switch 3 Release mode dial lock release 11 Shutter-release button (0 34) 4 Mode dial lock release 12 E button 5 Eyelet for camera strap (0 19) 13 E (focal plane mark) 6 Mode dial 14 Main command dial 7 Movie-record button (0 43) 15 Control panel (0 7) Getting to Know the Camera 1
Getting to Know the Camera Parts of the Camera Camera Body 78 9 10 11 6 12 5 4 5 3 13 2 14 1 15 1 Accessory shoe (for optional 8 S (Q) button flash unit) 9 Sub-command dial 2 Release mode dial 10 Power switch 3 Release mode dial lock release 11 Shutter-release button (0 34) 4 Mode dial lock release 12 E button 5 Eyelet for camera strap (0 19) 13 E (focal plane mark) 6 Mode dial 14 Main command dial 7 Movie-record button (0 43) 15 Control panel (0 7) Getting to Know the Camera 1
Users Manual
Page 27
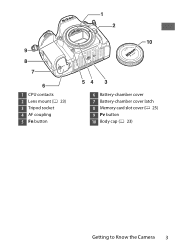
9 8 7 6 1 CPU contacts 2 Lens mount (0 23) 3 Tripod socket 4 AF coupling 5 Fn button 1 2 10 54 3 6 Battery-chamber cover 7 Battery-chamber cover latch 8 Memory card slot cover (0 25) 9 Pv button 10 Body cap (0 23) Getting to Know the Camera 3
9 8 7 6 1 CPU contacts 2 Lens mount (0 23) 3 Tripod socket 4 AF coupling 5 Fn button 1 2 10 54 3 6 Battery-chamber cover 7 Battery-chamber cover latch 8 Memory card slot cover (0 25) 9 Pv button 10 Body cap (0 23) Getting to Know the Camera 3


