
User Manual
Page 7
...Camera 2 First Steps 8 Attaching a Lens 8 Charging and Inserting the Battery 9 Basic Setup 11 Inserting Memory Cards 12 Adjusting Viewfinder Focus 14 Tutorial 15 "Point-and-Shoot" Photography ( Mode 15 Creative Photography (Digital... on Playback 50 Viewing Photographs on the Camera 50 Photo Information 51 Viewing Multiple Images:... a Computer 55 Before Connecting the Camera 55 Connecting the USB Cable 55 Printing Photographs...TV 62 Menu Guide 63 Using Camera Menus 63 Playback Options: The ...Self-Timer 79 17: Remote on Duration 79 Basic Camera Settings: The Setup Menu 80 CSM/Setup Menu 80...
...Camera 2 First Steps 8 Attaching a Lens 8 Charging and Inserting the Battery 9 Basic Setup 11 Inserting Memory Cards 12 Adjusting Viewfinder Focus 14 Tutorial 15 "Point-and-Shoot" Photography ( Mode 15 Creative Photography (Digital... on Playback 50 Viewing Photographs on the Camera 50 Photo Information 51 Viewing Multiple Images:... a Computer 55 Before Connecting the Camera 55 Connecting the USB Cable 55 Printing Photographs...TV 62 Menu Guide 63 Using Camera Menus 63 Playback Options: The ...Self-Timer 79 17: Remote on Duration 79 Basic Camera Settings: The Setup Menu 80 CSM/Setup Menu 80...
User Manual
Page 14
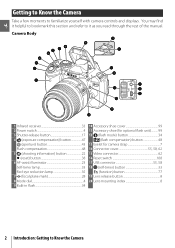
... Accessory shoe (for optional flash unit).......... 99 12 (flash mode) button 34 (flash compensation) button 48 13 Eyelet for camera strap 7 14 Connector cover 55, 58, 62 15 Video connector 62 16 Reset switch 108 17 USB connector 55, 58 18 (self-timer) button 33 (function) button 77 19... Lens release button 8 20 Lens mounting index 8 2 Introduction: Getting to it helpful to bookmark this section and refer to Know the Camera Getting to Know the Camera Take a...
... Accessory shoe (for optional flash unit).......... 99 12 (flash mode) button 34 (flash compensation) button 48 13 Eyelet for camera strap 7 14 Connector cover 55, 58, 62 15 Video connector 62 16 Reset switch 108 17 USB connector 55, 58 18 (self-timer) button 33 (function) button 77 19... Lens release button 8 20 Lens mounting index 8 2 Introduction: Getting to it helpful to bookmark this section and refer to Know the Camera Getting to Know the Camera Take a...
User Manual
Page 74
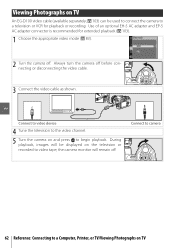
... ( 103). 1 Choose the appropriate video mode ( 83). 2 Turn the camera off. Connect to video device 4 Tune the television to the video channel. 5 Turn the camera on TV During playback, images will remain off before connecting or disconnecting the video cable. 3 Connect the video cable as shown. Always turn the camera off . Connect to camera 62 Reference: Connecting to a Computer...
... ( 103). 1 Choose the appropriate video mode ( 83). 2 Turn the camera off. Connect to video device 4 Tune the television to the video channel. 5 Turn the camera on TV During playback, images will remain off before connecting or disconnecting the video cable. 3 Connect the video cable as shown. Always turn the camera off . Connect to camera 62 Reference: Connecting to a Computer...
User Manual
Page 92
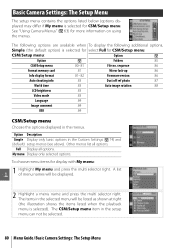
...format 81-82 Firmware version 86 Auto shooting info 83 Dust off ref photo 87 World time 83 Auto image rotation 88 LCD brightness 83 Video mode 83 Language 84 Image comment 84 USB 84 CSM/Setup menu Choose the options displayed in the Custom Settings ( 74) and (default...) setup menus (see above). Option Description Simple Display only basic options in the menus. My menu Display only selected options. See "Using Camera Menus" ( 63) for CSM/Setup menu. Other menus list all options. The CSM/Setup menu item in the selected menu will be selected. 80 Menu...
...format 81-82 Firmware version 86 Auto shooting info 83 Dust off ref photo 87 World time 83 Auto image rotation 88 LCD brightness 83 Video mode 83 Language 84 Image comment 84 USB 84 CSM/Setup menu Choose the options displayed in the Custom Settings ( 74) and (default...) setup menus (see above). Option Description Simple Display only basic options in the menus. My menu Display only selected options. See "Using Camera Menus" ( 63) for CSM/Setup menu. Other menus list all options. The CSM/Setup menu item in the selected menu will be selected. 80 Menu...

User Manual
Page 95
...the main battery is installed or the camera is off . Menu Guide/Basic Camera Settings: The Setup Menu 83 Select On to the time in Digital Vari-Program and ) modes or P, S, A, and M modes. Set the camera clock ( 11). The camera clock is powered by an independent, ...rechargeable power source, which the month, day, and year are displayed. Choose PAL when connecting the camera to the correct date and time. Set the clock to a PAL video...
...the main battery is installed or the camera is off . Menu Guide/Basic Camera Settings: The Setup Menu 83 Select On to the time in Digital Vari-Program and ) modes or P, S, A, and M modes. Set the camera clock ( 11). The camera clock is powered by an independent, ...rechargeable power source, which the month, day, and year are displayed. Choose PAL when connecting the camera to the correct date and time. Set the clock to a PAL video...

User Manual
Page 115
...Pro: Control the camera remotely from local Power sources retailers and Nikon service representatives. • EH-5 AC adapter: Use to the computer. Remote 1 2 3 4 5 controls Software • Capture NX: A complete photo editing package with support for more information on TV or record them to video tape ( 62... indicator in the monitor will show . ᕣ ᕤ See the EP-5 and EH-5 instruction manuals for RAW images. Update to the D40. Connecting the Optional EP-5 AC Adapter Connector and EH-5 AC Adapter 1 Open the battery-chamber (c) and power-connector (d) covers. 2 Insert...
...Pro: Control the camera remotely from local Power sources retailers and Nikon service representatives. • EH-5 AC adapter: Use to the computer. Remote 1 2 3 4 5 controls Software • Capture NX: A complete photo editing package with support for more information on TV or record them to video tape ( 62... indicator in the monitor will show . ᕣ ᕤ See the EP-5 and EH-5 instruction manuals for RAW images. Update to the D40. Connecting the Optional EP-5 AC Adapter Connector and EH-5 AC Adapter 1 Open the battery-chamber (c) and power-connector (d) covers. 2 Insert...

User Manual
Page 122
Can not delete photo. Problem Solution Flashing areas appear in images Shooting data appear on TV. shuttershooting • Camera was pointed up or down when photo was pressed in continuous mode. Memory card is not played back. Can not ... folder. Photo is in "wide" (landscape) orientation. • rotation. Can not use Camera Control Pro. Camera orientation was changed while release button was taken. Photo is protected: remove protection. Choose correct video mode. Can not copy photos to computer and print using PictureProject or Capture NX. Set USB...
Can not delete photo. Problem Solution Flashing areas appear in images Shooting data appear on TV. shuttershooting • Camera was pointed up or down when photo was pressed in continuous mode. Memory card is not played back. Can not ... folder. Photo is in "wide" (landscape) orientation. • rotation. Can not use Camera Control Pro. Camera orientation was changed while release button was taken. Photo is protected: remove protection. Choose correct video mode. Can not copy photos to computer and print using PictureProject or Capture NX. Set USB...

User Manual
Page 126
... 6: No memory card? AUTO JPEG normal Large Auto Off Normal 200 Setup menu CSM/Setup menu Display format Auto shooting info World time LCD brightness Video mode Language Image comment USB Folders File no. Off - Auto - Auto Slow* Fill flash Other settings * Auto slow sync. 114 Technical Notes/Appendix Center - Off...
... 6: No memory card? AUTO JPEG normal Large Auto Off Normal 200 Setup menu CSM/Setup menu Display format Auto shooting info World time LCD brightness Video mode Language Image comment USB Folders File no. Off - Auto - Auto Slow* Fill flash Other settings * Auto slow sync. 114 Technical Notes/Appendix Center - Off...
User Manual
Page 132
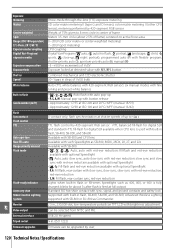
...Standard ISO hot-shoe contact with sync, signal, and ground contacts and safety lock Supported with brightness adjustment Video output Can be upgraded by 420-segment RGB sensor. blinks for digital SLR available when CPU lens is fired at ISO 100 and 20°C/68°F (manual 13/42) ...Flash Sync contact Flash control TTL Auto aperture Non-TTL auto Range-priority manual Flash mode Flash-ready indicator Accessory shoe Nikon Creative Lighting System X-contact ...
...Standard ISO hot-shoe contact with sync, signal, and ground contacts and safety lock Supported with brightness adjustment Video output Can be upgraded by 420-segment RGB sensor. blinks for digital SLR available when CPU lens is fired at ISO 100 and 20°C/68°F (manual 13/42) ...Flash Sync contact Flash control TTL Auto aperture Non-TTL auto Range-priority manual Flash mode Flash-ready indicator Accessory shoe Nikon Creative Lighting System X-contact ...

User Manual
Page 137
See Playback W (white balance indicator), 6, 49, 70-72 White balance, 49, 70-72. See also Color temperature preset, 49, 70-72 White balance (shooting menu), 49, 70-72 World time (setup menu), 11, 83 Index 125 USB (setup menu), 55, 84 V Video cable, 62, 103 Video device, 62 Video mode (setup menu), 62, 83 VIDEO OUT, 2, 62 Viewfinder, 5, 14, 16, 102, 111- 112 accessories, 102 focus, 14 indicators, 5, 111-112 Viewing photographs.
See Playback W (white balance indicator), 6, 49, 70-72 White balance, 49, 70-72. See also Color temperature preset, 49, 70-72 White balance (shooting menu), 49, 70-72 World time (setup menu), 11, 83 Index 125 USB (setup menu), 55, 84 V Video cable, 62, 103 Video device, 62 Video mode (setup menu), 62, 83 VIDEO OUT, 2, 62 Viewfinder, 5, 14, 16, 102, 111- 112 accessories, 102 focus, 14 indicators, 5, 111-112 Viewing photographs.


