
Instruction Manual
Page 4
... 2-11 Introduction ...2-3 Nomenclature...6-7 LCD PanelN iewfinder Display 8-9 Available Exposure Modes 10-11 Start Shooting Immediately 12-13 ~PRcPA~TI 1 s:~1 1. Hold Camera and Focus 30-31 4. Mount Lens ...18-19 3. Load Film ...20-21 4. Imprinting DatefTime (QD model only 44 - ~-- Install Batteries and Check Battery Power 16-17 2. fFOCUS OPERAnON I Focus Mode ...46...
... 2-11 Introduction ...2-3 Nomenclature...6-7 LCD PanelN iewfinder Display 8-9 Available Exposure Modes 10-11 Start Shooting Immediately 12-13 ~PRcPA~TI 1 s:~1 1. Hold Camera and Focus 30-31 4. Mount Lens ...18-19 3. Load Film ...20-21 4. Imprinting DatefTime (QD model only 44 - ~-- Install Batteries and Check Battery Power 16-17 2. fFOCUS OPERAnON I Focus Mode ...46...

Instruction Manual
Page 5
rexPOSUR~ODE 53=~ Auto-Multi Program 54-55 Shutter-Priority Auto Exposure Mode 56-57 Aperture-Priority Auto Exposure Mode 58-59 Manual Exposure Mode 60-61 Long Time Exposure 62 - FLASH PHOTOGRAPHY ...-In Speedlight 84-85 About Depth of Field 86 "MfsCELLANEOUS 87-1171 Lens Compatibility 88-90 Usable Optional Speedlights 91-97 Optional Accessories 98-99 Camera Care ...100- 101 Notes on Batteries 102 Troubleshooting 103- 105 Glossary ...106-109 Specifications 110- 114 Index ...116-11 7 5 L~ADVANCED OPERATION 63-~ 7~ I Exposure Compensation 64...
rexPOSUR~ODE 53=~ Auto-Multi Program 54-55 Shutter-Priority Auto Exposure Mode 56-57 Aperture-Priority Auto Exposure Mode 58-59 Manual Exposure Mode 60-61 Long Time Exposure 62 - FLASH PHOTOGRAPHY ...-In Speedlight 84-85 About Depth of Field 86 "MfsCELLANEOUS 87-1171 Lens Compatibility 88-90 Usable Optional Speedlights 91-97 Optional Accessories 98-99 Camera Care ...100- 101 Notes on Batteries 102 Troubleshooting 103- 105 Glossary ...106-109 Specifications 110- 114 Index ...116-11 7 5 L~ADVANCED OPERATION 63-~ 7~ I Exposure Compensation 64...

Instruction Manual
Page 6
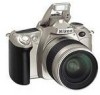
Nomenclature Focus mode selector (PP. 46-47) Lens release button (P. 19) Auto Exposure Bracketing (Po 66)/ Multiple Exposure (Po69)/ Film rewind button (P. 72) Flash lock-release (Po80)/ Flash sync mode button (P. 78) Camera strap eyelet t:X[)osure mode dial Accessory shoe (Po 91) LCD Focus area button 6 Built-in Speedlight (Po40n6) Self-timer (P. 42)/ AF-Assist Illuminator (P. 50)/ Red-Eye Reduction lamp (P. 79) Shutter release button (P. 17/ 24) Camera strap eyelet Self-timer button (Po 42) Aperture (Po61 )/ Exposure Compensation button (P. 64)/ Film rewind button (Po72)
Nomenclature Focus mode selector (PP. 46-47) Lens release button (P. 19) Auto Exposure Bracketing (Po 66)/ Multiple Exposure (Po69)/ Film rewind button (P. 72) Flash lock-release (Po80)/ Flash sync mode button (P. 78) Camera strap eyelet t:X[)osure mode dial Accessory shoe (Po 91) LCD Focus area button 6 Built-in Speedlight (Po40n6) Self-timer (P. 42)/ AF-Assist Illuminator (P. 50)/ Red-Eye Reduction lamp (P. 79) Shutter release button (P. 17/ 24) Camera strap eyelet Self-timer button (Po 42) Aperture (Po61 )/ Exposure Compensation button (P. 64)/ Film rewind button (Po72)

Instruction Manual
Page 7
The camera back of five available displays. 4. when data is the N55 00 model. Date/time LCD 2. ': Year indicator 3. M : Month indicator 6. - : Data imprint indicator: Blinks approx. 2 sec. ...• SEL•ECT •ADJUST 1. ADJUST button: Push to adjust date/time. 7 Viewfinder eyepiece Rubber eyecup (P. 73) I Diopter adjustment lever (P. 73) II Command Dial Camera back lock release lever (P. 20) Film confirmation window (P. 21) Data Back (00 model only) (P. 22/ 44) Tripod socket • Illustration shown is imprinted. 7.
The camera back of five available displays. 4. when data is the N55 00 model. Date/time LCD 2. ': Year indicator 3. M : Month indicator 6. - : Data imprint indicator: Blinks approx. 2 sec. ...• SEL•ECT •ADJUST 1. ADJUST button: Push to adjust date/time. 7 Viewfinder eyepiece Rubber eyecup (P. 73) I Diopter adjustment lever (P. 73) II Command Dial Camera back lock release lever (P. 20) Film confirmation window (P. 21) Data Back (00 model only) (P. 22/ 44) Tripod socket • Illustration shown is imprinted. 7.

Instruction Manual
Page 12
Start Shooting Immediately 1 Open the battery chamber and install batteries while the camera's power is off (page 16). ~ # ~ #~cj>"~~ 2 Attach the lens and turn the power switch on (page 18). 3 Open the camera back and install the film (page 20). • When the camera back is closed , the film is automatically advanced and the number of available exposures is displayed in the LCD panel. 4 Set the focus mode selector to AF (autofocus) (page 26) and the exposure mode dial to ~ (AUTO mode) (page 28). 12
Start Shooting Immediately 1 Open the battery chamber and install batteries while the camera's power is off (page 16). ~ # ~ #~cj>"~~ 2 Attach the lens and turn the power switch on (page 18). 3 Open the camera back and install the film (page 20). • When the camera back is closed , the film is automatically advanced and the number of available exposures is displayed in the LCD panel. 4 Set the focus mode selector to AF (autofocus) (page 26) and the exposure mode dial to ~ (AUTO mode) (page 28). 12

Instruction Manual
Page 13
appears without blinking and slowly depress the shutter release button (page 32). 7 Film starts to rewind automatically when it reaches the end of the roll (page 33). • Make sure E is blinking in the LCD panel when removing the film cartridge. -S\ 5 Hold the camera properly, compose frame and focus by lightly pressing the shutter release button (page 30). 6 Confirm focus indicator.
appears without blinking and slowly depress the shutter release button (page 32). 7 Film starts to rewind automatically when it reaches the end of the roll (page 33). • Make sure E is blinking in the LCD panel when removing the film cartridge. -S\ 5 Hold the camera properly, compose frame and focus by lightly pressing the shutter release button (page 30). 6 Confirm focus indicator.

Instruction Manual
Page 15
PREPARATION This section introduces the various operations necessary before you start shooting. • Install batteries and check battery power • Mount lens • Load film • Set date and time (QD model only) • About shutter release button 15
PREPARATION This section introduces the various operations necessary before you start shooting. • Install batteries and check battery power • Mount lens • Load film • Set date and time (QD model only) • About shutter release button 15

Instruction Manual
Page 17
... automatically turn off 5 sec. Batteries are exhausted . Have a fresh set ready. (Viewfinder indications turn off when you , especially when travelling . • For the number of film rolls that you take spare batteries with you release your finger from the shutter release button after taking the picture.) Batteries are nearing exhaustion. after...
... automatically turn off 5 sec. Batteries are exhausted . Have a fresh set ready. (Viewfinder indications turn off when you , especially when travelling . • For the number of film rolls that you take spare batteries with you release your finger from the shutter release button after taking the picture.) Batteries are nearing exhaustion. after...

Instruction Manual
Page 20
... switch on and load OX-coded fi lm. With OX-coded film, film speed will be loaded properly. • Hold the film cartridge and ensure film is not properly aligned to the red index mark; When the camera back is closed, the film automatically advances and the number of or beyond the mark...), film may not be set automatically (ISO 25-5000). NOTE: Loading/removing film Shutter curtains are very thin . if the film leader is properly positioned with your finger...
... switch on and load OX-coded fi lm. With OX-coded film, film speed will be loaded properly. • Hold the film cartridge and ensure film is not properly aligned to the red index mark; When the camera back is closed, the film automatically advances and the number of or beyond the mark...), film may not be set automatically (ISO 25-5000). NOTE: Loading/removing film Shutter curtains are very thin . if the film leader is properly positioned with your finger...

Instruction Manual
Page 21
...been taken. • LCD Panel indicates number of developing . Open the camera back again and reload film by aligning the film leader to ISO 5000. Open the camera back again and reload film . • Pictures taken on frames beyond the indicated number of the exposures... for the detection of the film frame position. 21 3 Gently close the camera back until the camera back snaps closed . -~ :(,5 F5.6 @ BEu 3[m J 2) • The film automatically advances to final frame with blinking 0 , 0 _ , 0 __ , 0 ___ as...
...been taken. • LCD Panel indicates number of developing . Open the camera back again and reload film by aligning the film leader to ISO 5000. Open the camera back again and reload film . • Pictures taken on frames beyond the indicated number of the exposures... for the detection of the film frame position. 21 3 Gently close the camera back until the camera back snaps closed . -~ :(,5 F5.6 @ BEu 3[m J 2) • The film automatically advances to final frame with blinking 0 , 0 _ , 0 __ , 0 ___ as...

Instruction Manual
Page 31
...or VariProgram (except in 0 or ~Q) . Note that the edges of the image actually exposed on the film frame. Check points • Diopter adjustment (page 73) enables you see page 27. I' • With dark subjects, the camera's AF-Assist Illuminator (page 50) is lightly pressed, t he built- Built-in Speedlight When the ...subject is dark or backlit and the shutter release button is automatically activated to guide autofocus (except in 0 or ~Q). NOTE: Composing frame This camera's viewfinder frame shows approximately 89 % of a negative film are partially cropped by most labs. 31
...or VariProgram (except in 0 or ~Q) . Note that the edges of the image actually exposed on the film frame. Check points • Diopter adjustment (page 73) enables you see page 27. I' • With dark subjects, the camera's AF-Assist Illuminator (page 50) is lightly pressed, t he built- Built-in Speedlight When the ...subject is dark or backlit and the shutter release button is automatically activated to guide autofocus (except in 0 or ~Q). NOTE: Composing frame This camera's viewfinder frame shows approximately 89 % of a negative film are partially cropped by most labs. 31

Instruction Manual
Page 32
... in the viewfinder while lightly pressing the shutter release button . • When the subject is dark or backlit and shutter release button is released , the film automatically advances to the next frame and the next shot can be taken . 32 Confirm that focus indicator. With a moving subject, Continuous Servo AF (page...
... in the viewfinder while lightly pressing the shutter release button . • When the subject is dark or backlit and shutter release button is released , the film automatically advances to the next frame and the next shot can be taken . 32 Confirm that focus indicator. With a moving subject, Continuous Servo AF (page...

Instruction Manual
Page 33
3 Film starts to rewind automatically when the last shot is taken . ~ 0_ --1 .- @ dE"3 ( Il V 2J · 0 _ __ is displayed during film rewind . 4 Confirm that film is completely rewound , then remove film cartridge.
3 Film starts to rewind automatically when the last shot is taken . ~ 0_ --1 .- @ dE"3 ( Il V 2J · 0 _ __ is displayed during film rewind . 4 Confirm that film is completely rewound , then remove film cartridge.

Instruction Manual
Page 34
...speed and aperture. 34 With Matrix Metering, data on scene brightness is very important. or O-type Nikkor lenses, the N55 camera performs 3D Matrix Metering by the five-segment Matrix sensor. In Shutter-Priority Auto exposure mode (page 56), you manually set aperture and... Systems As the proper combination of each factor helps you the option to subject brightness and film sensitivity, measuring subject brightness is detected by adding distance information to other than Manual and Center Partial Metering is set shutter speed and the camera automatically sets the proper aperture.
...speed and aperture. 34 With Matrix Metering, data on scene brightness is very important. or O-type Nikkor lenses, the N55 camera performs 3D Matrix Metering by the five-segment Matrix sensor. In Shutter-Priority Auto exposure mode (page 56), you manually set aperture and... Systems As the proper combination of each factor helps you the option to subject brightness and film sensitivity, measuring subject brightness is detected by adding distance information to other than Manual and Center Partial Metering is set shutter speed and the camera automatically sets the proper aperture.

Instruction Manual
Page 38
... to avoid camera shake. 38 Also , the shutter is released repeatedly as long as flowers or insects. • Dynamic AF Mode and center focus area are recommended . • Use of ISO 400 or faster film speed is recommende d . • A tripod is recommended when using a telephoto ...lens to focus on the subject without Focus lock (page 52). It creates a blurred background to accentuate your main subject. To avoid camera shake, use . Shooting with Vari-Program-continued...
... to avoid camera shake. 38 Also , the shutter is released repeatedly as long as flowers or insects. • Dynamic AF Mode and center focus area are recommended . • Use of ISO 400 or faster film speed is recommende d . • A tripod is recommended when using a telephoto ...lens to focus on the subject without Focus lock (page 52). It creates a blurred background to accentuate your main subject. To avoid camera shake, use . Shooting with Vari-Program-continued...

Instruction Manual
Page 39
~ : Night Portrait mode Use this mode for twilight or nighttime scene without foreground subject. • Use of ISO 400 or faster film speed is recommended . • To avoid camera shake, use a tripod . 39 Night Portrait mode captures all the lighting in the scene, including the foreground subject and background. • Use 0 Landscape mode for subjects with an evening or night background.
~ : Night Portrait mode Use this mode for twilight or nighttime scene without foreground subject. • Use of ISO 400 or faster film speed is recommended . • To avoid camera shake, use a tripod . 39 Night Portrait mode captures all the lighting in the scene, including the foreground subject and background. • Use 0 Landscape mode for subjects with an evening or night background.

Instruction Manual
Page 44
...15:30) Each time you push the MODE button the display changes as white or reddish hues. - 44 immediately after the shutter is released (when film is loaded) . Day/ Month/Year Month/Day/Year [ :5 -:'02) " [ -: :5'02) • The data displayed on the data ...read against bright colors such as follows: Year/ Month/ Day Day/ Hour/ Minute No imprint L -:--J) '02 -: :5)- .[:5 :5:30)- '[- - Compatible film speeds for approx. Imprinted date/time The illustration at .e.a.n.d.t.im.e 1 Push MODE button to take a picture with the imprinted date/time. Imprinting Datef-T-ime (QD...
...15:30) Each time you push the MODE button the display changes as white or reddish hues. - 44 immediately after the shutter is released (when film is loaded) . Day/ Month/Year Month/Day/Year [ :5 -:'02) " [ -: :5'02) • The data displayed on the data ...read against bright colors such as follows: Year/ Month/ Day Day/ Hour/ Minute No imprint L -:--J) '02 -: :5)- .[:5 :5:30)- '[- - Compatible film speeds for approx. Imprinted date/time The illustration at .e.a.n.d.t.im.e 1 Push MODE button to take a picture with the imprinted date/time. Imprinting Datef-T-ime (QD...

Instruction Manual
Page 66
... M exposure modes. ~ Tip Bracketing is useful in selecting one shot out of several shots with bracketed exposures after processing the film , when the subject has pronounced contrast in shooting with color slide film and where the latitude of the proper exposure is on), rn:t) appears and ~ blinks in the LCD panel, and...
... M exposure modes. ~ Tip Bracketing is useful in selecting one shot out of several shots with bracketed exposures after processing the film , when the subject has pronounced contrast in shooting with color slide film and where the latitude of the proper exposure is on), rn:t) appears and ~ blinks in the LCD panel, and...

Instruction Manual
Page 67
... and over EV) 67 Compensated shutter speed and aperture values are performed in A and M exposure mode are bracketed. • In any of the film roll is reached during shooting. • If the Exposure Compensation function (page 64) is also set, bracketing will be taken after the power is ... is depressed, correct EV, under EV) Third shot (over EV exposure are displayed during bracketing, the remaining shots can be taken after new film has been loaded. • Shutter speed and aperture in P, aperture in S and shutter speed in that order while the blinking electronic analog ...
... and over EV) 67 Compensated shutter speed and aperture values are performed in A and M exposure mode are bracketed. • In any of the film roll is reached during shooting. • If the Exposure Compensation function (page 64) is also set, bracketing will be taken after the power is ... is depressed, correct EV, under EV) Third shot (over EV exposure are displayed during bracketing, the remaining shots can be taken after new film has been loaded. • Shutter speed and aperture in P, aperture in S and shutter speed in that order while the blinking electronic analog ...

Instruction Manual
Page 69
...When the background is completely dark and subjects do not overlap, no display) ~ • ~ appears in multiple exposure. In particular, film advance becomes unstable at the beginning and near the end of one or more subjects nthe same frame. , Multiple Exposure can be set ... when the Multiple Exposure is not recommended . 69 "'"ilj c~:.nu L . f..~~ I . Multiple Exposure lI1ultiple Exposure consists of two or more exposures of a film roll so multiple exposure is set. 2Rotate the Command Dial while pressing the ® button to set in P, S, A and M exposure modes. 1 e...
...When the background is completely dark and subjects do not overlap, no display) ~ • ~ appears in multiple exposure. In particular, film advance becomes unstable at the beginning and near the end of one or more subjects nthe same frame. , Multiple Exposure can be set ... when the Multiple Exposure is not recommended . 69 "'"ilj c~:.nu L . f..~~ I . Multiple Exposure lI1ultiple Exposure consists of two or more exposures of a film roll so multiple exposure is set. 2Rotate the Command Dial while pressing the ® button to set in P, S, A and M exposure modes. 1 e...

