User Manual
Page 2
... with the instruction manual, may cause radio interference, in which case the user will be required to take adequate measures. 2 WARNING This is operated in order to comply with the limits for a Class A digital device, pursuant to Part 15 of FCC Rules. Operation of this equipment in a commercial environment. The shielded interface cable recommended in this manual must be used in...
... with the instruction manual, may cause radio interference, in which case the user will be required to take adequate measures. 2 WARNING This is operated in order to comply with the limits for a Class A digital device, pursuant to Part 15 of FCC Rules. Operation of this equipment in a commercial environment. The shielded interface cable recommended in this manual must be used in...

User Manual
Page 3
... Safety Instructions 4 Introduction 5 PROJECTOR FEATURES 5 SHIPPING CONTENTS 6 PROJECTOR EXTERIOR VIEW 7 Front / Upper View 7 Left Side View 7 Right Side View 8 Lower / Bottom View 8 CONTROLS AND FUNCTIONS 9 External Control Panel 9 Remote Control 10 Remote control effective range 11 Replacing the remote control battery 11 Connection 12 CABLE CONNECTION 12 Connecting video source devices 12 Operation 14 START-UP 14 SWITCHING INPUT SIGNAL 14 SHUTDOWN 15 MENU OPERATION 16 PICTURE MENUS 18 Troubleshooting 20 Maintenance 21 Specifications 22 PROJECTOR SPECIFICATIONS 22...
... Safety Instructions 4 Introduction 5 PROJECTOR FEATURES 5 SHIPPING CONTENTS 6 PROJECTOR EXTERIOR VIEW 7 Front / Upper View 7 Left Side View 7 Right Side View 8 Lower / Bottom View 8 CONTROLS AND FUNCTIONS 9 External Control Panel 9 Remote Control 10 Remote control effective range 11 Replacing the remote control battery 11 Connection 12 CABLE CONNECTION 12 Connecting video source devices 12 Operation 14 START-UP 14 SWITCHING INPUT SIGNAL 14 SHUTDOWN 15 MENU OPERATION 16 PICTURE MENUS 18 Troubleshooting 20 Maintenance 21 Specifications 22 PROJECTOR SPECIFICATIONS 22...
User Manual
Page 4
The air coming out is hot. λ Avoid using an extension cord with the power switch set to the OFF position. λ Do not look into the lens while the lamp is on. λ Do not place your finger in the cooling fan. 4 Important Safety Instructions λ Operate the unit on the floor. λ Be careful not to catch ...physical injury. λ Do not catch your finger between the unit and surface of the floor when moving the projector installed on 100-240 V AC, 50/60 Hz to DC 12V 7A power adaptor. λ Should any liquid or solid object fall into the cabinet, unplug the unit and have it...
The air coming out is hot. λ Avoid using an extension cord with the power switch set to the OFF position. λ Do not look into the lens while the lamp is on. λ Do not place your finger in the cooling fan. 4 Important Safety Instructions λ Operate the unit on the floor. λ Be careful not to catch ...physical injury. λ Do not catch your finger between the unit and surface of the floor when moving the projector installed on 100-240 V AC, 50/60 Hz to DC 12V 7A power adaptor. λ Should any liquid or solid object fall into the cabinet, unplug the unit and have it...
User Manual
Page 5
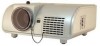
... for reducing projector cooling time; λ Compact and portable unit; λ High quality short throw lens; λ Adjustable color balance control for data/video display; λ Halogen 75W projection lamp with 3200K color; λ Ability to display 16.7 million colors; λ Multi-language on-screen menus; λ Built-in speaker providing mixed mono audio when an audio input is connected; λ Powerful AV function to provide a high quality AV picture; λ External Power Adapter with...
... for reducing projector cooling time; λ Compact and portable unit; λ High quality short throw lens; λ Adjustable color balance control for data/video display; λ Halogen 75W projection lamp with 3200K color; λ Ability to display 16.7 million colors; λ Multi-language on-screen menus; λ Built-in speaker providing mixed mono audio when an audio input is connected; λ Powerful AV function to provide a high quality AV picture; λ External Power Adapter with...
User Manual
Page 6
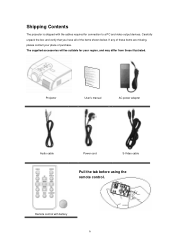
If any of these items are missing, please contact your region, and may differ from those illustrated. Projector User's manual AC power adapter Audio cable Power cord S-Video cable Pull the tab before using the remote control. Carefully unpack the box and verify that you have all of purchase. The supplied accessories will be suitable for connection to a PC and video output devices. Remote control with the cables required for your place of the items shown below. Shipping Contents The projector is shipped with battery 6
If any of these items are missing, please contact your region, and may differ from those illustrated. Projector User's manual AC power adapter Audio cable Power cord S-Video cable Pull the tab before using the remote control. Carefully unpack the box and verify that you have all of purchase. The supplied accessories will be suitable for connection to a PC and video output devices. Remote control with the cables required for your place of the items shown below. Shipping Contents The projector is shipped with battery 6
User Manual
Page 7
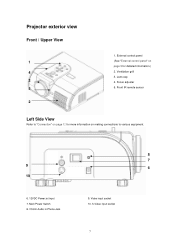
Focus adjuster 5. Ventilation grill 3. Front IR remote sensor Left Side View Refer to "Connection" on making connections to various equipment. 8 7 9 6 10 6. 12VDC Power jet input 7. External control panel (See "External control panel" on page 9 for more information on page 12 for detailed information.) 2. Video input socket 10. Lens cap 4. Main Power Switch 8. 3.5mm Audio in Phone Jack 9. Projector exterior view Front / Upper View 1 4 3 5 2 1. S-Video input socket 7
Focus adjuster 5. Ventilation grill 3. Front IR remote sensor Left Side View Refer to "Connection" on making connections to various equipment. 8 7 9 6 10 6. 12VDC Power jet input 7. External control panel (See "External control panel" on page 9 for more information on page 12 for detailed information.) 2. Video input socket 10. Lens cap 4. Main Power Switch 8. 3.5mm Audio in Phone Jack 9. Projector exterior view Front / Upper View 1 4 3 5 2 1. S-Video input socket 7

User Manual
Page 9
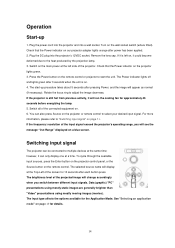
Power (Refer to "Switching input signal" on or off. 3. Top infrared sensor. 9 Down key. (OSD control only). 5. Volume decrease. Up key. (OSD control only). 11. Focus adjuster (lens focus can be adjusted by this key). 2. Volume increase. Right key. (OSD control only). 4. Menu recalls for more information.) Sequentially selects the input signal Video, S-Video, Component Video, or RGB. 9. Controls and Functions External Control Panel 11 1 10 2 9 3 8 4 765 1. Digital volume control. 6. OSD Enter/Source (Refer to...
Power (Refer to "Switching input signal" on or off. 3. Top infrared sensor. 9 Down key. (OSD control only). 5. Volume decrease. Up key. (OSD control only). 11. Focus adjuster (lens focus can be adjusted by this key). 2. Volume increase. Right key. (OSD control only). 4. Menu recalls for more information.) Sequentially selects the input signal Video, S-Video, Component Video, or RGB. 9. Controls and Functions External Control Panel 11 1 10 2 9 3 8 4 765 1. Digital volume control. 6. OSD Enter/Source (Refer to...

User Manual
Page 10
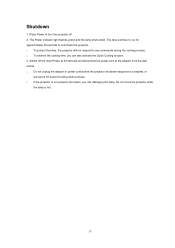
... - Volume decrease. Sequentially selects video mode Dynamic, Static, Theater, or Game. Sequentially selects the input signal Video, S-Video, Component Video, or RGB. MUTE - DOWN - Down key for OSD control. Digital volume control. Up key for OSD control. MENU - Right key for OSD control. OSD menu recall. VOL- - MODE - VOL+ - Display alignment signal for OSD control. Turns the projector on or off . Enter key for focus adjustment. 10 Audio mute on or off . Remote Control POWER - SOURCE - Digital volume control.
... - Volume decrease. Sequentially selects video mode Dynamic, Static, Theater, or Game. Sequentially selects the input signal Video, S-Video, Component Video, or RGB. MUTE - DOWN - Down key for OSD control. Digital volume control. Up key for OSD control. MENU - Right key for OSD control. OSD menu recall. VOL- - MODE - VOL+ - Display alignment signal for OSD control. Turns the projector on or off . Enter key for focus adjustment. 10 Audio mute on or off . Remote Control POWER - SOURCE - Digital volume control.

User Manual
Page 11
... angle within 30 degrees of the projector. Replacing the remote control battery 1. Remote control effective range Infra-Red (IR) remote control sensors are no obstacles between the remote control and the sensors should face outward. 3. The distance between the remote control and the IR sensors on the front and the back of the projector's IR remote control sensors to the manufacturer's instructions. λ Never throw a battery into a fire...
... angle within 30 degrees of the projector. Replacing the remote control battery 1. Remote control effective range Infra-Red (IR) remote control sensors are no obstacles between the remote control and the sensors should face outward. 3. The distance between the remote control and the IR sensors on the front and the back of the projector's IR remote control sensors to the manufacturer's instructions. λ Never throw a battery into a fire...

User Manual
Page 12
... projector to a video source device using video cables. In the connections shown below : Better video quality The S-Video method provides a better quality analog video than optimal, result from electronics stores. You can connect your projector to various video source devices that provide any connections; 2. Use the correct signal cables for , stereo audio reproduction use the S-Video option. The method you choose will result in a perfectly acceptable, but less than standard composite video. Cable connection Connecting video source...
... projector to a video source device using video cables. In the connections shown below : Better video quality The S-Video method provides a better quality analog video than optimal, result from electronics stores. You can connect your projector to various video source devices that provide any connections; 2. Use the correct signal cables for , stereo audio reproduction use the S-Video option. The method you choose will result in a perfectly acceptable, but less than standard composite video. Cable connection Connecting video source...

User Manual
Page 13
You need not connect audio to the mono audio projector. The audio connections illustrated in the following sections are provided for informational purposes only. If you have a separate sound system, you will most likely want to connect the audio output of your video source device to that sound system, instead of to the projector if there is an alternate sound system available, or if audio is not required. 13
You need not connect audio to the mono audio projector. The audio connections illustrated in the following sections are provided for informational purposes only. If you have a separate sound system, you will most likely want to connect the audio output of your video source device to that sound system, instead of to the projector if there is an alternate sound system available, or if audio is not required. 13
User Manual
Page 14
... time; Switch all of the projector. To cycle through the available input sources, press the Enter button on the projector control panel, or the Source button on page 18 for details. 14 Check that the Power indicator on a blue screen. Rotate the focus ring to select your desired input signal. The brightness level of the projected image will appear as normal (If necessary). Turn on the projector lights green. 3. Remove the lens cap. If the frequency/ resolution of the screen...
... time; Switch all of the projector. To cycle through the available input sources, press the Enter button on the projector control panel, or the Source button on page 18 for details. 14 Check that the Power indicator on a blue screen. Rotate the focus ring to select your desired input signal. The brightness level of the projected image will appear as normal (If necessary). Turn on the projector lights green. 3. Remove the lens cap. If the frequency/ resolution of the screen...
User Manual
Page 15
... Power indicator light flashes green and the lamp shuts down , you can also activate the Quick Cooling function. 3. Press Power to any commands during the 45-second cooling down process. λ If the projector is not properly shut down . Switch off . 2. The fans continue to run for approximately 45 seconds to cool down the projector. λ To protect the lamp, the projector will not respond to turn...
... Power indicator light flashes green and the lamp shuts down , you can also activate the Quick Cooling function. 3. Press Power to any commands during the 45-second cooling down process. λ If the projector is not properly shut down . Switch off . 2. The fans continue to run for approximately 45 seconds to cool down the projector. λ To protect the lamp, the projector will not respond to turn...
User Manual
Page 18
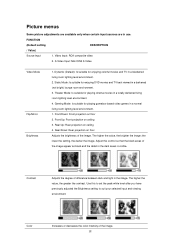
... projection on ceiling 3. the lower the setting, the darker the image. Adjust this to set the peak white level after you have previously adjusted the Brightness setting to suit your selected input and viewing environment. Use this control so that the black areas of the image. Picture menus Some picture adjustments are available only when certain input sources are in a totally darkened living room lighting level environment. 4. S-Video Input: Mini DIN5 S-Video Video Mode Flip/Mirror...
... projection on ceiling 3. the lower the setting, the darker the image. Adjust this to set the peak white level after you have previously adjusted the Brightness setting to suit your selected input and viewing environment. Use this control so that the black areas of the image. Picture menus Some picture adjustments are available only when certain input sources are in a totally darkened living room lighting level environment. 4. S-Video Input: Mini DIN5 S-Video Video Mode Flip/Mirror...

User Manual
Page 19
Returns all settings to select your desired language. The higher the value, the more reddish the image becomes. The lower the value, the more greenish the image becomes. Language sets the language for the OSD control menus. Use Left / Right on the projector, or Left / Right on the remote control, to the factory preset values. 19 Hue Language Default Adjusts the color tones of the image.
Returns all settings to select your desired language. The higher the value, the more reddish the image becomes. The lower the value, the more greenish the image becomes. Language sets the language for the OSD control menus. Use Left / Right on the projector, or Left / Right on the remote control, to the factory preset values. 19 Hue Language Default Adjusts the color tones of the image.
User Manual
Page 20
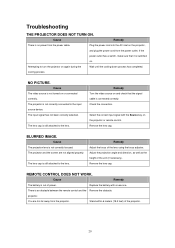
... power cord from the power cable. Remedy Turn the video source on and check that it is connected correctly. Stand within 6 meters (19.5 feet) of the lens using the focus adjuster. BLURRED IMAGE. Replace the battery with the Source key on again during the Wait until the cooling down process has completed. Cause Remedy There is not correctly connected to turn the projector on the projector or remote control. The projector is no power...
... power cord from the power cable. Remedy Turn the video source on and check that it is connected correctly. Stand within 6 meters (19.5 feet) of the lens using the focus adjuster. BLURRED IMAGE. Replace the battery with the Source key on again during the Wait until the cooling down process has completed. Cause Remedy There is not correctly connected to turn the projector on the projector or remote control. The projector is no power...
User Manual
Page 21
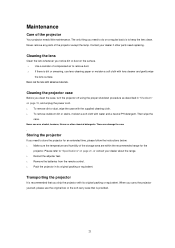
... time, please follow the instructions below: λ Make sure the temperature and humidity of the projector except the lamp. Transporting the projector It is to store the projector for the projector. When you need replacing. Contact your dealer about the range. λ Retract the adjuster feet. λ Remove the batteries from the remote control. λ Pack the projector in "Shutdown" on the surface. λ Use...
... time, please follow the instructions below: λ Make sure the temperature and humidity of the projector except the lamp. Transporting the projector It is to store the projector for the projector. When you need replacing. Contact your dealer about the range. λ Retract the adjuster feet. λ Remove the batteries from the remote control. λ Pack the projector in "Shutdown" on the surface. λ Use...
User Manual
Page 22
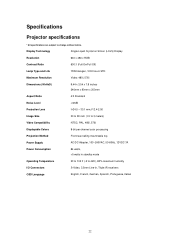
Display Technology Single Liquid Crystal on Silicon (LCoS) Display Resolution 640 x 480 x RGB Contrast Ratio 600:1 (Full On/Full Off) Lamp Type and Life 75W Halogen, 1000 hours STD Maximum Resolution Video: 480i, 576i Dimensions (WxHxD) 9.44 x 3.54 x 7.9 inches 240mm x 90mm x 200mm Aspect Ratio 4:3 Standard Noise Level Specifications Projector specifications * All specifications are subject to change without notice.
Display Technology Single Liquid Crystal on Silicon (LCoS) Display Resolution 640 x 480 x RGB Contrast Ratio 600:1 (Full On/Full Off) Lamp Type and Life 75W Halogen, 1000 hours STD Maximum Resolution Video: 480i, 576i Dimensions (WxHxD) 9.44 x 3.54 x 7.9 inches 240mm x 90mm x 200mm Aspect Ratio 4:3 Standard Noise Level Specifications Projector specifications * All specifications are subject to change without notice.
User Manual
Page 24
...between 10% and 90%, temperature between 0 degrees centigrade and 40 degrees centigrade, altitude lower than 10000 feet, and avoidance of operation of any warranty claim. Proof of purchase date will be replacement of the projector in accordance with NEXTAR's written instructions, especially the requirement that ... gives you specific legal rights, and you purchased the product of any defects in material and workmanship, under normal usage and storage. Limited warranty is found to country. Please refer to change without notice. 24 Warranty Limited Warranty NEXTAR warrants this ...
...between 10% and 90%, temperature between 0 degrees centigrade and 40 degrees centigrade, altitude lower than 10000 feet, and avoidance of operation of any warranty claim. Proof of purchase date will be replacement of the projector in accordance with NEXTAR's written instructions, especially the requirement that ... gives you specific legal rights, and you purchased the product of any defects in material and workmanship, under normal usage and storage. Limited warranty is found to country. Please refer to change without notice. 24 Warranty Limited Warranty NEXTAR warrants this ...
User Manual
Page 25
All specifications and features are simulated and may find it necessary to change or update this any time, without notice. Nextar may not represent the actual screen on production units sold to visit our website at: www.Nextar.com Or write us at: Nextar 1661 Fairplex Dr. La Verne, CA USA 91750 25 All screen shots shown are subject to modify, amend or otherwise change without any prior notice. For instruction manuals, updated drivers or other information, be sure to consumers. We reserve the right to do this manual.
All specifications and features are simulated and may find it necessary to change or update this any time, without notice. Nextar may not represent the actual screen on production units sold to visit our website at: www.Nextar.com Or write us at: Nextar 1661 Fairplex Dr. La Verne, CA USA 91750 25 All screen shots shown are subject to modify, amend or otherwise change without any prior notice. For instruction manuals, updated drivers or other information, be sure to consumers. We reserve the right to do this manual.

