Hardware Manual
Page 2
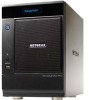
Technical Support Thank you for choosing NETGEAR. Phone (US & Canada only): 1-888-NETGEAR Phone (Other Countries): See support information card. All rights reserved. ReadyNAS Desktop Storage Systems © 2011 NETGEAR, Inc. To register your product, get the latest product updates, or get support online, visit us at http://support.netgear.com. Information is subject to the...
Technical Support Thank you for choosing NETGEAR. Phone (US & Canada only): 1-888-NETGEAR Phone (Other Countries): See support information card. All rights reserved. ReadyNAS Desktop Storage Systems © 2011 NETGEAR, Inc. To register your product, get the latest product updates, or get support online, visit us at http://support.netgear.com. Information is subject to the...
Hardware Manual
Page 3
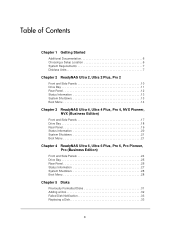
... Ultra 2 Plus, Pro 2 Front and Side Panels 10 Drive Bay 11 Rear Panel 12 Status Information 13 System Shutdown 13 Boot Menu 14 Chapter 3 ReadyNAS Ultra 4, Ultra 4 Plus, Pro 4, NVX Pioneer, NVX (Business Edition) Front and Side Panels 17 Drive Bay 18 Rear Panel 19 Status Information 20... System Shutdown 21 Boot Menu 21 Chapter 4 ReadyNAS Ultra 6, Ultra 6 Plus, Pro 6, Pro Pioneer, Pro (Business Edition) Front and Side Panels 24 Drive Bay 25 Rear Panel 26 Status Information ...
... Ultra 2 Plus, Pro 2 Front and Side Panels 10 Drive Bay 11 Rear Panel 12 Status Information 13 System Shutdown 13 Boot Menu 14 Chapter 3 ReadyNAS Ultra 4, Ultra 4 Plus, Pro 4, NVX Pioneer, NVX (Business Edition) Front and Side Panels 17 Drive Bay 18 Rear Panel 19 Status Information 20... System Shutdown 21 Boot Menu 21 Chapter 4 ReadyNAS Ultra 6, Ultra 6 Plus, Pro 6, Pro Pioneer, Pro (Business Edition) Front and Side Panels 24 Drive Bay 25 Rear Panel 26 Status Information ...
Hardware Manual
Page 4
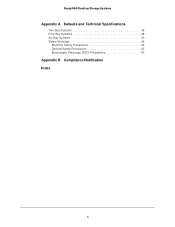
ReadyNAS Desktop Storage Systems Appendix A Defaults and Technical Specifications Two-Bay Systems 36 Four-Bay Systems 38 Six-Bay Systems 40 Safety Warnings 42 Electrical Safety Precautions 42 General Safety Precautions 43 Electrostatic Discharge (ESD) Precautions 43 Appendix B Compliance Notification Index 4
ReadyNAS Desktop Storage Systems Appendix A Defaults and Technical Specifications Two-Bay Systems 36 Four-Bay Systems 38 Six-Bay Systems 40 Safety Warnings 42 Electrical Safety Precautions 42 General Safety Precautions 43 Electrostatic Discharge (ESD) Precautions 43 Appendix B Compliance Notification Index 4
Hardware Manual
Page 5
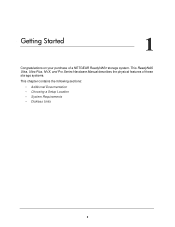
1. Getting Started 1 Congratulations on your purchase of these storage systems. This chapter contains the following sections: • Additional Documentation • Choosing a Setup Location • System Requirements • Diskless Units 5 This ReadyNAS Ultra, Ultra Plus, NVX, and Pro Series Hardware Manual describes the physical features of a NETGEAR ReadyNAS® storage system.
1. Getting Started 1 Congratulations on your purchase of these storage systems. This chapter contains the following sections: • Additional Documentation • Choosing a Setup Location • System Requirements • Diskless Units 5 This ReadyNAS Ultra, Ultra Plus, NVX, and Pro Series Hardware Manual describes the physical features of a NETGEAR ReadyNAS® storage system.
Hardware Manual
Page 6
...Pro 6 Pro (Business Edition) Both documents are using your storage system, see the appropriate software manual for your unit that supports ReadyNAS products. NETGEAR maintains a community website that meets these criteria: • Cables can be connected easily. • Water or moisture cannot enter ... listed in a home or small office environment where it suitable for sitting on a desk or on a closet shelf. ReadyNAS Desktop Storage Systems Additional Documentation For detailed information about configuring, managing, and using an uninterruptable power supply (UPS) for protection...
...Pro 6 Pro (Business Edition) Both documents are using your storage system, see the appropriate software manual for your unit that supports ReadyNAS products. NETGEAR maintains a community website that meets these criteria: • Cables can be connected easily. • Water or moisture cannot enter ... listed in a home or small office environment where it suitable for sitting on a desk or on a closet shelf. ReadyNAS Desktop Storage Systems Additional Documentation For detailed information about configuring, managing, and using an uninterruptable power supply (UPS) for protection...
Hardware Manual
Page 7
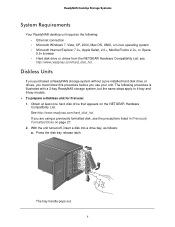
... Safari, 2.0+, Mozilla Firefox 2.0+, or Opera 9.5+ browser • Hard disk drive or drives from the NETGEAR Hardware Compatibility List; Diskless Units If you purchased a ReadyNAS storage system without a pre-installed hard disk drive or drives, you must follow this procedure before you ... using a previously formatted disk, see http://www.readynas.com/hard_disk_hcl. The tray handle pops out. 7 ReadyNAS Desktop Storage Systems System Requirements Your ReadyNAS desktop unit requires the following procedure is illustrated with a 2-bay ReadyNAS storage system, but the same steps apply to ...
... Safari, 2.0+, Mozilla Firefox 2.0+, or Opera 9.5+ browser • Hard disk drive or drives from the NETGEAR Hardware Compatibility List; Diskless Units If you purchased a ReadyNAS storage system without a pre-installed hard disk drive or drives, you must follow this procedure before you ... using a previously formatted disk, see http://www.readynas.com/hard_disk_hcl. The tray handle pops out. 7 ReadyNAS Desktop Storage Systems System Requirements Your ReadyNAS desktop unit requires the following procedure is illustrated with a 2-bay ReadyNAS storage system, but the same steps apply to ...
Hardware Manual
Page 8
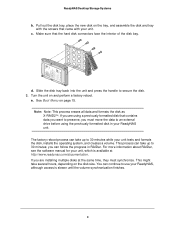
... the interior of the disk bay. Slide the disk tray back into the unit and press the handle to 30 minutes while your ReadyNAS, although access is available at the same time, they must move the data to an external drive before using the previously formatted disk...page 15. c. For more information about RAIDar, see the software manual for your ReadyNAS unit. The factory reboot process can take up to preserve, you are installing multiple disks at http://www.readynas.com/documentation. ReadyNAS Desktop Storage Systems b. Turn the unit on the tray, and assemble the disk and...
... the interior of the disk bay. Slide the disk tray back into the unit and press the handle to 30 minutes while your ReadyNAS, although access is available at the same time, they must move the data to an external drive before using the previously formatted disk...page 15. c. For more information about RAIDar, see the software manual for your ReadyNAS unit. The factory reboot process can take up to preserve, you are installing multiple disks at http://www.readynas.com/documentation. ReadyNAS Desktop Storage Systems b. Turn the unit on the tray, and assemble the disk and...
Hardware Manual
Page 9
2. ReadyNAS Ultra 2, Ultra 2 Plus, Pro 2 2 This chapter provides an overview of the physical features of the ReadyNAS Ultra 2, Ultra 2 Plus, and Pro 2 and includes the following sections: • Front and Side Panels • Drive Bay • Rear Panel • Status Information • System Shutdown • Boot Menu 9
2. ReadyNAS Ultra 2, Ultra 2 Plus, Pro 2 2 This chapter provides an overview of the physical features of the ReadyNAS Ultra 2, Ultra 2 Plus, and Pro 2 and includes the following sections: • Front and Side Panels • Drive Bay • Rear Panel • Status Information • System Shutdown • Boot Menu 9
Hardware Manual
Page 10
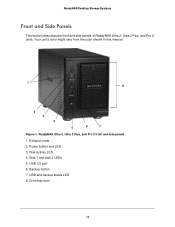
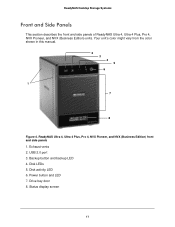
ReadyNAS Ultra 2, Ultra 2 Plus, and Pro 2 front and side panels 1. Exhaust vents 2. Backup button 7. Disk 1 and disk 2 LEDs 5. USB and backup status LED 8. USB 3.0 port 6. ReadyNAS Desktop Storage Systems Front and Side Panels This section describes the front and side panels of ReadyNAS Ultra 2, Ultra 2 Plus, and Pro 2 units. Power button and LED 3. Drive bay door 10 Your unit's color might vary from the color shown in this manual. 1 8 2 3 4 5 6 7 Figure 1. Disk activity LED 4.
ReadyNAS Ultra 2, Ultra 2 Plus, and Pro 2 front and side panels 1. Exhaust vents 2. Backup button 7. Disk 1 and disk 2 LEDs 5. USB and backup status LED 8. USB 3.0 port 6. ReadyNAS Desktop Storage Systems Front and Side Panels This section describes the front and side panels of ReadyNAS Ultra 2, Ultra 2 Plus, and Pro 2 units. Power button and LED 3. Drive bay door 10 Your unit's color might vary from the color shown in this manual. 1 8 2 3 4 5 6 7 Figure 1. Disk activity LED 4.
Hardware Manual
Page 11
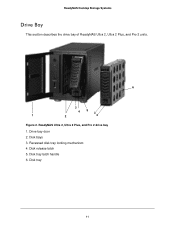
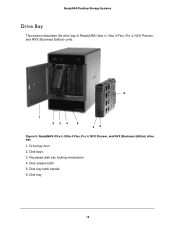
ReadyNAS Ultra 2, Ultra 2 Plus, and Pro 2 drive bay 1. Disk release latch 5. Disk tray latch handle 6. Recessed disk tray locking mechanism 4. Disk bays 3. Disk tray 11 Drive bay door 2. ReadyNAS Desktop Storage Systems Drive Bay This section describes the drive bay of ReadyNAS Ultra 2, Ultra 2 Plus, and Pro 2 units. 6 3 4 5 3 1 2 4 Figure 2.
ReadyNAS Ultra 2, Ultra 2 Plus, and Pro 2 drive bay 1. Disk release latch 5. Disk tray latch handle 6. Recessed disk tray locking mechanism 4. Disk bays 3. Disk tray 11 Drive bay door 2. ReadyNAS Desktop Storage Systems Drive Bay This section describes the drive bay of ReadyNAS Ultra 2, Ultra 2 Plus, and Pro 2 units. 6 3 4 5 3 1 2 4 Figure 2.
Hardware Manual
Page 12
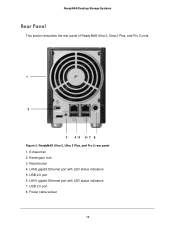
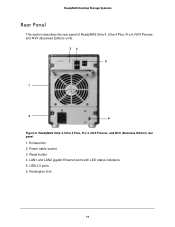
LAN1 gigabit Ethernet port with LED status indicators 5. Reset button 4. USB 2.0 port 6. USB 2.0 port 8. Power cable socket 12 Exhaust fan 2. LAN2 gigabit Ethernet port with LED status indicators 7. Kensington lock 3. ReadyNAS Ultra 2, Ultra 2 Plus, and Pro 2 rear panel 1. ReadyNAS Desktop Storage Systems Rear Panel This section describes the rear panel of ReadyNAS Ultra 2, Ultra 2 Plus, and Pro 2 units. 1 2 3 4/5 6/7 8 Figure 3.
LAN1 gigabit Ethernet port with LED status indicators 5. Reset button 4. USB 2.0 port 6. USB 2.0 port 8. Power cable socket 12 Exhaust fan 2. LAN2 gigabit Ethernet port with LED status indicators 7. Kensington lock 3. ReadyNAS Ultra 2, Ultra 2 Plus, and Pro 2 rear panel 1. ReadyNAS Desktop Storage Systems Rear Panel This section describes the rear panel of ReadyNAS Ultra 2, Ultra 2 Plus, and Pro 2 units. 1 2 3 4/5 6/7 8 Figure 3.
Hardware Manual
Page 13
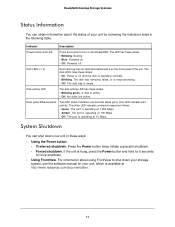
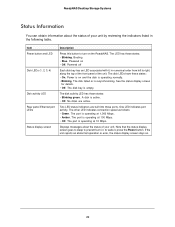
...Ethernet ports Two LED status indicators are active. If the unit is active. • Off. For information about the status of the unit. ReadyNAS Desktop Storage Systems Status Information You can shut down your storage system, see the software manual for 5 seconds to shut down your unit in... it on and the disk is operating normally. • Blinking. One LED indicates port activity. Power is operating at http://www.readynas.com/documentation. 13 The port is on the front panel of your unit by reviewing the indicators listed in these states: • Blinking.
...Ethernet ports Two LED status indicators are active. If the unit is active. • Off. For information about the status of the unit. ReadyNAS Desktop Storage Systems Status Information You can shut down your storage system, see the software manual for 5 seconds to shut down your unit in... it on and the disk is operating normally. • Blinking. One LED indicates port activity. Power is operating at http://www.readynas.com/documentation. 13 The port is on the front panel of your unit by reviewing the indicators listed in these states: • Blinking.
Hardware Manual
Page 14
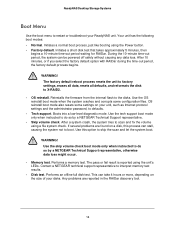
... OS reinstall boot mode when the system crashes and corrupts some settings on your ReadyNAS unit. After a system crash, the system tries to scan and fix the volume using the unit's LEDs. Contact a NETGEAR technical support representative to skip the scan and let the system boot. WARNING! Use..., the system can take 4 hours or more, depending on a disk, this option to interpret memory test results. • Disk test. ReadyNAS Desktop Storage Systems Boot Menu Use the boot menu to restart or troubleshoot your unit, such as Internet protocol settings and the administrator password, to...
... OS reinstall boot mode when the system crashes and corrupts some settings on your ReadyNAS unit. After a system crash, the system tries to scan and fix the volume using the unit's LEDs. Contact a NETGEAR technical support representative to skip the scan and let the system boot. WARNING! Use..., the system can take 4 hours or more, depending on a disk, this option to interpret memory test results. • Disk test. ReadyNAS Desktop Storage Systems Boot Menu Use the boot menu to restart or troubleshoot your unit, such as Internet protocol settings and the administrator password, to...
Hardware Manual
Page 15
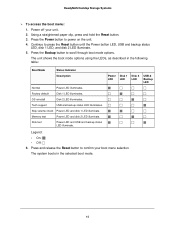
... 1 LED, and disk 2 LED illuminate. 5. Press and release the Reset button to power on the unit. 4. Skip volume check Power LED and disk 1 LED illuminate. ReadyNAS Desktop Storage Systems To access the boot menu: 1. Press the Power button to confirm your unit. 2.
... 1 LED, and disk 2 LED illuminate. 5. Press and release the Reset button to power on the unit. 4. Skip volume check Power LED and disk 1 LED illuminate. ReadyNAS Desktop Storage Systems To access the boot menu: 1. Press the Power button to confirm your unit. 2.
Hardware Manual
Page 16
ReadyNAS Ultra 4, Ultra 4 Plus, Pro 4, NVX Pioneer, NVX (Business Edition) This chapter provides an overview of the physical features of the ReadyNAS Ultra 4, Ultra 4 Plus, Pro 4, NVX Pioneer, and NVX (Business Edition) and includes the following sections: • Front and Side Panels • Drive Bay • Rear Panel • Status Information • System Shutdown • Boot Menu 16 3 3.
ReadyNAS Ultra 4, Ultra 4 Plus, Pro 4, NVX Pioneer, NVX (Business Edition) This chapter provides an overview of the physical features of the ReadyNAS Ultra 4, Ultra 4 Plus, Pro 4, NVX Pioneer, and NVX (Business Edition) and includes the following sections: • Front and Side Panels • Drive Bay • Rear Panel • Status Information • System Shutdown • Boot Menu 16 3 3.
Hardware Manual
Page 17
USB 2.0 port 3. Drive bay door 8. Power button and LED 7. ReadyNAS Ultra 4, Ultra 4 Plus, Pro 4, NVX Pioneer, and NVX (Business Edition) front and side panels 1. Backup button and backup LED 4. Disk LEDs 5. Status display screen 17 Disk activity LED 6. ReadyNAS Desktop Storage Systems Front and Side Panels This section describes the front and side panels of ReadyNAS Ultra 4, Ultra 4 Plus, Pro 4, NVX Pioneer, and NVX (Business Edition) units. Your unit's color might vary from the color shown in this manual. 2 3 4 5 6 1 7 8 Figure 4. Exhaust vents 2.
USB 2.0 port 3. Drive bay door 8. Power button and LED 7. ReadyNAS Ultra 4, Ultra 4 Plus, Pro 4, NVX Pioneer, and NVX (Business Edition) front and side panels 1. Backup button and backup LED 4. Disk LEDs 5. Status display screen 17 Disk activity LED 6. ReadyNAS Desktop Storage Systems Front and Side Panels This section describes the front and side panels of ReadyNAS Ultra 4, Ultra 4 Plus, Pro 4, NVX Pioneer, and NVX (Business Edition) units. Your unit's color might vary from the color shown in this manual. 2 3 4 5 6 1 7 8 Figure 4. Exhaust vents 2.
Hardware Manual
Page 18
Recessed disk tray locking mechanism 4. Drive bay door 2. ReadyNAS Ultra 4, Ultra 4 Plus, Pro 4, NVX Pioneer, and NVX (Business Edition) drive bay 1. Disk bays 3. ReadyNAS Desktop Storage Systems Drive Bay This section describes the drive bay of ReadyNAS Ultra 4, Ultra 4 Plus, Pro 4, NVX Pioneer, and NVX (Business Edition) units. 6 1 234 5 34 Figure 5. Disk tray 18 Disk tray latch handle 6. Disk release latch 5.
Recessed disk tray locking mechanism 4. Drive bay door 2. ReadyNAS Ultra 4, Ultra 4 Plus, Pro 4, NVX Pioneer, and NVX (Business Edition) drive bay 1. Disk bays 3. ReadyNAS Desktop Storage Systems Drive Bay This section describes the drive bay of ReadyNAS Ultra 4, Ultra 4 Plus, Pro 4, NVX Pioneer, and NVX (Business Edition) units. 6 1 234 5 34 Figure 5. Disk tray 18 Disk tray latch handle 6. Disk release latch 5.
Hardware Manual
Page 19
Kensington lock 19 ReadyNAS Ultra 4, Ultra 4 Plus, Pro 4, NVX Pioneer, and NVX (Business Edition) rear panel 1. LAN1 and LAN2 gigabit Ethernet ports with LED status indicators 5. USB 2.0 ports 6. Exhaust fan 2. ReadyNAS Desktop Storage Systems Rear Panel This section describes the rear panel of ReadyNAS Ultra 4, Ultra 4 Plus, Pro 4, NVX Pioneer, and NVX (Business Edition) units. 34 5 1 2 6 Figure 6. Power cable socket 3. Reset button 4.
Kensington lock 19 ReadyNAS Ultra 4, Ultra 4 Plus, Pro 4, NVX Pioneer, and NVX (Business Edition) rear panel 1. LAN1 and LAN2 gigabit Ethernet ports with LED status indicators 5. USB 2.0 ports 6. Exhaust fan 2. ReadyNAS Desktop Storage Systems Rear Panel This section describes the rear panel of ReadyNAS Ultra 4, Ultra 4 Plus, Pro 4, NVX Pioneer, and NVX (Business Edition) units. 34 5 1 2 6 Figure 6. Power cable socket 3. Reset button 4.
Hardware Manual
Page 20
ReadyNAS Desktop Storage Systems Status Information You can obtain information about the status of your unit by reviewing the indicators listed in the following table. No ... LEDs have these states: • Blinking. The disk bay is operating normally. • Blinking. The LED has these states: • On. Power is on the ReadyNAS. to prevent burn-in numerical order from left to turn on and the disk is empty. Item Power button and LED Disk LEDs (1, 2, 3, 4) Disk activity...
ReadyNAS Desktop Storage Systems Status Information You can obtain information about the status of your unit by reviewing the indicators listed in the following table. No ... LEDs have these states: • Blinking. The disk bay is operating normally. • Blinking. The LED has these states: • On. Power is on the ReadyNAS. to prevent burn-in numerical order from left to turn on and the disk is empty. Item Power button and LED Disk LEDs (1, 2, 3, 4) Disk activity...
Hardware Manual
Page 21
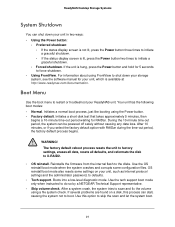
...using a file system check. After a system crash, the system tries to the disks. Boot Menu Use the boot menu to do so by a NETGEAR Technical Support representative. • Skip volume check. Your unit has the following boot modes: • Normal. Initiates a short disk test that takes ... to factory settings, erases all data, resets all defaults, and reformats the disk to initiate a graceful shutdown. • Forced shutdown. ReadyNAS Desktop Storage Systems System Shutdown You can shut down your storage system, see the software manual for your unit, which is available at http...
...using a file system check. After a system crash, the system tries to the disks. Boot Menu Use the boot menu to do so by a NETGEAR Technical Support representative. • Skip volume check. Your unit has the following boot modes: • Normal. Initiates a short disk test that takes ... to factory settings, erases all data, resets all defaults, and reformats the disk to initiate a graceful shutdown. • Forced shutdown. ReadyNAS Desktop Storage Systems System Shutdown You can shut down your storage system, see the software manual for your unit, which is available at http...


