

Hardware Manual
Page 2
ReadyNAS Duo and NV+ © 2011 NETGEAR, Inc. Trademarks NETGEAR, the NETGEAR logo, and Connect with Innovation are trademarks and/or registered trademarks of , the product(s) or circuit layout(s) described herein. 2 and/or its subsidiaries in this document without notice. To register your product, get the latest product updates, or get support online, visit us at http://support.netgear.com. Information is...
ReadyNAS Duo and NV+ © 2011 NETGEAR, Inc. Trademarks NETGEAR, the NETGEAR logo, and Connect with Innovation are trademarks and/or registered trademarks of , the product(s) or circuit layout(s) described herein. 2 and/or its subsidiaries in this document without notice. To register your product, get the latest product updates, or get support online, visit us at http://support.netgear.com. Information is...
Hardware Manual
Page 3
Table of Contents Chapter 1 Getting Started Additional Documentation 6 Setup Location 6 System Requirements 6 Diskless Units 7 Chapter 2 ReadyNAS Duo Front and Side Panels 10 Drive Bays 11 Rear Panel 13 Status Information 14 System Shutdown 14 Boot Menu 15 Chapter 3 ReadyNAS NV+ Front and Side Panels 18 Drive Bays 19 Rear Panel 21 Status Information 22 System Shutdown 22 Boot Menu 23 Chapter 4 Disks Previously Formatted Disks 26 Adding a Disk 27 Failed Disk Notification 28 Replacing a Disk 29 3
Table of Contents Chapter 1 Getting Started Additional Documentation 6 Setup Location 6 System Requirements 6 Diskless Units 7 Chapter 2 ReadyNAS Duo Front and Side Panels 10 Drive Bays 11 Rear Panel 13 Status Information 14 System Shutdown 14 Boot Menu 15 Chapter 3 ReadyNAS NV+ Front and Side Panels 18 Drive Bays 19 Rear Panel 21 Status Information 22 System Shutdown 22 Boot Menu 23 Chapter 4 Disks Previously Formatted Disks 26 Adding a Disk 27 Failed Disk Notification 28 Replacing a Disk 29 3

Hardware Manual
Page 4
ReadyNAS Duo and NV+ Appendix A Defaults and Technical Specifications Factory Default Settings 32 Duo Technical Specifications 33 NV+ Technical Specifications 34 Safety Warnings 35 Electrical Safety Precautions 35 General Safety Precautions 36 Electrostatic Discharge (ESD) Precautions 36 Appendix B Compliance Notification Index 4
ReadyNAS Duo and NV+ Appendix A Defaults and Technical Specifications Factory Default Settings 32 Duo Technical Specifications 33 NV+ Technical Specifications 34 Safety Warnings 35 Electrical Safety Precautions 35 General Safety Precautions 36 Electrostatic Discharge (ESD) Precautions 36 Appendix B Compliance Notification Index 4

Hardware Manual
Page 5
This ReadyNAS Duo and NV+ Hardware Manual describes the physical features of a NETGEAR ReadyNAS® storage system. 1. Getting Started 1 Congratulations on your purchase of the Duo and NV+ storage systems. This chapter contains the following sections: • Additional Documentation • Setup Location • System Requirements • Diskless Units 5
This ReadyNAS Duo and NV+ Hardware Manual describes the physical features of a NETGEAR ReadyNAS® storage system. 1. Getting Started 1 Congratulations on your purchase of the Duo and NV+ storage systems. This chapter contains the following sections: • Additional Documentation • Setup Location • System Requirements • Diskless Units 5

Hardware Manual
Page 6
...; Hard disk drive or drives from the NETGEAR Hardware Compatibility List; NETGEAR maintains a community website that meets these criteria: • Cables can be exceeded. • If you are not likely to be securely and safely connected to the UPS. Setup Location Your ReadyNAS Duo or NV+ is available at http://www.readynas.com/documentation. Getting Started 6 see the ReadyNAS RAIDiator 4.1 Software Manual, which is suitable for reviews, tutorials, a comparison chart, software updates, documentation, an active user...
...; Hard disk drive or drives from the NETGEAR Hardware Compatibility List; NETGEAR maintains a community website that meets these criteria: • Cables can be exceeded. • If you are not likely to be securely and safely connected to the UPS. Setup Location Your ReadyNAS Duo or NV+ is available at http://www.readynas.com/documentation. Getting Started 6 see the ReadyNAS RAIDiator 4.1 Software Manual, which is suitable for reviews, tutorials, a comparison chart, software updates, documentation, an active user...

Hardware Manual
Page 7
... data, copy it . With the system turned off, insert a disk into a drive bay, as X-RAID®. If you install as follows: a. Obtain at least one hard disk drive that appears on page 26. 2. For more information, see the ReadyNAS RAIDiator 4.1 Software Manual. To prepare a diskless system for an NV+. This procedure configures the disk or disk you want to use Flex-RAID, see Previously Formatted Disks on the NETGEAR Hardware Compatibility List...
... data, copy it . With the system turned off, insert a disk into a drive bay, as X-RAID®. If you install as follows: a. Obtain at least one hard disk drive that appears on page 26. 2. For more information, see the ReadyNAS RAIDiator 4.1 Software Manual. To prepare a diskless system for an NV+. This procedure configures the disk or disk you want to use Flex-RAID, see Previously Formatted Disks on the NETGEAR Hardware Compatibility List...

Hardware Manual
Page 8
... system and press the handle to power on . It tests and formats the disks, installs the operating system, and creates a new volume. You can follow the progress in the status display screen (after about RAIDar, see the ReadyNAS RAIDiator 4.1 Software Manual. Getting Started 8 Press and release the Power button to secure the disk. 3. The factory reset takes up to finish setting up and use your system. This might take several...
... system and press the handle to power on . It tests and formats the disks, installs the operating system, and creates a new volume. You can follow the progress in the status display screen (after about RAIDar, see the ReadyNAS RAIDiator 4.1 Software Manual. Getting Started 8 Press and release the Power button to secure the disk. 3. The factory reset takes up to finish setting up and use your system. This might take several...
Hardware Manual
Page 10
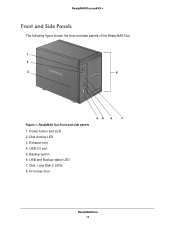
USB and Backup status LED 7. Drive bay door ReadyNAS Duo 10 ReadyNAS Duo and NV+ Front and Side Panels The following figure shows the front and side panels of the ReadyNAS Duo. 1 2 3 8 45 6 7 Figure 1. ReadyNAS Duo front and side panels 1. USB 2.0 port 5. Backup button 6. Power button and LED 2. Disk Activity LED 3. Exhaust vent 4. Disk 1 and Disk 2 LEDs 8.
USB and Backup status LED 7. Drive bay door ReadyNAS Duo 10 ReadyNAS Duo and NV+ Front and Side Panels The following figure shows the front and side panels of the ReadyNAS Duo. 1 2 3 8 45 6 7 Figure 1. ReadyNAS Duo front and side panels 1. USB 2.0 port 5. Backup button 6. Power button and LED 2. Disk Activity LED 3. Exhaust vent 4. Disk 1 and Disk 2 LEDs 8.
Hardware Manual
Page 13
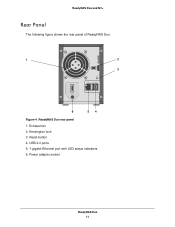
ReadyNAS Duo rear panel 1. Exhaust fan 2. ReadyNAS Duo and NV+ Rear Panel The following figure shows the rear panel of ReadyNAS Duo. 1 2 3 DC IN 6 54 Figure 4. USB 2.0 ports 5. 1-gigabit Ethernet port with LED status indicators 6. Kensington lock 3. Reset button 4. Power adapter socket ReadyNAS Duo 13
ReadyNAS Duo rear panel 1. Exhaust fan 2. ReadyNAS Duo and NV+ Rear Panel The following figure shows the rear panel of ReadyNAS Duo. 1 2 3 DC IN 6 54 Figure 4. USB 2.0 ports 5. 1-gigabit Ethernet port with LED status indicators 6. Kensington lock 3. Reset button 4. Power adapter socket ReadyNAS Duo 13

Hardware Manual
Page 14
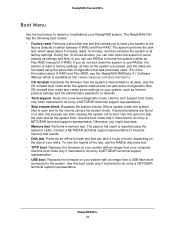
... to turn on • Off. Two LED status indicators are active. For more information, see the ReadyNAS RAIDiator 4.1 Software Manual, which is active. • Off. Booting or shutting down • On. They indicate port speed and activity as follows: • Green on, amber off. 1000 Mbps connection speed, no activity • Green off, amber off. ReadyNAS Duo 14 A disk is available at http://www.readynas.com/documentation. ReadyNAS Duo and NV+ Status Information...
... to turn on • Off. Two LED status indicators are active. For more information, see the ReadyNAS RAIDiator 4.1 Software Manual, which is active. • Off. Booting or shutting down • On. They indicate port speed and activity as follows: • Green on, amber off. 1000 Mbps connection speed, no activity • Green off, amber off. ReadyNAS Duo 14 A disk is available at http://www.readynas.com/documentation. ReadyNAS Duo and NV+ Status Information...

Hardware Manual
Page 15
... an image from a USB flash drive connected to the system. OS reinstall boot mode also resets some configuration files. ReadyNAS Duo and NV+ Boot Menu Use the boot menu to restart or troubleshoot your computer. Contact a NETGEAR technical support representative to the factory defaults or switch between X-RAID and Flex-RAID. The pass or fail result is available at http://www.readynas.com/documentation.) • OS reinstall. Replaces the firmware on your disks. Use the OS reinstall boot mode when the system...
... an image from a USB flash drive connected to the system. OS reinstall boot mode also resets some configuration files. ReadyNAS Duo and NV+ Boot Menu Use the boot menu to restart or troubleshoot your computer. Contact a NETGEAR technical support representative to the factory defaults or switch between X-RAID and Flex-RAID. The pass or fail result is available at http://www.readynas.com/documentation.) • OS reinstall. Replaces the firmware on your disks. Use the OS reinstall boot mode when the system...

Hardware Manual
Page 22
... resynchronizing. • Off. ReadyNAS NV+ 22 The disk was removed, failed, or is operating normally. • Blinking. For more information, see the ReadyNAS RAIDiator 4.1 Software Manual, which is active. • Off. A disk is available at http://www.readynas.com/documentation. Powered on your system from a computer, use FrontView. Booting or shutting down your ReadyNAS system. Indicator Power button and LED Disk LEDs (1, 2, 3, 4) Disk Activity LED Rear panel Ethernet port LEDs Description Press this port, one green and one...
... resynchronizing. • Off. ReadyNAS NV+ 22 The disk was removed, failed, or is operating normally. • Blinking. For more information, see the ReadyNAS RAIDiator 4.1 Software Manual, which is active. • Off. A disk is available at http://www.readynas.com/documentation. Powered on your system from a computer, use FrontView. Booting or shutting down your ReadyNAS system. Indicator Power button and LED Disk LEDs (1, 2, 3, 4) Disk Activity LED Rear panel Ethernet port LEDs Description Press this port, one green and one...
Hardware Manual
Page 23
... the volume using the system's LEDs. Use this option to skip the scan and let the system boot. Replaces the firmware on the size of your system, such as Flex-RAID instead of the test, use RAIDar to format the system's disks as Internet protocol settings and the administrator password, to defaults. • Tech support. ReadyNAS Duo and NV+ Boot Menu Use the boot menu to restart or troubleshoot your computer. Reinstalls the firmware from a USB flash drive connected...
... the volume using the system's LEDs. Use this option to skip the scan and let the system boot. Replaces the firmware on the size of your system, such as Flex-RAID instead of the test, use RAIDar to format the system's disks as Internet protocol settings and the administrator password, to defaults. • Tech support. ReadyNAS Duo and NV+ Boot Menu Use the boot menu to restart or troubleshoot your computer. Reinstalls the firmware from a USB flash drive connected...
Hardware Manual
Page 26
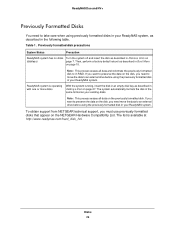
... Units on the NETGEAR Hardware Compatibility List. Then, perform a factory default reboot as described in the same format as described in the following table. Previously formatted disk precautions System Status Precaution ReadyNAS system has no disks Turn the system off and insert the disk as described in Adding a Disk on the disk, you need to move the data to take care when using previously formatted disks in your ReadyNAS system, as your...
... Units on the NETGEAR Hardware Compatibility List. Then, perform a factory default reboot as described in the same format as described in the following table. Previously formatted disk precautions System Status Precaution ReadyNAS system has no disks Turn the system off and insert the disk as described in Adding a Disk on the disk, you need to move the data to take care when using previously formatted disks in your ReadyNAS system, as your...

Hardware Manual
Page 28
... the disk size. ReadyNAS Duo and NV+ 3. Email alerts need to be set up email alerts and using RAIDar to maintain adequate airflow. NETGEAR recommends replacing a failed disk with the new disk in the background. This might take several hours, depending on your ReadyNAS, although access is complete. Disks 28 In addition, ReadyNAS FrontView provides information about using ReadyNAS FrontView, see the ReadyNAS RAIDiator 4.1 Software Manual, which is available at http://www.readynas.com/documentation...
... the disk size. ReadyNAS Duo and NV+ 3. Email alerts need to be set up email alerts and using RAIDar to maintain adequate airflow. NETGEAR recommends replacing a failed disk with the new disk in the background. This might take several hours, depending on your ReadyNAS, although access is complete. Disks 28 In addition, ReadyNAS FrontView provides information about using ReadyNAS FrontView, see the ReadyNAS RAIDiator 4.1 Software Manual, which is available at http://www.readynas.com/documentation...
Hardware Manual
Page 29
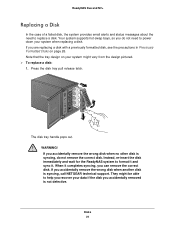
.... ReadyNAS Duo and NV+ Replacing a Disk In the case of a failed disk, the system provides email alerts and status messages about the need to help you recover your system might be able to power down your system when replacing a disk. WARNING! If you are replacing a disk with a previously formatted disk, see the precautions in Previously Formatted Disks on your data if the disk you accidentally removed is syncing, call NETGEAR technical support. Instead...
.... ReadyNAS Duo and NV+ Replacing a Disk In the case of a failed disk, the system provides email alerts and status messages about the need to help you recover your system might be able to power down your system when replacing a disk. WARNING! If you are replacing a disk with a previously formatted disk, see the precautions in Previously Formatted Disks on your data if the disk you accidentally removed is syncing, call NETGEAR technical support. Instead...

Hardware Manual
Page 32
... user name (case-sensitive) admin Admin login password (case-sensitive) netgear1 Management System configuration ReadyNAS FrontView web-based configuration and status monitoring Discovery, multiunit status monitoring, and formatting utility RAIDar for ReadyNAS Duo and NV+. ReadyNAS Duo and NV+ Factory Default Settings The following table lists factory default settings for Windows, Mac, and Linux LAN Connections MAC address See sticker on system MTU size 1500 Ethernet port Auto Sense 10/100/1000BASE-T, RJ-45 LAN IP address DHCP acquired Defaults and Technical Specifications...
... user name (case-sensitive) admin Admin login password (case-sensitive) netgear1 Management System configuration ReadyNAS FrontView web-based configuration and status monitoring Discovery, multiunit status monitoring, and formatting utility RAIDar for ReadyNAS Duo and NV+. ReadyNAS Duo and NV+ Factory Default Settings The following table lists factory default settings for Windows, Mac, and Linux LAN Connections MAC address See sticker on system MTU size 1500 Ethernet port Auto Sense 10/100/1000BASE-T, RJ-45 LAN IP address DHCP acquired Defaults and Technical Specifications...

Hardware Manual
Page 36
... can replace the self-resetting PTC (positive temperature coefficient) fuses on -board battery only with each other. Dispose of used batteries according to the manufacturer's instructions. ReadyNAS Duo and NV+ General Safety Precautions Follow these rules to ensure general safety: • Keep the area around the ReadyNAS clean and free of clutter. • See the technical specifications in this manual...
... can replace the self-resetting PTC (positive temperature coefficient) fuses on -board battery only with each other. Dispose of used batteries according to the manufacturer's instructions. ReadyNAS Duo and NV+ General Safety Precautions Follow these rules to ensure general safety: • Keep the area around the ReadyNAS clean and free of clutter. • See the technical specifications in this manual...

Hardware Manual
Page 38
...; Connect the equipment into an electrical outlet on a circuit different from digital apparatus as set out in the Radio Interference Regulations of the Canadian Department of Communications Radio Interference Regulations This digital apparatus, NETGEAR ReadyNAS Duo and NV+, do not exceed the Class B limits for a Class B digital device, pursuant to provide reasonable protection against harmful interference in a residential installation. FCC...
...; Connect the equipment into an electrical outlet on a circuit different from digital apparatus as set out in the Radio Interference Regulations of the Canadian Department of Communications Radio Interference Regulations This digital apparatus, NETGEAR ReadyNAS Duo and NV+, do not exceed the Class B limits for a Class B digital device, pursuant to provide reasonable protection against harmful interference in a residential installation. FCC...

Hardware Manual
Page 40
... Conformity 38 disk adding 27 failure 28 previously formatted 26 replacing 29 supported 25 disk tray Duo 12 NV+ 20 diskless units 7, 26 drive bay Duo 11 NV+ 19 E electrical safety 35 electrostatic discharge (ESD) 36 email alerts 28 F factory default settings 32 failed disk 28 FCC 37 front panel Duo 10 NV+ 18 G general safety 36 H Hardware Compatibility List 6, 25, 26 L LEDs Duo 14 NV+ 22 location, setup 6 P previously formatted disks 26 R rear...
... Conformity 38 disk adding 27 failure 28 previously formatted 26 replacing 29 supported 25 disk tray Duo 12 NV+ 20 diskless units 7, 26 drive bay Duo 11 NV+ 19 E electrical safety 35 electrostatic discharge (ESD) 36 email alerts 28 F factory default settings 32 failed disk 28 FCC 37 front panel Duo 10 NV+ 18 G general safety 36 H Hardware Compatibility List 6, 25, 26 L LEDs Duo 14 NV+ 22 location, setup 6 P previously formatted disks 26 R rear...


