
Hardware Manual
Page 1
ReadyNAS Duo v2 and NV+ v2 Hardware Manual 350 East Plumeria Drive San Jose, CA 95134 USA March 2012 202-10895-04
ReadyNAS Duo v2 and NV+ v2 Hardware Manual 350 East Plumeria Drive San Jose, CA 95134 USA March 2012 202-10895-04
Hardware Manual
Page 2
... in the United States and/or other countries. All rights reserved. Phone (US & Canada only): 1-888-NETGEAR Phone (Other Countries): See support information card. ReadyNAS Duo v2 and NV+ v2 © NETGEAR, Inc. All rights reserved. NETGEAR, the NETGEAR logo, and Connect with Innovation are trademarks and/or registered trademarks of this document without notice. ©...
... in the United States and/or other countries. All rights reserved. Phone (US & Canada only): 1-888-NETGEAR Phone (Other Countries): See support information card. ReadyNAS Duo v2 and NV+ v2 © NETGEAR, Inc. All rights reserved. NETGEAR, the NETGEAR logo, and Connect with Innovation are trademarks and/or registered trademarks of this document without notice. ©...

Hardware Manual
Page 3
Table of Contents Chapter 1 Getting Started Additional Documentation 6 Setup Location 7 System Requirements 7 Diskless Units 8 Chapter 2 ReadyNAS Duo v2 Front and Side Panels 11 Drive Bays 12 Rear Panel 14 Status Information 15 System Shutdown 15 Boot Menu 16 Chapter 3 ReadyNAS NV+ v2 Front and Side Panels 19 Drive Bays 20 Rear Panel 22 Status Information 23 System Shutdown 23 Boot Menu 24 Chapter 4 Disks Previously Formatted Disks 27 Adding a Disk 28 Failed Disk Notification 29 Replacing a Disk 30 3
Table of Contents Chapter 1 Getting Started Additional Documentation 6 Setup Location 7 System Requirements 7 Diskless Units 8 Chapter 2 ReadyNAS Duo v2 Front and Side Panels 11 Drive Bays 12 Rear Panel 14 Status Information 15 System Shutdown 15 Boot Menu 16 Chapter 3 ReadyNAS NV+ v2 Front and Side Panels 19 Drive Bays 20 Rear Panel 22 Status Information 23 System Shutdown 23 Boot Menu 24 Chapter 4 Disks Previously Formatted Disks 27 Adding a Disk 28 Failed Disk Notification 29 Replacing a Disk 30 3
Hardware Manual
Page 4
ReadyNAS Duo v2 and NV+ v2 Appendix A Defaults and Technical Specifications Factory Default Settings 33 Duo v2 Technical Specifications 34 NV+ v2 Technical Specifications 35 Safety Warnings 36 Electrical Safety Precautions 36 General Safety Precautions 36 Electrostatic Discharge (ESD) Precautions 37 Appendix B Compliance Notification Index 4
ReadyNAS Duo v2 and NV+ v2 Appendix A Defaults and Technical Specifications Factory Default Settings 33 Duo v2 Technical Specifications 34 NV+ v2 Technical Specifications 35 Safety Warnings 36 Electrical Safety Precautions 36 General Safety Precautions 36 Electrostatic Discharge (ESD) Precautions 37 Appendix B Compliance Notification Index 4
Hardware Manual
Page 5
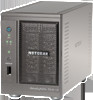
1. Getting Started 1 Congratulations on your purchase of the Duo v2 and NV+ v2 storage systems. This chapter contains the following sections: • Additional Documentation • Setup Location • System Requirements • Diskless Units 5 This ReadyNAS Duo v2 and NV+ v2 Hardware Manual describes the physical features of a NETGEAR ReadyNAS® storage system.
1. Getting Started 1 Congratulations on your purchase of the Duo v2 and NV+ v2 storage systems. This chapter contains the following sections: • Additional Documentation • Setup Location • System Requirements • Diskless Units 5 This ReadyNAS Duo v2 and NV+ v2 Hardware Manual describes the physical features of a NETGEAR ReadyNAS® storage system.
Hardware Manual
Page 6
Getting Started 6 NETGEAR maintains a community website that supports ReadyNAS products. Visit http://readynas.com for Home Software Manual, which is available at http://www.readynas.com/documentation. ReadyNAS Duo v2 and NV+ v2 Additional Documentation For detailed information about configuring, managing, and using your ReadyNAS Duo v2 or NV+ v2 storage system, see the ReadyNAS RAIDiator 5.3 for reviews, tutorials, a comparison chart, software updates, documentation, an active user forum, and much more.
Getting Started 6 NETGEAR maintains a community website that supports ReadyNAS products. Visit http://readynas.com for Home Software Manual, which is available at http://www.readynas.com/documentation. ReadyNAS Duo v2 and NV+ v2 Additional Documentation For detailed information about configuring, managing, and using your ReadyNAS Duo v2 or NV+ v2 storage system, see the ReadyNAS RAIDiator 5.3 for reviews, tutorials, a comparison chart, software updates, documentation, an active user forum, and much more.
Hardware Manual
Page 7
...ReadyNAS Duo v2 or NV+ v2 requires the following: • Ethernet connection • Microsoft Windows 7, Vista, XP, 2000, Mac OS, UNIX, or Linux operating system • Microsoft Internet Explorer 7.0+, Apple Safari, 2.0+, Mozilla Firefox 2.0+, Opera 9.5+, or Google Chrome 10+ browser • Hard disk drive or drives from the NETGEAR...environment where it suitable for protection, the power cable can be securely and safely connected to the UPS. ReadyNAS Duo v2 and NV+ v2 Setup Location Your ReadyNAS Duo v2 or NV+ v2 is suitable for use in the side of the case is not restricted. &#...
...ReadyNAS Duo v2 or NV+ v2 requires the following: • Ethernet connection • Microsoft Windows 7, Vista, XP, 2000, Mac OS, UNIX, or Linux operating system • Microsoft Internet Explorer 7.0+, Apple Safari, 2.0+, Mozilla Firefox 2.0+, Opera 9.5+, or Google Chrome 10+ browser • Hard disk drive or drives from the NETGEAR...environment where it suitable for protection, the power cable can be securely and safely connected to the UPS. ReadyNAS Duo v2 and NV+ v2 Setup Location Your ReadyNAS Duo v2 or NV+ v2 is suitable for use in the side of the case is not restricted. &#...

Hardware Manual
Page 8
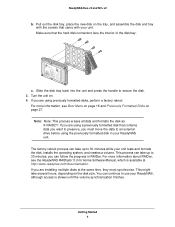
The tray handle pops out. Getting Started 8 The following procedure is illustrated with a Duo v2, but the same steps apply for an NV+ v2. To prepare a diskless unit for first use your unit. Obtain at least one hard ..., insert a disk into a drive bay, as follows: a. Press the disk tray release latch. If you use : 1. See http://www.readynas.com/hard_disk_hcl. ReadyNAS Duo v2 and NV+ v2 Diskless Units If you purchased a ReadyNAS storage system without a pre-installed hard disk drive or drives, you must follow this procedure before you are using a previously...
The tray handle pops out. Getting Started 8 The following procedure is illustrated with a Duo v2, but the same steps apply for an NV+ v2. To prepare a diskless unit for first use your unit. Obtain at least one hard ..., insert a disk into a drive bay, as follows: a. Press the disk tray release latch. If you use : 1. See http://www.readynas.com/hard_disk_hcl. ReadyNAS Duo v2 and NV+ v2 Diskless Units If you purchased a ReadyNAS storage system without a pre-installed hard disk drive or drives, you must follow this procedure before you are using a previously...
Hardware Manual
Page 9
... disk connectors face the interior of the disk bay. This process can continue to preserve, you are installing multiple disks at http://www.readynas.com/documentation. ReadyNAS Duo v2 and NV+ v2 b. Note: Note: This process erases all data and formats the disk as X-RAID2TM. Slide the disk tray... back into the unit and press the handle to 30 minutes while your ReadyNAS, although access is available at the same time, they must ...
... disk connectors face the interior of the disk bay. This process can continue to preserve, you are installing multiple disks at http://www.readynas.com/documentation. ReadyNAS Duo v2 and NV+ v2 b. Note: Note: This process erases all data and formats the disk as X-RAID2TM. Slide the disk tray... back into the unit and press the handle to 30 minutes while your ReadyNAS, although access is available at the same time, they must ...

Hardware Manual
Page 10
ReadyNAS Duo v2 2 This chapter provides an overview of the physical features of the ReadyNAS Duo v2 and includes the following sections: • Front and Side Panels • Drive Bays • Rear Panel • Status Information • System Shutdown • Boot Menu 10 2.
ReadyNAS Duo v2 2 This chapter provides an overview of the physical features of the ReadyNAS Duo v2 and includes the following sections: • Front and Side Panels • Drive Bays • Rear Panel • Status Information • System Shutdown • Boot Menu 10 2.

Hardware Manual
Page 11
Exhaust vent 4. Backup button 6. ReadyNAS Duo v2 front and side panels 1. Power button and LED 2. Disk activity LED 3. Disk 1 and disk 2 LEDs 8. Drive bay door ReadyNAS Duo v2 11 USB 2.0 port 5. USB and backup status LED 7. ReadyNAS Duo v2 and NV+ v2 Front and Side Panels The following figure shows the front and side panels of ReadyNAS Duo v2. 1 2 3 8 45 6 7 Figure 1.
Exhaust vent 4. Backup button 6. ReadyNAS Duo v2 front and side panels 1. Power button and LED 2. Disk activity LED 3. Disk 1 and disk 2 LEDs 8. Drive bay door ReadyNAS Duo v2 11 USB 2.0 port 5. USB and backup status LED 7. ReadyNAS Duo v2 and NV+ v2 Front and Side Panels The following figure shows the front and side panels of ReadyNAS Duo v2. 1 2 3 8 45 6 7 Figure 1.

Hardware Manual
Page 12
Disk tray handle 3. Drive tray release latch 5. ReadyNAS Duo v2 drive bay 1. Drive bay door 2. Drive bays ReadyNAS Duo v2 12 Recessed drive tray locking mechanism 4. ReadyNAS Duo v2 and NV+ v2 Drive Bays The following figure shows the drive bays of ReadyNAS Duo v2. 1 2 3 4 5 Figure 2.
Disk tray handle 3. Drive tray release latch 5. ReadyNAS Duo v2 drive bay 1. Drive bay door 2. Drive bays ReadyNAS Duo v2 12 Recessed drive tray locking mechanism 4. ReadyNAS Duo v2 and NV+ v2 Drive Bays The following figure shows the drive bays of ReadyNAS Duo v2. 1 2 3 4 5 Figure 2.

Hardware Manual
Page 13
Disk tray handle 4. ReadyNAS Duo v2 disk tray 1. Disk tray 3. ReadyNAS Duo v2 and NV+ v2 The following figure shows a ReadyNAS Duo v2 disk tray. 2 1 3 4 5 Figure 3. Hard drive 2. Disk tray release latch ReadyNAS Duo v2 13 Recessed disk tray locking mechanism 5.
Disk tray handle 4. ReadyNAS Duo v2 disk tray 1. Disk tray 3. ReadyNAS Duo v2 and NV+ v2 The following figure shows a ReadyNAS Duo v2 disk tray. 2 1 3 4 5 Figure 3. Hard drive 2. Disk tray release latch ReadyNAS Duo v2 13 Recessed disk tray locking mechanism 5.

Hardware Manual
Page 14
ReadyNAS Duo v2 and NV+ v2 Rear Panel The following figure shows the rear panel of ReadyNAS Duo v2. 1 2 34 56 Figure 4. Reset button 4. Kensington lock 3. Power adapter socket ReadyNAS Duo v2 14 USB 3.0 ports 5. 1-gigabit Ethernet port with LED status indicators 6. Exhaust fan 2. ReadyNAS Duo v2 rear panel 1.
ReadyNAS Duo v2 and NV+ v2 Rear Panel The following figure shows the rear panel of ReadyNAS Duo v2. 1 2 34 56 Figure 4. Reset button 4. Kensington lock 3. Power adapter socket ReadyNAS Duo v2 14 USB 3.0 ports 5. 1-gigabit Ethernet port with LED status indicators 6. Exhaust fan 2. ReadyNAS Duo v2 rear panel 1.
Hardware Manual
Page 15
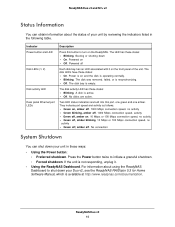
... in these ways: • Using the Power button: • Preferred shutdown. Press the Power button twice to shut down your Duo v2, see the ReadyNAS RAIDiator 5.3 for Home Software Manual, which is operating normally. • Blinking. Booting or shutting down your unit in the following ...(1, 2) Disk activity LED Rear panel Ethernet port LEDs Description Press this port, one green and one amber. Two LED status indicators are active. ReadyNAS Duo v2 and NV+ v2 Status Information You can shut down • On. The disk LEDs have these states: • Blinking. Power is ...
... in these ways: • Using the Power button: • Preferred shutdown. Press the Power button twice to shut down your Duo v2, see the ReadyNAS RAIDiator 5.3 for Home Software Manual, which is operating normally. • Blinking. Booting or shutting down your unit in the following ...(1, 2) Disk activity LED Rear panel Ethernet port LEDs Description Press this port, one green and one amber. Two LED status indicators are active. ReadyNAS Duo v2 and NV+ v2 Status Information You can shut down • On. The disk LEDs have these states: • Blinking. Power is ...
Hardware Manual
Page 16
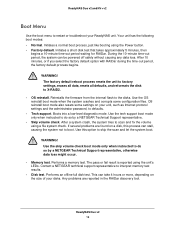
... Support representative. • Skip volume check. After a system crash, the system tries to do so by a NETGEAR Technical Support representative, otherwise data loss might occur. • Memory test. ReadyNAS Duo v2 16 Initiates a normal boot process, just like booting using a file system check. Initiates a short disk test that takes approximately 5 minutes, then begins...
... Support representative. • Skip volume check. After a system crash, the system tries to do so by a NETGEAR Technical Support representative, otherwise data loss might occur. • Memory test. ReadyNAS Duo v2 16 Initiates a normal boot process, just like booting using a file system check. Initiates a short disk test that takes approximately 5 minutes, then begins...
Hardware Manual
Page 17
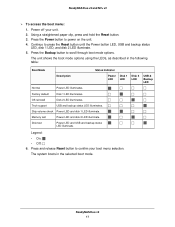
... test Power LED and disk 2 LED illuminate. Disk test Power LED and USB and backup status LED illuminate. ReadyNAS Duo v2 and NV+ v2 To access the boot menu: 1. ReadyNAS Duo v2 17 Using a straightened paper clip, press and hold the Reset button. 3. Press the Power button to press the Reset...
... test Power LED and disk 2 LED illuminate. Disk test Power LED and USB and backup status LED illuminate. ReadyNAS Duo v2 and NV+ v2 To access the boot menu: 1. ReadyNAS Duo v2 17 Using a straightened paper clip, press and hold the Reset button. 3. Press the Power button to press the Reset...

Hardware Manual
Page 19
ReadyNAS Duo v2 and NV+ v2 Front and Side Panels The following figure shows the front and side panels of ReadyNAS NV+ v2. 23 4 56 1 7 8 Figure 5. Exhaust vents 2. Backup button and backup LED 4. Disk LEDs 5. Status display screen ReadyNAS NV+ v2 19 Disk activity LED 6. ReadyNAS NV+ v2 front and side panels 1. USB 2.0 port 3. Power button and LED 7. Drive bay door 8.
ReadyNAS Duo v2 and NV+ v2 Front and Side Panels The following figure shows the front and side panels of ReadyNAS NV+ v2. 23 4 56 1 7 8 Figure 5. Exhaust vents 2. Backup button and backup LED 4. Disk LEDs 5. Status display screen ReadyNAS NV+ v2 19 Disk activity LED 6. ReadyNAS NV+ v2 front and side panels 1. USB 2.0 port 3. Power button and LED 7. Drive bay door 8.

Hardware Manual
Page 20
Disk tray handle 3. Recessed drive tray locking mechanism 4. ReadyNAS Duo v2 and NV+ v2 Drive Bays The following figure shows the drive bays of ReadyNAS NV+ v2. 2 3 4 1 5 Figure 6. Drive bays ReadyNAS NV+ v2 20 ReadyNAS NV+ v2 drive bay 1. Drive bay door 2. Drive tray release latch 5.
Disk tray handle 3. Recessed drive tray locking mechanism 4. ReadyNAS Duo v2 and NV+ v2 Drive Bays The following figure shows the drive bays of ReadyNAS NV+ v2. 2 3 4 1 5 Figure 6. Drive bays ReadyNAS NV+ v2 20 ReadyNAS NV+ v2 drive bay 1. Drive bay door 2. Drive tray release latch 5.

Hardware Manual
Page 21
ReadyNAS NV+ v2 disk tray 1. Disk tray handle 4. Hard drive 2. Recessed disk tray locking mechanism 5. Disk tray release latch ReadyNAS NV+ v2 21 Disk tray 3. ReadyNAS Duo v2 and NV+ v2 The following figure shows a ReadyNAS NV+ v2 disk tray. 2 1 3 4 5 Figure 7.
ReadyNAS NV+ v2 disk tray 1. Disk tray handle 4. Hard drive 2. Recessed disk tray locking mechanism 5. Disk tray release latch ReadyNAS NV+ v2 21 Disk tray 3. ReadyNAS Duo v2 and NV+ v2 The following figure shows a ReadyNAS NV+ v2 disk tray. 2 1 3 4 5 Figure 7.


