RND2110 Setup Manual
Page 3
... and Accessing Your ReadyNAS Device 2 Using the RAIDar Utility on Windows and Linux 2 Using the RAIDar Widget on the Mac OS X 4 Using the ReadyNAS Duo IP Address 6 Copying Files From Your PC to Your ReadyNAS Duo 7 Using the Setup Wizard Setting the Clock ...13 Configuring Alert Contacts 14 Configuring Your Network 16...
... and Accessing Your ReadyNAS Device 2 Using the RAIDar Utility on Windows and Linux 2 Using the RAIDar Widget on the Mac OS X 4 Using the ReadyNAS Duo IP Address 6 Copying Files From Your PC to Your ReadyNAS Duo 7 Using the Setup Wizard Setting the Clock ...13 Configuring Alert Contacts 14 Configuring Your Network 16...
RND2110 Setup Manual
Page 5
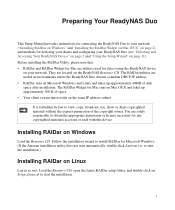
... Widget for Mac are solely responsible to start the installation.) Installing RAIDar on the ReadyNAS Resource CD. Installing RAIDar on the same IP address subnet. The RAIDar Widget for Mac runs on Mac OS X and takes up approximately 40MB of the copyright owner. The RAIDar ...utilities are located on Linux Log in environments where the ReadyNAS Duo obtains a random DHCP IP address. • RAIDar runs on Setup_Linux.sh to obtain the appropriate permission or license necessary for detecting your shares and configuring your network...
... Widget for Mac are solely responsible to start the installation.) Installing RAIDar on the ReadyNAS Resource CD. Installing RAIDar on the same IP address subnet. The RAIDar Widget for Mac runs on Mac OS X and takes up approximately 40MB of the copyright owner. The RAIDar ...utilities are located on Linux Log in environments where the ReadyNAS Duo obtains a random DHCP IP address. • RAIDar runs on Setup_Linux.sh to obtain the appropriate permission or license necessary for detecting your shares and configuring your network...

RND2110 Setup Manual
Page 6
...click Install. 3. When you want to start the installation. You can detect your ReadyNAS Duo by accessing your router and pasting the ReadyNAS Duo IP Address into your environment, ReadyNAS will display. If you have a ReadyNAS with an LCD (such as the ReadyNAS NV+), press the power button once... to display the IP address. • To connect to the FrontView Setup Wizard, open a browser, and use the RAIDar utility, or you already have an existing workgroup ...
...click Install. 3. When you want to start the installation. You can detect your ReadyNAS Duo by accessing your router and pasting the ReadyNAS Duo IP Address into your environment, ReadyNAS will display. If you have a ReadyNAS with an LCD (such as the ReadyNAS NV+), press the power button once... to display the IP address. • To connect to the FrontView Setup Wizard, open a browser, and use the RAIDar utility, or you already have an existing workgroup ...

RND2110 Setup Manual
Page 10
... one below . In this example, the default IP address for the router is connected to it.) To access the IP address of your ReadyNAS Duo: 1. Figure 9 3. Browse through your router, your router stores, and can display, the IP address of the ReadyNAS Duo. (Your router will also display the IP addresses of all other devices connected to your...
... one below . In this example, the default IP address for the router is connected to it.) To access the IP address of your ReadyNAS Duo: 1. Figure 9 3. Browse through your router, your router stores, and can display, the IP address of the ReadyNAS Duo. (Your router will also display the IP addresses of all other devices connected to your...
RND2110 Setup Manual
Page 11
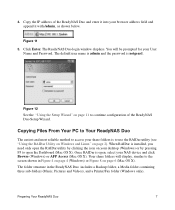
... on page 2). Figure 12 See the "Using the Setup Wizard" on page 6 (Mac OS X). Figure 11 5. Copy the IP address of the ReadyNAS Duo Setup Wizard. You will display, similar to access your browser address field and append it into your share folders is netgear1. The ReadyNAS Duo login window displays. 4. Preparing Your...
... on page 2). Figure 12 See the "Using the Setup Wizard" on page 6 (Mac OS X). Figure 11 5. Copy the IP address of the ReadyNAS Duo Setup Wizard. You will display, similar to access your browser address field and append it into your share folders is netgear1. The ReadyNAS Duo login window displays. 4. Preparing Your...
RND2110 Setup Manual
Page 15
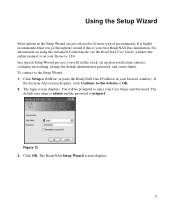
... up alert notification contacts, configure networking, change the default administrator password, and create shares. Figure 13 3. Click Setup in RAIDar (or paste the ReadyNAS Duo IP address in the Setup Wizard are pre-selected to fit most typical environments. The default user name is admin and the password is your first ReadyNAS...
... up alert notification contacts, configure networking, change the default administrator password, and create shares. Figure 13 3. Click Setup in RAIDar (or paste the ReadyNAS Duo IP address in the Setup Wizard are pre-selected to fit most typical environments. The default user name is admin and the password is your first ReadyNAS...
RND2110 Setup Manual
Page 20
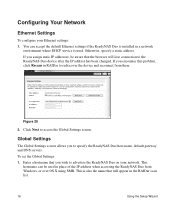
... 1. To set the Global Settings: 1. Global Settings The Global Settings screen allows you encounter this problem, click Rescan in place of the IP address when accessing the ReadyNAS Duo from there. Configuring Your Network Ethernet Settings To configure your network. Otherwise, specify a static... Wizard This hostname can accept the default Ethernet settings if the ReadyNAS Duo is used in RAIDar to the ReadyNAS Duo device after the IP address has been changed. This is also the name that will lose connection to rediscover the device and reconnect from Windows, or over OS ...
... 1. To set the Global Settings: 1. Global Settings The Global Settings screen allows you encounter this problem, click Rescan in place of the IP address when accessing the ReadyNAS Duo from there. Configuring Your Network Ethernet Settings To configure your network. Otherwise, specify a static... Wizard This hostname can accept the default Ethernet settings if the ReadyNAS Duo is used in RAIDar to the ReadyNAS Duo device after the IP address has been changed. This is also the name that will lose connection to rediscover the device and reconnect from Windows, or over OS ...
RND2110 Setup Manual
Page 27
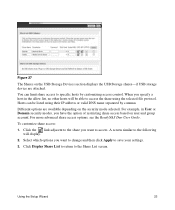
... Guide. Click the link adjacent to the share you specify a host in User or Domain security modes, you want to access the share using their IP address or valid DNS name separated by customizing access control. Select which options you have the option of restricting share access based on the security mode...
... Guide. Click the link adjacent to the share you specify a host in User or Domain security modes, you want to access the share using their IP address or valid DNS name separated by customizing access control. Select which options you have the option of restricting share access based on the security mode...

