
Rackmount Hardware Manual
Page 3
... Panel 9 Rear Panel 10 Status Information 11 Power On and Shut Down 12 Power On 12 Preferred Shutdown 12 Forced Shutdown 12 Power State 13 Boot Menu 13 Chapter 3 ReadyNAS 3220 and 4220 Front Panel 16 3220 Rear Panel 18 4220 Rear Panel 19 Status Information 20... Boot Menu 21 Rack-Mount Setup 23 Installation 23 Chapter 4 Disks Disk Tray 26 Supported Disks 27 Previously Formatted Disks 27 Reformat Previously Formatted Disks 27 Migrate a ...
... Panel 9 Rear Panel 10 Status Information 11 Power On and Shut Down 12 Power On 12 Preferred Shutdown 12 Forced Shutdown 12 Power State 13 Boot Menu 13 Chapter 3 ReadyNAS 3220 and 4220 Front Panel 16 3220 Rear Panel 18 4220 Rear Panel 19 Status Information 20... Boot Menu 21 Rack-Mount Setup 23 Installation 23 Chapter 4 Disks Disk Tray 26 Supported Disks 27 Previously Formatted Disks 27 Reformat Previously Formatted Disks 27 Migrate a ...

Rackmount Hardware Manual
Page 8
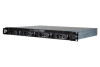
It includes the following sections: • Front Panel • Rear Panel • Status Information • Power On and Shut Down • Boot Menu 8 2. ReadyNAS 2120 and 2120 v2 2 This chapter describes the physical features of the ReadyNAS 2120 and the 2120 v2.
It includes the following sections: • Front Panel • Rear Panel • Status Information • Power On and Shut Down • Boot Menu 8 2. ReadyNAS 2120 and 2120 v2 2 This chapter describes the physical features of the ReadyNAS 2120 and the 2120 v2.
Rackmount Hardware Manual
Page 13
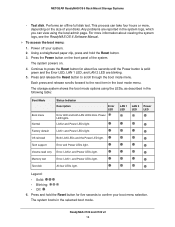
...off the storage system, after the 10-minute time-out period, the factory default process begins. Use the tech support boot mode only when a NETGEAR technical support representative instructs you are attempting to rescue data off the storage system without causing any data loss, and the... 5 minutes. Reinstalls the firmware from the internal flash to restart or troubleshoot your storage system, such as read only. Boot Menu Use the boot menu to the disks. Note: To start the factory default process immediately, press the Reset button during a disaster recovery. • Memory test...
...off the storage system, after the 10-minute time-out period, the factory default process begins. Use the tech support boot mode only when a NETGEAR technical support representative instructs you are attempting to rescue data off the storage system without causing any data loss, and the... 5 minutes. Reinstalls the firmware from the internal flash to restart or troubleshoot your storage system, such as read only. Boot Menu Use the boot menu to the disks. Note: To start the factory default process immediately, press the Reset button during a disaster recovery. • Memory test...
Rackmount Hardware Manual
Page 14
... and hold the Reset button for about viewing the system logs, see the ReadyNAS OS 6 Software Manual. To access the boot menu: 1. Press and release the Reset button to the next item in the system logs, which you can take four hours or more information ... LED Legend: • Solid Blinking Off: 6. NETGEAR ReadyNAS OS 6 Rack-Mount Storage Systems • Test disk. For more , depending on the size of the system. The system boots in the following table: Boot Mode Boot menu Normal Factory default OS reinstall Tech support Volume read only Memory test Test...
... and hold the Reset button for about viewing the system logs, see the ReadyNAS OS 6 Software Manual. To access the boot menu: 1. Press and release the Reset button to the next item in the system logs, which you can take four hours or more information ... LED Legend: • Solid Blinking Off: 6. NETGEAR ReadyNAS OS 6 Rack-Mount Storage Systems • Test disk. For more , depending on the size of the system. The system boots in the following table: Boot Mode Boot menu Normal Factory default OS reinstall Tech support Volume read only Memory test Test...

Rackmount Hardware Manual
Page 15
3. It includes the following sections: • Front Panel • 3220 Rear Panel • 4220 Rear Panel • Status Information • Boot Menu • Rack-Mount Setup 15 ReadyNAS 3220 and 4220 3 This chapter describes the physical features of the ReadyNAS 3220 and ReadyNAS 4220.
3. It includes the following sections: • Front Panel • 3220 Rear Panel • 4220 Rear Panel • Status Information • Boot Menu • Rack-Mount Setup 15 ReadyNAS 3220 and 4220 3 This chapter describes the physical features of the ReadyNAS 3220 and ReadyNAS 4220.
Rackmount Hardware Manual
Page 21
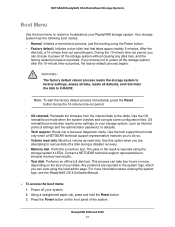
...take four hours or more information about viewing the system logs, see the ReadyNAS OS 6 Software Manual. To access the boot menu: 1. WARNING: The factory default reboot process resets the storage system to factory settings, erases all data, resets all defaults, and ...Power off your disks. OS reinstall boot mode also resets some configuration files. Initiates a short disk test that takes approximately 5 minutes. For more , depending on the front panel of your system. 2. NETGEAR ReadyNAS OS 6 Rack-Mount Storage Systems Boot Menu Use the boot menu to rescue data off a disk ...
...take four hours or more information about viewing the system logs, see the ReadyNAS OS 6 Software Manual. To access the boot menu: 1. WARNING: The factory default reboot process resets the storage system to factory settings, erases all data, resets all defaults, and ...Power off your disks. OS reinstall boot mode also resets some configuration files. Initiates a short disk test that takes approximately 5 minutes. For more , depending on the front panel of your system. 2. NETGEAR ReadyNAS OS 6 Rack-Mount Storage Systems Boot Menu Use the boot menu to rescue data off a disk ...

Rackmount Hardware Manual
Page 22
... UI, and Health LEDs are blinking. Continue to scroll through the boot menu modes. Memory test Power and UI LEDs light Test disk Power, UI, and Health LEDs light. Health LED ReadyNAS 3220 and 4220 22 NETGEAR ReadyNAS OS 6 Rack-Mount Storage Systems The system powers on. ...4. Normal Health LED lights. Volume read only Power and Health LEDs light. The system boots in the following table: Boot Mode Status Indicator Description Boot menu Power, UI, and Health LEDs blink....
... UI, and Health LEDs are blinking. Continue to scroll through the boot menu modes. Memory test Power and UI LEDs light Test disk Power, UI, and Health LEDs light. Health LED ReadyNAS 3220 and 4220 22 NETGEAR ReadyNAS OS 6 Rack-Mount Storage Systems The system powers on. ...4. Normal Health LED lights. Volume read only Power and Health LEDs light. The system boots in the following table: Boot Mode Status Indicator Description Boot menu Power, UI, and Health LEDs blink....

Rackmount Hardware Manual
Page 28
... on page 29. 3. If you want to a diskless ReadyNAS OS 6 system: 1. For information about adding a disk while the system is running , see the Boot Menu section of a volume to its factory default settings, see Add a Disk on page 29. If you must add both disks to the new system. The... X-RAID2 volume. The disk is reformatted and becomes available for use with one ReadyNAS OS 6 storage system to another, as long as a degraded volume. NETGEAR ReadyNAS OS 6 Rack-Mount Storage Systems For more information, see Add a Disk on page 29. 4. Migrate a Volume You can add disks while the ...
... on page 29. 3. If you want to a diskless ReadyNAS OS 6 system: 1. For information about adding a disk while the system is running , see the Boot Menu section of a volume to its factory default settings, see Add a Disk on page 29. If you must add both disks to the new system. The... X-RAID2 volume. The disk is reformatted and becomes available for use with one ReadyNAS OS 6 storage system to another, as long as a degraded volume. NETGEAR ReadyNAS OS 6 Rack-Mount Storage Systems For more information, see Add a Disk on page 29. 4. Migrate a Volume You can add disks while the ...