Product Data Sheet
Page 2
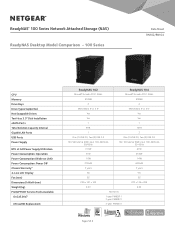
... Storage (NAS) ReadyNAS Desktop Model Comparison - 100 Series Data Sheet RN102/RN104 CPU Memory Drive Bays Drive Types Supported Hot Swappable Drives Tool-less 3.5" Disk Installation eSATA Ports Total Solution Capacity Internal Gigabit LAN Ports USB Ports Power Supply BTU at Full Power Supply Utilization Power Consumption: Operation Power Consumption (Wake...
... Storage (NAS) ReadyNAS Desktop Model Comparison - 100 Series Data Sheet RN102/RN104 CPU Memory Drive Bays Drive Types Supported Hot Swappable Drives Tool-less 3.5" Disk Installation eSATA Ports Total Solution Capacity Internal Gigabit LAN Ports USB Ports Power Supply BTU at Full Power Supply Utilization Power Consumption: Operation Power Consumption (Wake...
Product Data Sheet
Page 4
... Test Guideline • ENGR 10036 CDG Component Derating Guideline Add-on Applications • One click installation of add-on applications directly through local GUI • Applications available for productivity, media, backup, surveillance, and many others • NETGEAR applications include Surveillance, Photo Sharing, Advanced configuration tools • Partner applications include BitTorrent Sync, Plex...
... Test Guideline • ENGR 10036 CDG Component Derating Guideline Add-on Applications • One click installation of add-on applications directly through local GUI • Applications available for productivity, media, backup, surveillance, and many others • NETGEAR applications include Surveillance, Photo Sharing, Advanced configuration tools • Partner applications include BitTorrent Sync, Plex...
Hardware Manual
Page 2
... and web support, visit http://support.netgear.com. After installing your device, locate the serial number on the label of your product before you for selecting NETGEAR products. Phone (US & Canada only): 1-888-NETGEAR. You must register your product and use NETGEAR telephone support. All rights reserved. 2 Trademarks NETGEAR, the NETGEAR logo, and Connect with Innovation are...
... and web support, visit http://support.netgear.com. After installing your device, locate the serial number on the label of your product before you for selecting NETGEAR products. Phone (US & Canada only): 1-888-NETGEAR. You must register your product and use NETGEAR telephone support. All rights reserved. 2 Trademarks NETGEAR, the NETGEAR logo, and Connect with Innovation are...

Hardware Manual
Page 8
... ReadyNAS local admin page, see the instructions in Previously Formatted Disks on page 76. If you use the system. If you are not supported, NETGEAR technical support will not provide assistance. Use only supported SATA hard disk drives (HDD) or solid state drives (SSD) in your storage system,... to an empty drive bay. You can add a 3.5-inch hard disk drive, a 2.5-inch hard disk drive, or a 2.5-inch solid state drive to install a disk, see the NETGEAR Hardware Compatibility List at least one disk your system before you notice unexpected behavior, try using another browser.
... ReadyNAS local admin page, see the instructions in Previously Formatted Disks on page 76. If you use the system. If you are not supported, NETGEAR technical support will not provide assistance. Use only supported SATA hard disk drives (HDD) or solid state drives (SSD) in your storage system,... to an empty drive bay. You can add a 3.5-inch hard disk drive, a 2.5-inch hard disk drive, or a 2.5-inch solid state drive to install a disk, see the NETGEAR Hardware Compatibility List at least one disk your system before you notice unexpected behavior, try using another browser.

Hardware Manual
Page 72
This disk tray is installed in all systems except the EDA 500. Disk tray release latch 3. This section describes both the standard and EDA 500 disk trays. Standard disk tray 1. ...
This disk tray is installed in all systems except the EDA 500. Disk tray release latch 3. This section describes both the standard and EDA 500 disk trays. Standard disk tray 1. ...

Hardware Manual
Page 73
... EDA 500. Disk screw holes 6. To maintain adequate airflow, make sure that all disk trays remain in the drive bays, even if no disk is installed in the tray. Disks 73 EDA 500 disk tray 1. Recessed disk tray handle lock 4. Bracket lock 8. Disk tray handle 5. Disk tray release latch 3. Do not...
... EDA 500. Disk screw holes 6. To maintain adequate airflow, make sure that all disk trays remain in the drive bays, even if no disk is installed in the tray. Disks 73 EDA 500 disk tray 1. Recessed disk tray handle lock 4. Bracket lock 8. Disk tray handle 5. Disk tray release latch 3. Do not...

Hardware Manual
Page 75
...volume from one or more information, see the Preferred Shutdown section of the chapter that describes your ReadyNAS storage system does not have any disks installed, perform the following procedure. To migrate a volume to migrate a volume that contains two disks, you migrate every disk in ...your ReadyNAS OS 6 storage system. Install each disk in the volume into a single X-RAID2 volume. For more disks, you can migrate a volume from the old system. 3. For information...
...volume from one or more information, see the Preferred Shutdown section of the chapter that describes your ReadyNAS storage system does not have any disks installed, perform the following procedure. To migrate a volume to migrate a volume that contains two disks, you migrate every disk in ...your ReadyNAS OS 6 storage system. Install each disk in the volume into a single X-RAID2 volume. For more disks, you can migrate a volume from the old system. 3. For information...

Hardware Manual
Page 82
Make sure that the disk tray release latch is installed on the correct side of the disk tray. Place the new 2.5-inch HDD or SSD in the disk tray. 7. Make sure that came with your ...
Make sure that the disk tray release latch is installed on the correct side of the disk tray. Place the new 2.5-inch HDD or SSD in the disk tray. 7. Make sure that came with your ...

Hardware Manual
Page 89
ReadyNAS OS 6 Desktop Storage Systems Make sure that the HDD or SSD is installed on the correct side of the system. 6. WARNING: To prevent damage to use your system, make sure that the disk tray is slower until it .... 5. You can continue to your storage system, although access is correctly oriented before inserting it latches closed. The disk tray is available at http://support.netgear.com/product/ReadyNAS-OS6. Resynchronization might take several hours, depending on the disk tray handle until the volume resynchronization finishes. For more information about RAID...
ReadyNAS OS 6 Desktop Storage Systems Make sure that the HDD or SSD is installed on the correct side of the system. 6. WARNING: To prevent damage to use your system, make sure that the disk tray is slower until it .... 5. You can continue to your storage system, although access is correctly oriented before inserting it latches closed. The disk tray is available at http://support.netgear.com/product/ReadyNAS-OS6. Resynchronization might take several hours, depending on the disk tray handle until the volume resynchronization finishes. For more information about RAID...

Hardware Manual
Page 101
...system. • Do not work alone when working with high-voltage components. • Always disconnect power from the system when removing or installing main system components, such as electrical insulators. • Use only power supply cords that include a grounding plug and plug them into contact.... ReadyNAS OS 6 Desktop Storage Systems Safety Warnings • The equipment contains no operator access areas and is certified for installation only by an incorrect type. Electrical Safety Precautions Follow basic electrical safety precautions to protect yourself from harm and the ReadyNAS from ...
...system. • Do not work alone when working with high-voltage components. • Always disconnect power from the system when removing or installing main system components, such as electrical insulators. • Use only power supply cords that include a grounding plug and plug them into contact.... ReadyNAS OS 6 Desktop Storage Systems Safety Warnings • The equipment contains no operator access areas and is certified for installation only by an incorrect type. Electrical Safety Precautions Follow basic electrical safety precautions to protect yourself from harm and the ReadyNAS from ...

Hardware Manual
Page 102
... of battery recommended by its polarities and creates a danger of explosion. • Only trained service technicians can damage electronic components and printed circuit boards. DANGER: Installing the battery upside down reverses its edges only; Electrostatic Discharge Precautions Electrostatic discharge (ESD) is made to protect your equipment from ESD: • Use a grounded...
... of battery recommended by its polarities and creates a danger of explosion. • Only trained service technicians can damage electronic components and printed circuit boards. DANGER: Installing the battery upside down reverses its edges only; Electrostatic Discharge Precautions Electrostatic discharge (ESD) is made to protect your equipment from ESD: • Use a grounded...

Hardware Manual
Page 104
... Canadian Department of Communications Radio Interference Regulations This digital apparatus, NETGEAR ReadyNAS OS 6 Desktop Storage Systems, does not exceed the Class B limits for radio-noise emissions from that interference will not occur in a particular installation. Cet appareil numérique de la classe [B] est ...FCC Rules. FCC Declaration Of Conformity We, NETGEAR, Inc., 350 East Plumeria Drive, San Jose, CA 95134, declare under our sole responsibility that may not cause harmful interference, and • This device must not be installed and operated with minimum distance of 20 ...
... Canadian Department of Communications Radio Interference Regulations This digital apparatus, NETGEAR ReadyNAS OS 6 Desktop Storage Systems, does not exceed the Class B limits for radio-noise emissions from that interference will not occur in a particular installation. Cet appareil numérique de la classe [B] est ...FCC Rules. FCC Declaration Of Conformity We, NETGEAR, Inc., 350 East Plumeria Drive, San Jose, CA 95134, declare under our sole responsibility that may not cause harmful interference, and • This device must not be installed and operated with minimum distance of 20 ...
ReadyNAS OS 6 Installation Guide
Page 1
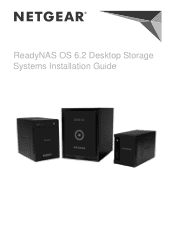
ReadyNAS OS 6.2 Desktop Storage Systems Installation Guide
ReadyNAS OS 6.2 Desktop Storage Systems Installation Guide
ReadyNAS OS 6 Installation Guide
Page 4
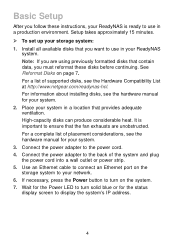
... complete list of placement considerations, see the Hardware Compatibility List at http://www.netgear.com/readynas-hcl. Connect the power adapter to the back of supported disks...that contain data, you want to turn solid blue or for your system. 3. Install all available disks that you must reformat these instructions, your ReadyNAS is important to turn on the system. 7. For... information about installing disks, see the hardware manual for the Power LED to ensure that the fan exhausts are...
... complete list of placement considerations, see the Hardware Compatibility List at http://www.netgear.com/readynas-hcl. Connect the power adapter to the back of supported disks...that contain data, you want to turn solid blue or for your system. 3. Install all available disks that you must reformat these instructions, your ReadyNAS is important to turn on the system. 7. For... information about installing disks, see the hardware manual for the Power LED to ensure that the fan exhausts are...
ReadyNAS OS 6 Installation Guide
Page 5
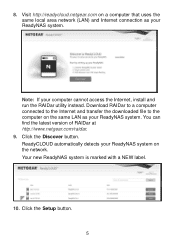
... new ReadyNAS system is marked with a NEW label. 10. Note: If your ReadyNAS system. Click the Discover button. Click the Setup button. 5 Visit http://readycloud.netgear.com on the network. 8. Download RAIDar to a computer connected to the Internet and transfer the downloaded file to the computer on the same LAN as... your ReadyNAS system on a computer that uses the same local area network (LAN) and Internet connection as your computer cannot access the Internet, install and run the RAIDar utility instead. ReadyCLOUD automatically detects your ReadyNAS system.
... new ReadyNAS system is marked with a NEW label. 10. Note: If your ReadyNAS system. Click the Discover button. Click the Setup button. 5 Visit http://readycloud.netgear.com on the network. 8. Download RAIDar to a computer connected to the Internet and transfer the downloaded file to the computer on the same LAN as... your ReadyNAS system on a computer that uses the same local area network (LAN) and Internet connection as your computer cannot access the Internet, install and run the RAIDar utility instead. ReadyCLOUD automatically detects your ReadyNAS system.

ReadyNAS OS 6 Installation Guide
Page 7
... of supported disks, see the hardware manual for your system is in boot mode. 7 Press the Power button. If your system. 3. For information about installing disks, see the Hardware Compatibility List at http://www.netgear.com/readynas-hcl. Warning: This process erases all data and reformats all disks into a single X-RAID volume...
... of supported disks, see the hardware manual for your system is in boot mode. 7 Press the Power button. If your system. 3. For information about installing disks, see the Hardware Compatibility List at http://www.netgear.com/readynas-hcl. Warning: This process erases all data and reformats all disks into a single X-RAID volume...

ReadyNAS OS 6 Installation Guide
Page 8
... the arrows on the touchpad. b When only the Disk 1 LED is complete, the reformatted disks are ready to its factory default settings and reformats all installed disks for use with ReadyNAS OS 6. The system returns to use with your system. 8
... the arrows on the touchpad. b When only the Disk 1 LED is complete, the reformatted disks are ready to its factory default settings and reformats all installed disks for use with ReadyNAS OS 6. The system returns to use with your system. 8

ReadyNAS OS 6 Installation Guide
Page 12
.../regulatory/. See the regulatory compliance document before you use only the official NETGEAR support resources. After installing your device, locate the serial number on the label of NETGEAR, Inc. NETGEAR recommends registering your product and use NETGEAR telephone support. Trademarks ©NETGEAR, Inc. NETGEAR, the NETGEAR Logo, ReadySHARE, and AirCard, are trademarks of your product through a link in...
.../regulatory/. See the regulatory compliance document before you use only the official NETGEAR support resources. After installing your device, locate the serial number on the label of NETGEAR, Inc. NETGEAR recommends registering your product and use NETGEAR telephone support. Trademarks ©NETGEAR, Inc. NETGEAR, the NETGEAR Logo, ReadySHARE, and AirCard, are trademarks of your product through a link in...
Software Manual
Page 2
... Information is subject to support additional ReadyNAS models. Updated manual to change without notice. © NETGEAR All rights reserved. Trademarks NETGEAR, the NETGEAR logo, and Connect with Innovation are trademarks and/or registered trademarks of phone numbers at https://my... Comments Updated to add RN716X to reflect changes in 6.0.8 firmware. NETGEAR recommends registering your device, locate the serial number on the label of supported ReadyNAS models. Phone (US & Canada only): 1-888-NETGEAR. After installing your product through the NETGEAR website. First publication 2
... Information is subject to support additional ReadyNAS models. Updated manual to change without notice. © NETGEAR All rights reserved. Trademarks NETGEAR, the NETGEAR logo, and Connect with Innovation are trademarks and/or registered trademarks of phone numbers at https://my... Comments Updated to add RN716X to reflect changes in 6.0.8 firmware. NETGEAR recommends registering your device, locate the serial number on the label of supported ReadyNAS models. Phone (US & Canada only): 1-888-NETGEAR. After installing your product through the NETGEAR website. First publication 2
Software Manual
Page 3
Contents Chapter 1 Getting Started Quick-Start Guide 9 Additional Documentation 9 Supported Operating Systems 10 Supported Browsers 10 Diskless Systems 10 Basic Installation 11 Discover and Set Up Your ReadyNAS 12 Local Setup Wizard 14 Local Admin Page 15 Access the Local Admin Page 16 Register Your System ...
Contents Chapter 1 Getting Started Quick-Start Guide 9 Additional Documentation 9 Supported Operating Systems 10 Supported Browsers 10 Diskless Systems 10 Basic Installation 11 Discover and Set Up Your ReadyNAS 12 Local Setup Wizard 14 Local Admin Page 15 Access the Local Admin Page 16 Register Your System ...

