PS113 Reference Manual
Page 11
... Model PS113 Print Server 1-7 FirstGear Introductory Window 3-2 User Installation Option Window 3-3 NETGEAR Print Server Software Installation Window 3-4 Choose Destination Location Window 3-5 Select Program Folder Window 3-6 Setup Complete Window 3-7 Firstgear for Print Server Icon 3-8 Setup Icon 3-9 Setup Window 3-9 Printer Select Window (Add Port 3-10 ADDPORT Window (Epson Connection 3-11 Epson Spool Manager Queue Setup Window 3-11 ADDPORT Window 3-12 Add Printer Wizard Window (Manufacturer and Model of Printer) .........3-12 Add Printer Wizard Window (Driver...
... Model PS113 Print Server 1-7 FirstGear Introductory Window 3-2 User Installation Option Window 3-3 NETGEAR Print Server Software Installation Window 3-4 Choose Destination Location Window 3-5 Select Program Folder Window 3-6 Setup Complete Window 3-7 Firstgear for Print Server Icon 3-8 Setup Icon 3-9 Setup Window 3-9 Printer Select Window (Add Port 3-10 ADDPORT Window (Epson Connection 3-11 Epson Spool Manager Queue Setup Window 3-11 ADDPORT Window 3-12 Add Printer Wizard Window (Manufacturer and Model of Printer) .........3-12 Add Printer Wizard Window (Driver...
PS113 Reference Manual
Page 42
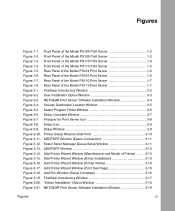
Figure 3-15. Click on Next after clicking on Have Disk and insert the driver disk that you are adding. Add Printer Wizard Window (Driver Installation) Microsoft Windows 95 and Windows 98 Printing 3-13 Install the driver, proceeding as instructed until the Add Printer Wizard window, as illustrated in Figure 3-15, opens. Installation and Reference for the Model PS104/PS105/PS110/PS113 Print Server 9. If your printer is not listed, click on the names of the manufacturer and printer model you received from the printer manufacturer.
Figure 3-15. Click on Next after clicking on Have Disk and insert the driver disk that you are adding. Add Printer Wizard Window (Driver Installation) Microsoft Windows 95 and Windows 98 Printing 3-13 Install the driver, proceeding as instructed until the Add Printer Wizard window, as illustrated in Figure 3-15, opens. Installation and Reference for the Model PS104/PS105/PS110/PS113 Print Server 9. If your printer is not listed, click on the names of the manufacturer and printer model you received from the printer manufacturer.

PS113 Reference Manual
Page 43
Figure 3-16. If you have already installed the printer driver, select Keep existing driver (recommended), and click on Next. Add Printer Wizard Window (Printer Name) 3-14 Microsoft Windows 95 and Windows 98 Printing Installation and Reference for naming your printer, as illustrated in Figure 3-16, opens. The Add Printer Wizard window for the Model PS104/PS105/PS110/PS113 Print Server 10. If you have not installed the driver, do so now as prompted by the screen, as illustrated in Figure 3-15.
Figure 3-16. If you have already installed the printer driver, select Keep existing driver (recommended), and click on Next. Add Printer Wizard Window (Printer Name) 3-14 Microsoft Windows 95 and Windows 98 Printing Installation and Reference for naming your printer, as illustrated in Figure 3-16, opens. The Add Printer Wizard window for the Model PS104/PS105/PS110/PS113 Print Server 10. If you have not installed the driver, do so now as prompted by the screen, as illustrated in Figure 3-15.

PS113 Reference Manual
Page 70
If your printer is not listed, click on the names of the manufacturer and printer model you received from the printer manufacturer. Install the driver, proceeding as illustrated in the Add Printer Wizard window. Figure 4-15. Click on Next after clicking on Have Disk and insert the driver disk that you are adding in Figure 4-15, opens. Add Printer Wizard Window (Printer Name) Microsoft Windows NT and Windows 2000 Printing 4-13 Installation and Reference for the Model PS104/PS105/PS110/PS113 Print Server 11. The Add Printer Wizard window, as instructed.
If your printer is not listed, click on the names of the manufacturer and printer model you received from the printer manufacturer. Install the driver, proceeding as illustrated in the Add Printer Wizard window. Figure 4-15. Click on Next after clicking on Have Disk and insert the driver disk that you are adding in Figure 4-15, opens. Add Printer Wizard Window (Printer Name) Microsoft Windows NT and Windows 2000 Printing 4-13 Installation and Reference for the Model PS104/PS105/PS110/PS113 Print Server 11. The Add Printer Wizard window, as instructed.

PS113 Reference Manual
Page 86
...Continue. Microsoft Windows NT and Windows 2000 Printing 4-29 Installation and Reference for the full path to the Windows NT distribution files. 6. Windows NT Setup displays a message asking for the Model PS104/PS105/PS110/PS113 Print Server 2. Table 4-2. Add a Spooled LPR Printer Fields Field Printer Name Driver Description Description Type...of the dialog box, using the definitions in the title bar of the printer window. Select TCP/IP Protocol And Related Components in the Print To entry field. Click on Other in the Network Software dialog box, and then ...
...Continue. Microsoft Windows NT and Windows 2000 Printing 4-29 Installation and Reference for the full path to the Windows NT distribution files. 6. Windows NT Setup displays a message asking for the Model PS104/PS105/PS110/PS113 Print Server 2. Table 4-2. Add a Spooled LPR Printer Fields Field Printer Name Driver Description Description Type...of the dialog box, using the definitions in the title bar of the printer window. Select TCP/IP Protocol And Related Components in the Print To entry field. Click on Other in the Network Software dialog box, and then ...

PS113 Reference Manual
Page 88
... name is L1 = P1, L2 = P2, and L3 = P3. 7. Microsoft Windows NT and Windows 2000 Printing 4-31 Reboot the computer for the changes to indicate whether or not the printer will be shared. 10. Use only the logical printer when implementing the LPR printer port on OK. 8. Click... Close when the Printer Ports window reopens, and then install your printer driver as previously configured on the print server in step 3. With this printer on the Create Printer dialog box. The configuration procedure for the Model PS104/PS105/PS110/PS113 Print Server 3. If you are using ...
... name is L1 = P1, L2 = P2, and L3 = P3. 7. Microsoft Windows NT and Windows 2000 Printing 4-31 Reboot the computer for the changes to indicate whether or not the printer will be shared. 10. Use only the logical printer when implementing the LPR printer port on OK. 8. Click... Close when the Printer Ports window reopens, and then install your printer driver as previously configured on the print server in step 3. With this printer on the Create Printer dialog box. The configuration procedure for the Model PS104/PS105/PS110/PS113 Print Server 3. If you are using ...

PS113 Reference Manual
Page 140
... Installation and Reference for the Model PS104/PS105/PS110/PS113 Print Server Configuring Using PSCONFIG This section of the screen. The network number shown is the NetWare IPX network number that can be customized. A second popup window with the Available Options headline appears in the lower-...the NET.CFG file for various network parameters such as packet type. • DOS ODI driver for more detailed configuration of the print servers on the Available Options window. To start the PSCONFIG program, execute it from the \DOS directory of the various parameters on the...
... Installation and Reference for the Model PS104/PS105/PS110/PS113 Print Server Configuring Using PSCONFIG This section of the screen. The network number shown is the NetWare IPX network number that can be customized. A second popup window with the Available Options headline appears in the lower-...the NET.CFG file for various network parameters such as packet type. • DOS ODI driver for more detailed configuration of the print servers on the Available Options window. To start the PSCONFIG program, execute it from the \DOS directory of the various parameters on the...
PS113 Reference Manual
Page 165
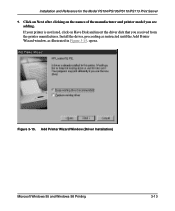
...Port name on the Print Server (for Windows 95, Windows 98, Windows NT 4, and Windows 2000. The new printer agent will now appear in Figure D-3. Click Finish; then select appropriate drivers for example, L1). Configure Port Handler Window 10. For devices with ...window. Note: For print servers with two or three parallel ports, the logical ports are named L1, L2, and L3. Figure D-3. D-4 Using NetWare 5 NDPS In the Host Address IP field, enter the IP address previously assigned to L8. 11. Installation and Reference for the Model PS104/PS105/PS110/PS113 Print Server...
...Port name on the Print Server (for Windows 95, Windows 98, Windows NT 4, and Windows 2000. The new printer agent will now appear in Figure D-3. Click Finish; then select appropriate drivers for example, L1). Configure Port Handler Window 10. For devices with ...window. Note: For print servers with two or three parallel ports, the logical ports are named L1, L2, and L3. Figure D-3. D-4 Using NetWare 5 NDPS In the Host Address IP field, enter the IP address previously assigned to L8. 11. Installation and Reference for the Model PS104/PS105/PS110/PS113 Print Server...

PS113 Reference Manual
Page 166
...PS113 Print Server Workstation Configuration Before installation and configuration of the Public Access Printers on your workstation, ensure that the following statements apply: • Novell IntranetWare Client v2.2 (or later) is now available for print jobs. Select Printer>New from the server as required. Click on Install. 4. Printer drivers...have access to the Novell Printer Manager utility (Nwpmw32.exe). The printer is now in the main Printer Manager window under the Name listing and is installed on Add. 3. Installing and Configuring the Public Access Printers To...
...PS113 Print Server Workstation Configuration Before installation and configuration of the Public Access Printers on your workstation, ensure that the following statements apply: • Novell IntranetWare Client v2.2 (or later) is now available for print jobs. Select Printer>New from the server as required. Click on Install. 4. Printer drivers...have access to the Novell Printer Manager utility (Nwpmw32.exe). The printer is now in the main Printer Manager window under the Name listing and is installed on Add. 3. Installing and Configuring the Public Access Printers To...
