

FA410 Installation Guide
Page 2
Verify Package Contents 2. Start Here Instructions in your Model FA410TX Network Card: 1. Model FA410TX Network Card Installation Giude Install the Network Card 3. Connect the Network Cables As a last step, be sure to "Install the Windows 95 Network Driver" on installing and verifying the Windows 95 network driver, refer to fill out and send in this guide. For instructions on the other side of...
Verify Package Contents 2. Start Here Instructions in your Model FA410TX Network Card: 1. Model FA410TX Network Card Installation Giude Install the Network Card 3. Connect the Network Cables As a last step, be sure to "Install the Windows 95 Network Driver" on installing and verifying the Windows 95 network driver, refer to fill out and send in this guide. For instructions on the other side of...
FA410 Installation Guide
Page 3
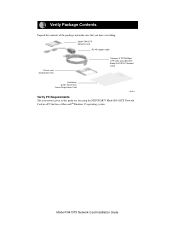
Model FA410TX Network Card RJ-45 adapter cable Drivers and Diagnostics Disk Category 5 10/100 Mbps UTP cable (provided with Model FA410TXC Network Card) Installation guide, Warranty & Owner Registration Card 8085FA Verify PC Requirements The instructions given in this guide are for using the NETGEAR™ Model FA410TX Network Card in a PC that you have everything. Model FA410TX Network Card Installation Giude Verify Package Contents Unpack the contents of the package and make sure that has a Microsoft® Windows 95 operating system.
Model FA410TX Network Card RJ-45 adapter cable Drivers and Diagnostics Disk Category 5 10/100 Mbps UTP cable (provided with Model FA410TXC Network Card) Installation guide, Warranty & Owner Registration Card 8085FA Verify PC Requirements The instructions given in this guide are for using the NETGEAR™ Model FA410TX Network Card in a PC that you have everything. Model FA410TX Network Card Installation Giude Verify Package Contents Unpack the contents of the package and make sure that has a Microsoft® Windows 95 operating system.
FA410 Installation Guide
Page 7
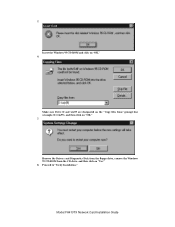
.... If you do not have the Windows 95 CD-ROM and the FA410TX Drivers and Diagnostics Disk ready to use in the instructions. Model FA410TX Network Card Installation Giude All versions of this guide) before installing the network driver. Therefore, windows that are using the Windows 95 floppy disks,...open but prompt you for the same information, and windows might not respond with instructions for each PC (each name must install the network card (instructions on "OK." message appears at any time during the installation process, insert the Windows 95 CD-ROM in the instructions....
.... If you do not have the Windows 95 CD-ROM and the FA410TX Drivers and Diagnostics Disk ready to use in the instructions. Model FA410TX Network Card Installation Giude All versions of this guide) before installing the network driver. Therefore, windows that are using the Windows 95 floppy disks,...open but prompt you for the same information, and windows might not respond with instructions for each PC (each name must install the network card (instructions on "OK." message appears at any time during the installation process, insert the Windows 95 CD-ROM in the instructions....

FA410 Installation Guide
Page 8
Make sure Drive A is designated on "OK." 2. Select "Driver from disk provided by hardware manufacturer," and then click on the prompt line (for example, A:\) when the "Copy manufacturer's files from...." message is automatically loaded. Click on "OK." OK Click on "OK." 3. Model FA410TX Network Card Installation Giude 1. Turn on the network. The new hardware is found, and the driver is displayed. Network i You must provide computer and workgroup names that will identify this computer on power to the computer and start Windows 95.
Make sure Drive A is designated on "OK." 2. Select "Driver from disk provided by hardware manufacturer," and then click on the prompt line (for example, A:\) when the "Copy manufacturer's files from...." message is automatically loaded. Click on "OK." OK Click on "OK." 3. Model FA410TX Network Card Installation Giude 1. Turn on the network. The new hardware is found, and the driver is displayed. Network i You must provide computer and workgroup names that will identify this computer on power to the computer and start Windows 95.
FA410 Installation Guide
Page 10
5. Insert the Windows 95 CD-ROM and click on "OK." 7. Make sure Drive D and win95 are designated on the "Copy files from the CD drive, and then click on "Yes." 8. Proceed to "Verify Installation." Remove the Drivers and Diagnostics Disk from the floppy drive, remove the Windows 95 CD-ROM from " prompt line (example, D:\win95), and then click on "OK." 6. Model FA410TX Network Card Installation Giude
5. Insert the Windows 95 CD-ROM and click on "OK." 7. Make sure Drive D and win95 are designated on the "Copy files from the CD drive, and then click on "Yes." 8. Proceed to "Verify Installation." Remove the Drivers and Diagnostics Disk from the floppy drive, remove the Windows 95 CD-ROM from " prompt line (example, D:\win95), and then click on "OK." 6. Model FA410TX Network Card Installation Giude
FA410 Installation Guide
Page 14
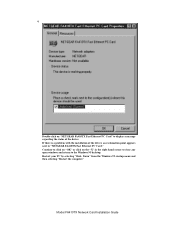
Double-click on the "X" in the right hand corner to close any open windows and return to the Windows 95 desktop. Model FA410TX Network Card Installation Giude If there is a problem with the installation of the driver, an exclamation point appears next to display a message regarding the status of the device. Continue to click on "OK" or click on "NETGEAR FA410TX Fast Ethernet PC Card" to "NETGEAR FA410TX Fast Ethernet PC Card." Down" from the Windows 95 startup menu and then selecting "Restart the computer." 4. Restart your PC by selecting "Shut-
Double-click on the "X" in the right hand corner to close any open windows and return to the Windows 95 desktop. Model FA410TX Network Card Installation Giude If there is a problem with the installation of the driver, an exclamation point appears next to display a message regarding the status of the device. Continue to click on "OK" or click on "NETGEAR FA410TX Fast Ethernet PC Card" to "NETGEAR FA410TX Fast Ethernet PC Card." Down" from the Windows 95 startup menu and then selecting "Restart the computer." 4. Restart your PC by selecting "Shut-