Instruction Manual
Page 2
... Mount the TV to a Wall 6 At a Glance 8 Main Unit 8 Remote Control 14 Battery Installation 17 Using the Remote Control 18 Connect Power 18 Using the AC Power Adapter 18 Using the DC Car Adapter 19 Basic Functions 19 Turning the Unit On and Off 19 Setting the Input Source 20 Adjusting the Volume 20 Using the Number Keypad 20 Connections 21 RF In (TV Source Mode 21 CVBS In (AV Source Mode 22 YPbPr In (YPbPr Source Mode 23 HDMI In (HDMI Source Mode...
... Mount the TV to a Wall 6 At a Glance 8 Main Unit 8 Remote Control 14 Battery Installation 17 Using the Remote Control 18 Connect Power 18 Using the AC Power Adapter 18 Using the DC Car Adapter 19 Basic Functions 19 Turning the Unit On and Off 19 Setting the Input Source 20 Adjusting the Volume 20 Using the Number Keypad 20 Connections 21 RF In (TV Source Mode 21 CVBS In (AV Source Mode 22 YPbPr In (YPbPr Source Mode 23 HDMI In (HDMI Source Mode...

Instruction Manual
Page 3
... Playing a Disc 38 Switching to the USB or SD/MMC/MS Player 39 DVD System Menu 39 General Setup Page 40 Audio Setup Page 41 Warnings and Precautions 45 Troubleshooting 51 Specifications 53 Support 54 About Optical Discs 41 Disc Types 41 Video DVDs 42 Audio CDs 42 Picture CDs (JPEG 42 DVD Features 42 DVD Region Codes 43 Disc Care and Maintenance 43 Handling a Disc 43 Cleaning a Disc 44 www.naxa...
... Playing a Disc 38 Switching to the USB or SD/MMC/MS Player 39 DVD System Menu 39 General Setup Page 40 Audio Setup Page 41 Warnings and Precautions 45 Troubleshooting 51 Specifications 53 Support 54 About Optical Discs 41 Disc Types 41 Video DVDs 42 Audio CDs 42 Picture CDs (JPEG 42 DVD Features 42 DVD Region Codes 43 Disc Care and Maintenance 43 Handling a Disc 43 Cleaning a Disc 44 www.naxa...
Instruction Manual
Page 6
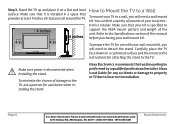
... instructions for attaching the stand to the TV. ⚠⚠Make sure power is specified to incorrect installation. Carefully place the TV face down on a flat and level surface. Make sure that your TV to a wall, you will need to the TV, ask a partner for any accidents or damage to property or TV due to support the VESA mount pattern and weight...
... instructions for attaching the stand to the TV. ⚠⚠Make sure power is specified to incorrect installation. Carefully place the TV face down on a flat and level surface. Make sure that your TV to a wall, you will need to the TV, ask a partner for any accidents or damage to property or TV due to support the VESA mount pattern and weight...
Instruction Manual
Page 7
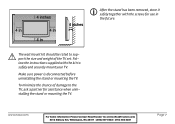
Follow the instructions supplied with the screws for use in the future. ⚠⚠The wall mount kit should be rated to support the size and weight of damage to the TV, ask a partner for assistance when uninstalling the stand or mounting the TV. Make sure power is disconnected before uninstalling the stand or mounting the TV. LLAfter the stand has been removed, store it safely together...
Follow the instructions supplied with the screws for use in the future. ⚠⚠The wall mount kit should be rated to support the size and weight of damage to the TV, ask a partner for assistance when uninstalling the stand or mounting the TV. Make sure power is disconnected before uninstalling the stand or mounting the TV. LLAfter the stand has been removed, store it safely together...
Instruction Manual
Page 9
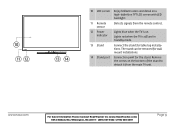
... in Standby mode. Connect the stand for wall mount installations. Remove the screws on a high-definition TFT LCD screen with LED backlight. The stand can be removed for table top installations. Wilmington, NC 28411 - (800) 507-0482 / (910) 686-4281 Page 9 www.naxa.com For Sales Information Please Contact RoadTrucker Inc (www.RoadTrucker.com) 8312 Sidbury Rd.; Connection point for the stand. 10 LCD screen 11 Remote sensor 12 Power indicator 13 Stand 14 Stand post...
... in Standby mode. Connect the stand for wall mount installations. Remove the screws on a high-definition TFT LCD screen with LED backlight. The stand can be removed for table top installations. Wilmington, NC 28411 - (800) 507-0482 / (910) 686-4281 Page 9 www.naxa.com For Sales Information Please Contact RoadTrucker Inc (www.RoadTrucker.com) 8312 Sidbury Rd.; Connection point for the stand. 10 LCD screen 11 Remote sensor 12 Power indicator 13 Stand 14 Stand post...
Instruction Manual
Page 10
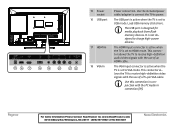
...-0482 / (910) 686-4281 Naxa Electronics The USB port is active when the TV is not designed to receive high-definition video signals with the PC Audio In connection [19]. Use the included power cable/adapter to connect the TV to USB mode. The HDMI input connector is active when the TV is designed for media playback from flash memory devices. VO LUM E CHANN EL MENU SOURCE P OW E R POW ER IN...
...-0482 / (910) 686-4281 Naxa Electronics The USB port is active when the TV is not designed to receive high-definition video signals with the PC Audio In connection [19]. Use the included power cable/adapter to connect the TV to USB mode. The HDMI input connector is active when the TV is designed for media playback from flash memory devices. VO LUM E CHANN EL MENU SOURCE P OW E R POW ER IN...
Instruction Manual
Page 11
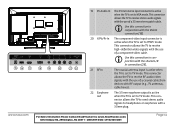
... In connection [18]. 20 Y/Pb/Pr In The component video input connector is active when the TV is set to VGA mode. This connector allows the TV to TV mode. This connector allows the TV to receive high-definition video signals with RF output (e.g., TV antennas, cable boxes). 22 Earphone out The 3.5 mm earphone output is active when the TV is set to receive RF audio/video signals with the use...
... In connection [18]. 20 Y/Pb/Pr In The component video input connector is active when the TV is set to VGA mode. This connector allows the TV to TV mode. This connector allows the TV to receive high-definition video signals with RF output (e.g., TV antennas, cable boxes). 22 Earphone out The 3.5 mm earphone output is active when the TV is set to receive RF audio/video signals with the use...
Instruction Manual
Page 12
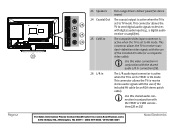
... 23 Speakers Full-range drivers deliver powerful stereo sound. 24 Coaxial Out The coaxial output is active when the TV is set to AV mode. a digital audio 25 receiver or amplifier). 25 CVBS In 24 The composite video input connector is active when the TV is 26 set to TV mode. This connector allows the TV to devices with the use of the included AV cable...
... 23 Speakers Full-range drivers deliver powerful stereo sound. 24 Coaxial Out The coaxial output is active when the TV is set to AV mode. a digital audio 25 receiver or amplifier). 25 CVBS In 24 The composite video input connector is active when the TV is 26 set to TV mode. This connector allows the TV to devices with the use of the included AV cable...
Instruction Manual
Page 15
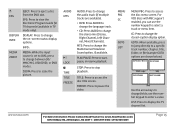
... resume playback. PLAY/PAUSE: Press to view the Electronic Program Guide for TV channels (available in TV mode only). EPG DISPLAY INFO MEDIA ZOOM EJECT: Press to access the disc menu screen. INFO: MEDIA: While the input source is set to DVD, press to change between SD/ MMC/MS, USB (DVD), or DVD modes. Use the arrow keys to change fields; DISPLAY: Press to change the on-screen status display options. MENU PBC CC GOTO LIST MENU PBC: Press to...
... resume playback. PLAY/PAUSE: Press to view the Electronic Program Guide for TV channels (available in TV mode only). EPG DISPLAY INFO MEDIA ZOOM EJECT: Press to access the disc menu screen. INFO: MEDIA: While the input source is set to DVD, press to change between SD/ MMC/MS, USB (DVD), or DVD modes. Use the arrow keys to change fields; DISPLAY: Press to change the on-screen status display options. MENU PBC CC GOTO LIST MENU PBC: Press to...

Instruction Manual
Page 19
... again. Basic Functions Using the DC Car Adapter Use the included DC car adapter to connect the unit to Standby mode after 10 minutes if no signal is detected. ⚠⚠After placing the TV in Standby mode, press POWER [9]. The power indicator [12] will automatically switch to DC power socket found on , press POWER [9]. LLTo turn off completely, disconnect the power plug. www.naxa.com For Sales Information...
... again. Basic Functions Using the DC Car Adapter Use the included DC car adapter to connect the unit to Standby mode after 10 minutes if no signal is detected. ⚠⚠After placing the TV in Standby mode, press POWER [9]. The power indicator [12] will automatically switch to DC power socket found on , press POWER [9]. LLTo turn off completely, disconnect the power plug. www.naxa.com For Sales Information...

Instruction Manual
Page 20
... connection is ac- •• Use the VOL- Press SOURCE [8] to access the input source menu, then •• Press the MUTE key on the remote to confirm the selection. To tune to track 15, for instance: 1. To go to channel 15-1, for instance: 1. Press the SOURCE key, and then use the remote control. Press the ENTER key. output completely. Setting the Input Source Adjusting the Volume Set the input source to change...
... connection is ac- •• Use the VOL- Press SOURCE [8] to access the input source menu, then •• Press the MUTE key on the remote to confirm the selection. To tune to track 15, for instance: 1. To go to channel 15-1, for instance: 1. Press the SOURCE key, and then use the remote control. Press the ENTER key. output completely. Setting the Input Source Adjusting the Volume Set the input source to change...

Instruction Manual
Page 24
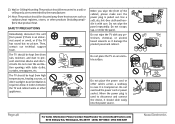
... the external AV device does not support Auto HDMI, you will have to manually set the output resolution to match the native resolution of receiving video at resolutions up to view this and any other connection. Set the source mode to HDMI to 1080p (1080-progressive). LLHDMI transmits digital audio and video signals simultaneously over a single cable. HDMI In (HDMI Source Mode) Connection for HDMI video signals. The HDMI video connection is capable of the TV set. ⚠⚠Disconnect power before making this connection on the display screen...
... the external AV device does not support Auto HDMI, you will have to manually set the output resolution to match the native resolution of receiving video at resolutions up to view this and any other connection. Set the source mode to HDMI to 1080p (1080-progressive). LLHDMI transmits digital audio and video signals simultaneously over a single cable. HDMI In (HDMI Source Mode) Connection for HDMI video signals. The HDMI video connection is capable of the TV set. ⚠⚠Disconnect power before making this connection on the display screen...

Instruction Manual
Page 27
... previous screen and to exit the menu when you are not familiar with the TV. • Select Air if you turn on the TV. Initial Setup A setup wizard menu will appear the first time you are using an antenna to match your TV ready for use the arrow keys on the remote control as indicated on screen. Menu Language Air/Cable Cable System Auto Scan Set the system menu language...
... previous screen and to exit the menu when you are not familiar with the TV. • Select Air if you turn on the TV. Initial Setup A setup wizard menu will appear the first time you are using an antenna to match your TV ready for use the arrow keys on the remote control as indicated on screen. Menu Language Air/Cable Cable System Auto Scan Set the system menu language...

Instruction Manual
Page 34
... to the Channel list. • Cable System: If the Air/Cable option is set to Cable, you are using a cable TV system. TV Channel Options Air/Cable Auto Scan The TV Channel options are only available when the source mode is set the cable system type to match your cable system type. • Start to add or remove channels from the Favorite Channels list. Mark a channel for inclusion in the Favorite Channels list. Favorite Set the antenna system that...
... to the Channel list. • Cable System: If the Air/Cable option is set to Cable, you are using a cable TV system. TV Channel Options Air/Cable Auto Scan The TV Channel options are only available when the source mode is set the cable system type to match your cable system type. • Start to add or remove channels from the Favorite Channels list. Mark a channel for inclusion in the Favorite Channels list. Favorite Set the antenna system that...
Instruction Manual
Page 35
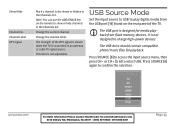
.... Channel Label DTV Signal Mark a channel to select USB. USB Source Mode Set the input source to USB to confirm the selection. The USB drive should contain compatible photo/music files for media playback from the USB port [16] found on the remote to access the input source menu, then press CH- Press SOURCE [8] to show or hide channels in the Channels list. Show/Hide Channel No. Note: You can use the ADD/ERASE key on the rear panel...
.... Channel Label DTV Signal Mark a channel to select USB. USB Source Mode Set the input source to USB to confirm the selection. The USB drive should contain compatible photo/music files for media playback from the USB port [16] found on the remote to access the input source menu, then press CH- Press SOURCE [8] to show or hide channels in the Channels list. Show/Hide Channel No. Note: You can use the ADD/ERASE key on the rear panel...

Instruction Manual
Page 41
... audio is kept in separate channels. Rear left audio is output through both left speaker; Audio Setup Page About Optical Discs Speaker Setup • Downmix > LT/RT: Rear surround audio is mixed together and output through the right speaker. Disc Types This player supports playback of the following media types and discs. Discs and media types not listed above are not supported by this unit (e.g., PC CD-ROM, CD-Extra, CD-G, CD-I, etc.) www.naxa...
... audio is kept in separate channels. Rear left audio is output through both left speaker; Audio Setup Page About Optical Discs Speaker Setup • Downmix > LT/RT: Rear surround audio is mixed together and output through the right speaker. Disc Types This player supports playback of the following media types and discs. Discs and media types not listed above are not supported by this unit (e.g., PC CD-ROM, CD-Extra, CD-G, CD-I, etc.) www.naxa...

Instruction Manual
Page 47
... or removing covers may expose you to dangerous voltage or other electric light or power circuits, or where it from the wall outlet and refer servicing to qualified service personnel under the following the operating instructions. f) when the product exhibits a distinct change in performance-this product,ask the service technician to perform safety checks to ensure that your service technician has used replacement parts...
... or removing covers may expose you to dangerous voltage or other electric light or power circuits, or where it from the wall outlet and refer servicing to qualified service personnel under the following the operating instructions. f) when the product exhibits a distinct change in performance-this product,ask the service technician to perform safety checks to ensure that your service technician has used replacement parts...
Instruction Manual
Page 48
...power cord or other appliances. Use a soft, dry, lint-free cloth and handle it is an abnormal sound or smell, or if the TV has sound but no picture. Do not place the TV on . Wall or Ceiling Mounting: The product should be mounted to disconnect and connect the device, it damage the product panel... the panel. Do not overload the power cord or power socket. 23. SAFETY PRECAUTIONS Immediately disconnect the unit from heat sources such as recommended by the manufacturer. 24. Allow 4 inches between the TV and cabinet walls or other cables across a walkway in case it with table cloths...
...power cord or other appliances. Use a soft, dry, lint-free cloth and handle it is an abnormal sound or smell, or if the TV has sound but no picture. Do not place the TV on . Wall or Ceiling Mounting: The product should be mounted to disconnect and connect the device, it damage the product panel... the panel. Do not overload the power cord or power socket. 23. SAFETY PRECAUTIONS Immediately disconnect the unit from heat sources such as recommended by the manufacturer. 24. Allow 4 inches between the TV and cabinet walls or other cables across a walkway in case it with table cloths...

Instruction Manual
Page 52
... a different picture preset, or adjust the contrast and brightness options manually in safe mode, then reset the monitor parameters to elevate it. The picture options may be improperly set beyond the maximum limit. This sort of the picture is not working. The picture looks fine but Ensure that the RF IN antenna/cable there is wavy. connection is secure. Try increasing the volume level. Turn off...
... a different picture preset, or adjust the contrast and brightness options manually in safe mode, then reset the monitor parameters to elevate it. The picture options may be improperly set beyond the maximum limit. This sort of the picture is not working. The picture looks fine but Ensure that the RF IN antenna/cable there is wavy. connection is secure. Try increasing the volume level. Turn off...

Instruction Manual
Page 54
... obtained by contacting Naxa's Customer Support Department by a Naxa Customer Support Representative. NAXA Technical Support2320 East 49th St.Vernon, CA 90058http://www.naxa.com/naxa_support/ Parts If you need spare parts, you have an RMA number provided by phone, email or using our online RMA ticketing system at the following web page. For additional assistance, please contact Naxa Technical Support. Naxa Support and Parts Product Registration Please...
... obtained by contacting Naxa's Customer Support Department by a Naxa Customer Support Representative. NAXA Technical Support2320 East 49th St.Vernon, CA 90058http://www.naxa.com/naxa_support/ Parts If you need spare parts, you have an RMA number provided by phone, email or using our online RMA ticketing system at the following web page. For additional assistance, please contact Naxa Technical Support. Naxa Support and Parts Product Registration Please...


