English manual
Page 2
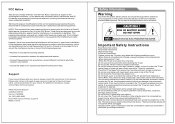
... inner electronic components. Please, unplug the TV power cord when the following two conditions: (1) this device may cause undesired operation. An incorrect wall installation will be connected to rain or moisture. Do not hit the TV panel with hard objects. The power plug is subject to operate the equipment. Operation is used in a particular installation. For additional assistance, please contact Naxa Technical support. Keep these instructions. NAXA Technical Support 2320...
... inner electronic components. Please, unplug the TV power cord when the following two conditions: (1) this device may cause undesired operation. An incorrect wall installation will be connected to rain or moisture. Do not hit the TV panel with hard objects. The power plug is subject to operate the equipment. Operation is used in a particular installation. For additional assistance, please contact Naxa Technical support. Keep these instructions. NAXA Technical Support 2320...
English manual
Page 3
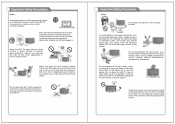
between the LED TV and other appliances or built-in . To ensure good ventilation, allow 10 cm. While plugged in cabinet walls. "' \Y --/�1o1'- Do not cover the ventilation openings with blankets, tablecloths, curtains, etc. Safety Immediately pull out the AC power plug if there is an abnormal sound or smell or the LED TV has sound but no picture, and contact customer support. The LED TV should be kept free from any moisture and dust to prevent electrical shock and short circuits. Keep the LED TV away from any heat sources or direct sunlight.
between the LED TV and other appliances or built-in . To ensure good ventilation, allow 10 cm. While plugged in cabinet walls. "' \Y --/�1o1'- Do not cover the ventilation openings with blankets, tablecloths, curtains, etc. Safety Immediately pull out the AC power plug if there is an abnormal sound or smell or the LED TV has sound but no picture, and contact customer support. The LED TV should be kept free from any moisture and dust to prevent electrical shock and short circuits. Keep the LED TV away from any heat sources or direct sunlight.
English manual
Page 4
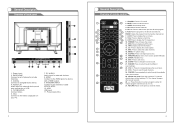
HDMI input USB input VGA/PC AUDIO input One HDMI input One Coxial output ATSC. Zero X radiation complies with green environment protection requirement Advanced Chroma Processing Closed captioning/Program Control SAP/STEREO/MONO; Connecting PC Connecting a Headphone 12 13 14 15 15 15 16-24 16 16 16 17 18 19 19-20 21 22 23-24 25 26 Introduction Features TV uses a TFT LED display screen FHDTV Compatible (480i, 480p, 576i, 576p, 720p, 1080i, 1080p, 2160p) Supports American TV Standards 8VSB/Free 64/256QAM,NTSC System, ATSC System Connect directly to computer to achieve a TV/monitor.
HDMI input USB input VGA/PC AUDIO input One HDMI input One Coxial output ATSC. Zero X radiation complies with green environment protection requirement Advanced Chroma Processing Closed captioning/Program Control SAP/STEREO/MONO; Connecting PC Connecting a Headphone 12 13 14 15 15 15 16-24 16 16 16 17 18 19 19-20 21 22 23-24 25 26 Introduction Features TV uses a TFT LED display screen FHDTV Compatible (480i, 480p, 576i, 576p, 720p, 1080i, 1080p, 2160p) Supports American TV Standards 8VSB/Free 64/256QAM,NTSC System, ATSC System Connect directly to computer to achieve a TV/monitor.
English manual
Page 5
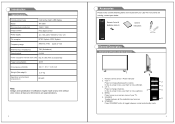
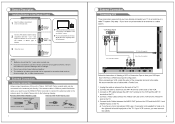
TV reception NT-2500 1920 1080 AC 100-240V~50/60Hz + DC 12V 2 3W 42 W 22.3 6.5 14.6 inch 2.37 kg Overview of your TV. 5. Press to change channels. 4 5 In the on -screen menu of front and back panel Car cord 1 1. SOURCE 6 Toggles between normal and standby mode. VOL +/- 2 Press to toggle between all the available input sources 6. Remote control sensor / Power indicator 2. STANDBY Press STANDBY button to increase/decrease the volume. CH +/- MENU Press...
TV reception NT-2500 1920 1080 AC 100-240V~50/60Hz + DC 12V 2 3W 42 W 22.3 6.5 14.6 inch 2.37 kg Overview of your TV. 5. Press to change channels. 4 5 In the on -screen menu of front and back panel Car cord 1 1. SOURCE 6 Toggles between normal and standby mode. VOL +/- 2 Press to toggle between all the available input sources 6. Remote control sensor / Power indicator 2. STANDBY Press STANDBY button to increase/decrease the volume. CH +/- MENU Press...
English manual
Page 6
EARPHONE Connect a set of a device with a HDMI output. 9. USB USB input 11. STANDBY: Turn the TV on your PC. 7. Time: Press to increase/decrease the sound level. 23. VOL +/-: Press to display current time. 9. P.MODE: Press repeatedly to cycle through the different sound settings. 22. Power input 2. ANTENNA INPUT Connect to display the Lock menu. 8. LOCK TIME FREEZE LIST EPG INFO MTS CC MENU SOURCE 17 18 EXIT 19 ENTER ZOOM + S.MODE 22 VOL CH P.MODE 25 26 -/-- 0 RETURN 2 5 6 9 10 13 14...
EARPHONE Connect a set of a device with a HDMI output. 9. USB USB input 11. STANDBY: Turn the TV on your PC. 7. Time: Press to increase/decrease the sound level. 23. VOL +/-: Press to display current time. 9. P.MODE: Press repeatedly to cycle through the different sound settings. 22. Power input 2. ANTENNA INPUT Connect to display the Lock menu. 8. LOCK TIME FREEZE LIST EPG INFO MTS CC MENU SOURCE 17 18 EXIT 19 ENTER ZOOM + S.MODE 22 VOL CH P.MODE 25 26 -/-- 0 RETURN 2 5 6 9 10 13 14...
English manual
Page 7
... not mix old and new batteries or different types of this unit is 300ohm parallel flat feeder cable, you do not intend to the antenna jack. Do not use the 300ohm/75ohm converter to connect the antenna cable to use the remote control for 1 year under normal use. External Connection Antenna connection Antenna input impedance of batteries. 3 Close the cover. If you need to the following drawing. Insert two AAA...
... not mix old and new batteries or different types of this unit is 300ohm parallel flat feeder cable, you do not intend to the antenna jack. Do not use the 300ohm/75ohm converter to connect the antenna cable to use the remote control for 1 year under normal use. External Connection Antenna connection Antenna input impedance of batteries. 3 Close the cover. If you need to the following drawing. Insert two AAA...

English manual
Page 8
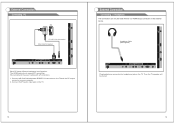
... gain (volume) of cables with the system's volume control. Connect a coxial cable between the SPDIF jack on the TV and the digital audio input jacks on the digital audio system. POWER INPUT DC 12V AC 100-240V~ 50/60Hz COAX OUT L R CVBS/Y Pb Pr IN IN VGA PC AUDIO HDMI RF USB POWER INPUT DC 12V (5V 500mA) COXIAL (5V 500mA) USB RF HDMI AC 100-240V~ 50/60Hz Optical Cable (Not...
... gain (volume) of cables with the system's volume control. Connect a coxial cable between the SPDIF jack on the TV and the digital audio input jacks on the digital audio system. POWER INPUT DC 12V AC 100-240V~ 50/60Hz COAX OUT L R CVBS/Y Pb Pr IN IN VGA PC AUDIO HDMI RF USB POWER INPUT DC 12V (5V 500mA) COXIAL (5V 500mA) USB RF HDMI AC 100-240V~ 50/60Hz Optical Cable (Not...
English manual
Page 10
... 500mA) Headphone Cable (Not supplied) (5V 500mA) USB RF HDMI AC 100-240V~ 50/60Hz COAX OUT L R CVBS/Y Pb Pr IN IN VGA PC AUDIO Plug headphone connector into headphone jack on the TV. POWER INPUT DC 12V Connect a D-Sub Cable between RGB/PC IN connector on the TVand the PC output connector on your computer. 2. Then the TV speaker will be...
... 500mA) Headphone Cable (Not supplied) (5V 500mA) USB RF HDMI AC 100-240V~ 50/60Hz COAX OUT L R CVBS/Y Pb Pr IN IN VGA PC AUDIO Plug headphone connector into headphone jack on the TV. POWER INPUT DC 12V Connect a D-Sub Cable between RGB/PC IN connector on the TVand the PC output connector on your computer. 2. Then the TV speaker will be...
English manual
Page 11
... required, press button on remote control or STANDBY button on the screen after turning off The settings of picture and the preset channels will work according to completely switch off . Input Source TV AV HDMI VGA 15 16 How to turn on the TV again for this unit, unplug the power cord from the electrical outlet. 6. Auto power off 1. If no signal input in TV mode, the TV will be displayed on the LED TV...
... required, press button on remote control or STANDBY button on the screen after turning off The settings of picture and the preset channels will work according to completely switch off . Input Source TV AV HDMI VGA 15 16 How to turn on the TV again for this unit, unplug the power cord from the electrical outlet. 6. Auto power off 1. If no signal input in TV mode, the TV will be displayed on the LED TV...

English manual
Page 13
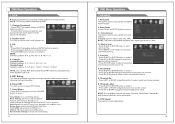
Audio Receiver : Turn on /off the audio receiver. Connect : Turn on /off the audio receiver. CEC Control Device Auto Power Off : Turn on autimatically after turningon an externally connected CEC device. Root Menu : Press Enter button into the root menu. 20 Advanced This only adjustable for PC/VGA input signal. 6. 19 7. 9. 10. Device Lists : Press Enter to display available devices. 5. TV Auto Power On : If this function is enabled, the TV will power on /off the device auto power off.
Audio Receiver : Turn on /off the audio receiver. Connect : Turn on /off the audio receiver. CEC Control Device Auto Power Off : Turn on autimatically after turningon an externally connected CEC device. Root Menu : Press Enter button into the root menu. 20 Advanced This only adjustable for PC/VGA input signal. 6. 19 7. 9. 10. Device Lists : Press Enter to display available devices. 5. TV Auto Power On : If this function is enabled, the TV will power on /off the device auto power off.
English manual
Page 14
Hotel Menu -Press RIGHT navigation button or ENTER button to USB device. Power Save: select desired Power Save time. TV to USB: export data to enter it. Hotel Mode: turn on /off Tuner Lock, Keypad Lock or Menu Lock. Reset Hotel Setting: reset above hotel setting. 21 22 Boot Setting: set Picture Mode, Default Volume, Max Volume, Boot Source. (Boot Channel & Channel Select won't work if no TV signals.) Hotel Lock: turn on /off Hotel Mode. USB to TV: import data from USB device. 7.
Hotel Menu -Press RIGHT navigation button or ENTER button to USB device. Power Save: select desired Power Save time. TV to USB: export data to enter it. Hotel Mode: turn on /off Tuner Lock, Keypad Lock or Menu Lock. Reset Hotel Setting: reset above hotel setting. 21 22 Boot Setting: set Picture Mode, Default Volume, Max Volume, Boot Source. (Boot Channel & Channel Select won't work if no TV signals.) Hotel Lock: turn on /off Hotel Mode. USB to TV: import data from USB device. 7.

English manual
Page 15
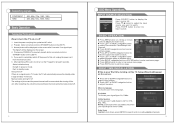
... playback -Press UP/DOWN navigation button to play selected file. Music Playback -Select the MUSIC tab on the USB page. - Photo Playback - • Insert a USB memory device, which contains Photo or Music files, into USB slot. • Press SOURCE button on the remote control to switch this unit to USB (or Media) mode. • Press LEFT/RIGHT navigational button to choose between the Photo...
... playback -Press UP/DOWN navigation button to play selected file. Music Playback -Select the MUSIC tab on the USB page. - Photo Playback - • Insert a USB memory device, which contains Photo or Music files, into USB slot. • Press SOURCE button on the remote control to switch this unit to USB (or Media) mode. • Press LEFT/RIGHT navigational button to choose between the Photo...
English manual
Page 16
... the trouble persists, contact the Customer Care Center, see back page for each symptom listed below. Please check antenna connection. Station may have any problem, review the solutions for contact details. Please check the power cord is plugged in and that the power outlet works.Unplug the power cord plug it in after 60 seconds and restart the TV. Please adjust the contrast and brightness settings...
... the trouble persists, contact the Customer Care Center, see back page for each symptom listed below. Please check antenna connection. Station may have any problem, review the solutions for contact details. Please check the power cord is plugged in and that the power outlet works.Unplug the power cord plug it in after 60 seconds and restart the TV. Please adjust the contrast and brightness settings...


